

I’ve been sewing a summer wardrobe for my granddaughter, because sewing pretty things brings me joy while we’re all under “safer at home” orders. I texted my daughter to see if she needs any baby gowns for Lila’s soon-to-be-arriving baby sister, and if so, what size she needs. Since she only has one newborn gown, and a couple of 3 months size gowns, newborn gowns are definitely on her need list!
It would have been easiest to buy a baby gown pattern, but where’s the fun and challenge in that? 🙂 Hacking the Patterns for Pirates Wee Lap Tee into a gown was simple enough. Adding 12-3/4″ to the length of the tee, and angling the pattern out from the bottom of the armscye, to 6″ wide at the bottom of both the front and back pattern pieces worked perfectly. I also curved the bottoms up slightly at the side seam.

To keep baby from accidentally scratching herself, (and to keep tiny fingers warm at night) fold-over mitten cuffs were needed. So I cut the sleeves at the normal hem cut-line and hacked some cuffs to add to them. You need two pieces of fabric 5-3/4″ high x 2-3/4″ wide, and two pieces 9-3/4 high x 2-3/4 wide. (The direction of greatest stretch is across the width.) Use 3/8″ seams to construct the cuffs, rather than the 1/2″ called for in the Wee Lap Tee pattern.
To assemble each cuff, fold the 9-3/4″ high piece (the pink fabric) in half, wrong sides together, lining up the 2-3/4″ ends . Lay it on top of a 5-3/4″ high piece (the flamingo fabric) that is right side of fabric up (but with the print upside down if using a directional fabric), aligning the 2-3/4″ ends at the top, like below left. Then carefully fold the bottom of this sandwich up, until it lines up at the top, and pin the sides, like below right.

Stitch along the two pinned sides. When you turn the cuff right sides out, the seams will be completely enclosed inside the cuff, and the mitten can be folded back as a cuff, or folded over like a mitten. It’s almost magical when you try it! 🙂

Follow the pattern tutorial for basic construction, except you will need to sew the side seams and then set-in the sleeves, rather than sewing the sleeves in flat. Personally, that is how I always sew sleeves, because I think set-in sleeves are easier and cleaner. Keep in mind that it’s easier to sew the tiny cuffs to the sleeves, by leaving the sleeve right sides together after sewing the sleeve seam. Slide the cuff inside the end of the sleeve, carefully quartering and pinning it in place. You may have to wrangle the sewing machine foot inside the cuff, and slowly sew it on. But the finish is so much more professional than having an unfinished edge on a basic cuff sewn on flat!

I also chose to finish the neck edges by binding rather than banding. But that’s because I now have a cover-stitch and seem to be binding everything I sew! 😉 I played around and did a reverse triple cover stitch on the neckline of the flamingo gown, using a variegated thread in the looper.
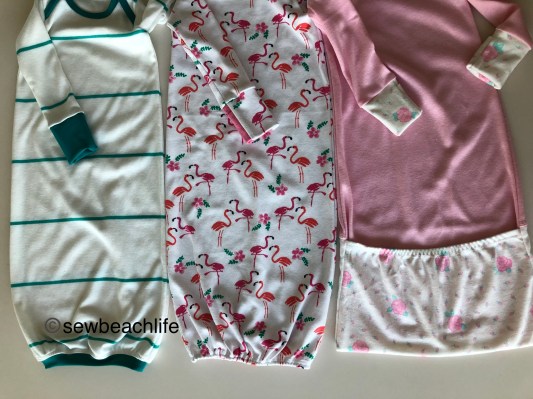
It was fun to try different methods of finishing the bottom of the gowns. The white and teal striped gown was finished with a band. It’s super important to use a fabric with excellent recovery if you want to do a band. The main fabric was some old interlock from my stash, with poor recovery, so I knew I would need to use fabric with great recovery for all the finished edges. I chose teal nylon spandex tricot from Phee Fabrics for the cuffs, binding, and band on the gown, and it worked out perfectly. The 2-1/4″ high, by 13″ wide strip was folded in half, and the short ends sewn together to make the band. The band was folded wrong sides together, and carefully pinned to the bottom of the gown at the quarter and eighths points, then sewn. The band really needs to stretch to get the bottom evenly gathered.
The flamingo gown was finished with elastic at the bottom, stitched, then turned under and top-stitched.
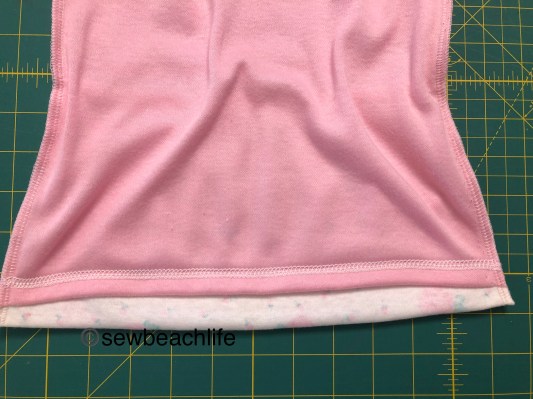
The pink gown was finished with an envelope flap. Mostly out of necessity because I didn’t have enough fabric! 🙂 The front was cut out as normal. The back was as long as I could make it. So the rosebud print fabric was folded in half, then half the opposite way, then the balance of the gown back bottom (plus seam allowance) was cut out. The gown front was hemmed. One end of the rosebud extension piece was sewn to the gown back, and the seam top stitched. The other end of the extension was slightly gathered with elastic to keep the envelope flap from being floppy. Then the elastic was folded under and top-stitched.
To complete the envelope bottom, with the gown back right side up, fold the back extension piece up, so that it is right sides together. Lay the gown front on the gown back, right sides together, and stitch the side seams.
When you turn the gown right sides out, the seam will be enclosed inside the back extension.
It felt good to use up the old cotton interlock fabric in my stash that really isn’t useful for anything other than baby and children’s clothes. The stripe, pink, and rosebud fabrics are super old, and I couldn’t begin to tell you where they were purchased. It’s pretty likely that the stores they came from are no longer in existence! The flamingo fabric came from JoAnn Fabrics a few years ago, so you may still be able to find it in their Doodles line.
I hope that you are finding joy while sewing through your fabric stash, and using patterns you may not have tried before. Being able to make something beautiful for someone who truly needs it makes me happy. I hope that sewing to help others is making you happy too!


Did you use a binder attachment? Your bindings look amazing. I just finished a golf dress with bias binding made of Lycra without an attachment. Very hard to work with since it doesn’t hold a fold , very time consuming but it looks nice. Looking for tips for binding material and methods for attaching. I also live in Florida so sleeveless is a big part of my wardrobe.
LikeLike
I serge the binding to the opening, right sides together. Then I fold the binding over and around the edge and pin in place. Then I coverstitch it.
LikeLike
Thanks
LikeLiked by 1 person