

Like many (most?) sewists, I like looking through patterns, and thinking about new clothing I can add to my wardrobe. I have eyed the GreenStyle Pace Skirt several times, and even when I’ve made bulk pattern purchases to get the discount, I’ve hesitated on the Pace Skirt because of the pleats. Pleats may seem intimidating, but you really can sew pretty pleats! I want to share some tips for making pleats, so you won’t be afraid to try this fun pattern.
The Pace Skirt has a plain front and pleated back, with optional attached briefs, or shorts with pockets! 🙂 Secret hidden pockets to carry your keys and phone? Not having to worry that a big gust of wind will come along, or that you’ll have to perform some kind of quick un-lady-like move while chasing a little one around? Sign me up please!
The pattern is drafted for a stretch woven skirt, with a stretch knit waistband and briefs/shorts. Since it can be challenging to find a stretch woven fabric, GreenStyle has a note in the directions that you can use a stretch knit by sizing the skirt portion down a size. I have learned to trust the extensive testing and excellent pattern drafting, follow my measurements, and make the recommended sizes. I like to print and tape a master copy of my patterns and trace out my size on parchment paper. That way I’ve always got my master pattern to go back to, even if my pattern pieces get torn or a bit crinkled up from use.
So here is my first tip: pay attention when you are tracing your pattern pieces. Because I was using a stretch knit, I had to remember to trace a smaller size for the skirt front, back, and upper back pieces, while using my measured size for the waistband and shorts pieces. This is also the time to lengthen or shorten the pattern pieces as needed. I am tall, so I added 1-3/8″ to the skirt length. I also used the high rise waistband pieces rather than the standard pieces. Can I just add here that I love that both rises are included in the pattern? I didn’t have to worry about adjusting the pattern to add to the rise, and those that prefer a shorter rise also have the appropriate pattern pieces.
Tip #2: Make sure that you are laying out your pattern perfectly on the grain. Grainlines and direction of greatest stretch lines are included on patterns for a very important reason. They help you line up the pattern with the fabric so that your garment will hang properly on the body. This is super important on the skirt back piece, because you will want to reference the grainline when pressing your pleats. If you cut it out on grain, it will make it so much easier to get perfect pleats. If you cut it out crooked, you will get crooked pleats if you follow the grainline while pressing.
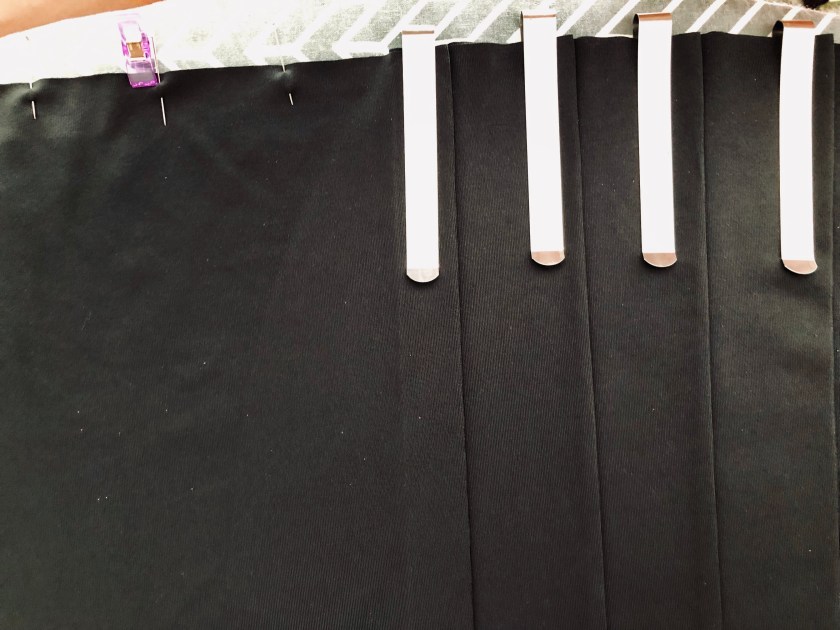
Tip #3: Mark the pleat lines on the skirt back. The pattern piece is clearly marked with how to fold your pleats, so they go from the center outwards. You could use tracing paper or a disappearing pen, but I found it easy enough to use pins and clips. I placed pins along the top of the skirt at the pleat marks. And where each pleat folded over, and the next pleat started, I also added a clip. That was my reminder of where the pleat ended. In the photo below, I’ve already pressed all the pleats on the right outward toward the right side of the skirt. (I used the metal hem guides to help hold my pleats in place while I made the folds to pleat the other half of the skirt back. You could also just use pins or clips to accomplish this.) Since I had made sure that I cut my pattern piece on the grainline, it was easy to follow the grainline to press the entire length of the pleat down to the hemline. And obviously, I need to clean my iron, because little white specks of build-up have flaked out of the steam ports! 🙂
Tip #4: When pattern directions suggest that you baste, take the time to baste! The small amount of time that it takes to baste, will save you so much more time when you are sewing your pieces together. Once all of your pleats are pressed, pin them in place so that you can baste them down before sewing on the upper back piece. Check out those pretty, pressed pleats!

By following the pattern directions, you will end up with a fun, flirty, pleated skirt! It can be casual everyday wear when paired with a simple tank top. In this case, a rayon spandex GreenStyle Staple Tank.


You can use the built-in briefs option if you prefer it when playing tennis or golf. If you’re like me and want pockets to hold your stuff while power-walking, I recommend the shorts. I love the “secret” pockets!

I also love that you can change the vibe and wear the Pace Skirt for dressier occasions by wearing a chiffon top, or adding a jacket or cardigan. This RTW top had been languishing in my closet because I didn’t really have anything to wear it with.

I am very happy with my new skirt. My husband complimented me on it, and said that he loves the pleats. ❤ Even with the built-in shorts, I don’t feel overheated because I used Phee Fabrics circular knit which is moisture-wicking and super comfortable. There’s no need to feel intimidated by pleats. If you have any questions about sewing or pleats, feel free to comment and I will try to help you out. Take your time, use my tips, follow the pattern directions, and add some cute new skirts to your closet!
*This post may contain affiliate links. This means that at no extra cost to you, I may receive a small commission if you purchase through my links. As always, I only give my honest opinion. After all, it is my blog, which represents me! Thank you for reading and supporting my love of sewing!


One thought on “Pace Skirt”