Frolic Dress Fun All Summer Long

Tips for adding support and sewing the binding

Summer clothes are so much more fun than winter clothes. They’re light and comfortable, and tend to be more colorful. Swishy sundresses that you can throw on and head out the door are a great summer look.

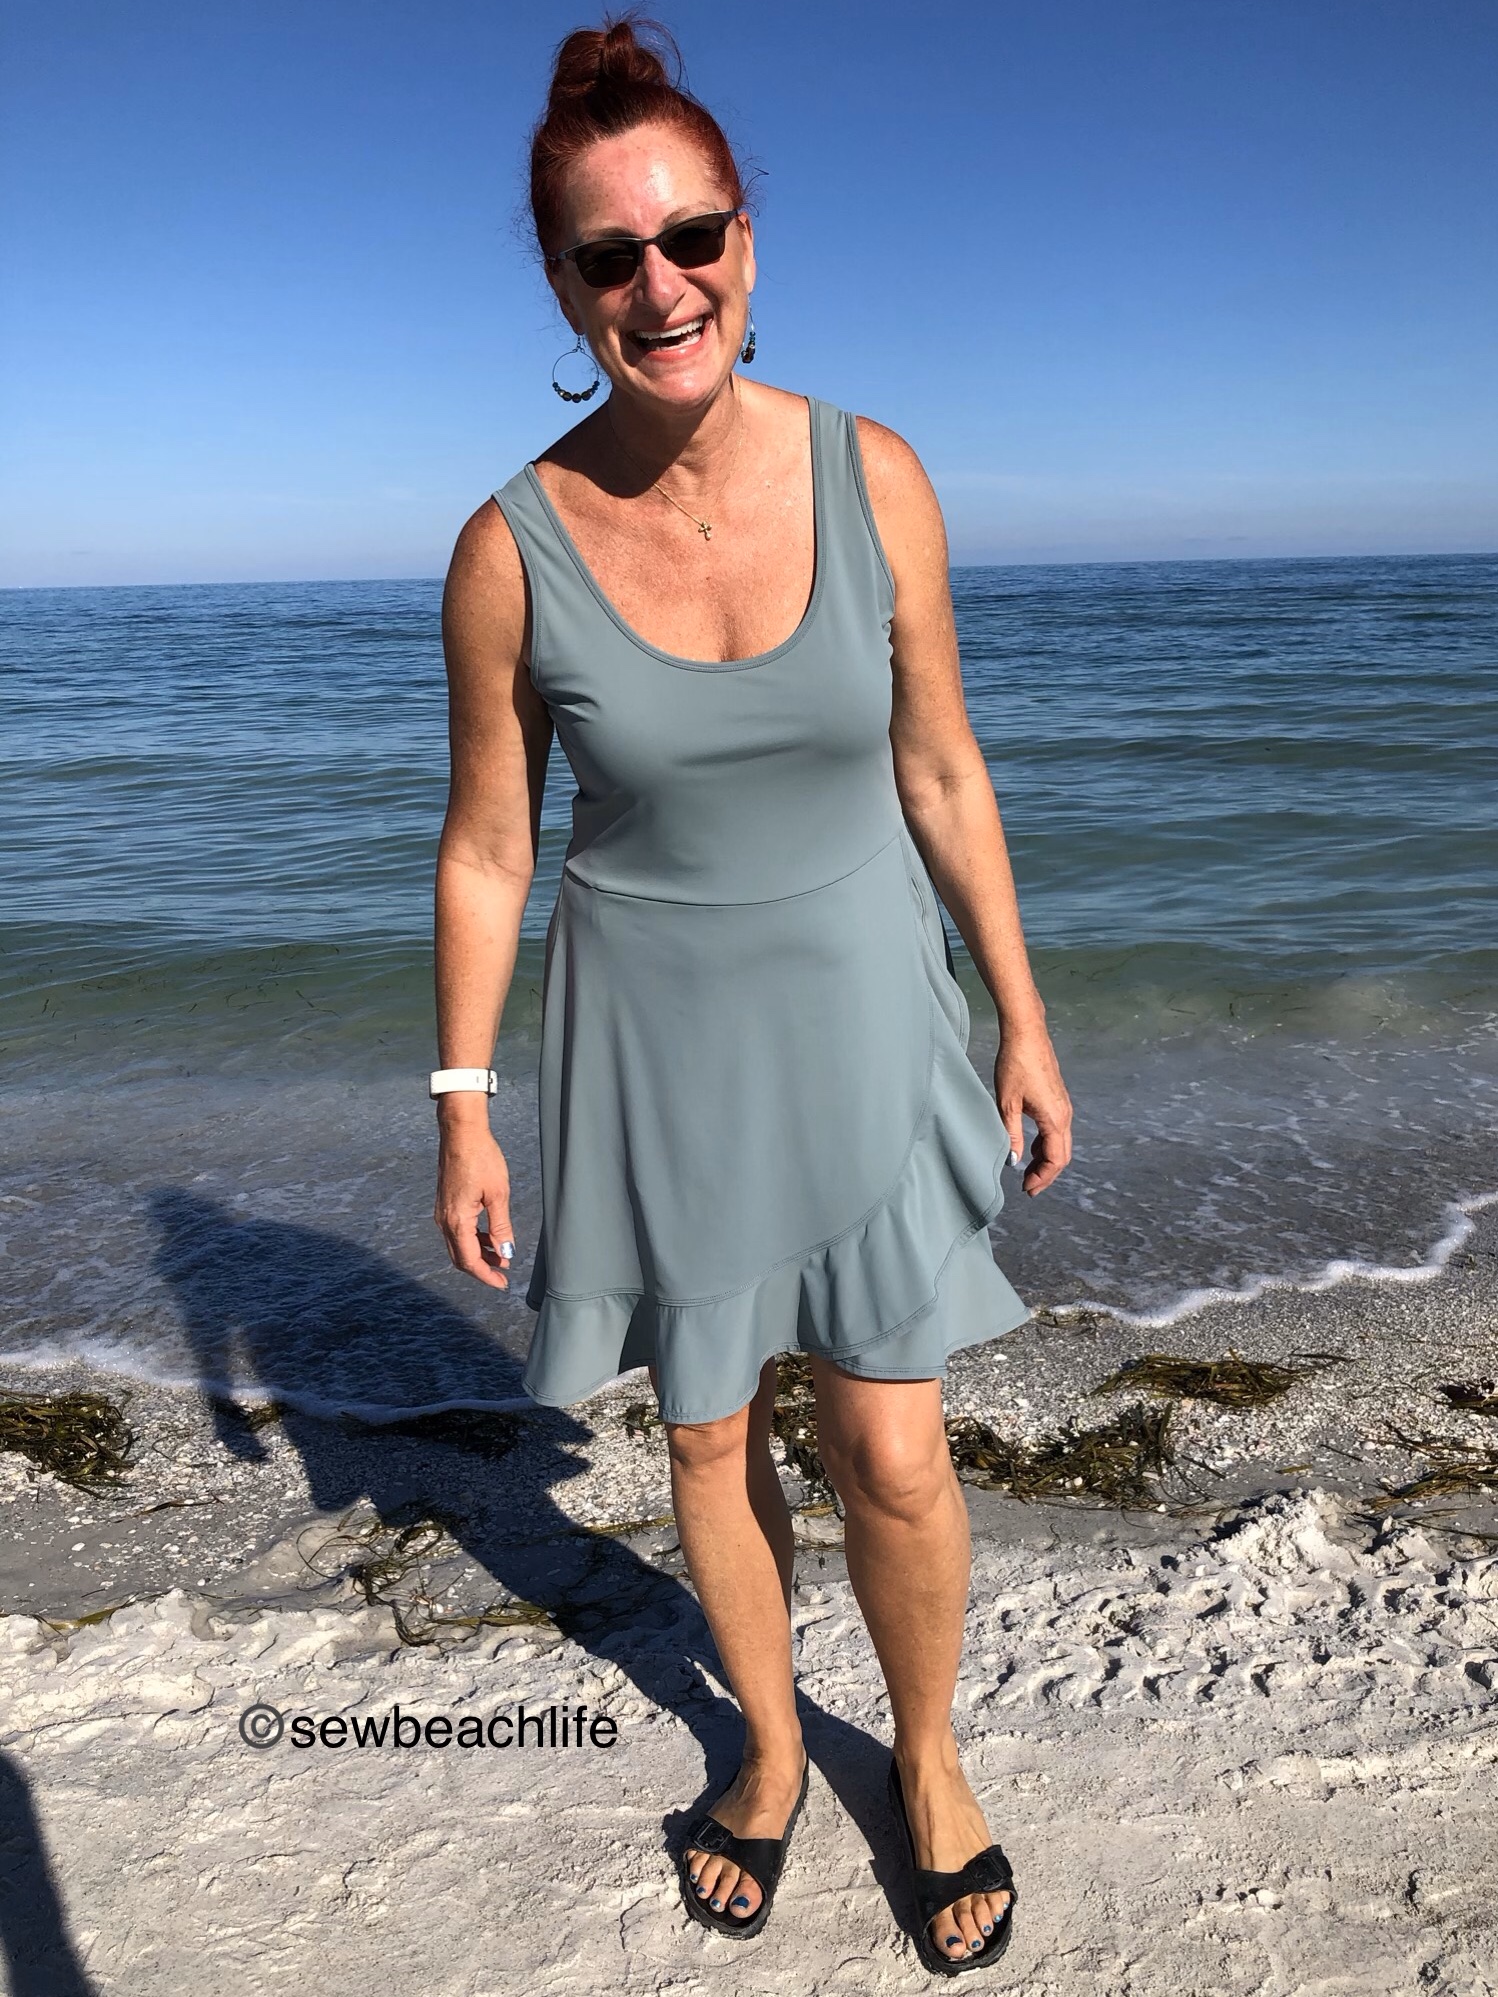
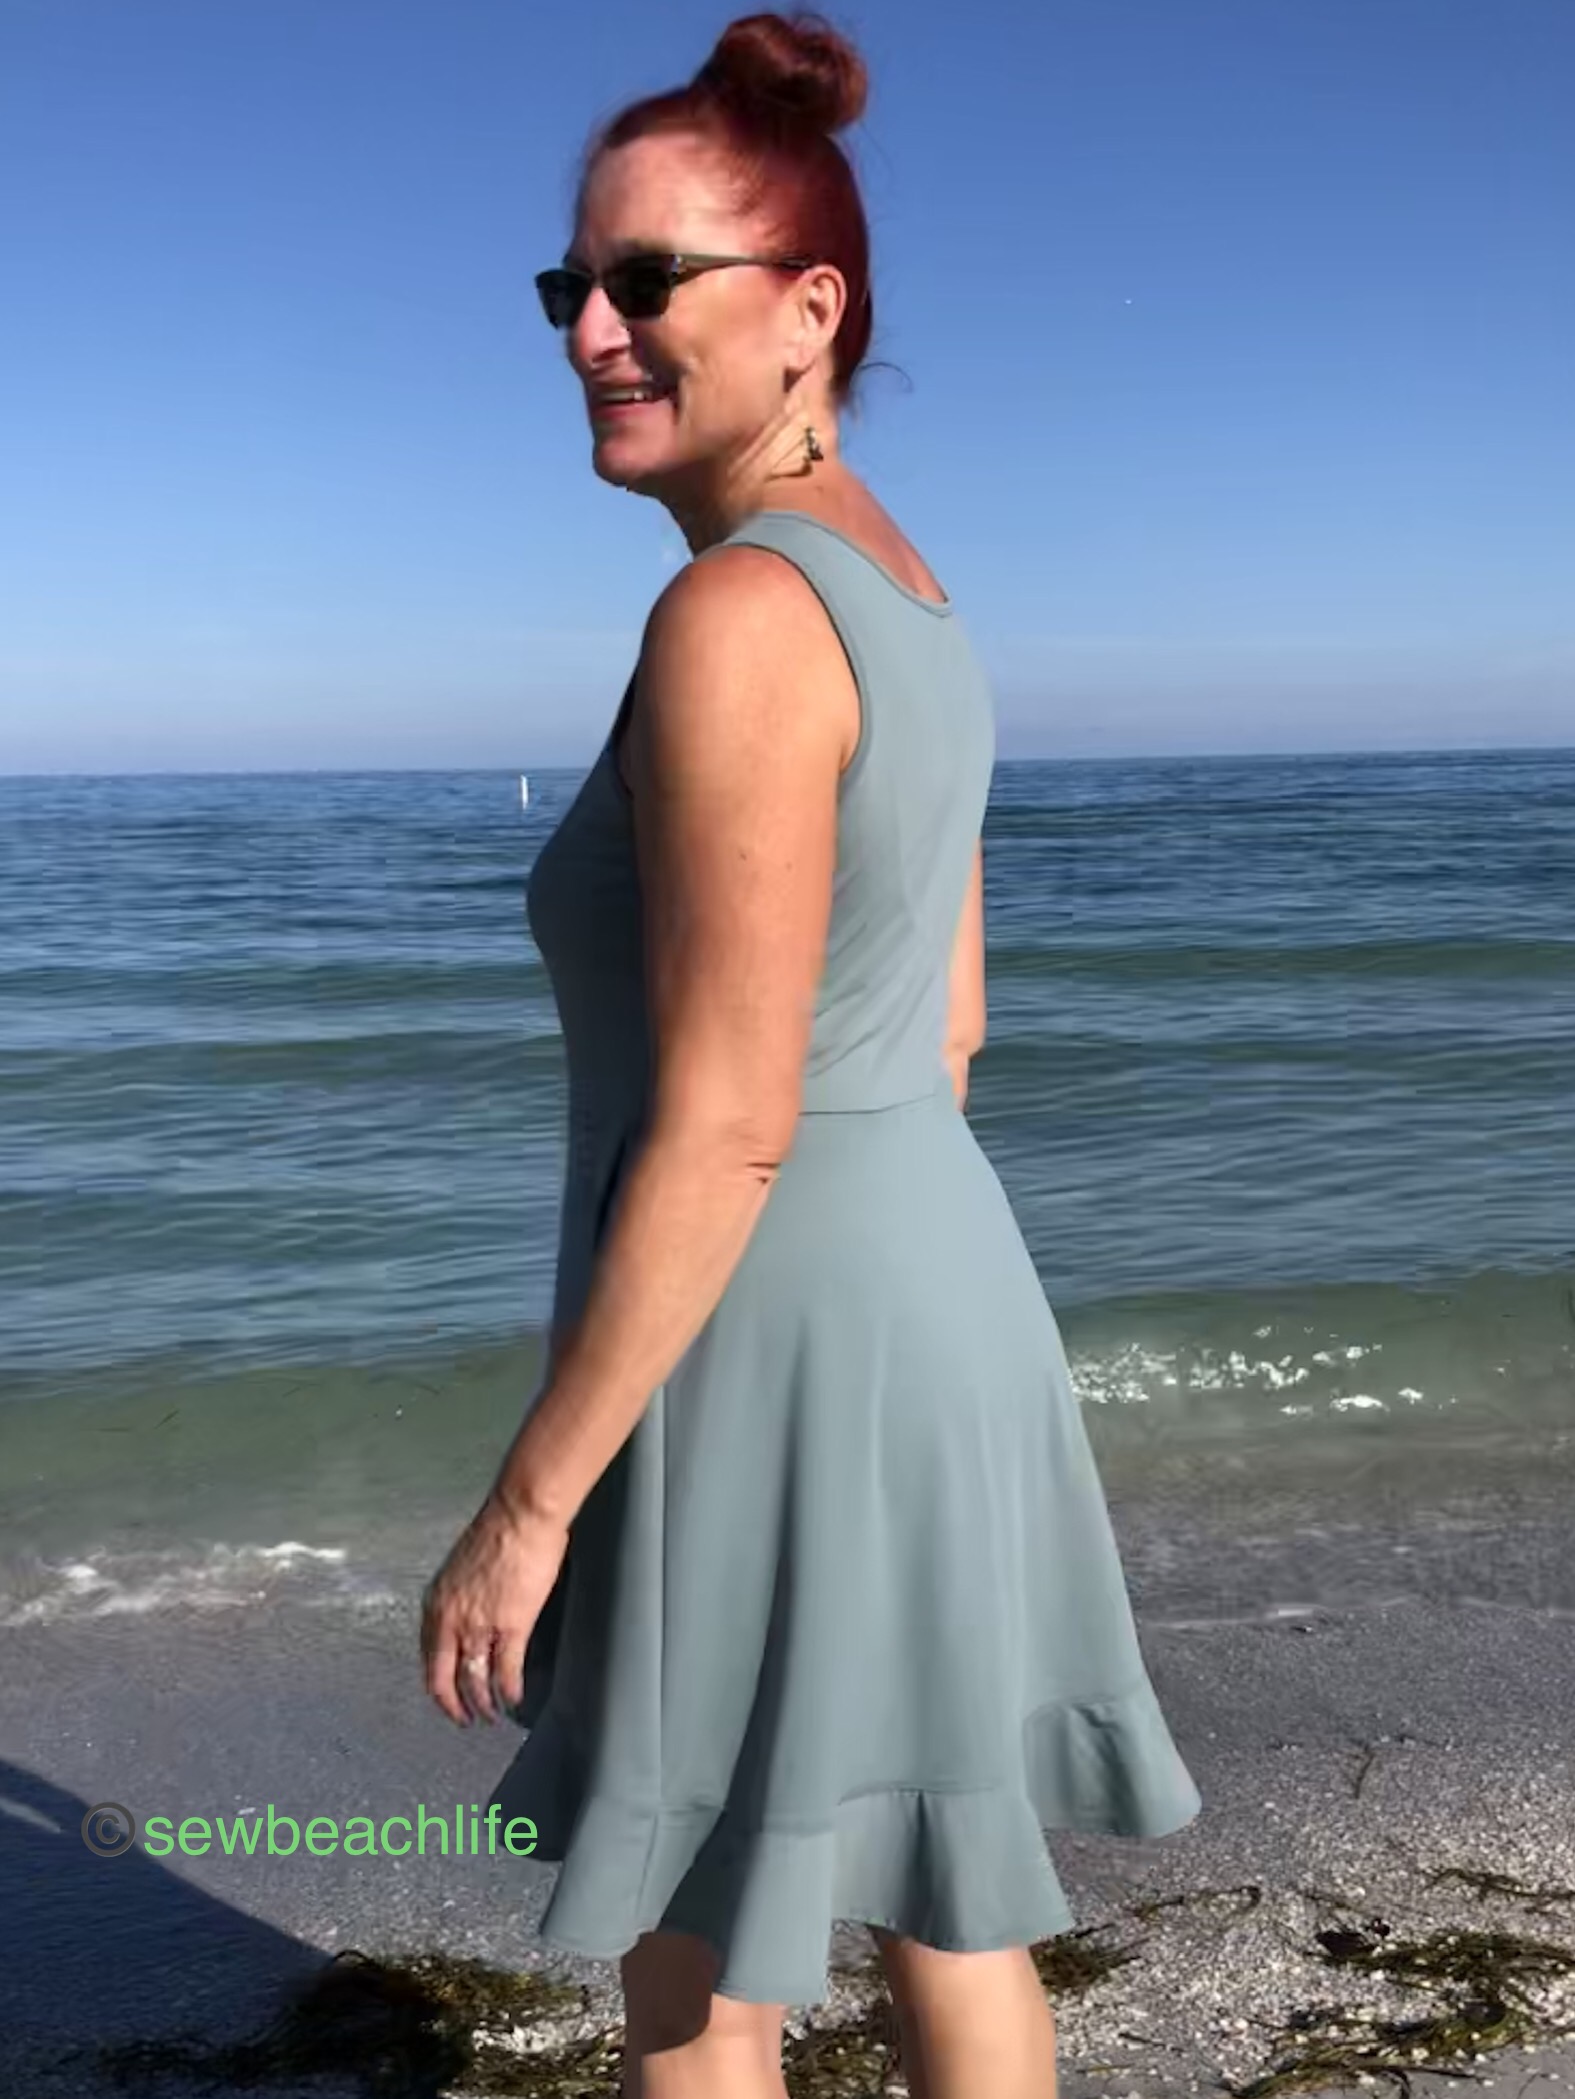
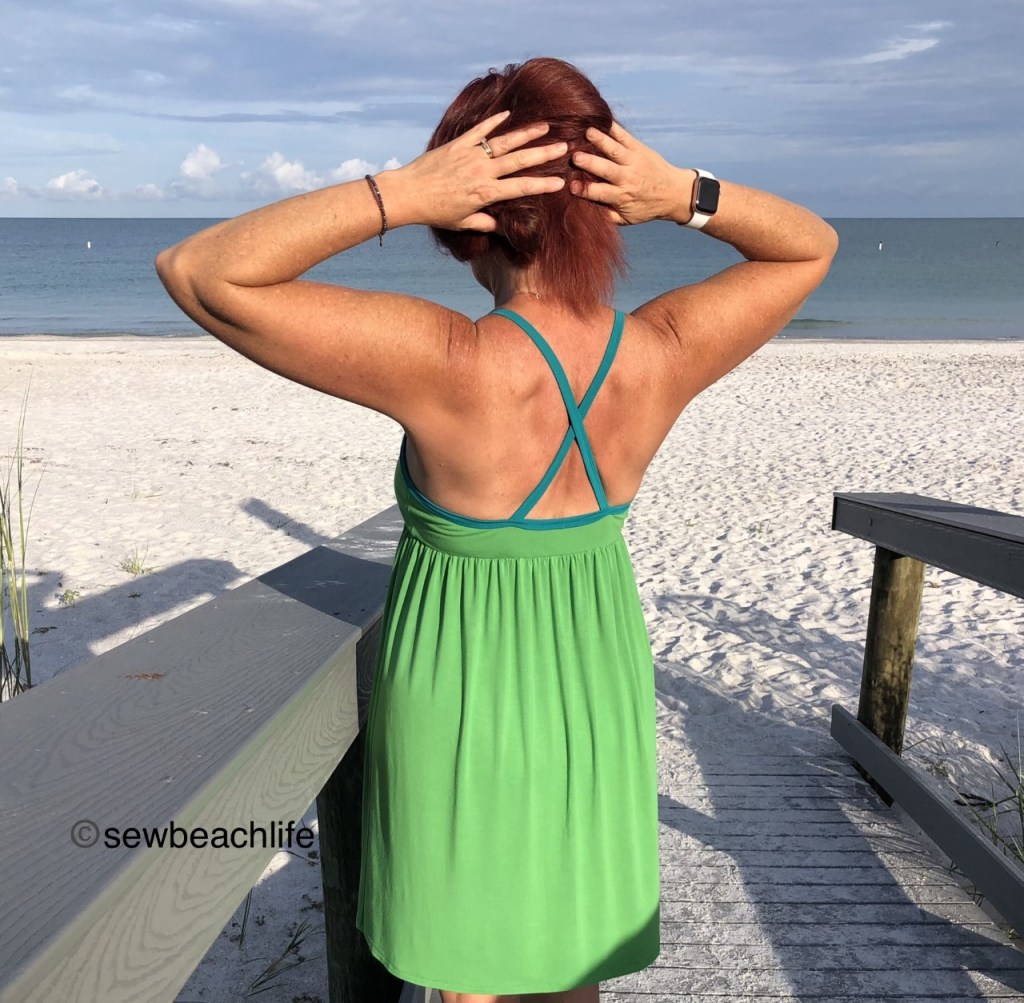
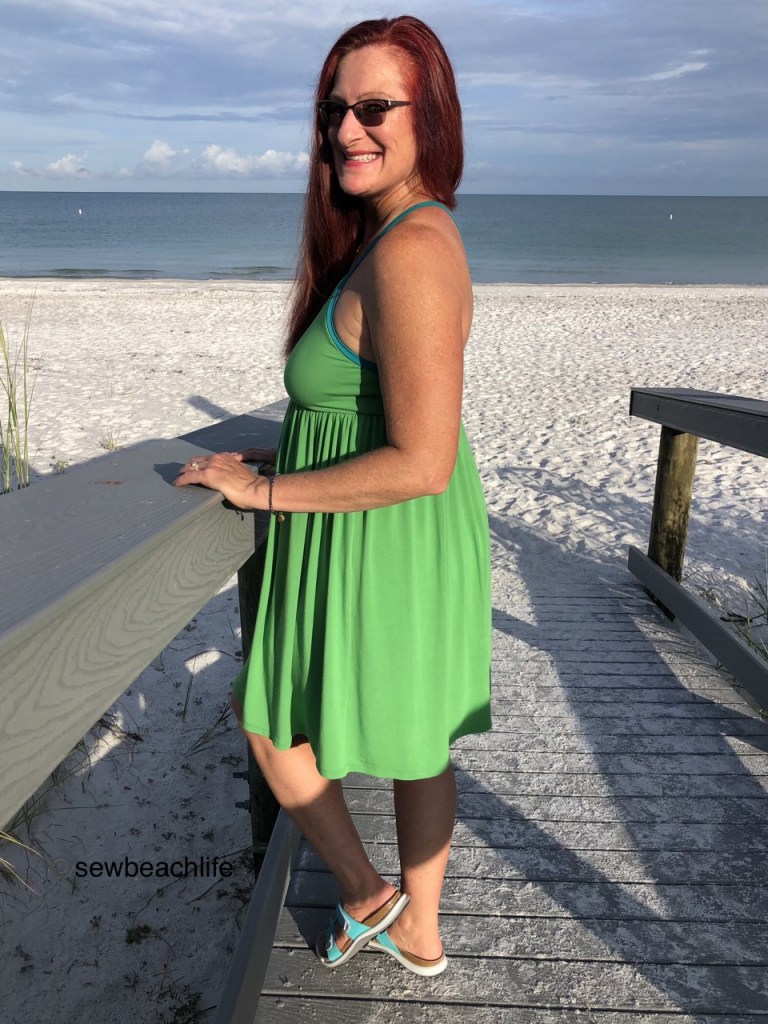
The new Frolic Romper and Dress by Stitch Upon A Time is perfect for summer breezes. The wrap around skirt is full and swishy, and the top can have a halter tie or cross back straps. Mine started out as a halter top, which I thought was really cute.

The open back of the halter, is certainly sexy (so says my husband!)

But after wearing it a while, the weight of my bust pulled on my neck too much, so I turned it into a cross back.

I love the cross-back!

I think it’s just as sexy, and it’s certainly more comfortable for my neck. The wrap skirt is perfect for skimming over the belly, without being tight or revealing.

It’s such a fun look, I can’t help but smile!

I thought it would be fun to climb up on the railing for a photo, to show the slit of the wrap around skirt. Try not to laugh at my version of a “sexy pose”. Hahahahahaha! Of course after climbing up on the railing, I had to jump down, in a perhaps not quite so lady-like fashion. 🙂

As you can see, it overlaps pretty far in the front, so there won’t be any wardrobe malfunctions!

I love the drape of high quality rayon spandex, it’s perfect for dresses. As I am not small-chested, I decided to use a nylon spandex tricot swim fabric as the inner layer on the bodice. The stronger rebound of the swim fabric gave me extra support and coverage. During testing, it was suggested to add elastic at the bottom of the bodice, sandwiched between the inner and outer layers for more support. Since I need maximum support, I used 1″ knit elastic.

To help keep the elastic in place (and give myself a guide for sewing the skirt on), I basted the main and lining layers wrong sides together, 1″ from the bottom edge of the bodice. I cut the elastic to fit snugly, yet comfortably under my bust, overlapped 1/2″, and zig-zagged the elastic to form a loop. Then I slid the elastic in between the fabric layers, and pinned at the quarter points.

I added more pins to ensure that the elastic would be evenly stretched before serging along the bottom edge.

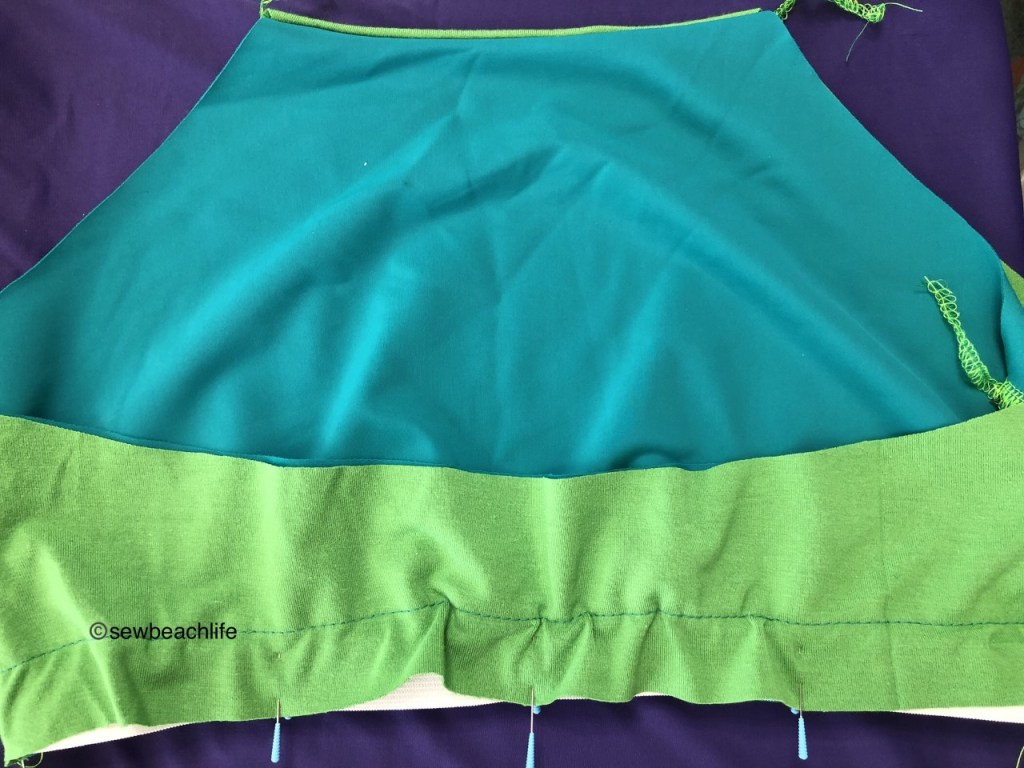
After I serged the elastic around the bottom, it was time to add the binding. Since this is a summer dress, I wanted a fun pop of color for the binding, and decided to use the same teal nylon spandex tricot as I did for the bodice lining layer. To give my bust even more support, I added clear elastic when serging the binding to the bodice.

I always serge along the unfinished edge of binding before adding it to my garments. It adds extra stability when you wrap the binding and top or coverstitch it.

Then I pressed the binding up toward the seam allowance, wrapped it around the inside and pinned it in place. Then it was time to coverstitch.

You might think I use too many pins, but, I like everything to stay perfectly in place so I can do a good job of coverstitching the first time, and not have to spend any time seam ripping!

Next came gathering the skirt. Have I mentioned that I dislike gathering? I like the look when it’s done well, but it is so time consuming to gather and pin in place! This is where that basting line above the elastic came in handy. The skirt got pinned to the bodice, right sides together, leaving the (encased) elastic below. Because I wanted to ensure that the skirt was even, I hand-basted the skirt to the bodice. Can I just mention how very grateful I am to live in this era of fancy sewing machines, sergers, and coverstitch machines? I cannot imagine how long it used to take to sew all your clothing by hand.

The hand-basting paid off with pretty perfect gathers!

While I love the result, it was a bit time consuming to sew the skirt to the bodice above the elastic, rather than just serging it on. The next time I make this dress, I plan to add an inch to the bodice lining so that I can serge the 1″ elastic on, flip it up and coverstitch it. Then I’d take an inch off the main fabric bodice so that the skirt could just be serged to the outer bodice (and still line up with the bodice lining). It’s important that the seam line falls right under the bust to give the most flattering shaping.

The Frolic Dress just screams summer!

Suffice it to say that I love this dress! It’s comfortable and flattering, while hiding my love of buttered popcorn! 🙂 It’s going to get worn all summer long. Ok, did anybody else just start singing?

The details: the Frolic Romper and Dress, along with all their other patterns and fabric are available at Stitch Upon A Time.

Technically, the cross back straps should have gone through loops, and then just tied in a bow. But I am long from shoulder to bust, and the straps didn’t seem quite long enough for a bow. And well, I like things clean and simple. So I just sewed them into place. It works for me!

I purchased the rayon spandex and nylon spandex tricot from Phee Fabrics.

The links to Stitch Upon A Time are affiliate links, which means that at no extra cost to you, I may receive a small commission if you purchase through my link. As always, I only give my honest opinion. After all, it is my blog, which represents me! Thank you for reading and sharing my love of creating, sewing, patterns, fabric, and making beautiful, well-fitting garments! ❤

Follow Me Wrap Dress

And How To Simplify Hemming The Flounce

I couldn’t resist purchasing the Pattern Emporium Follow Me Wrap Dress when it first released, even though I am not a flounce or ruffles kind of girl.  A girly girl, absolutely!  I love dresses and all sorts of womanly things.  But frills, flounces and ruffles?  Not my gig.  The pattern includes a plain wrap version, and four lengths from mini to below knee.  But the flounce version just spoke to me, and I knew a knee length sleeveless dress would be the most worn.

When I traced the pattern in my size, I originally added 2″ to the length of the skirt because a lot of my height is in my legs.  And I wanted it a flattering knee length that could also be worn to church.  Then I tried laying the pattern out.  No matter how hard I tried to Tetris the pattern pieces, I could not make them fit on a two yard cut of fabric.  After debating whether to skip the flounce, and deciding not to, I set the pattern aside for a while.

Most of the knit fabric in my stash is a one or two yard cut, depending upon the weight and intended use of the fabric.  I could have just ordered two and a half yards of fabric, but I prefer to place a larger fabric order to save on shipping costs.  Then the pandemic hit, and I kind of lost the desire to sew for myself.  I made masks for family members, and found sewing joy making clothes for my granddaughters.  It was fun to upcycle unworn clothing and to use some of the older fabric in my stash to make cute toddler and baby clothes.  Finally, it sounded fun to sew something pretty for myself.

So I pulled out the pattern and decided to just go for it as written.  I cut the added length off the traced skirt pieces, and kept the only other pattern alterations.  The seam on the back bodice bugged me, so I folded over the center back seam allowance and cut the piece on the fold instead.  To slightly widen the straps, the low round neckline was traced and cut one size smaller than the rest of the pattern.

Follow Me side

The ingenious design of the wrap means that even when taking a walk along the windy shoreline, I didn’t have to worry about accidental undie exposure.  The wrap crosses over far enough that even when the top panel is lifted by the wind, you still have full frontal coverage.

The dress feels fun and flirty, sexy and yet modest.  You can also increase the modesty factor by using the higher neckline, and adding the cap, short, flounce, or long sleeves.  The below knee length would change the look as well.

Follow Me laugh

The dress was sewn entirely on my serger, and the actual sewing time was much faster than the pinning time! 🙂  It takes more than a minute to pin all that flounce to the bottom of the skirt.  But it is such a fun touch that I definitely plan to use it on the next one.  I also figured out a way to make hemming the flounce simple and easy.

Although you may be tempted to skip hemming, especially when using a high quality knit that doesn’t curl, if I’ve taken the time to sew a nice garment, you can bet that I’m going to finish it off nicely!  Hemming curved skirts, or in this case a very curved flounce can be challenging.  When you pin the hem up, there’s all this extra fabric (due to the curve) and it can get “bunchy” and wrinkly.  But, if you serge along the bottom edge of the hem or flounce, and up the differential feed, it will very neatly, slightly “gather” the edge.  I upped the differential to 1.3 on my machine, which is one click up from N(eutral) on most of the curve.  On the more curved ends, I upped it to 1.5, which is two clicks up.

Follow Me flounce

As you can see on this inside view of the flounce, I used a four-thread overlock stitch.  The darker gray thread is my overlock, and the light gray thread is the looper thread of the coverstitched hem.  On the bottom left where the flounce has a slighter curve the 1.3 differential made slight gathers.  At the center bottom where the curve is sharper, upping the differential to 1.5 kind of gathered it a bit more, while still keeping the fabric smooth and unwrinkled.  All I had to do at that point was take it over to my ironing board and press the hem up into place.  I used a few clips to keep it in place while the fabric cooled, but it was super easy to coverstitch (or topstitch with a single or twin needle if you don’t have a coverstitch machine) at that point.

Once you start playing with a coverstitch, you tend to coverstitch everything.  The binding at the neckline and armscye was coverstitched, the hem was coverstitched, and the seam where the flounce was attached to the skirt got coverstitched.  I did not coverstitch the waist seam, because who wants to draw attention to that area? 😉

Technically, this is my “muslin” or “toile”, as I went straight to my nice nylon/spandex tricot from Phee Fabrics, rather than making a test garment.  But I know that Pattern Emporium patterns are a good fit with only minor tweaking for my body shape.  And sewing with high quality fabric is so much easier than wasting time with flimsy fabric.

I really like my dress, but as with every garment I make, I’d like to perfect it.  I’m thinking of raising the waist seam on the next one by approximately 1″ to hit closer to my natural waist.  I’m also considering going down a size in the bodice, but doing a full bust adjustment to address the wrinkling across the bust and pulling up into the armpit area.  Should I add an inch of length to the skirt to make up for the inch I plan to take out of the bodice?  Do you think I’m on the right track with a smaller size and FBA?

Follow Me back

Because I need more of these easy breezy summer dresses!  Hmmmm, maybe some soft rayon spandex for the next one?

I hope you have found your sewing joy.  But if you’re struggling, take the time to breathe deeply, then dive back in to a project that sounds fun to you. ❤