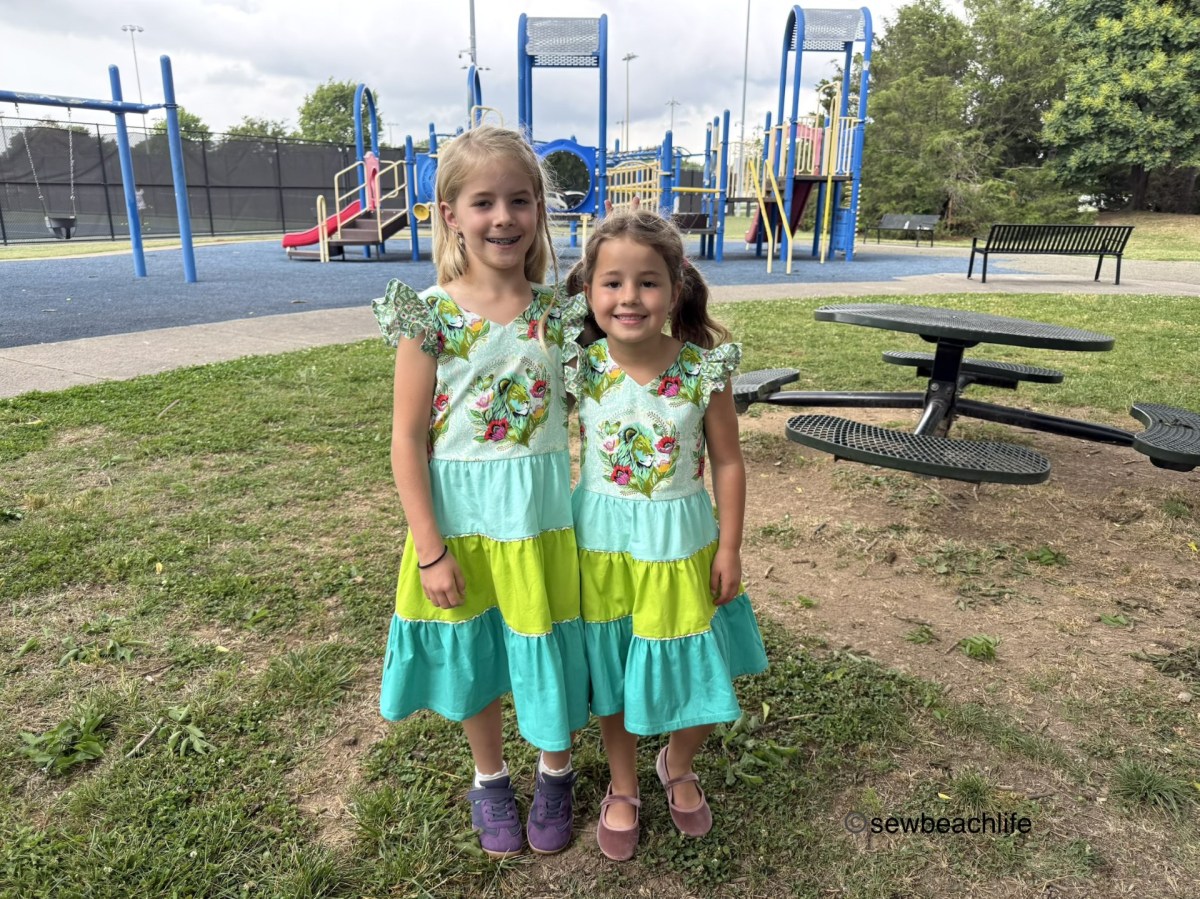
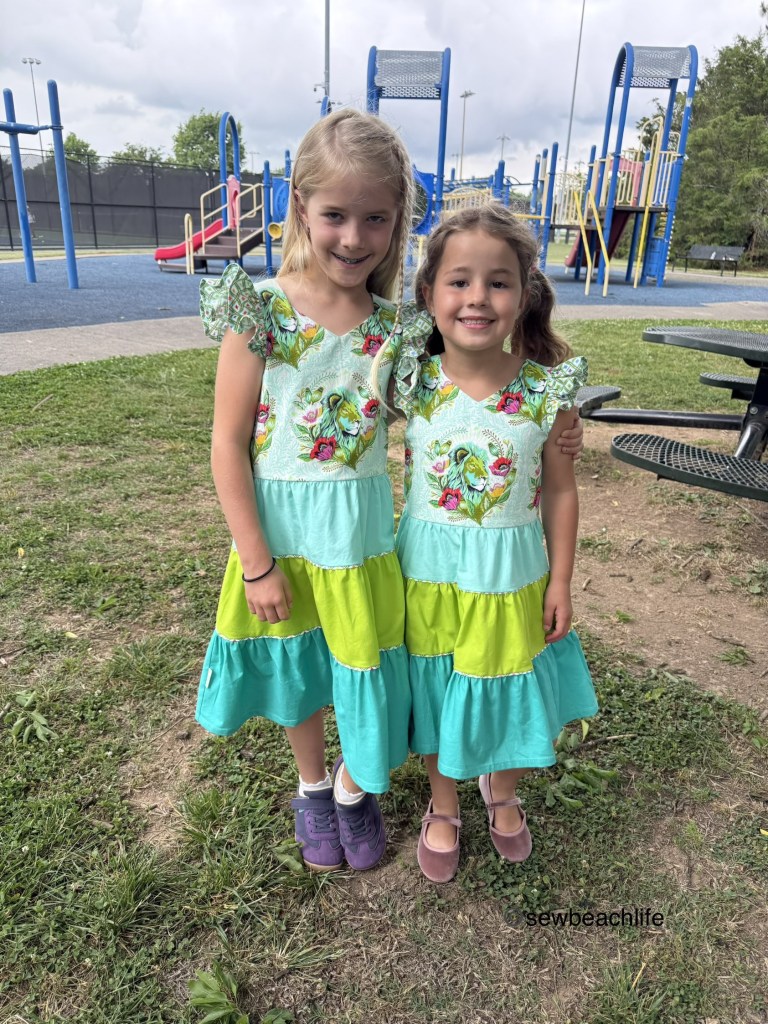
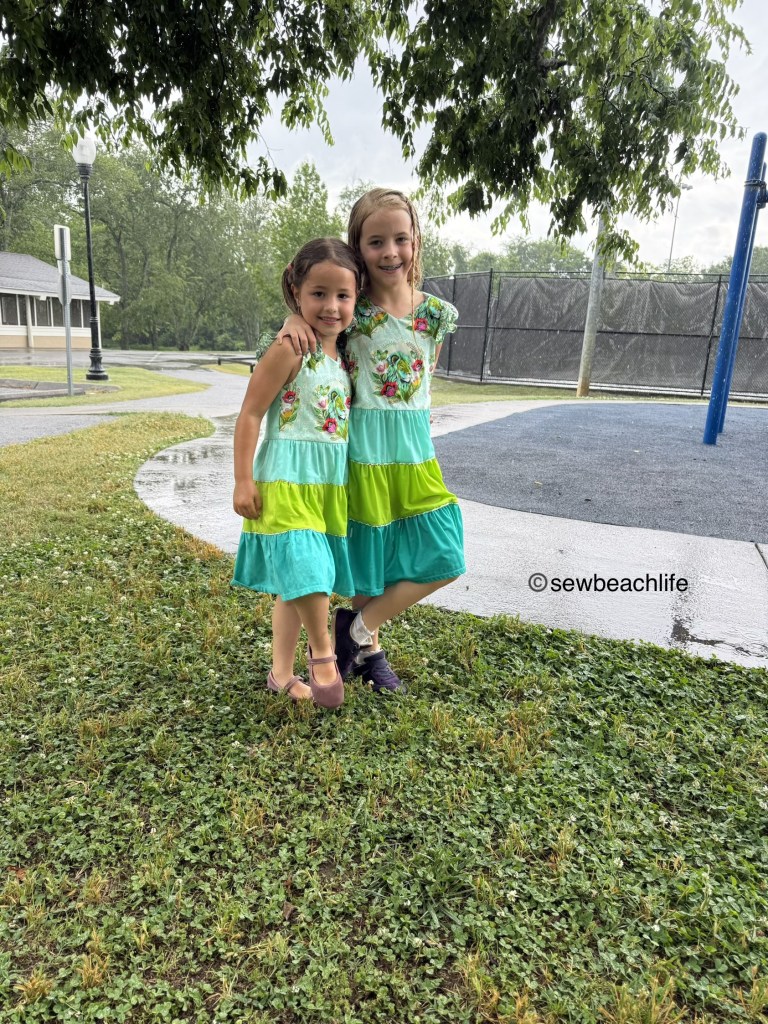
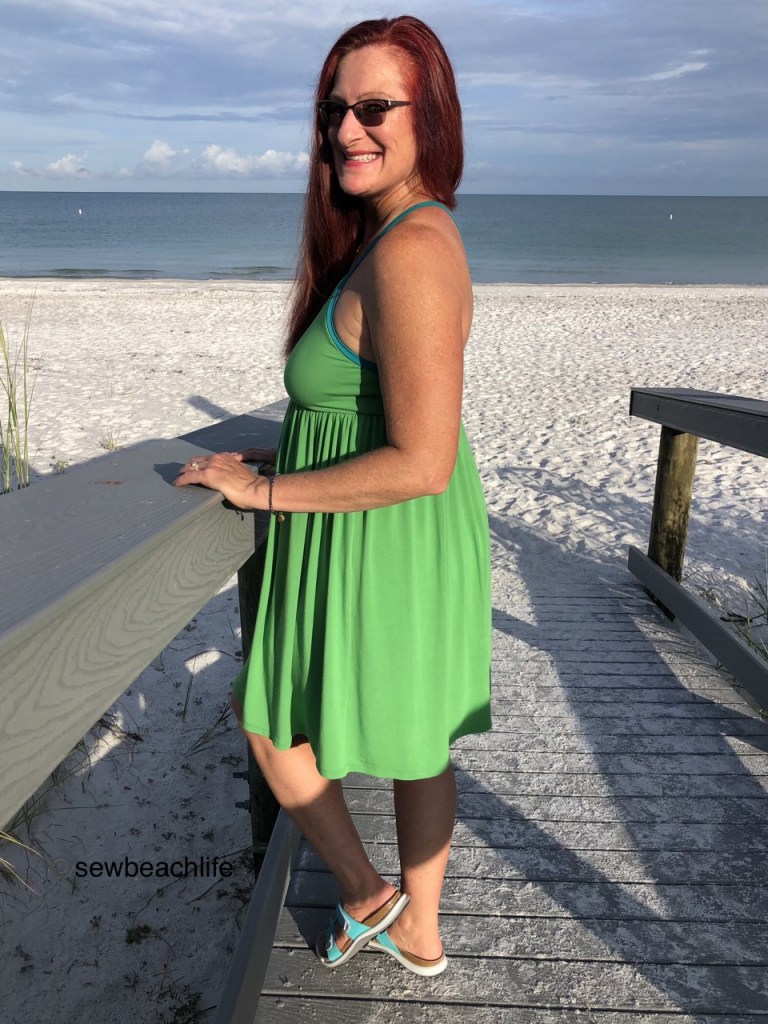
I’ve gotten into the habit of making my granddaughters matching dresses for their birthdays. On occasion only the birthday girl has gotten a dress, like the year the youngest wanted a “pink princess dress”, and I only had a limited amount of the fancy, flower and sequin-encrusted tulle. The elder girl got a simpler outfit. But usually they get matching dresses. Sometimes the dresses have matched the theme of their party, and other times the girls have requested what they wanted.
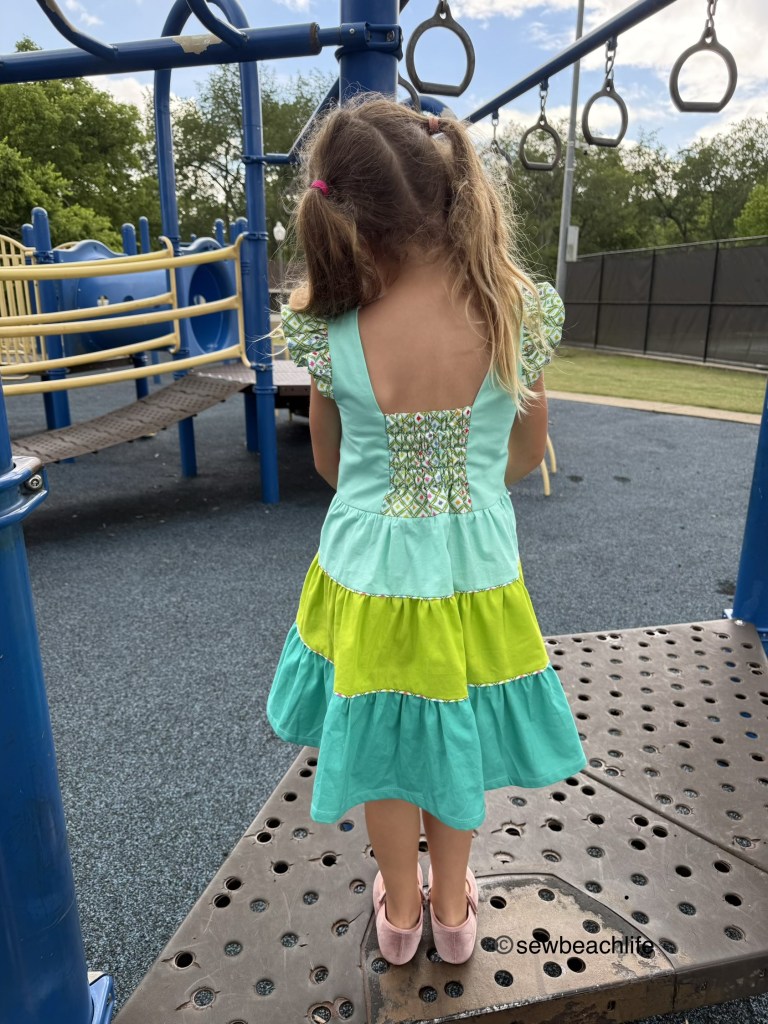
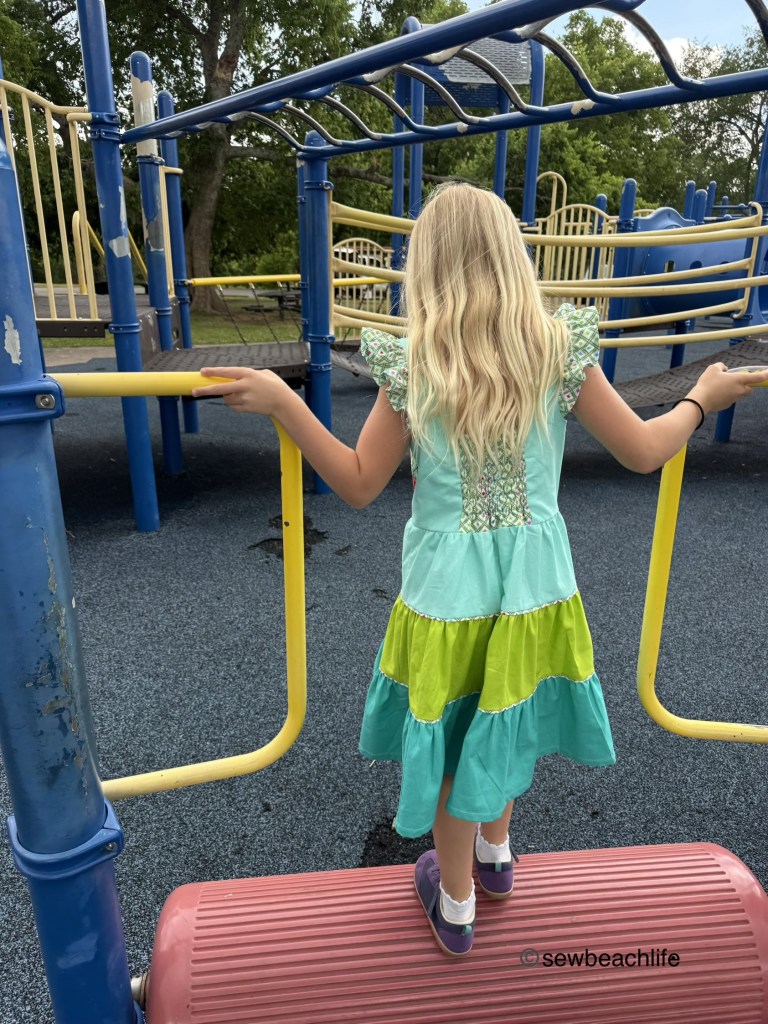
This year when asked, the soon-to-be-six-year old said, “I like it when Grandma surprises us!” In the past they’ve sometimes drawn a picture of a dress that they want Grandma to make. Maybe six or eight months ago, they drew a picture of a dress with a tiered skirt in multiple colors, with ruffles at the shoulders in rainbow stripes. At the time, I didn’t have fabric that would work for that vision, and they kind of forgot about it.
Well, when I bought fabric for my second quilt, as a novice, I of course had no clue how much yardage to buy. (I like modern quilts, so I use yardage rather than charm packs or jelly rolls). Anyway, I had plenty of fabric left over from my quilt, and it kind of fit into the drawing they had made of the colorful tiered dress they wanted. So I got to work.
I used the Little Lizard King Aarhus Dress for the bodice, hacking it to have the Mackinac Island neckline in the front. Then I made up the tiered skirts, adding one and a half times the width for each successive tier. The size 6 dress had a skirt with tiers of two pieces at 5″x 21″, 6″x 31-1/2″, and 7-1/2″x 47″. The bottom tier has a bit more length since it is hemmed. The size 8 dress had tiers of two pieces at 6″x 21″, 7″x 32″, and 8-1/2″x 47″. The 8 year old is slim, so her bodice was size 7 width and 8 length. Honestly, she could have fit into the size 6 bodice.
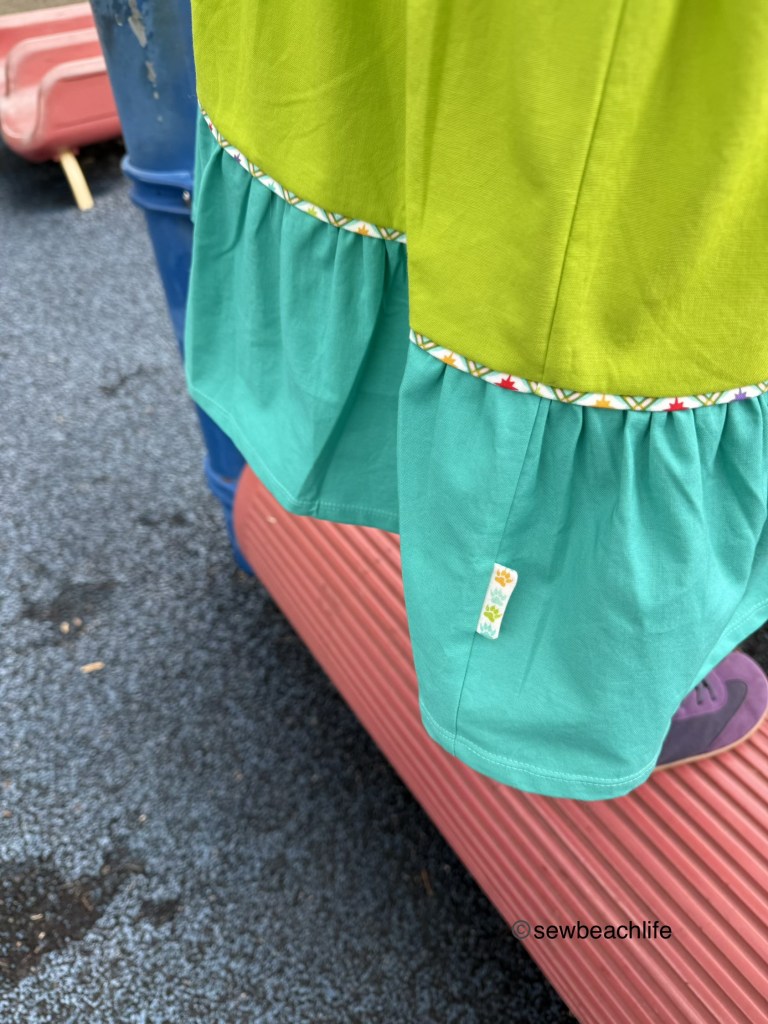
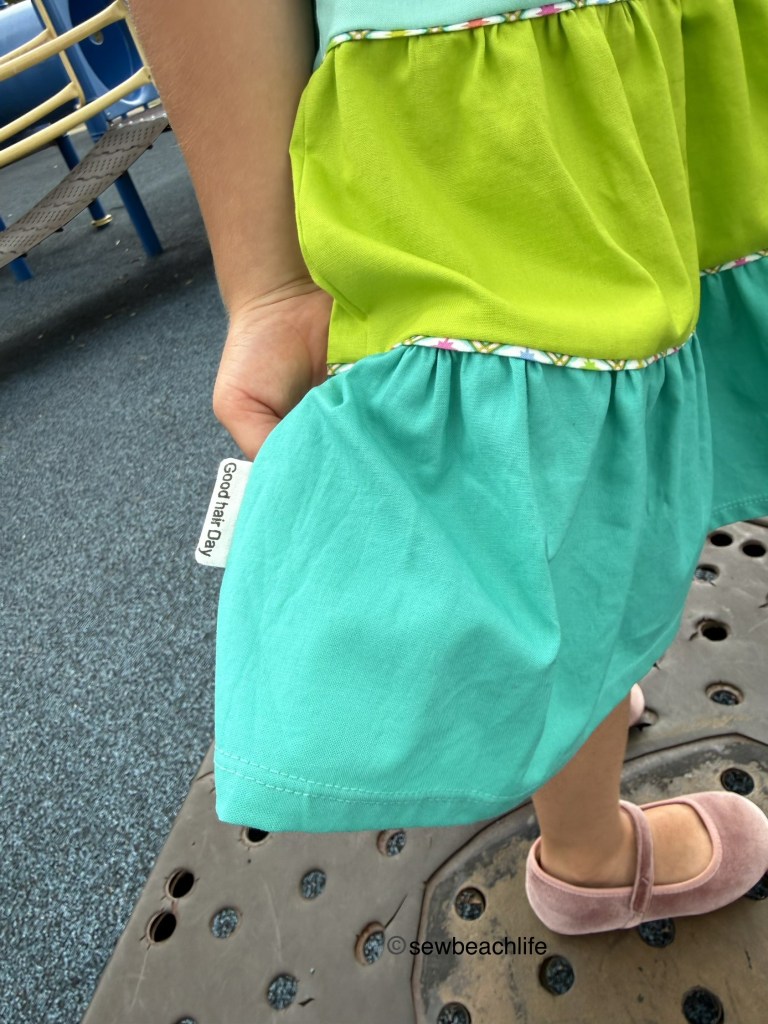
The fabric is all by Tula Pink (Free Spirit Fabrics) except the lime green as the shop was out of that color. The lion print is called Good Hair Day, which I think is hilarious! Of course a beautiful lion’s mane would look good. So I just had to use the fabric selvedge to make my own tags for the dresses.
I used sections of the lion paw prints (that show all the colors used in the fabric print) for one side of the tags.
Then I used Good hair Day (the name of the print) on the other side of the tag. I used a Tula Pink print called Stargazer for the shoulder ruffles, elastic casing, and handmade piping.
Although it’s not a rainbow stripe, it does contain a rainbow of colors, so I figured it would be acceptable! 😉 The girls like the elasticated back so that they don’t have to deal with zippers or buttons when getting dressed.
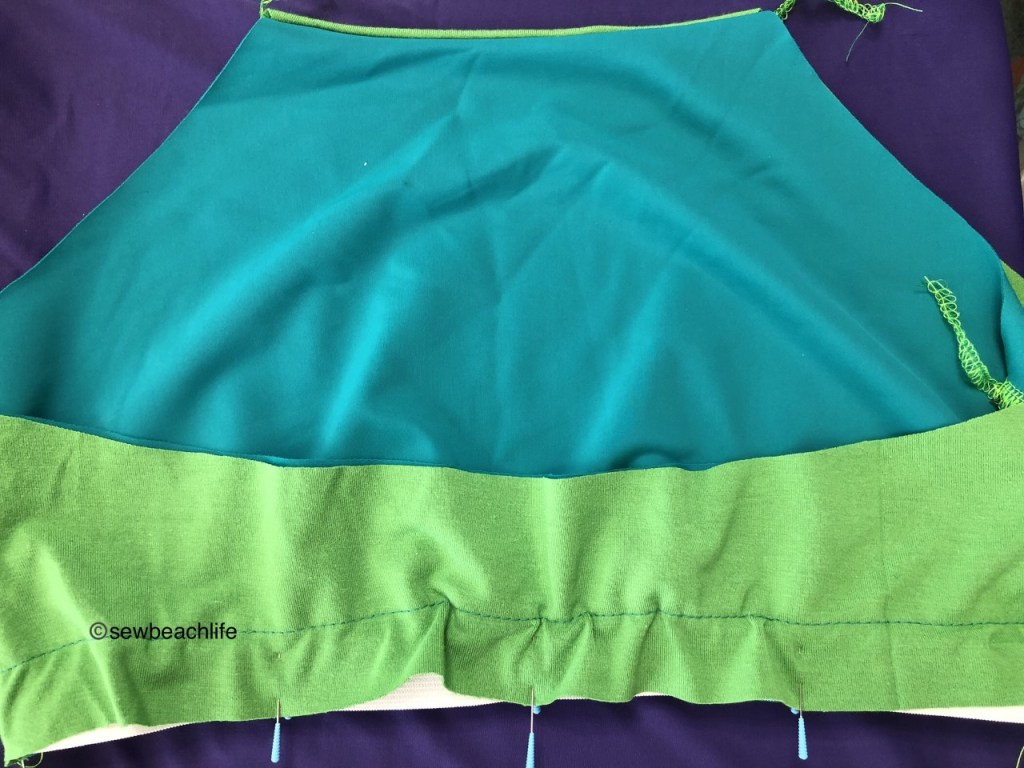
I used 1-1/4″ strips of the Tula Pink Stargazer fabric to make the piping. I pressed the strips in half, and basted it to the bottom edge of the first two tiers. That way it was perfectly in place when I gathered the top of the next tier and stitched it to the tier above. I think it adds a nice pop of color.
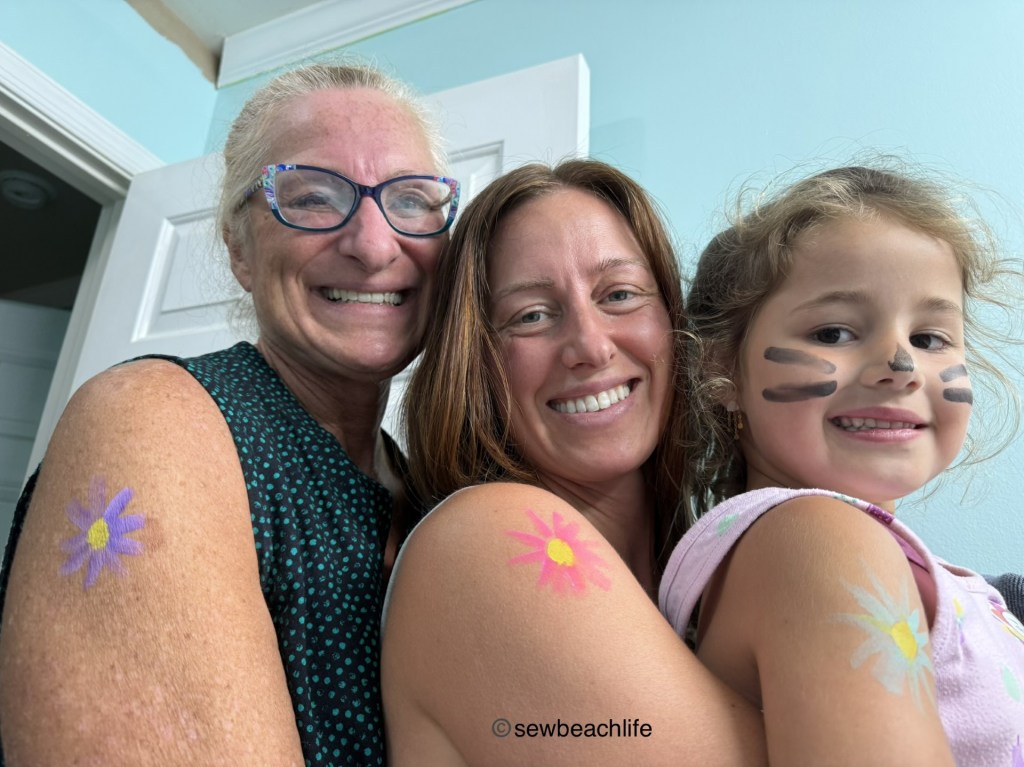
The girls had so much fun playing with their friends, eating snacks and ice cream cake, and enjoying face painting (done by the eight year old with her fancy face painting kit). Grandma stayed nearby to rinse and sanitize each brush as it was used. The designs turned out super cute. She practiced the night before by painting flowers on Grandma, Mama, and sister. She even made a little sign listing the designs available. She was willing to be a little flexible when a couple of the boys at the party wanted 67 painted on their arms. 🙂
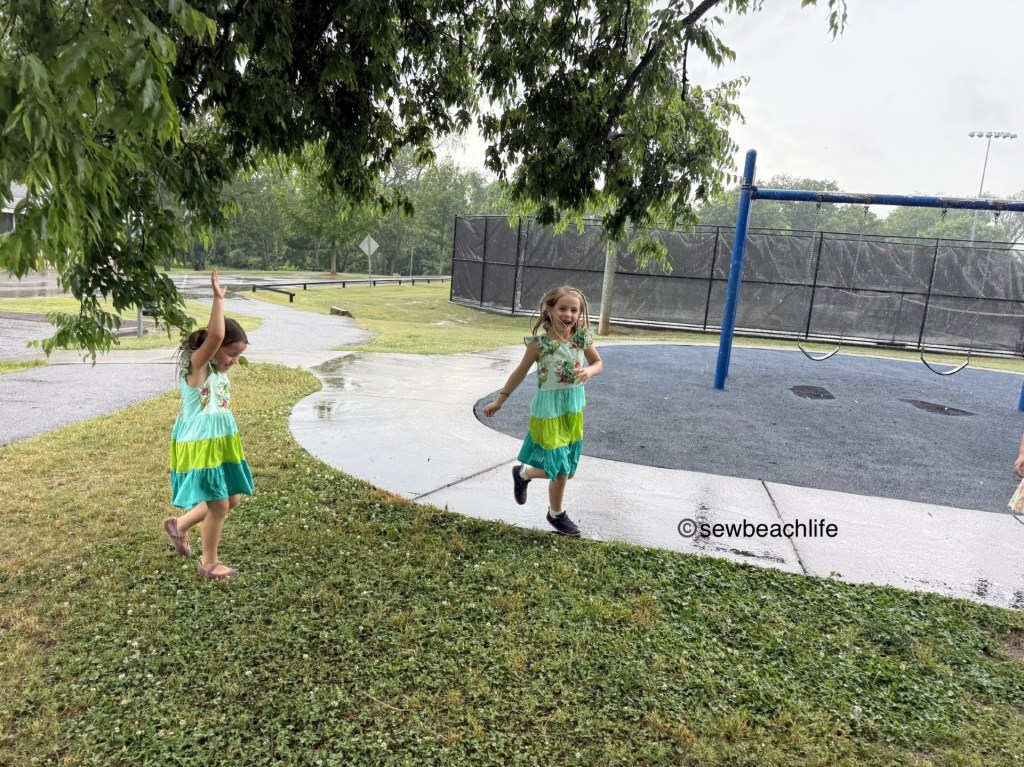
The morning had been nice and sunny, and the afternoon was sunny for a while. But then the rain moved in. Some people left, but you know kids, they don’t care if it’s raining, and continued on playing and running around.
Someone had a canopy in their vehicle, so the adults huddled under the canopy for a bit, trying to stay dry, while the kids had a blast running and jumping and continuing to play on the playground. Eventually the party came to an end, but my sweet girls still looked adorable in their (sopping wet) matching birthday dresses!
Being a Grandma is the best! And I love it when I can make my girls pretty and fun clothes.
I bought all the Tula Pink fabric from a very nice quilt shop in St. Petersburg, Florida called Whim So Doodle. All of the ladies who work there are so friendly and helpful. And they have the largest selection of Tula Pink fabric that I’ve seen in this area.
Thank you for reading and sharing my love of sewing, fabric, patterns, color, and making cute clothes for others. Since this is my blog and represents me, I always give my honest opinion about any patterns, fabric, or supplies that I talk about. I do like knowing whether the time I spend writing posts actually interests people enough that they take a look at the patterns I review, but I write for me. It’s one more creative pursuit that I hope is helpful or interesting to others. I write to share my love of sewing and to encourage others to love it as much as I do!
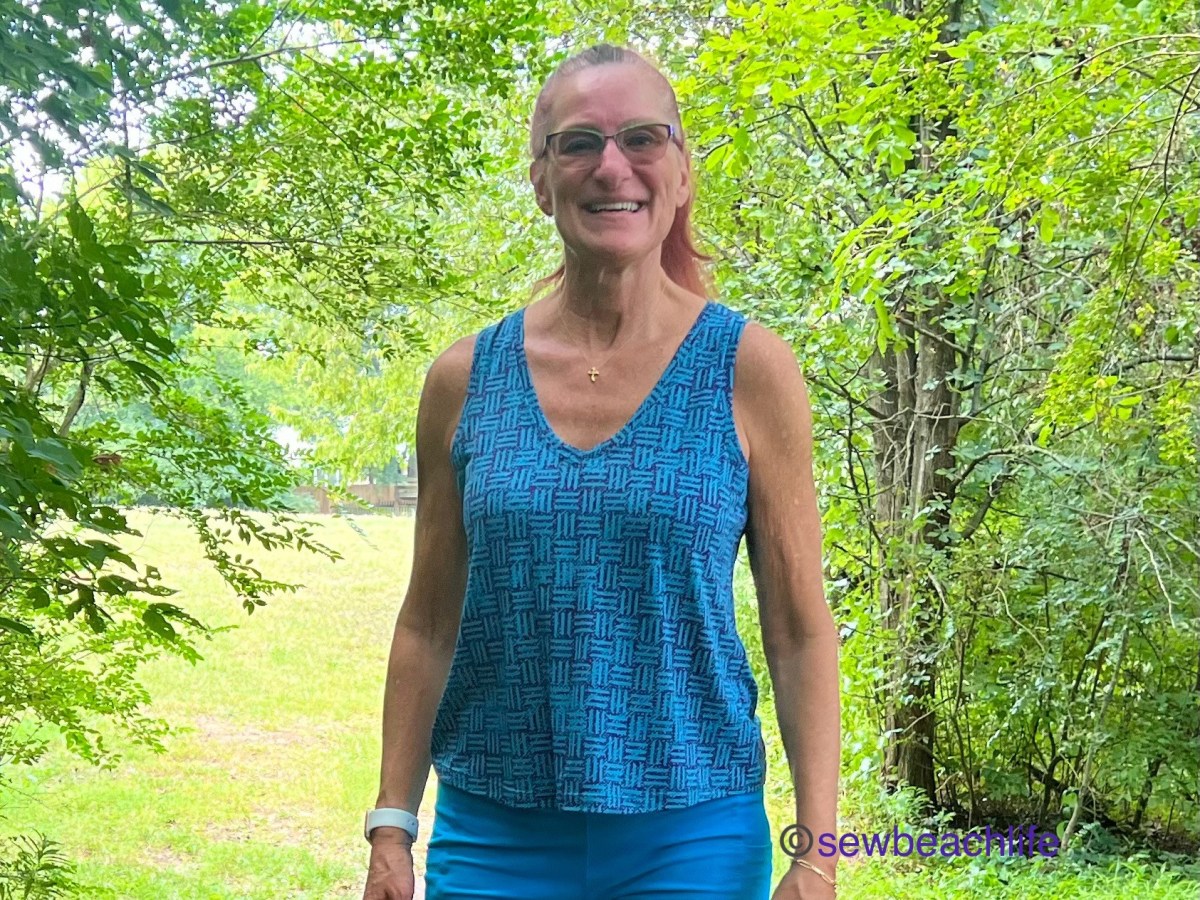
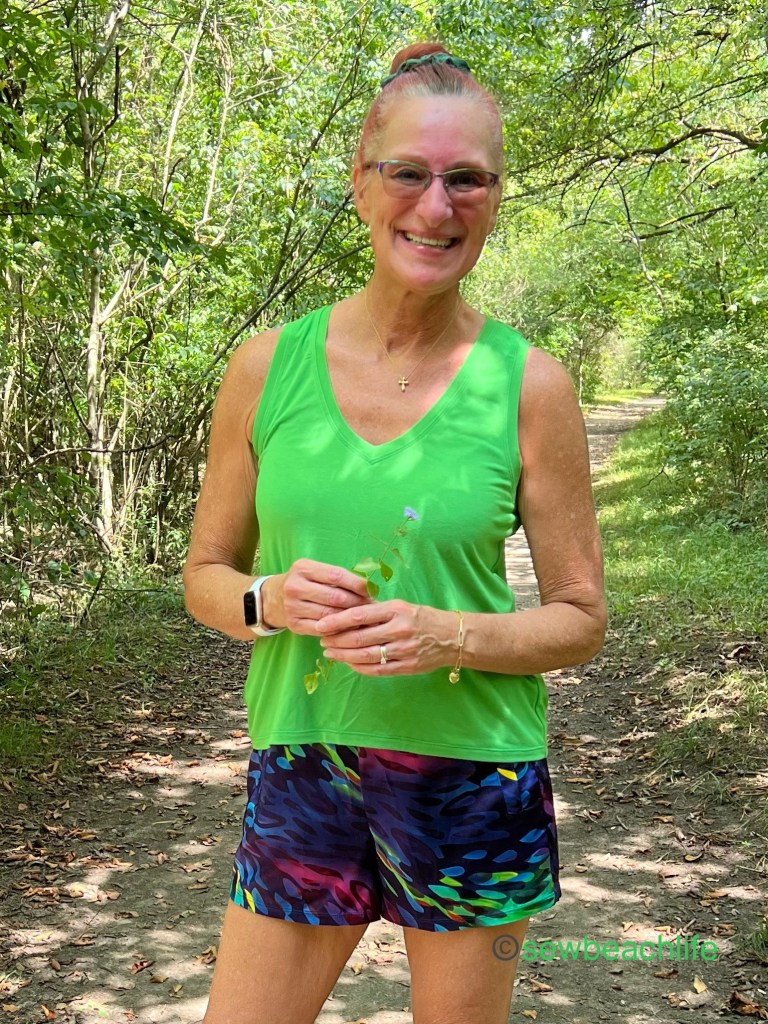
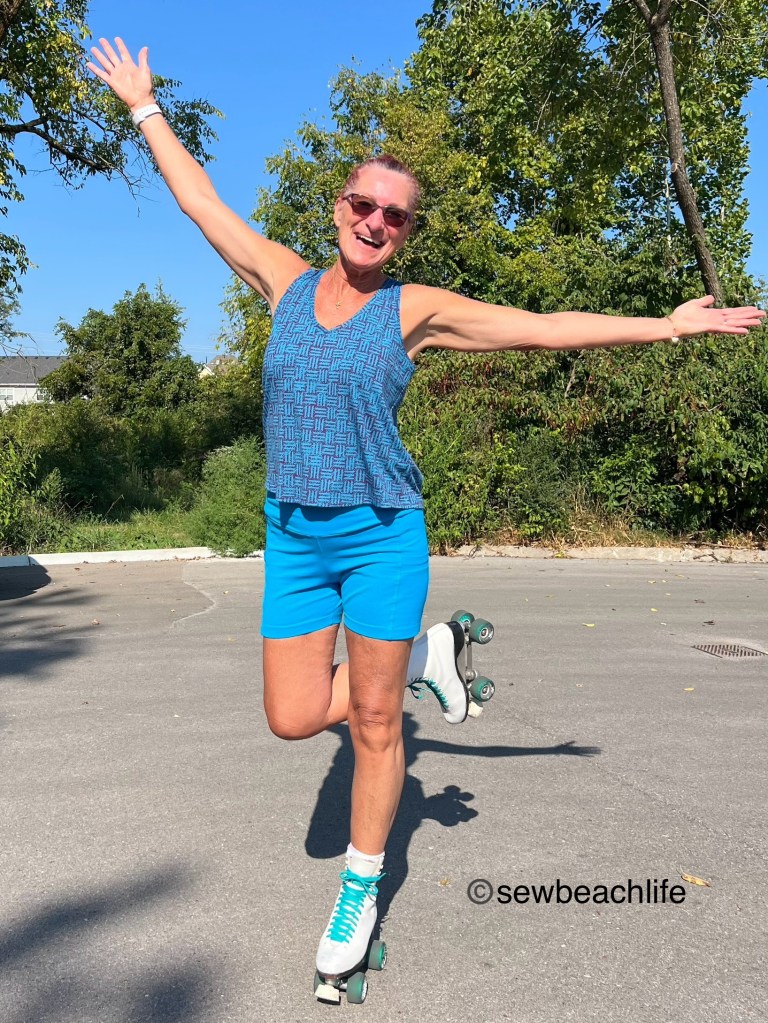
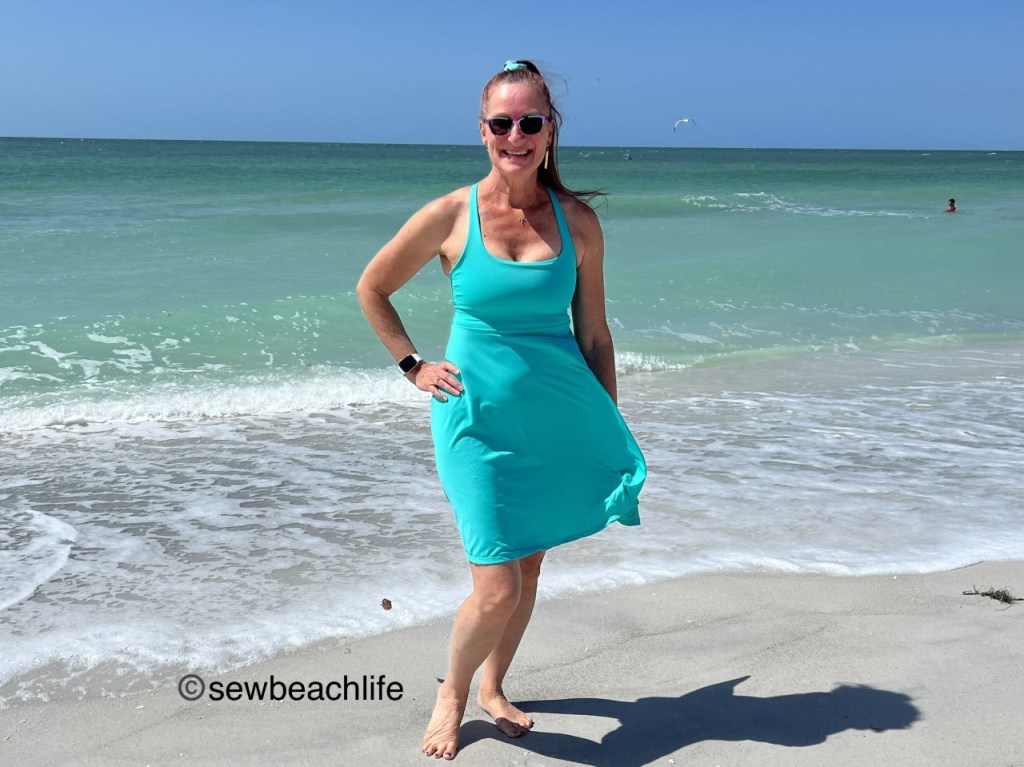
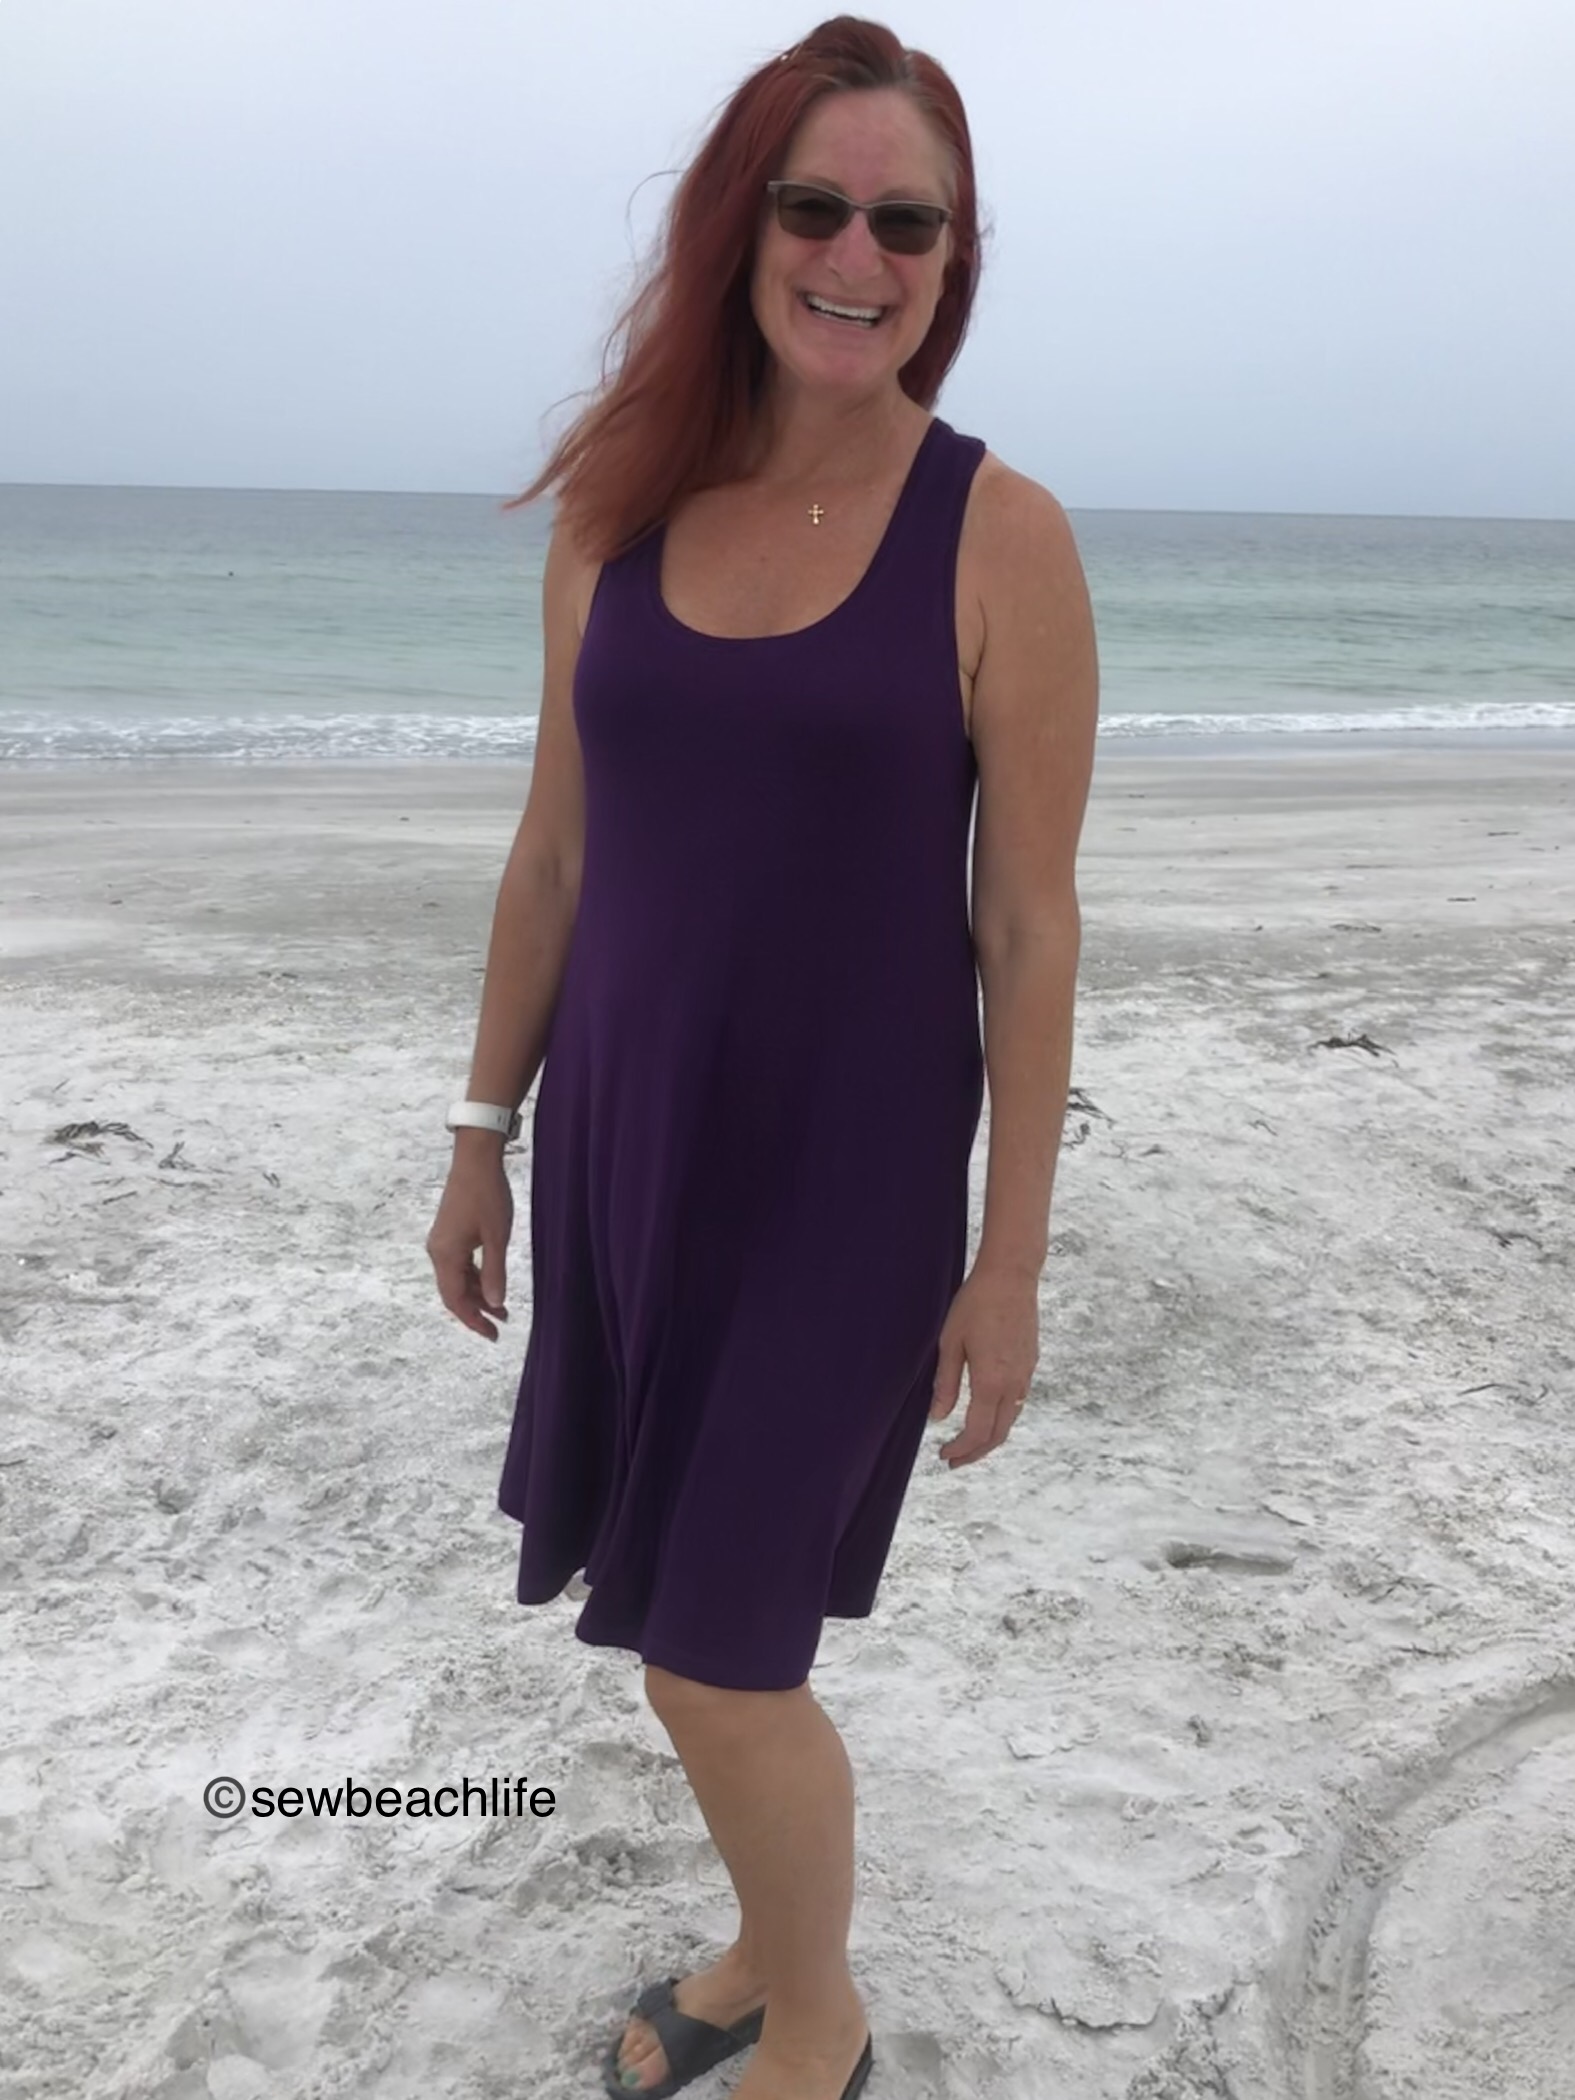
Greenstyle has been knocking it out of the park with new patterns, and the Azure Top and Dress is another winner! There are options galore with crew, scoop and V-necklines; narrow or wide tanks; cap, short, full, or long sleeves; crop, high hip, or low hip tops; and a super cute dress with elastic in the back for shaping.
When you make three tops and a dress, it’s a sure sign that you love a pattern! 🙂 My first make is a V-neck narrow tank in the high hip length. When I texted my daughter a photo to show her how cute it is, she said she “loves the modern length on me.” Hahahahahahahaha! Obviously I have not been wearing tops with a modern length! She’s not wrong. After losing some weight, most of my tanks and tops are big, baggy, and too long on me. So I really needed to make some new ones!
I love the V-neck, I love the drapiness of rayon spandex for this style, and the narrow tank width is perfect for my shoulder width.
Since those style choices worked so well the first time, my second make is another V-neck narrow tank in high hip length.
This green rayon spandex is a bit heavier weight than the cheetah print, and as usual for testing, the pattern was updated slightly to fit a little slimmer at the armscye and bust. This top may look a little snug at the bust, but it is super comfortable and will fit an average bust quite nicely.
All of my makes are a size E graded out to size F. My upper bust is 33″, which is the smallest end of size E. My full bust is 37″, the largest measurement for size E, so right on the edge of needing an FBA. Because Greenstyle is awesome, they include a +2″ FBA option in the pattern. 🙂
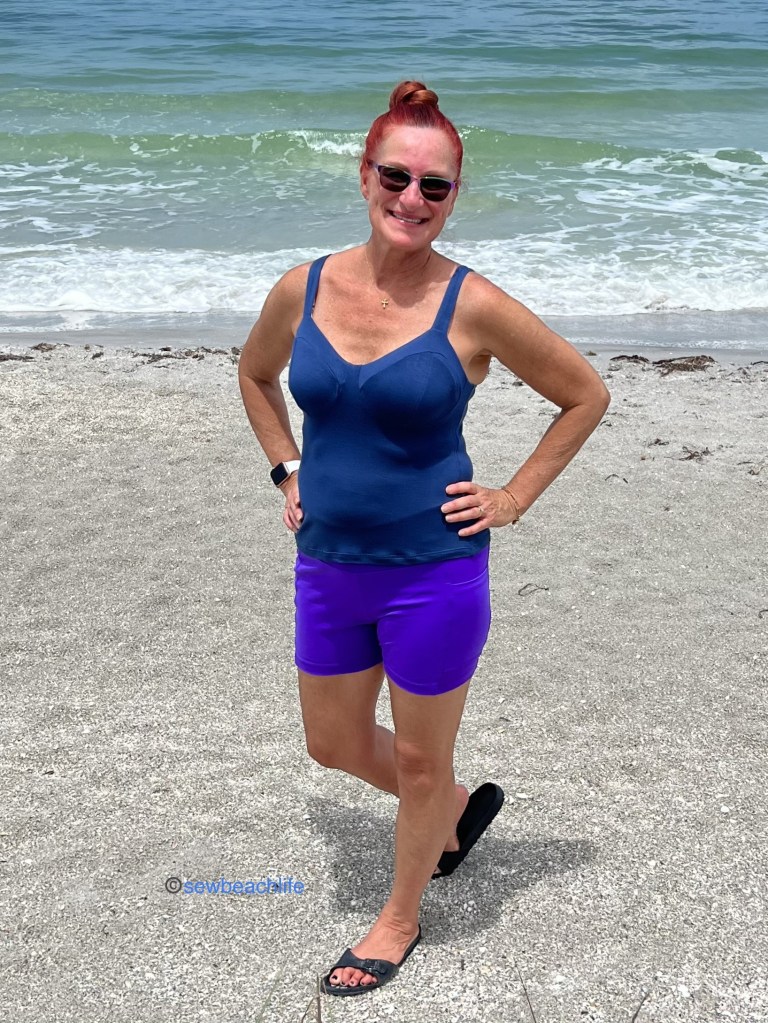
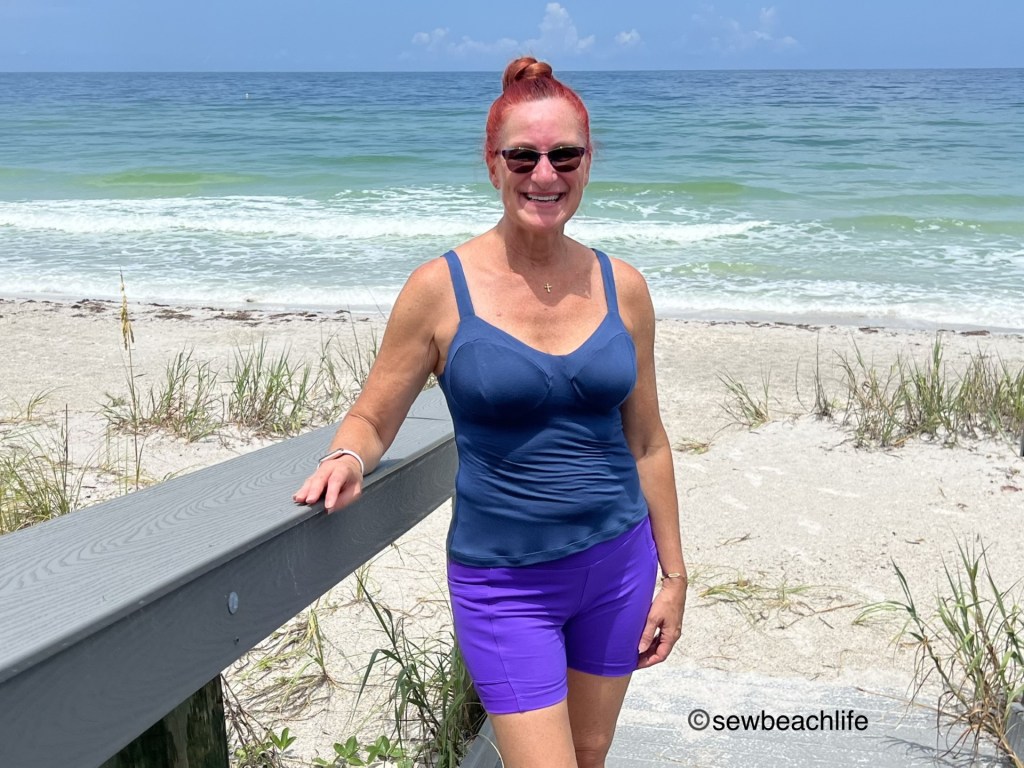
Which leads me to the third V-neck narrow tank in high hip length, made using the +2″ FBA front pattern piece. Along with a bit of width at the bust, the FBA adds length to the center front, which is super helpful for those of us with a lot of bust projection. Although I don’t mind the slightly high low look of my first two tanks, my FBA make has a more level hemline.
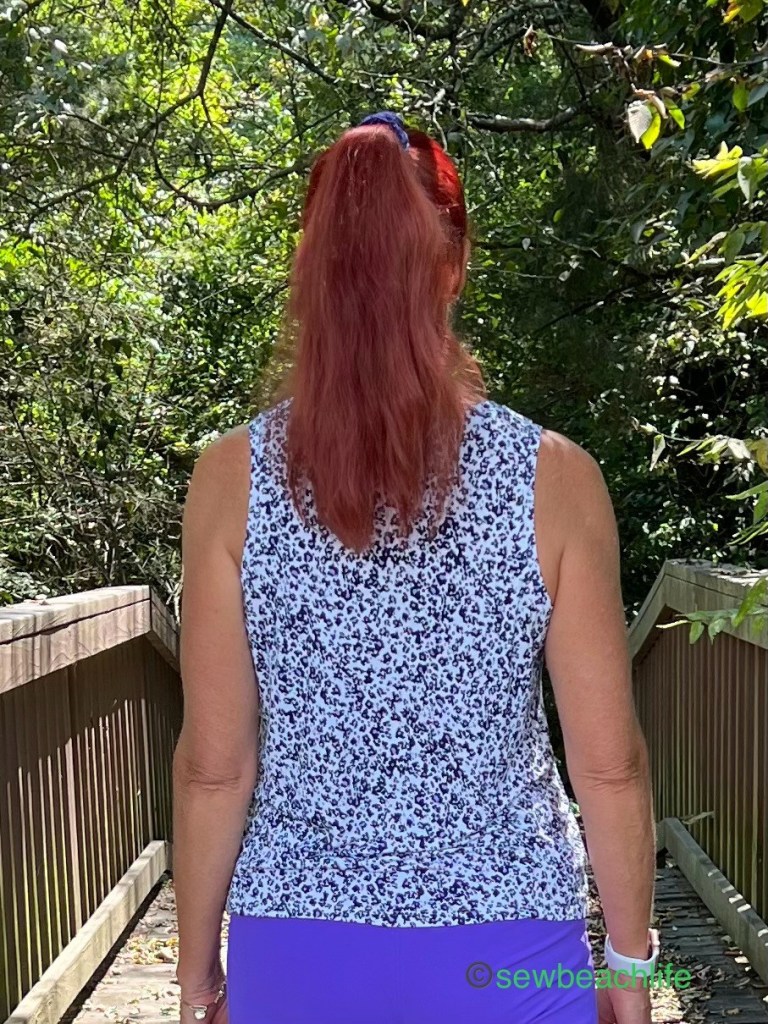
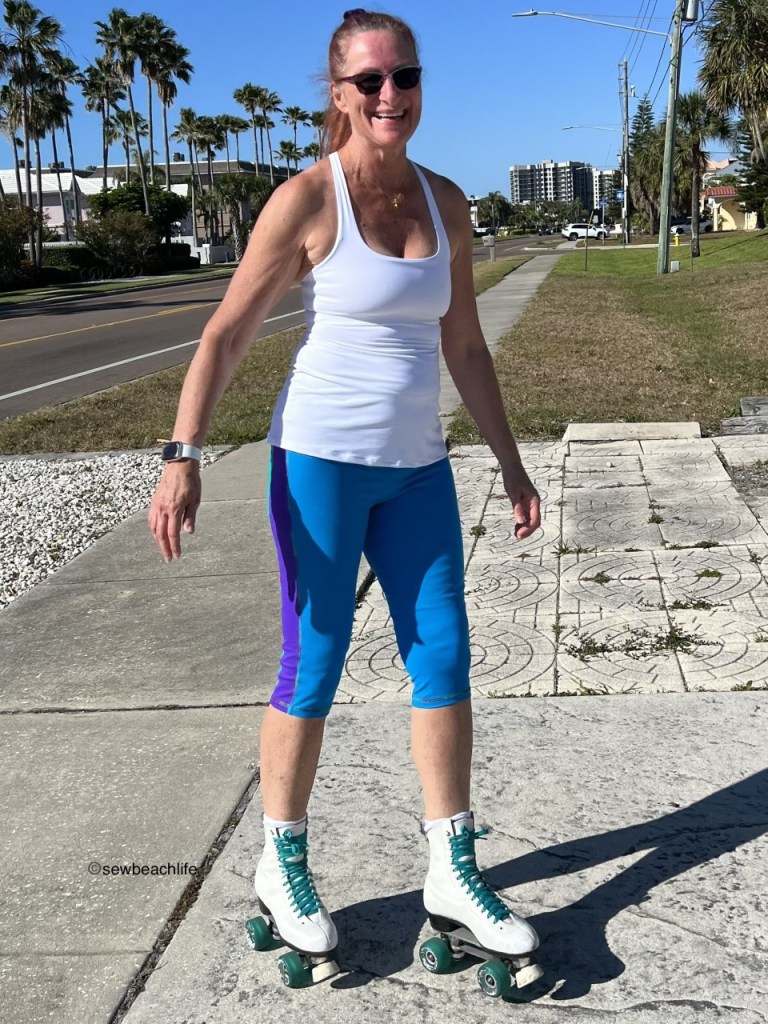
This tank is an upcycle made from an old RTW dress. Although the fabric is a polyester spandex (if you know or follow me, I’m not generally a fan of polyester) the print and colors were too fun for me to ignore.
Polyester spandex doesn’t have quite as nice a drape as rayon spandex, but it still works well for this pattern. I wore this outfit all day while playing with my granddaughters. The six year old and I went roller skating around the neighborhood and I was so comfortable that I didn’t even think about my clothes.
Photo courtesy of my six year old granddaughter.
I love that the “modern” 😉 high hip length keeps my belly covered even with arms raised overhead. One of these days I might try the crop length, because it would look super cute with a Paseo Skirt…
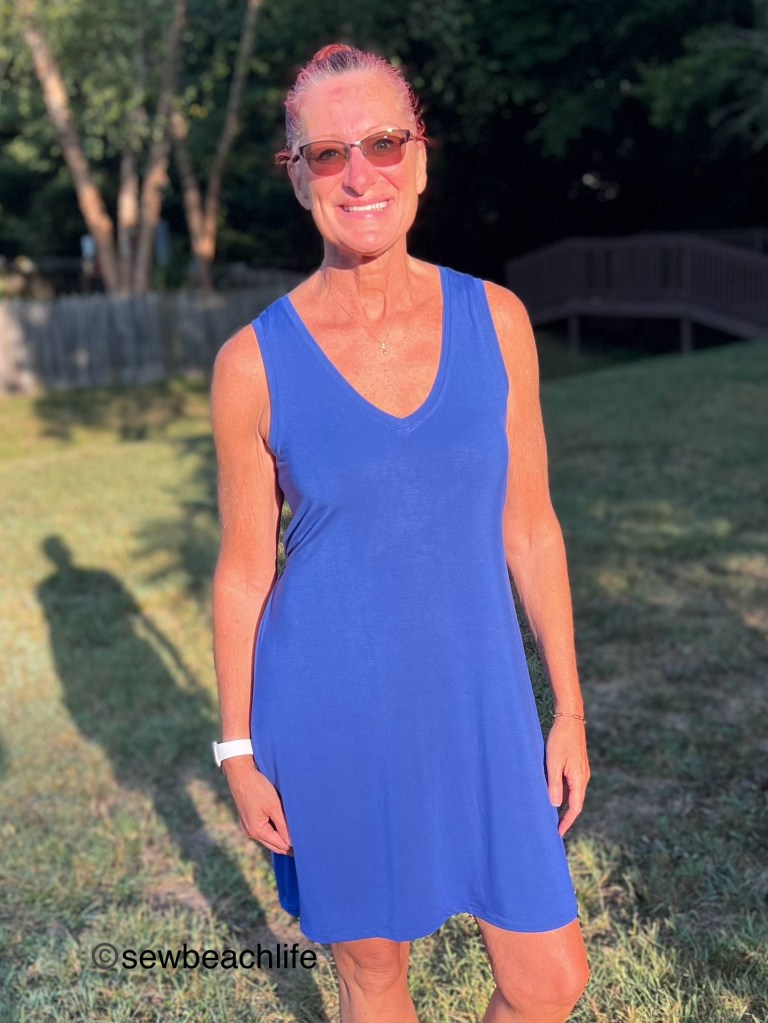
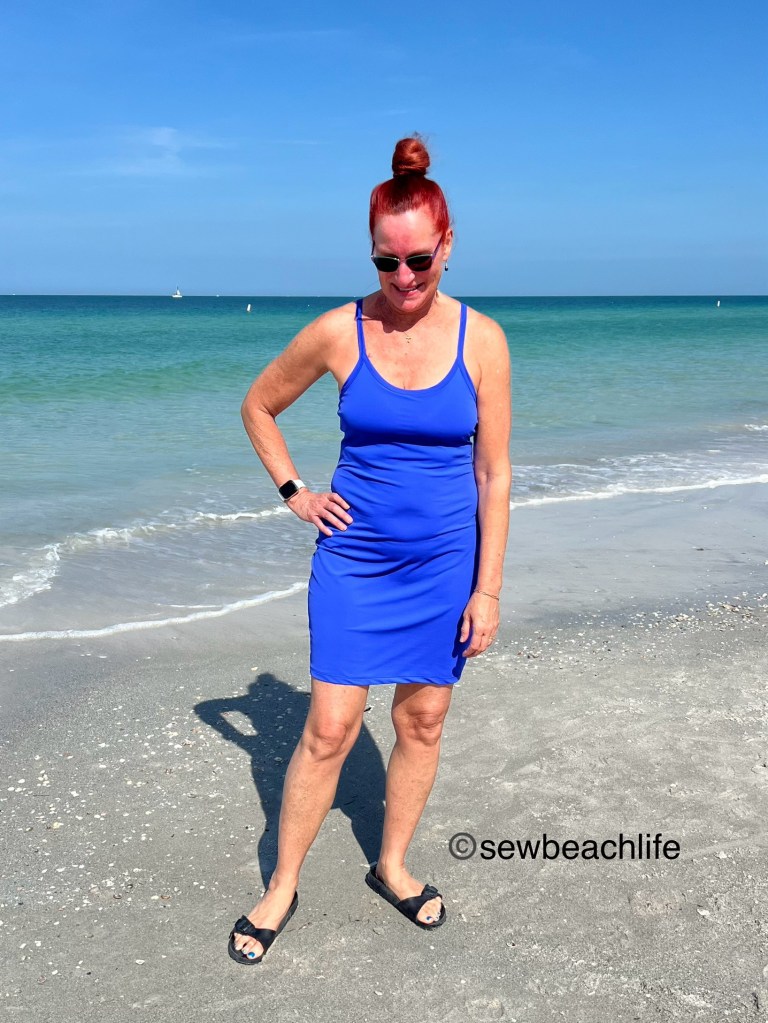
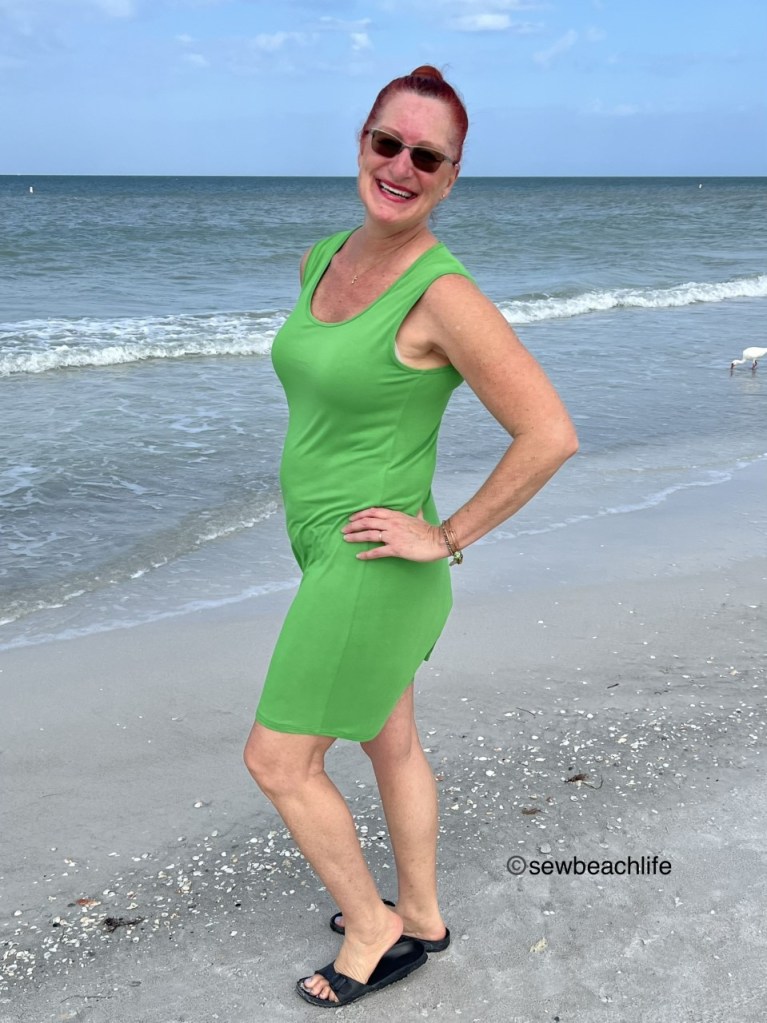
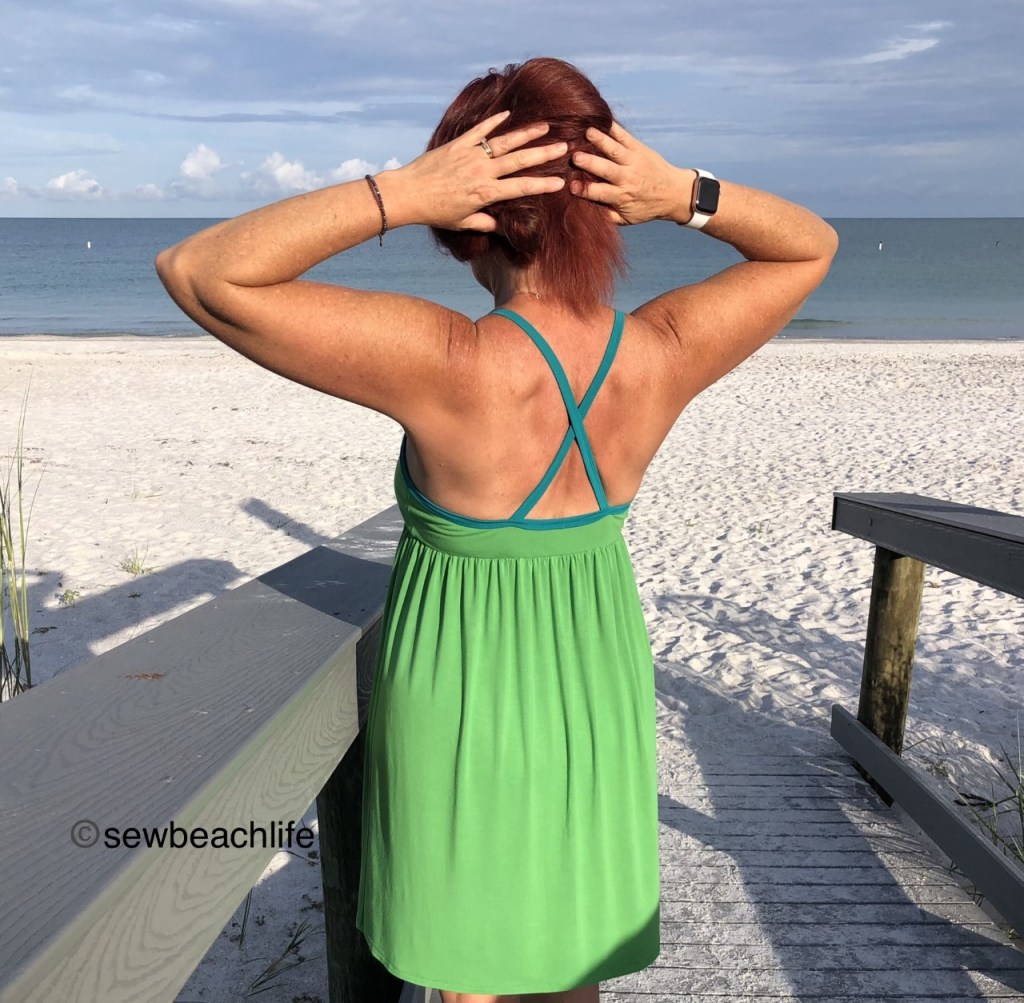
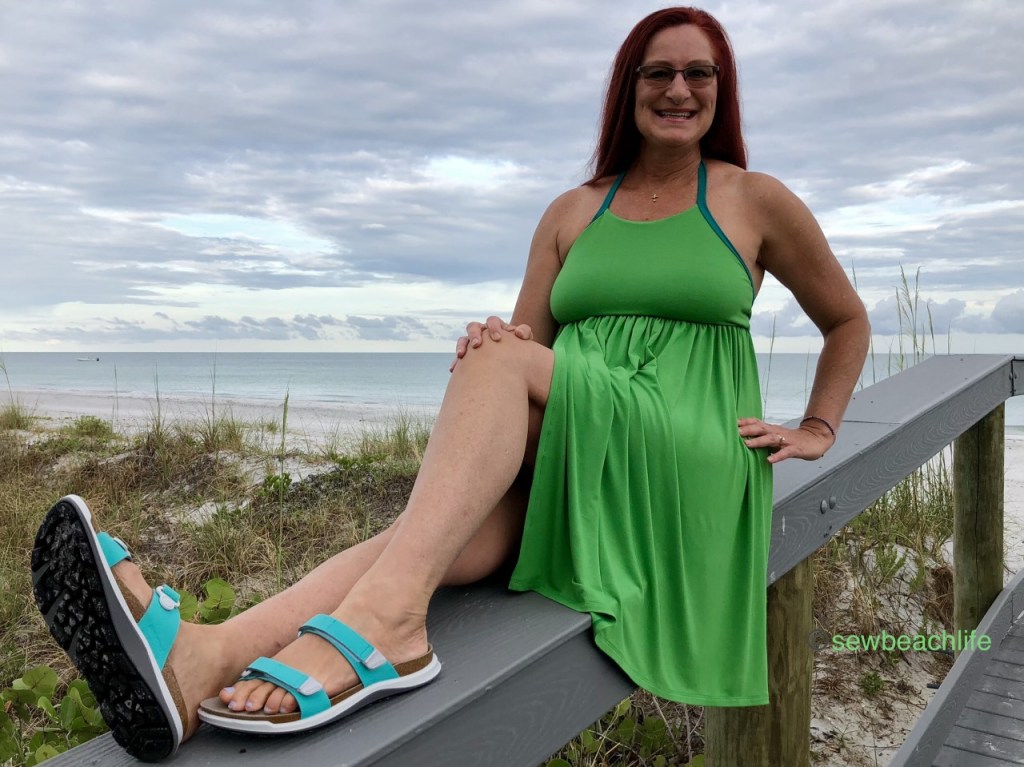
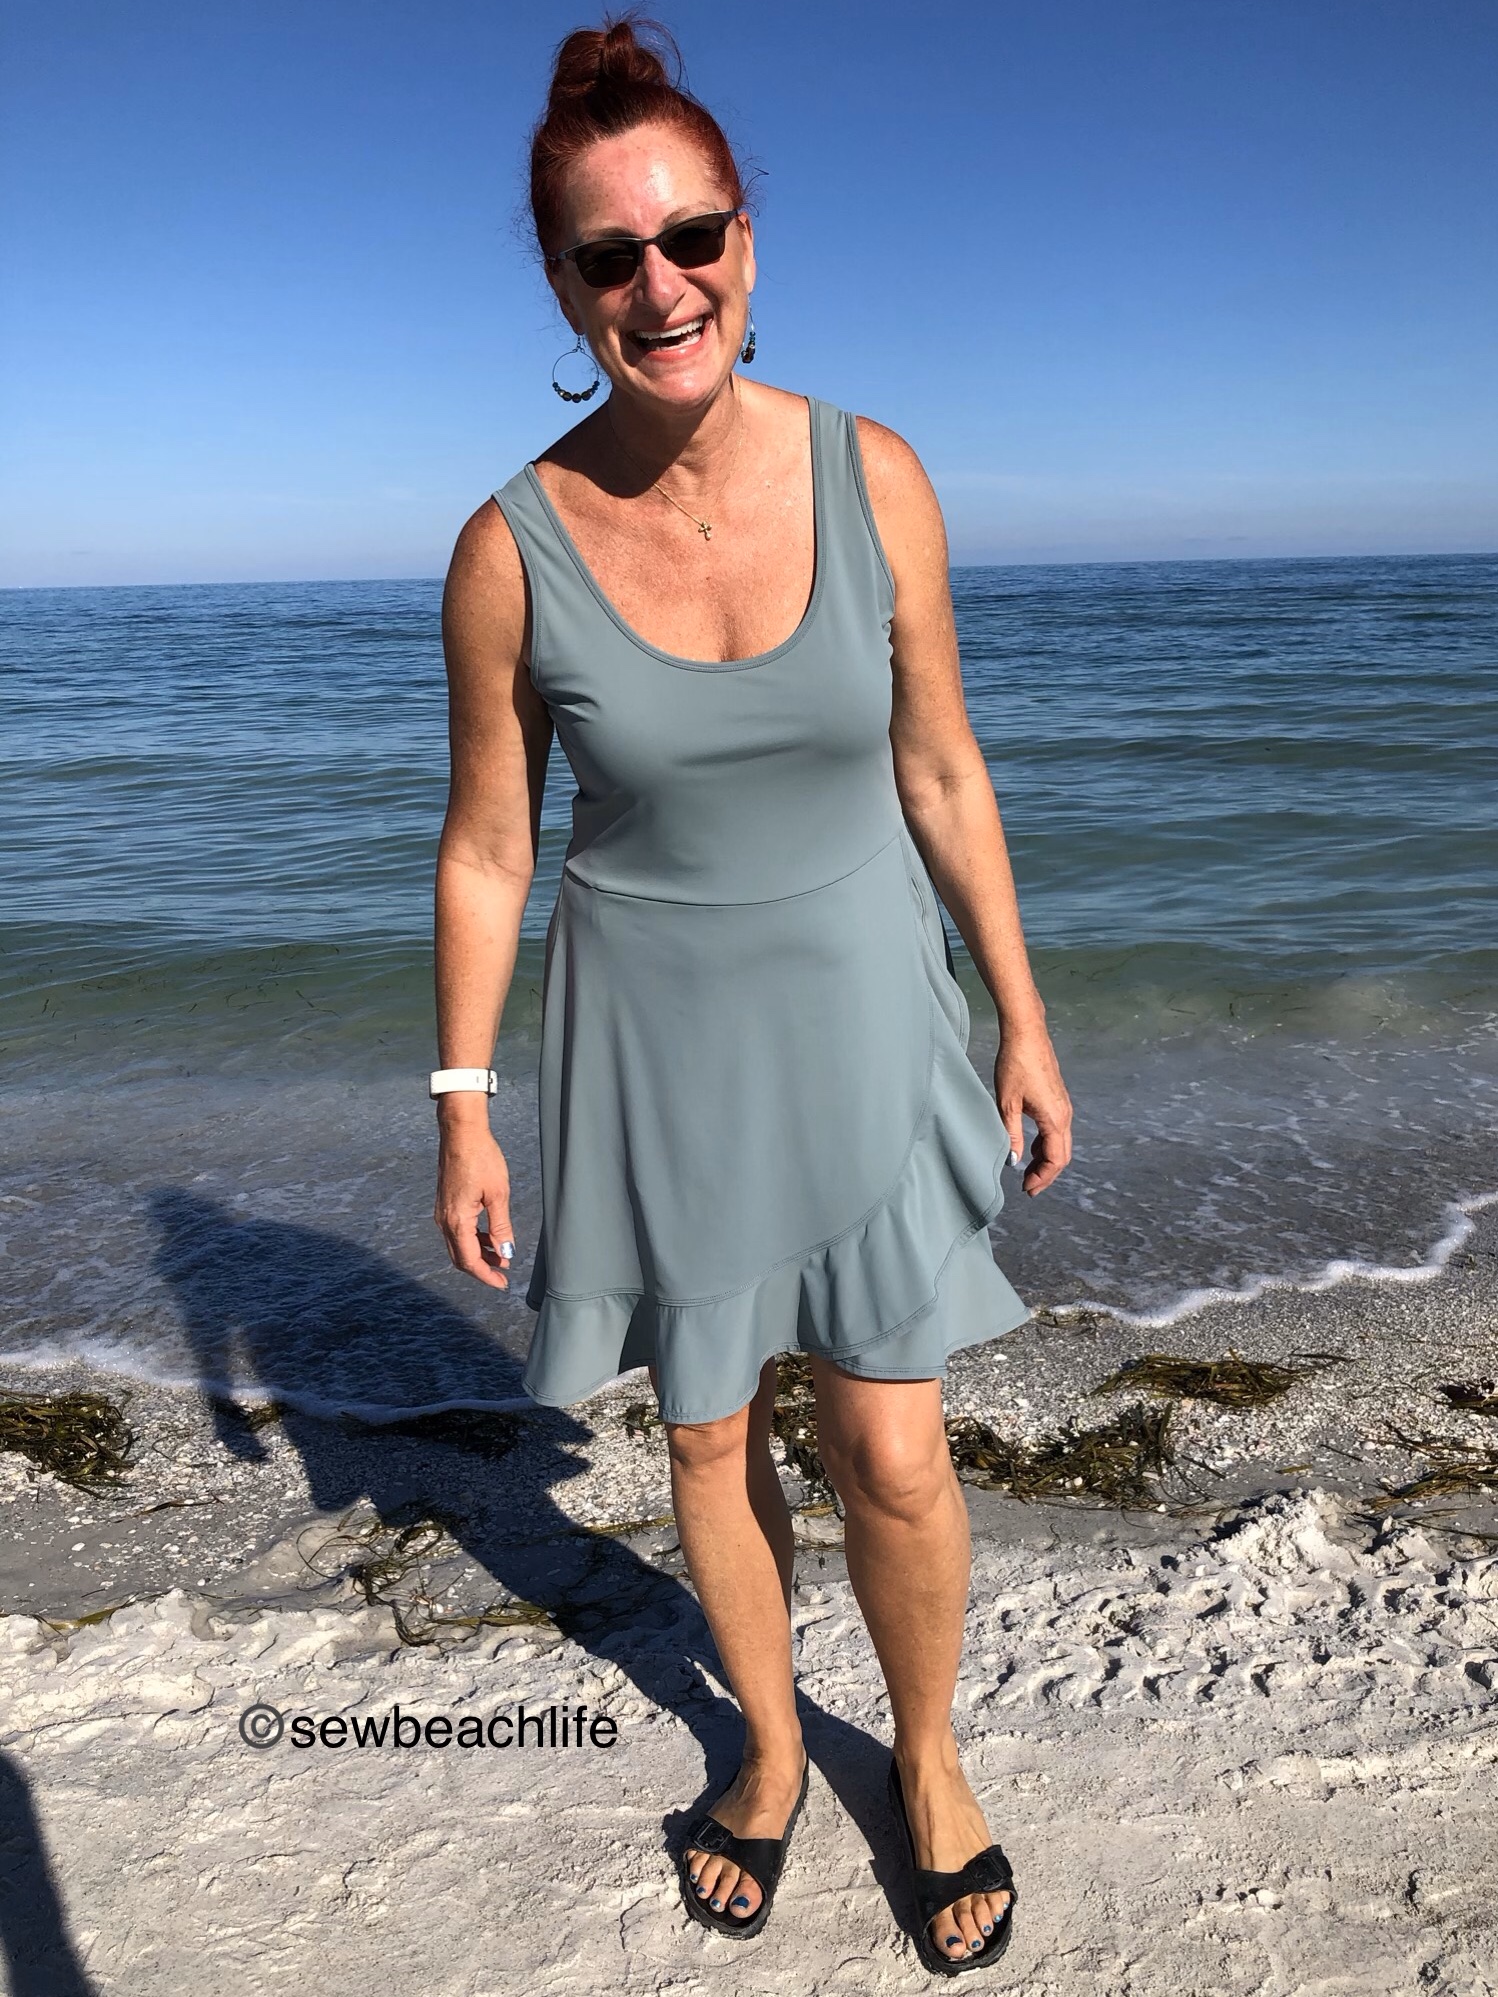
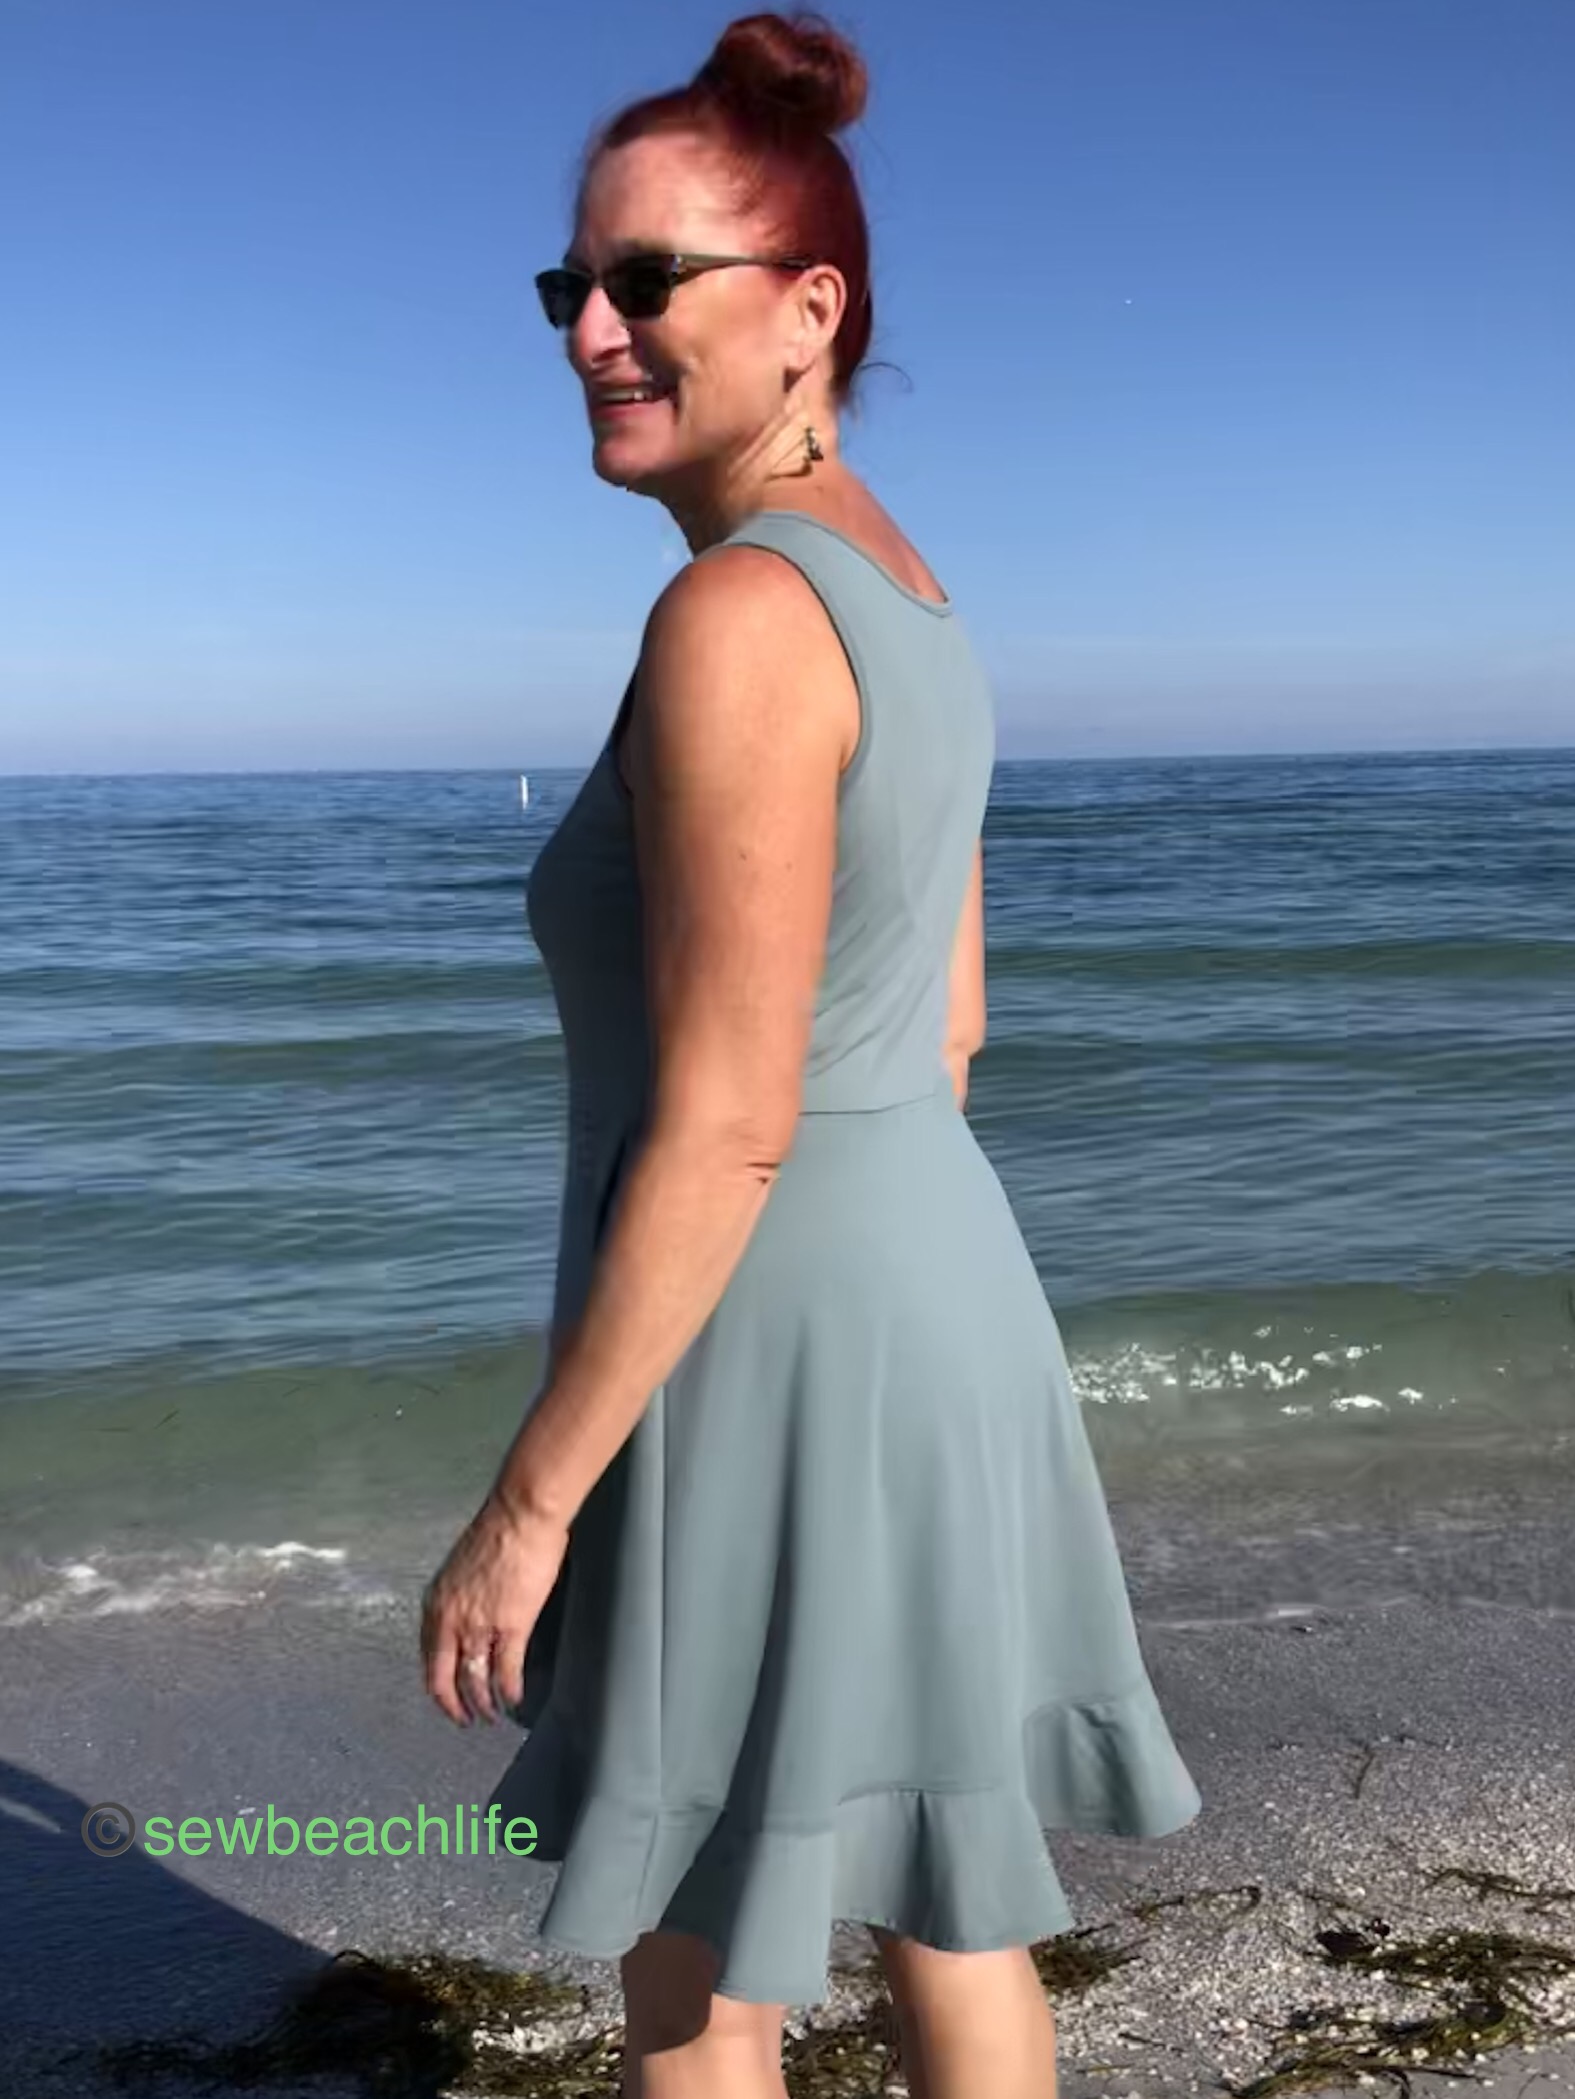
After seeing the cute Azure dresses during testing, it was impossible to not make one. The back elastic just gives it such pretty shaping.
The length is perfect! Short enough to be cool and breezy (because let’s face it- Florida is hot and humid for most of the year), but long enough to wear to Mass.
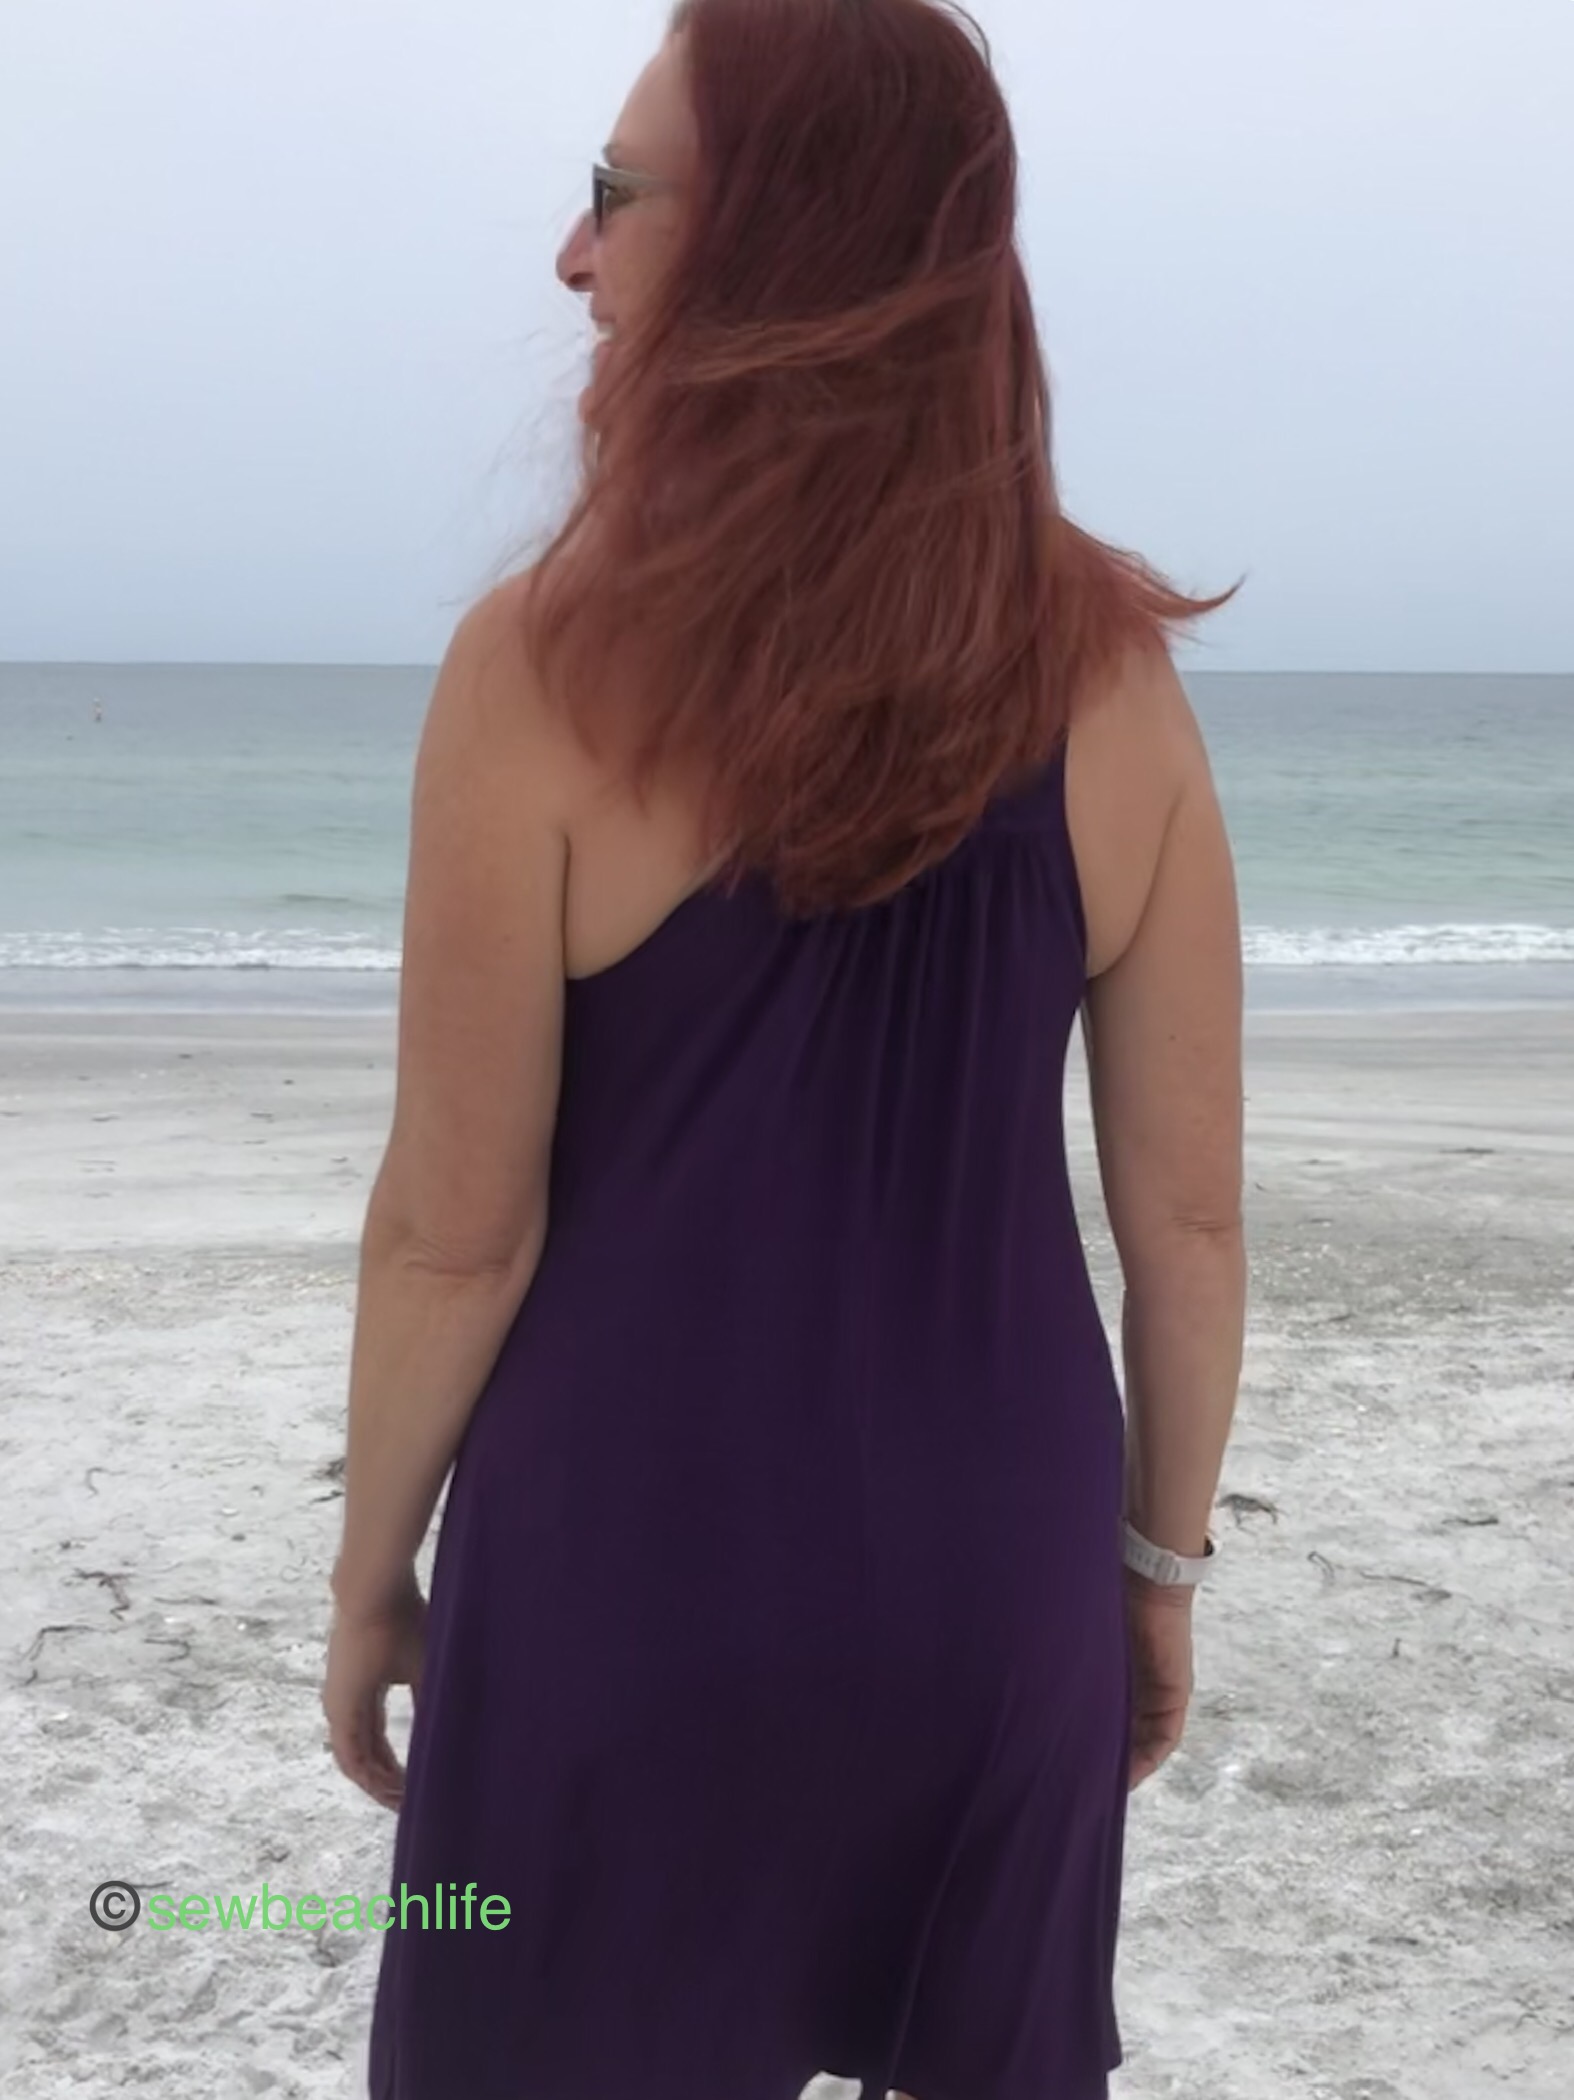
The back elastic not only provides shaping for the front of the dress, but helps it lay smoothly and comfortably against your back.
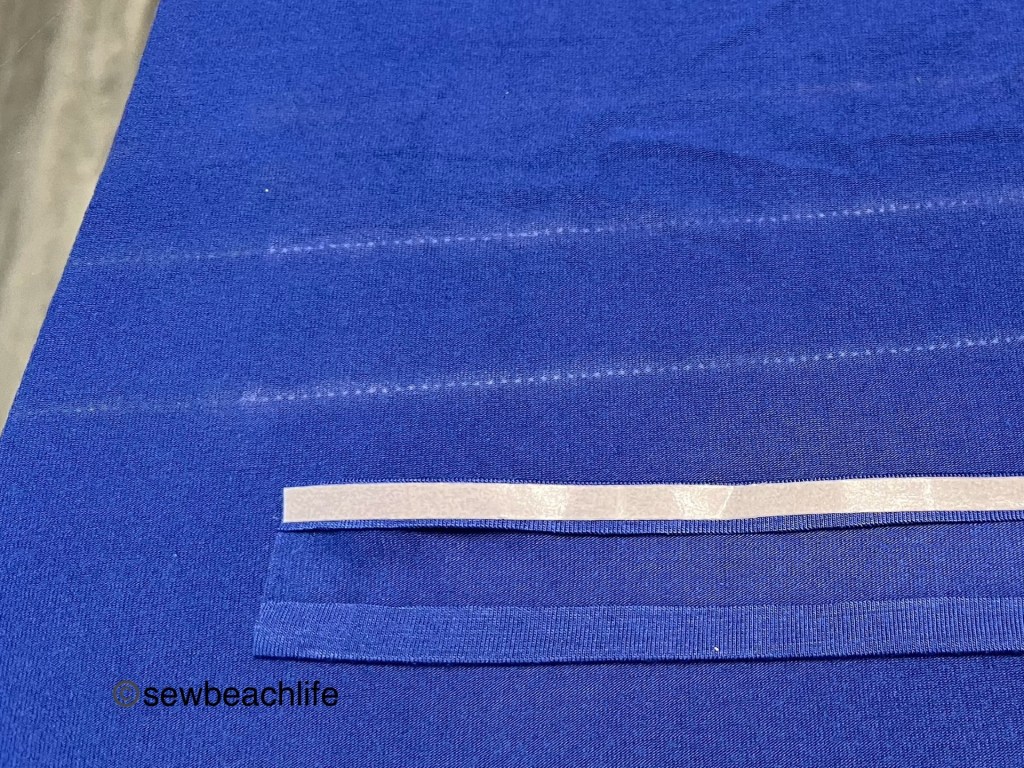
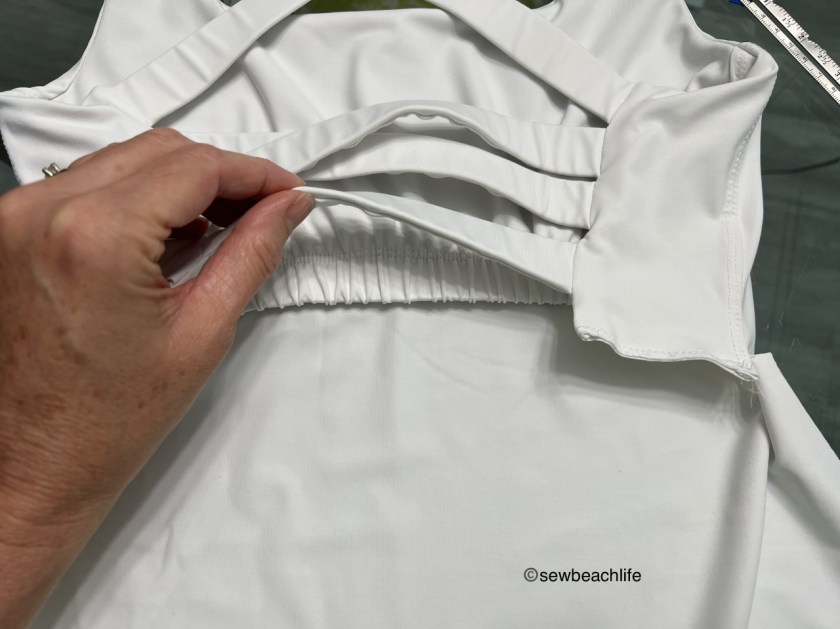
If you’re nervous about sewing an elastic casing on stretchy knit fabric, I’ve got great tips for you. First, make sure you mark your casing lines (on the wrong side of the fabric) with a high contrast color. I like using tracing paper and a tracing wheel. Then press up both long sides of the casing.
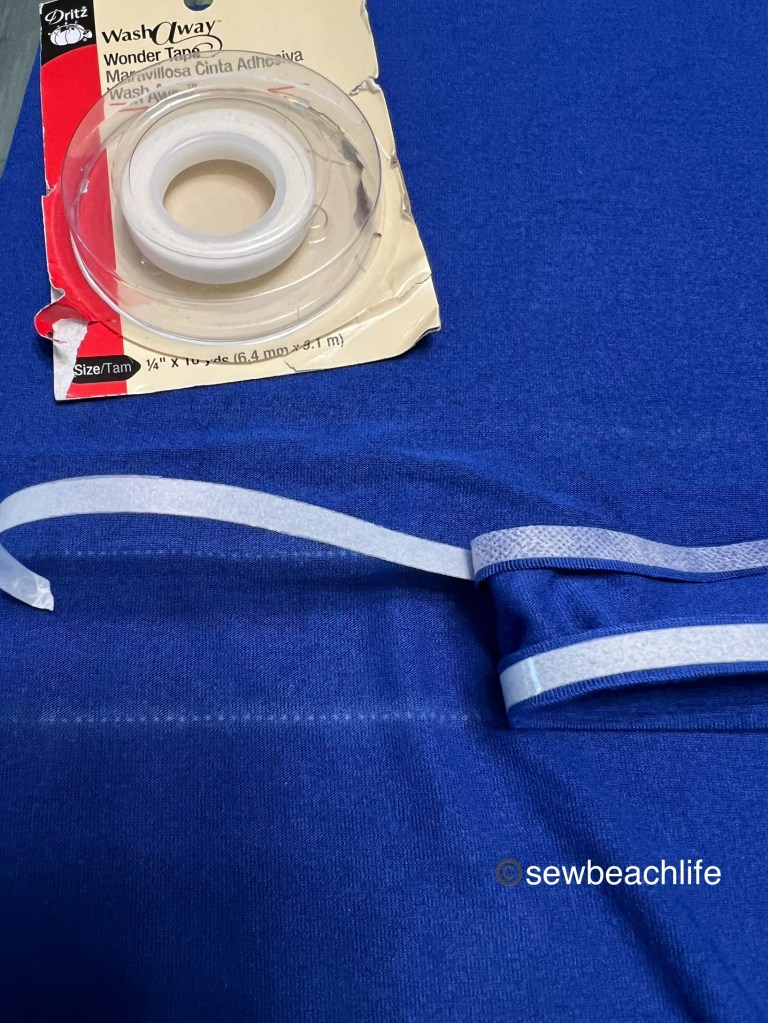
My (not so) secret weapon for keeping the casing from stretching or shifting out of place when sewing is Wash Away Wonder Tape.
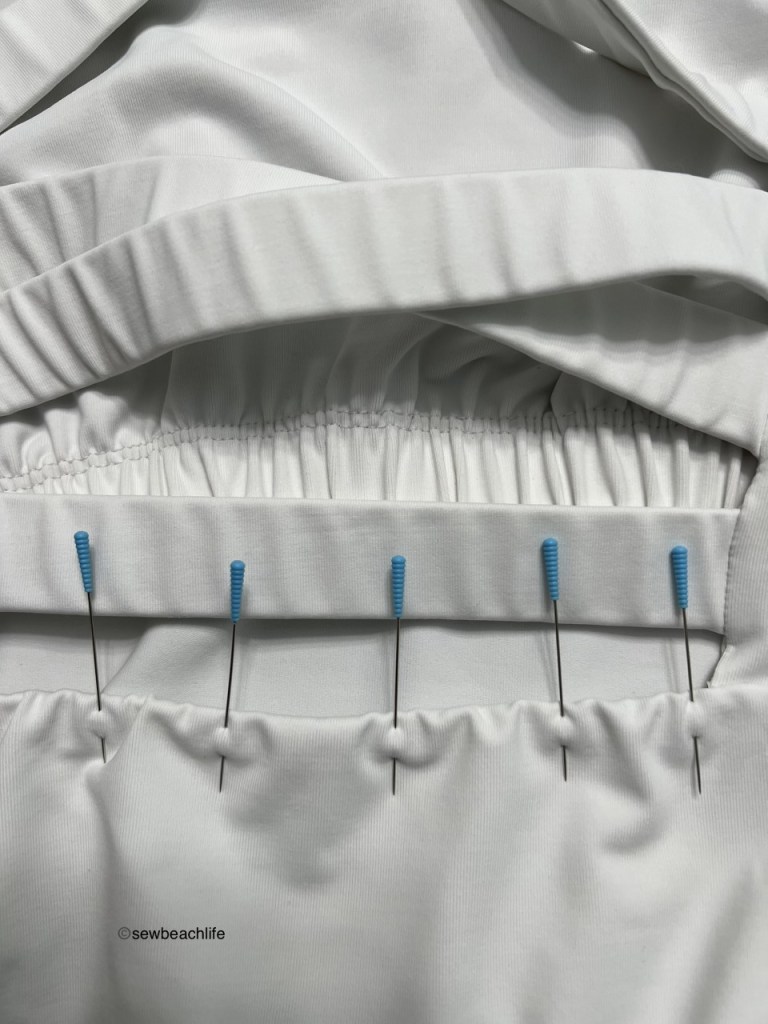
Place a strip of Wash Away Wonder Tape along both pressed up edges of the casing. Flip the casing over so that the wrong side of the casing lines up with the marked lines on the wrong side of the dress back.
Start peeling the paper backing off the strip on the top edge of the casing, then use your hands to press it in place along the top marked line. Once the casing is perfectly aligned and pressed into place, do the same with the bottom edge.
My sweet kitty likes to be close by while I’m sewing. He lounges on a chair while I cut or do prep at the dining table, then follows me into the sewing studio when I sew. ❤
The Wash Away Wonder Tape will keep the casing perfectly in place for stitching. What you may have thought of as a challenging step becomes super easy, and you don’t even need to worry about using or pulling pins when you sew the casing in place!
Maybe this winter I’ll try a version with sleeves, but for now the V-neck and narrow tank options are perfect for both the top and dress.
My favorite fabric for both the tank and dress is of course rayon spandex, because I love that fabric blend for pretty much any knit tank, tee, or dress I make.
But I have to admit that the polyester spandex blend worked well too.
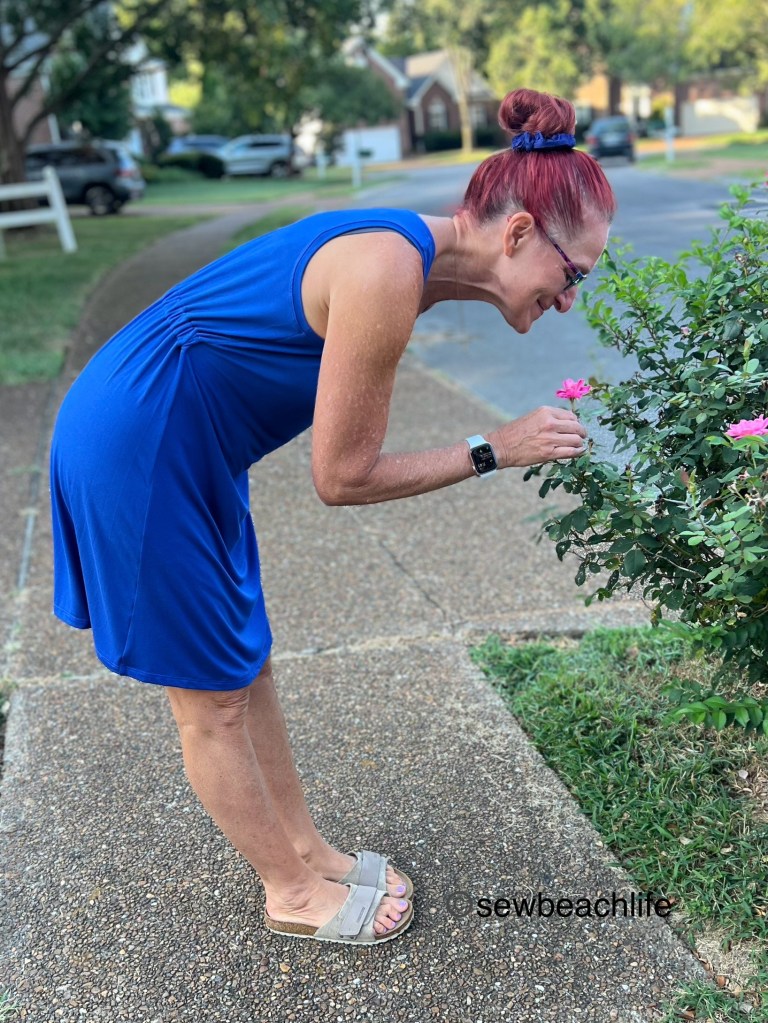
Whether you’re working, playing, walking through the woods or just stopping to smell the roses, the Azure Top and Dress will keep you comfortable on your journey.
The details: the Azure Top and Dress is a new pattern from GreenStyle Creations. It comes in sizes B-M (full bust of 30″ to 61″ and hips of 32″ to 62″) and has options galore for the neckline, tank styles, and sleeve options, with three top lengths (plus a dress length!)
I purchased the rayon spandex cheetah print from Mood Fabrics, and wore my tank with bike shorts from the Moxi Shorts pattern.
I purchased the green rayon spandex from Phee Fabrics, and wore it with my Windward Shorts (you can read all about them here.)
I upcycled the teal and purple polyester spandex fabric, and wore the FBA version of the tank with Moxi bike shorts.
The blue rayon spandex for the dress was purchased from Phee Fabrics. The Wash Away Wonder Tape and the 1″ knit elastic used for the back elastic casing were purchased from Wawak.
No matter what options you choose, I am definitely all about the Azure!
The links to GreenStyle may be affiliate links (if I did them properly!) which means that I may earn a few pennies if you use my links without it costing you anything extra. Since this is my blog and represents me, I always give my honest opinion about any patterns, fabric, or supplies that I talk about. I hope the time I spend writing posts actually interests people enough that they take a look at the patterns I review. I write to share my love of sewing, fabric, patterns, and notions, and hope that sharing helpful tips encourages others to love sewing as much as I do! 🙂
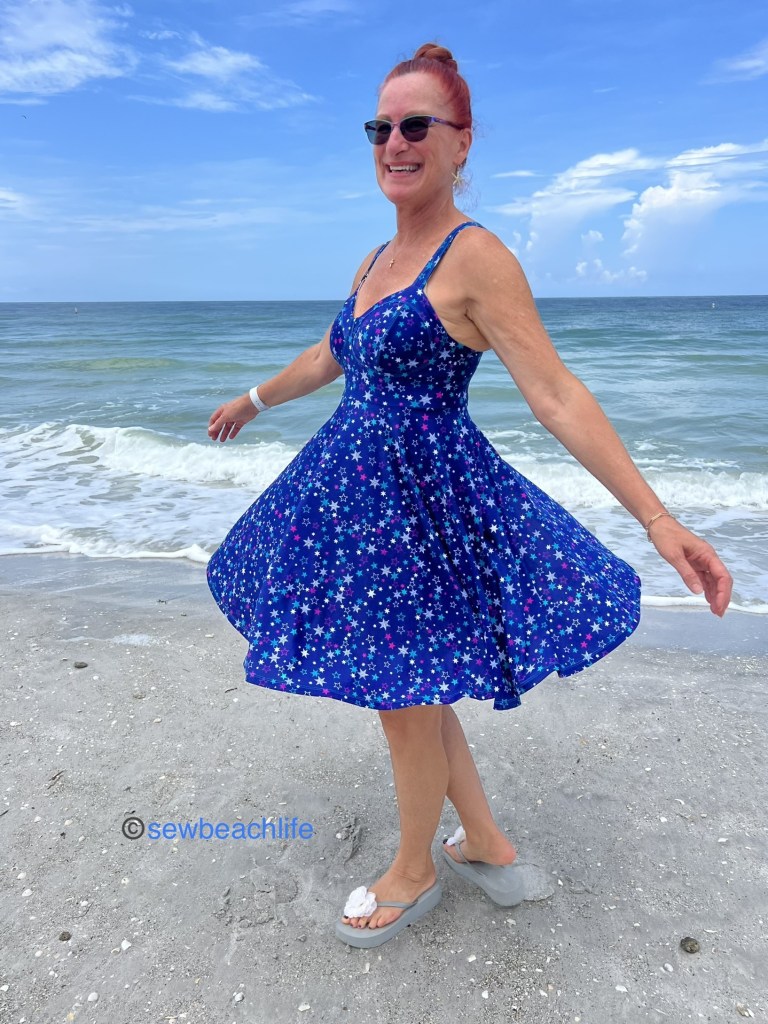
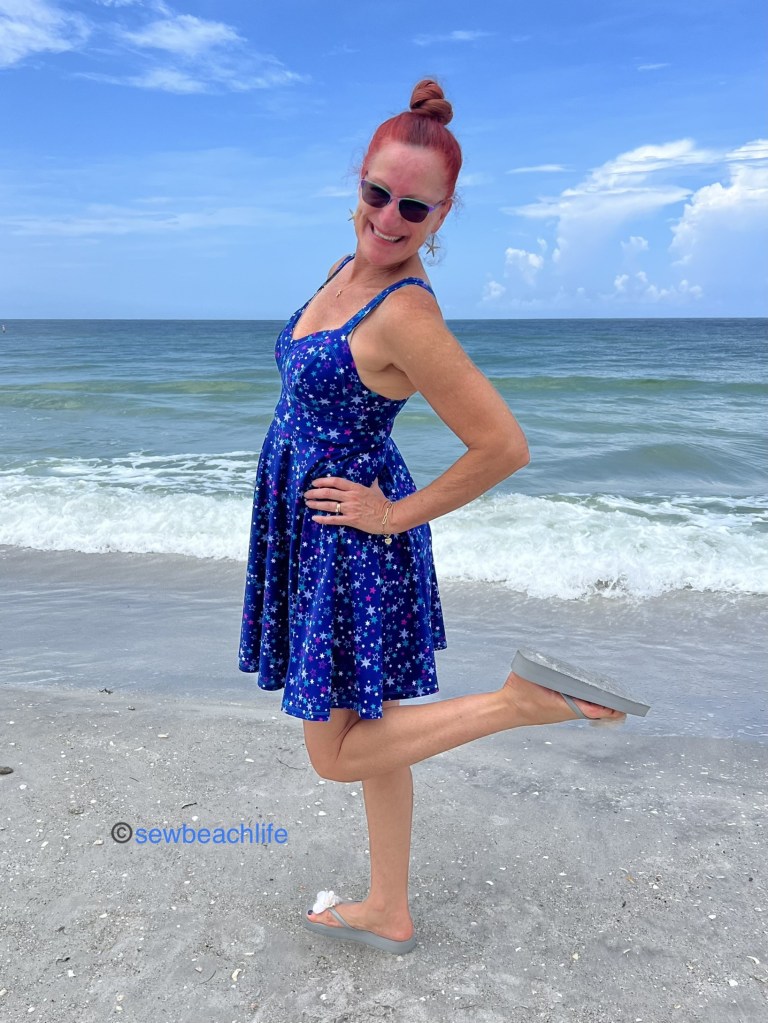
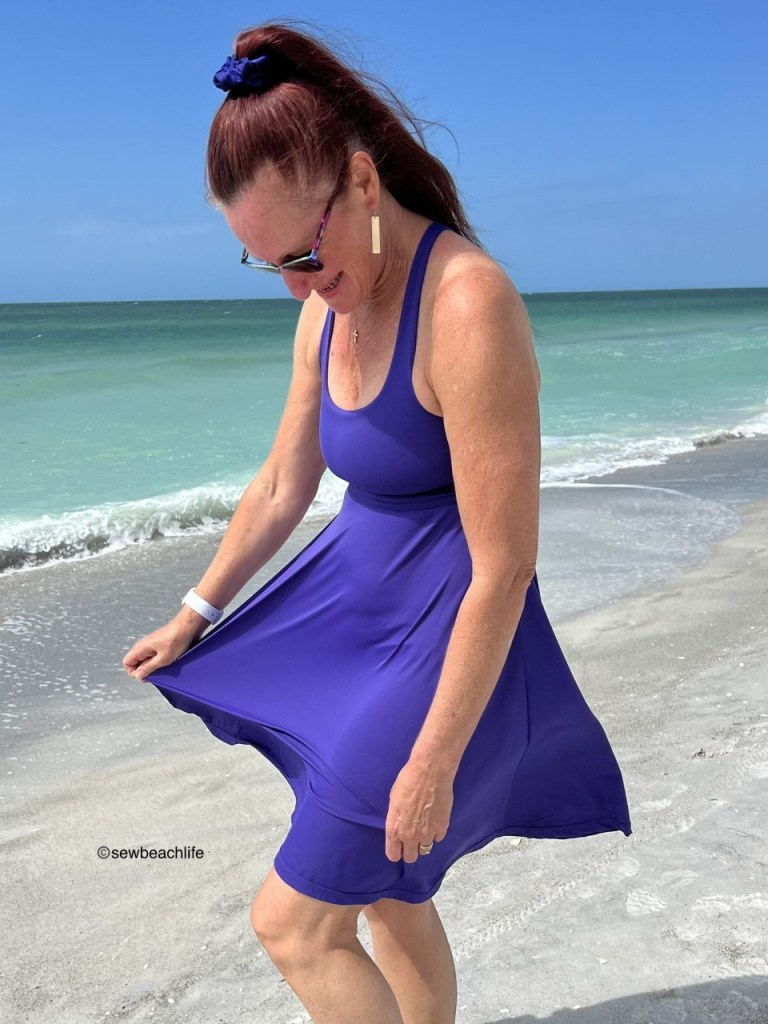
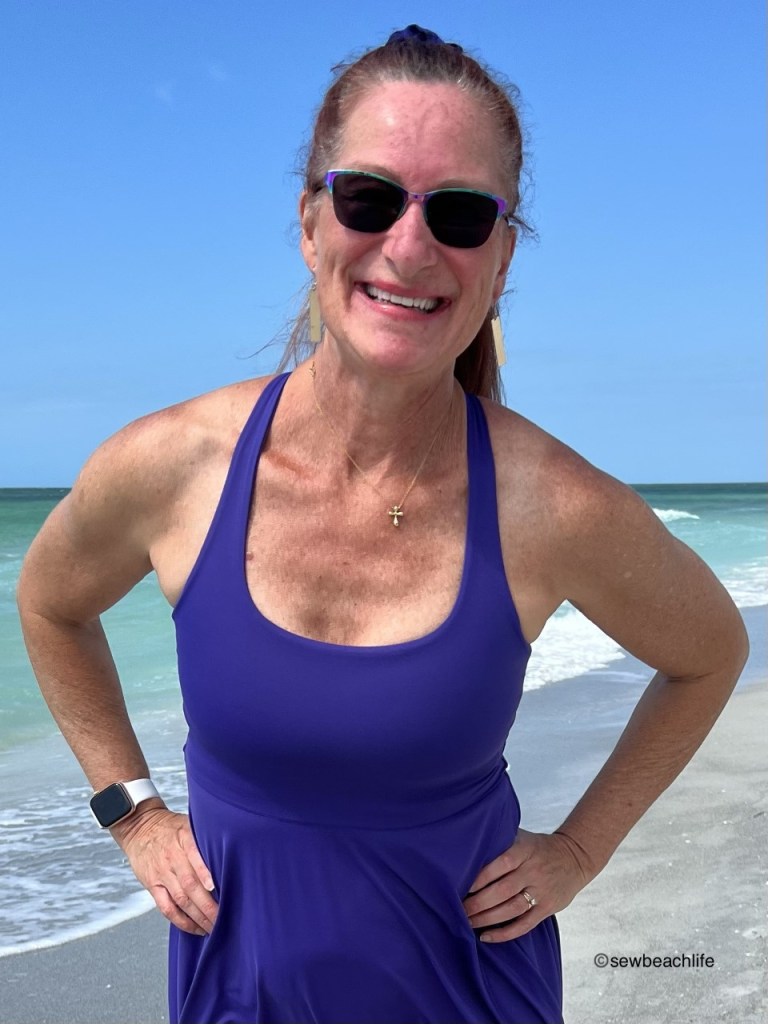
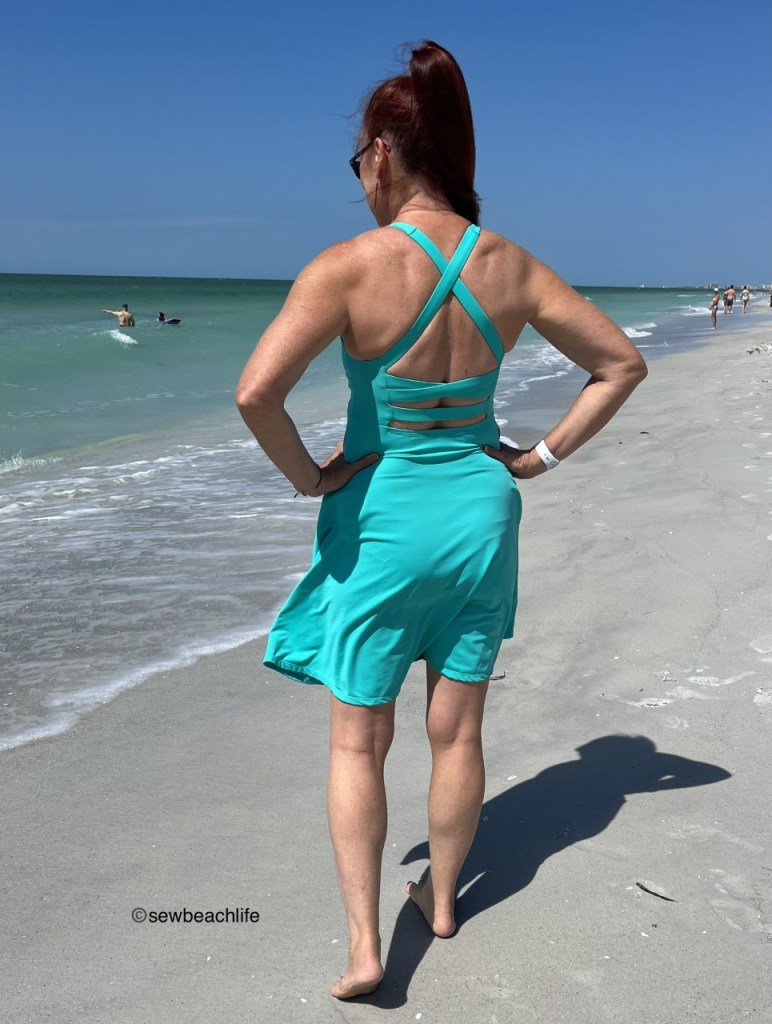
The new Savannah Dress pattern is so cute! I love that it has so many options: a fitted look (with or without a center back seam for extra shaping!); a half or full circle skirt; narrow or wide straps that can be sewn as straight, crossed or in a V; an optional shelf bra, with a full bust option; and an optional removable bra cup panel.
I don’t normally wear fitted dresses, but this one intrigued me. I’m super glad that I’ve made a couple because they are comfortable and perfect for the sunny weather here in Florida.
Fitted dresses are great for walking the beach because even on a windy day, you don’t need to worry about a full skirt blowing up in the wind. Although technically, you don’t need to worry anyway, because this pattern includes shorts too!
I chose the straight skirt option for both of my dresses and made the optional shelf bra (because who wants to deal with a strapless bra?) with crossed straps. The first dress had the one piece back, but several pattern testers thought that perhaps a seamed back would better fit and accentuate our curves. The designers made that option happen, and I like it!
Have I mentioned how much I love well-drafted patterns, and designers who work hard to try and make a great fitting pattern? Probably several times now! It really does make a difference in your sewing success when you use a well-drafted and tested pattern, and grade to fit your body.
Speaking of grading, always start by taking fresh measurements of your upper and full bust, waist, and hip, and reference the size chart before printing your pattern. Use the layers function when you print, and print just the size(s) you need. You may want to print a size larger and/or smaller if you’re on the edge of a size range. My upper bust measurement puts me in a size E, with my waist and hips falling into size G. So that’s how I graded the dress, and made the shelf bra in size E.
I didn’t use powernet in the shelf bra of the purple dress, but I did add the optional bra cup panel in case I ever want to add cups. It’s pretty supportive, even without powernet. This purple nylon spandex tricot was purchased at Phee Fabrics, and I love the happy color!
Supportive enough, even without powernet or bra cups, which is saying something considering I am a mature Grandma!
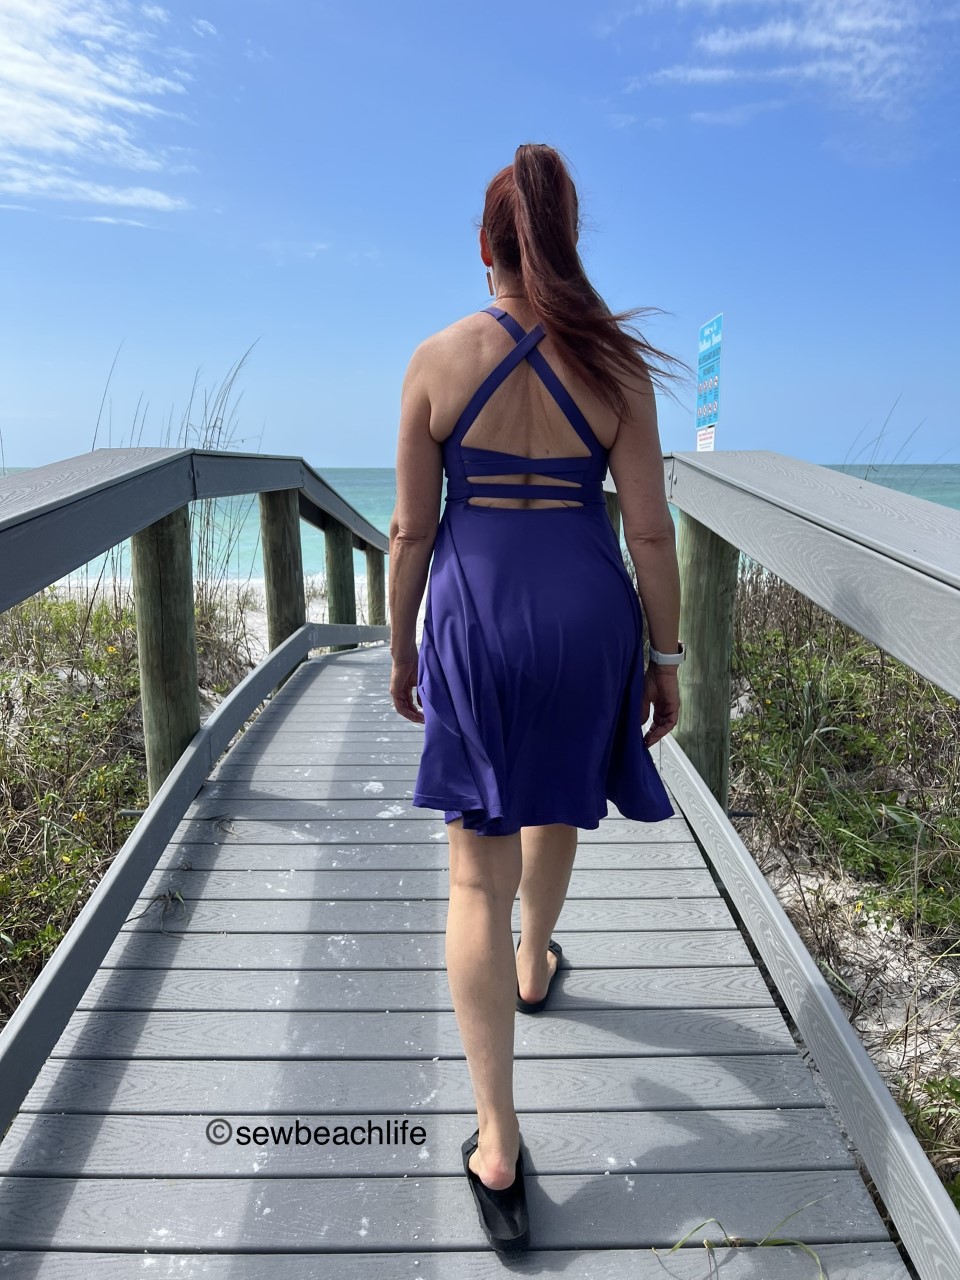
The center back seam really does add nice shaping if you have a curvy booty, or sway back. It also seemed to save on fabric, because I was able to fit my blue dress on one yard of 60″ fabric. If you’ve followed my blog or noticed my comments on sewing pages, I am all about playing fabric tetris to use the least amount of fabric possible, because I love high quality fabric. The beautiful blue nylon spandex fabric was purchased from Porcelynne.
The center back seam shaping fits nicely over your curves. And if you’re wondering, my straps are crossed and stitched at 2″ to either side of center.
I decided to use powernet as the optional bra cup layer on the shelf bra of the blue dress. I probably should have used a layer on the shelf bra back too for a little bit of smoothing, but whatever! Hopefully people are looking at my back muscles from twenty plus years of yoga rather than the back fat. 😉
A bit more support with the layer of powernet, though I don’t know why I bothered cutting the openings for bra cups, since I don’t use them.
Did I mention that the dress has multiple length options? I cut on the shortest length line, adding 1″ to the length because I am tall. The longer lengths hit below knee, which isn’t my thing on this style of dress. The circle skirt pattern pieces are formatted so that you can easily choose the length you want. Super helpful, because when I make the half circle skirt version, I’ll make it a bit longer than this.
Slightly above the knee seems to proportionally be the best length on me for summer dresses.
Do you want to hear something amusing? My husband and I walk along a busy road to the beach to get photos. It is spring break season, and traffic is heavy. First, I got whistled at while walking. Hahahahahaha! And on the way back, a young gentleman leaned out the window of a passing car making, lets call them complementary comments on my appearance. Oh my! I mean, obviously my husband thinks the dresses are “hot” and loves it when I wear them. But it cracks me up when a (much) younger dude still thinks I’ve got it! 🙂
Making a pattern that fits your style and body not only looks flattering, but gives you that extra boost of confidence to really enjoy wearing what you make.
The details:
Savannah Dress from GreenStyle, in sizes B-M (fits full bust sizes from 30″ to 61″, hips from 32″ to 62″)
Thank you for reading and sharing my love of patterns, sewing, fabric, and creating practical, useful garments! ❤
The links to GreenStyle may be affiliate links (if I did them properly!) which means that I may earn a few pennies if you use my links without it costing you anything extra. Since this is my blog and represents me, I always give my honest opinion about any patterns, fabric, thread or supplies that I talk about. I don’t even bother to use aff links when I share on social media, so obviously it’s not a big deal to me whether you choose to use them. I do like knowing whether the time I spend writing posts actually interests people enough that they take a look at the patterns I review, but I write for me. It’s one more creative pursuit that I hope is helpful or interesting to others. I’m writing to share my love of sewing, not to make money! 🙂
It’s a dress, crop, top, cami, and corset style top all in one
Sometimes a pattern testing call just speaks to you, so you apply and hope to get chosen for testing. I’ve never tested for Ragamuffin Patterns before, and was excited about testing for them. I’ve got to say, Jennifer was super easy to test for. She was very open to all comments on or questions about the pattern pieces, construction, and how everything fit all the testers.
One of the main reasons I was drawn to the Princess Party Dress was the cup size options and the flattering shaping they provide. Whether you have an A or an E (or larger) sewing cup size, having cup shaping that fits your body means you’ll get the most customized and flattering fit.
To ensure proper sizing, testing started with a cami top. My measurements put me in a size Large E cup. I graded out to an XL from waist to hips because I was making the classic length and using rayon/spandex, and didn’t want the back to ride up. Fabric will always choose the path of least resistance, and if it’s too snug across the hips, it will ride up towards a narrower part of the body.
My cup sizing was spot on, and the E cup size fit well.
The cup shaping is so flattering, and the straps are perfectly placed to hide my bra straps. Since I was using a somewhat lighter weight rayon/spandex which doesn’t have as much rebound/recovery as say a nylon spandex swim fabric, I reinforced my straps with elastic.
Obviously I could have done a better job of pressing the hem before taking photos. Yikes! 🙂
Since I knew that the size Large in an E cup fit, I was ready to sew my dress. I contemplated whether to do the princess seaming on the bodice, along with the seamed cups. After a bit of dithering, I decided that with a printed fabric the simple bodice would look best, especially since I planned to accent the cups, straps, and hem with coverstitching in a contrasting color.
I thought that my turquoise coverstitching was quite bold, but it doesn’t look like it in this photo!
One of the best things about sewing your own clothes is that you can adjust things to fit your unique body. For instance, I am longer than average from shoulder to bust point, so I made my straps 14″ long. For being taller than average, I am a bit short-waisted. I tried on my bodice before adding the skirt, and ended up taking 1″ off the bodice in the front, tapering up to 1-1/4″ at the side seams, and up to 1-5/8″ off at center back. I love customizing clothes for a perfect fit, it’s just so satisfying!
Who can resist twirling in a circle skirt? ❤
Since I’m tall, and wanted to ensure that the knee length dress actually ended up at the top of my knees, I cut the waist at my size large, but cut the hem at P2 length, which ended up perfect! It’s long enough for modesty, but short enough to be fun and flirty. Here’s my favorite tip for hemming a circle skirt: serge the raw hem with the differential turned up to 1.5. This will slightly gather the bottom so that when you turn it under to hem, it will lay nice and flat for you.
It’s a perfect summer dress, and I wore it to a party that weekend. The nylon/spandex swim fabric from Ragamuffin Fabrics is breathable, comfortable, and perfect for a fun, swishy dress.
I’m very happy with my new Princess Party Dress. It fits well, it’s a flattering silhouette, and with cup sizing, it lays smoothly over the bust, with no wrinkles or pulling. Yay!
Patterns with plenty of options really make me feel like I’m getting my money’s worth. The Princess Party Dress pattern includes a simple cami, cami with three piece cups (with or without princess seam panels), a lace-up corset style option (with front or back lacing), narrow, wide, or tied straps, cami lengths from crop to classic, and peplum, mini, or knee length skirts for the dress option. Whew! I hope I’m remembering everything.
Sorry for the crooked photo of the graphic of the options. I’m traveling this week, so I’ve got to work with what I’ve got!
I’ve worn the dress and the cami a couple of times now, and am very happy I made them. They are comfortable and cute additions to my wardrobe whether I’m taking my granddaughters for a stroller stroll, attending a party, or walking the beach.
I’m pretty discerning when it comes to pattern testing, and only test when a pattern looks like something that would get a lot of wear. When I saw the tester call for the Stitch Upon A Time Spellbound Bra and Dress, I applied right away. That criss cross back is exactly what I’ve been looking for!
When you’re a bit busty, you’ve got to love a pattern that has cup sizes. Seriously! There don’t seem to be many designers in the .pdf (or paper) pattern world that include multiple cup sizes. Including cup sizes makes a pattern fit so much better. The Spellbound includes sizes XXS to 6X, along with cup sizes A-G (determined by the difference between your full bust and upper bust). Per the measurement chart, I made a size small D cup. The size chart on this is spot on, and did not require any grading. The strap lengths were perfect (which seems amazing to me because obviously there is a lot of math involved to get all five strap pieces the proper length for each size).
Although it is a shelf bra and relies upon compression, I feel quite comfortable with the amount of support. If you wanted to, I suppose you could add bra cups during construction, but I don’t feel the need to do so. This is coming from a girl whose regular bras have underwires, so that is saying something!
Pretty and supportive!
There are usually changes and updates during testing, which is kind of the point. A designer wants to ensure a great fit on real bodies in a wide range of body shapes and sizes. A higher neckline option was added for anyone that prefers a little more coverage. Another tester and I commented that we wanted to hack the bra into a dress, and Kelly (the designer) made that happen!
Why does it always seem to be windy when I try to take photos of a new make?
Having this bra pattern turn into dress just makes me so happy! I love, love, love it! The half circle skirt is swishy, but not too full. It’s super easy to get dressed for the day when you can wear a dress with a built-in bra. The knee-length option hits in just the right place, even on a taller girl like me.
I know some people get frustrated when trying to hem a knit skirt with a curved hem, but here’s my not-so-secret tip to make it easy: serge around the raw hem of the skirt with a 4 thread overlock with a stitch width of M, stitch length of 2, and up the differential to 1.5. This will slightly gather the hem, curling it up, which helps it to lay flat to hem. Then I like to pin up a 5/8″ hem and coverstitch it. It turns out perfect every time. Make sure to follow up with a nice press for a professional finish.
The criss-cross straps show just enough skin to look and feel sexy. Combined with the supportive front, it’s definitely a confidence boosting look for me.
Obviously one dress wasn’t enough for me, 😉 so I’ve already made two. I’m contemplating over what fabric I should try next. The turquoise dress is a nylon spandex tricot (swim) fabric. The purple dress is a nylon spandex circular knit. Both fabrics were purchased from Phee Fabrics a while back, so I don’t know if these particular colors are still in stock. It’s important to use fabric with good stretch and recovery (rebound factor) so that the bra fits well and stays somewhat firmly against the body. If you have a larger cup size, I also recommend using powernet. Though it is optional, I like the extra bust support it provides.
No matter how far forward I lean, I still feel supported.
I can wear my dresses to walk the beach, or go to the grocery store, or out to dinner. (If it’s at a restaurant that has gluten and dairy free food that’s safe for me to eat!) which is quite the challenge for me. My journey of food allergies deserve a discussion of their own on Sew Beach Life, and will probably be my next post.
The Spellbound Bra and Dress is flattering whether I’m sitting or standing. Even on a windy day! 🙂 There is a peplum top cut line on the skirt that will turn the bra into a cute, casual top. But I go to yoga class four days a week, and a flowy top isn’t practical for forward folds and headstands! 🙂
If you follow my page, you know that I can never leave a pattern well enough alone. Especially a pattern that I love as much as this one! So I had to turn this bra into a workout top. I mashed it with the Versa Cami and came up with something fun.
I wanted the front to be one piece, without a seam between the bra and body of the top. The back of course, has to have a seam.
To get the front pattern piece, I lined up the front of the Spellbound at the lining cut line with the front of the Versa Cami at the shorten or lengthen here line on the pattern piece. Once I traced down to the bottom of the bra front piece, I started grading out for my hips. My grading went from small to large, and I removed one inch from the small length and large width at the hemline.
To get the back pattern piece, I started at the shorten or lengthen here line on the Versa Cami, and graded out for my hips. Originally, I just went straight across and cut on the shorten/lengthen line. But after sewing it up, I realized that the straight line gave me too much fabric at center back, and didn’t show the same amount of skin that the dresses show in that area. So I refined the pattern piece and used the curve from hem of the Spellbound skirt at the top of my back piece. In hindsight, I’ll probably just use the top curve of the skirt for the top curve of my top on the next one. My grading went from small to large, and I used the small length and large width at the hemline. You may be wondering why I shortened the front piece an inch but not the back. Two reasons: I like my workout tops to hit at hip level (the Versa is a bit longer than that); and because the back has a 1/2″ seam whereas the front doesn’t.
The pattern pieces I created to hack the bra into a workout top.
As always, I don’t show full pattern pieces out of respect for the designers hard work in creating a pattern. But I am showing enough for you to see the smooth curves of my grading. The front pattern piece is on the left, and the back pattern piece is on the right. A French curve ruler is a very helpful tool for grading and adjusting pattern pieces.
I wear my workout top to skate around the neighborhood as well as to yoga class.
The top is sewn together by following the tutorial for the Spellbound bra up to the point of hemming, except for one thing. When sewing the bra front (turned into a workout top) piece to the bra side piece, don’t sew all the way to the bottom of the side piece. Stop 1/2″ from the bottom to leave yourself fabric for the back seam. Then snip tobut not through the stitching line. This will allow you to press the seam toward the back and top or coverstitch as per the tutorial. You’ll sew the bra lining front and side pieces together as per normal.
I changed the construction of the Spellbound bra lining piece a tiny bit to suit my preferences. I am longer than average from shoulder to bust point and needed to add 5/8″ in order for the elastic to land in the perfect spot under my bust. Although a higher cut line was added to the pattern, my unique body shape requires the elastic lower because I needed the entire bra to slide up, not just add height at the front. This is a common alteration I have to make on a lot of tops and dresses, not just this specific pattern. Just one more reason that I sew- I can make clothing that fits my body. Because I don’t like elastic touching my bare skin, I added another inch so that I could flip the elastic up and have fabric against my skin.
I cut my powernet at the original lining and powernet cut line and the bra main fabric is cut at the original bra cut line. The bra lining is the only piece that I lengthen.
As per the tutorial I basted the powernet to the wrong side of the lining piece. Here’s where I go rogue from the pattern tutorial: I serge the elastic to the wrong side of the lining, then flip it up to fully encase the elastic. Use plenty of pins to hold the elastic in place and coverstitch.
Notice how the serged elastic overlaps the bottom of the basted-in-place powernet?
After top or coverstitching the edge of the elastic in place, remove the basting stitches along the bottom of the powernet. I purposely don’t lengthen the powernet to the same length as the lining because I don’t want the bulk and stiffness of the powernet in the enclosed elastic. It just needs to be long enough to get caught in the topstitching.
My other tip involves the straps. Once you’ve threaded the elastic through the straps, zig zag both ends of the straps to ensure that the elastic stays aligned with the ends of the straps.
You’ll notice how helpful the zig zag basting is when you are pulling the top straps through the bra, and when you’re criss-crossing, pinning, and stitching all the straps at the back.
Here’s how the straps on the workout top hack look once they’re stitched in place.
There are a couple of things to notice in the photo above. First is the clean finish of the enclosed elastic on the liner if you choose to go rogue like I do. The second item of note is the snip on the side seam that will allow the back bottom piece I made be stitched in place.
I add 3/8″ knit elastic along the top of the back workout top or skirt piece. I don’t take the elastic all the way to the side seams, because I don’t want bulky seams. It’s just there to give a little stability to the top of the back of the skirt or workout top bottom back piece. Once the seam connecting the bra to the skirt or workout top back bottom is complete, I fold the elastic down, pin it in place and coverstitch it.
Coverstitching is probably trickier than topstitching in this small area, but I’m so used to working with my machine (I coverstitch a lot) that it isn’t a big deal to me. Either method works and will give nice results.
After that it’s just pinning and stitching the bottom half of the side seam and hemming your new top! You can wear it to the gym, to yoga class, or to skate around your neighborhood.
Even though I skate on a somewhat regular basis, it’s hard to keep from rolling when you’re trying to get photos on the slope of a bridge!
In case you’re wondering what capri length leggings I’m wearing, they are the Stitch Upon A Time Legend Leggings, posted about here. They’re getting a little too big, but I still like them. I should take them apart and make them in a smaller size.
Trying to get nice photos on the beach on a super windy day when it’s not even 60 degrees F makes for some interesting shots!
Luckily the next day was warmer and I got to go for a little skate around the neighborhood.
Whether you make the Spellbound bra, peplum top, or dress version, or play around with my idea of a Versa Cami hack, I’m pretty certain that you are going to love this pattern as much as I do!
Thank you for reading and sharing my love of creating, sewing, serging, great patterns, pattern hacking, fabric, and making beautiful, well-fitting garments! ❤
The links to Stitch Upon A Time may be affiliate links, which means that at no extra cost to you, I may receive a few pennies if you purchase through my link. As always, I only give my honest opinion. After all, it is my blog, which represents me!
I go to yoga class four days a week, so workout wear is an important part of my wardrobe. Roller skating has made it’s way back into my life as well, and I’m here to tell you, you can’t skate without smiling. I seem to break out into a grin every time I put my skates on. Having these two forms of exercise in my life brings a certain balance that just feels right.
It makes me happy that I was able to complete two workout outfits as part of the GreenStyle Fit Capsule Challenge. Even though both outfits are Spark Tights and Power Sports Bras hacked into workout tops, they’re very different looks. My first purchase of GreenStyle fabric was this super cool Super Nova Power Flex. It’s a nylon/spandex blend, and I love how colorful it is. Scraps of grape supplex (a color no longer available) from Phee Fabrics was the perfect accent fabric to pair with it, so I decided to go wild and color-block the bodice and then accent everything with a reverse triple coverstitch using MaxiLock radiant turquoise.
Coverstitching in turquoise really accented the fun colors and contrasted with the grape pockets and panels and cool Super Nova print.
I added a panel of white powernet to the back of my top for extra airflow during sweaty workouts. If you’re like me, and dislike straps near your neck, doing straight straps is such a game changer. There’s no need to ever adjust your straps again! To see how to do straight straps and add panels, check out this post.
I love using bra strapping and doing straight straps with the U-back.
My other Power Sports Bra workout top and Spark Tights combination is completely solid. I used a shimmery, almost glittery nylon spandex athletic fabric from JoAnn Fabrics. Since the fabric was shimmery I kept everything one color and achieved an extra pop of color by reverse triple coverstitching with Superior Threads Fantastico #5028 Peacock Plume. I just love their variegated threads!
The rising sun really picks up the sparkle in the fabric, and the beautiful sheen of the thread.
Once again I chose the U-back of the Power Sports Bra and used straight straps. Can you tell that these are well-loved patterns? 🙂 The straps were cut along the edges of the fabric where it wasn’t shimmery, just for a bit of accent. And to not waste that couple inches of fabric! 😉
My non-shimmery straight straps.
The Valerie Dress, another well-loved pattern, hacked to be sleeveless and made in green rayon spandex will get a lot of use. I wear my Valerie Dresses all the time. Sometimes as a dress, sometimes as a nightgown or loungewear. I’ve also mashed it with the Staple Tank for a slightly different look, seen here.
It was a windy day, which made the dress cling to my body.
If it gets chilly, I can slide on my new Sunday Cardigan, hacked to have tiers, butttons, and a sleeve flounce. You can read about that here.
The cardigan works over dresses, shorts or pants, swimwear or workout wear. I love it!
Last but not least, I had to make another Staple Tank! You can never have too many of these tanks. I was gifted some pretty fabric scraps by a woman in one of my Facebook sewing groups. And this fun crocodile skin rayon/spandex print was actually large enough to eek out a new tank! It makes me smile to have such a fun printed tank!
I like using binding to finish my Staple Tanks. It gives it such a clean look.
Whew! That was a lot of sewing and posing for photos. 🙂 I was pretty inspired by the Fit Capsule Challenge this year, and I’m excited to have made so many cute things. It speaks volumes about how I feel about GreenStyle patterns and the way they fit my body so well. I may have plans to make myself another workout outfit. 😉 I bought some navy supplex, and have some pretty fabric scraps to coordinate with it. But I need to make a few things for other people first.
Thank you for reading and sharing my love of creating, sewing, patterns, pattern hacking, fabric, and making beautiful, well-fitting garments! ❤
The links to GreenStyle may be affiliate links, which means that at no extra cost to you, I may receive a few pennies if you purchase through my link. As always, I only give my honest opinion. After all, it is my blog, which represents me!
Summer clothes are so much more fun than winter clothes. They’re light and comfortable, and tend to be more colorful. Swishy sundresses that you can throw on and head out the door are a great summer look.
The new Frolic Romper and Dress by Stitch Upon A Time is perfect for summer breezes. The wrap around skirt is full and swishy, and the top can have a halter tie or cross back straps. Mine started out as a halter top, which I thought was really cute.
The open back of the halter, is certainly sexy (so says my husband!)
But after wearing it a while, the weight of my bust pulled on my neck too much, so I turned it into a cross back.
I love the cross-back!
I think it’s just as sexy, and it’s certainly more comfortable for my neck. The wrap skirt is perfect for skimming over the belly, without being tight or revealing.
It’s such a fun look, I can’t help but smile!
I thought it would be fun to climb up on the railing for a photo, to show the slit of the wrap around skirt. Try not to laugh at my version of a “sexy pose”. Hahahahahaha! Of course after climbing up on the railing, I had to jump down, in a perhaps not quite so lady-like fashion. 🙂
As you can see, it overlaps pretty far in the front, so there won’t be any wardrobe malfunctions!
I love the drape of high quality rayon spandex, it’s perfect for dresses. As I am not small-chested, I decided to use a nylon spandex tricot swim fabric as the inner layer on the bodice. The stronger rebound of the swim fabric gave me extra support and coverage. During testing, it was suggested to add elastic at the bottom of the bodice, sandwiched between the inner and outer layers for more support. Since I need maximum support, I used 1″ knit elastic.
To help keep the elastic in place (and give myself a guide for sewing the skirt on), I basted the main and lining layers wrong sides together, 1″ from the bottom edge of the bodice. I cut the elastic to fit snugly, yet comfortably under my bust, overlapped 1/2″, and zig-zagged the elastic to form a loop. Then I slid the elastic in between the fabric layers, and pinned at the quarter points.
I added more pins to ensure that the elastic would be evenly stretched before serging along the bottom edge.
After I serged the elastic around the bottom, it was time to add the binding. Since this is a summer dress, I wanted a fun pop of color for the binding, and decided to use the same teal nylon spandex tricot as I did for the bodice lining layer. To give my bust even more support, I added clear elastic when serging the binding to the bodice.
I always serge along the unfinished edge of binding before adding it to my garments. It adds extra stability when you wrap the binding and top or coverstitch it.
Then I pressed the binding up toward the seam allowance, wrapped it around the inside and pinned it in place. Then it was time to coverstitch.
You might think I use too many pins, but, I like everything to stay perfectly in place so I can do a good job of coverstitching the first time, and not have to spend any time seam ripping!
Next came gathering the skirt. Have I mentioned that I dislike gathering? I like the look when it’s done well, but it is so time consuming to gather and pin in place! This is where that basting line above the elastic came in handy. The skirt got pinned to the bodice, right sides together, leaving the (encased) elastic below. Because I wanted to ensure that the skirt was even, I hand-basted the skirt to the bodice. Can I just mention how very grateful I am to live in this era of fancy sewing machines, sergers, and coverstitch machines? I cannot imagine how long it used to take to sew all your clothing by hand.
The hand-basting paid off with pretty perfect gathers!
While I love the result, it was a bit time consuming to sew the skirt to the bodice above the elastic, rather than just serging it on. The next time I make this dress, I plan to add an inch to the bodice lining so that I can serge the 1″ elastic on, flip it up and coverstitch it. Then I’d take an inch off the main fabric bodice so that the skirt could just be serged to the outer bodice (and still line up with the bodice lining). It’s important that the seam line falls right under the bust to give the most flattering shaping.
The Frolic Dress just screams summer!
Suffice it to say that I love this dress! It’s comfortable and flattering, while hiding my love of buttered popcorn! 🙂 It’s going to get worn all summer long. Ok, did anybody else just start singing?
Technically, the cross back straps should have gone through loops, and then just tied in a bow. But I am long from shoulder to bust, and the straps didn’t seem quite long enough for a bow. And well, I like things clean and simple. So I just sewed them into place. It works for me!
The links to Stitch Upon A Time are affiliate links, which means that at no extra cost to you, I may receive a small commission if you purchase through my link. As always, I only give my honest opinion. After all, it is my blog, which represents me! Thank you for reading and sharing my love of creating, sewing, patterns, fabric, and making beautiful, well-fitting garments! ❤
Pattern Hacks And Serger Tips For The GreenStyle Valerie Dress
When the GreenStyle Creations Valerie Dress was first released, I put off buying it. I don’t know why, since 2020 was definitely the year for lounge wear! 🙂 Now that I’ve whipped a couple of them up, I’m really wondering why I waited! It’s a comfortable, flattering dress that can transform from lounge wear, to beach cover-up, to throw-it-on-and-run-to-the-store, to pretty enough to wear to church.
The shaped seamed back gives a flattering, comfortable fit that is so much nicer than a sloppy, boxy T-shirt. It has sleeves ranging from cap to long, but of course I chose to go sleeveless. #floridalife The curved hem (a shirttail hem) gives a more casual look, so I chose that and the scoop neckline for my first make of the pattern.
Talk about comfortable! This immediately became my new favorite nightgown and got worn to bed that evening. And worn around the house the next day while sewing. Surely I’m not the only one to sew in my lounge wear? Be honest, you know you’ve done it! 😉 I chose to bind the neckline and armscyes rather than do bands just because I can.
Use the same length for binding as recommended for your band, but only cut your strip 1″ high. Stitch the short ends together and quarter and pin the binding to the neckline right sides together. When you serge the neck binding on using the normal 3/8″ seam allowance, with your stitch width set at M, your machine will trim 1/8″ off. Press the seam allowance up, and wrap the binding around to the inside, pinning in place. Then top-stitch or cover-stitch it in place. It’s a super easy, yet professional looking (although technically faux) binding finish.
Windy days make taking photos a bit challenging!
People sometimes get nervous about hemming a curved shirttail hem, with memories of past wonky, wrinkly, bunched up hems. But it really isn’t hard if you do a couple of things. First of all, don’t sew with fabric that doesn’t have “recovery”. Generally speaking, this means it contains spandex/Lycra. When you stretch your knit fabric out, it should come back to its original size. If the fabric stays in a stretched out shape, it’s a sign that the fabric is going to grow and hang oddly and unflatteringly. Just don’t waste your time with it. Secondly, the Valerie pattern has a nice gradual curve not sharp turns, which makes it easier.
And here’s the most important tip: serge along the hemline on the right side of your dress, using a 4 thread overlock, stitch width of M, stitch length of 2 to 2 and a quarter, with your differential turned up to 1.3. This does two things. It gives the hem stability so that it won’t stretch out while top or cover-stitching. It also very slightly brings the edge in a bit. Then when you pin the hem in place, you won’t have excess fabric bunching up. You’ll just have a smooth beautifully curved hem.
Smooth curves and no weird bunching, it’s magic I tell you! 🙂
One Valerie dress led to another… as in the very next day I decided I needed another one! To change things up, I did a mash and a hack. Mashing the Valerie with the Staple Tank was a no-brainer, since the Staple Tank is my most used tank pattern. Simply layer your Valerie pattern with your Staple Tank pattern, matching the natural waist markings. Then trace the Staple Tank bodice merging it into the Valerie body .
This photo led to my next tweak, further pattern grading.
A seasoned sewist has learned and understands the importance of grading. But a new sewist is likely to be a bit nervous about the idea. You mean I bought a pattern and it’s not going to magically perfectly fit my unique body and shape? What??? Okay, the possibility exists that it will fit you perfectly well, at least as well as your basic ready-to-wear. But the more you sew, the more demanding you become about getting the best fit possible. And the first step towards that is measuring and grading. Pattern companies include a measurement chart in the tutorial, and it’s important to look at them.
You may be tempted to say well, my bust falls into size x, and my waist and hips are size z, so I’ll just make size y. Depending on the ease of the garment, it may fit. But it will likely be a bit large on your shoulders, and the top or dress may ride up because it’s a little too snug across the hips. Personally, I like when patterns include an upper bust measurement, as well as a full bust measurement. My bust is fuller than average for the frame of my body. So if I choose a pattern size based on my bust measurement, it’s likely to be too wide across my shoulders, which leads to bagginess above the bust, with the excess fabric digging into the front of my armpits. Super uncomfortable and not an attractive look. So I generally trace a smaller size above the bust, grading out to my bust size below the armscye. If my hips measure on the edge of two sizes, I generally grade out to the bigger size to give myself more room for the booty.
Grading to fit your curves leads to a curvy sexy fit.
All of this is pattern dependent of course, but on a more fitted style like the Valerie Dress or Staple Tank, it’s super important to grade. Some people get all fancy using a french curve to grade their patterns. Since I don’t own one, I just draw gently curved lines from one size to the next. Think hourglass curves rather than straight lines when going in or out on sizes.
Using the lower scoop back of the Staple Tank really changes the look of this dress.
You kind of get a hint of my side vent hack in the photo above. Since I was doing the straighter hem on this dress, I thought it would be fun to add some side vents. I marked the sides of the front and back pieces 4″ up from the hem, and made a 3/8 ” snip.
Apparently it’s time to buy a new marking pencil, since I’m working with just a pencil stub! 🙂
Serge from the snip to the hem, along the bottom raw edge, up to the snip on the other side, on both the front and back.
Serging the edges makes it easy to get a clean finished hem.
Then follow the pattern tutorial for assembling the dress. When sewing the side seams together, be sure to fold the lower vent area out of the way when serging off the snipped edge. Tuck your serger tails, and press the vents to either side and cover stitch. Then pin the hem up and coverstitch. You’ll end up with beautifully finished side vents.
I could have made the vents 5 or 6 inches long and still felt comfortable.
I love the look and fit of this hacked, mashed dress! It’s comfortable, and kind of sexy, while still looking classy. In fact I wore it to Mass on Sunday with one of my Sunday Cardigans.
It was hard to stop grinning in a dress that made me feel confident and pretty!
Here’s the takeaway: grade to fit your body; don’t be afraid to mash the Valerie with one of your favorite patterns; side vents are fun; and try my serger tips and tricks. The details: both the emerald and navy dresses were made with rayon spandex purchased at Phee Fabrics.
So, which version should I make next? I’m thinking I need to try the V-neck!
This post may contain affiliate links. This means that at no extra cost to you, I may receive a small commission if you purchase through my link. As always, I only give my honest opinion. After all, it is my blog, which represents me! 🙂 Thank you for reading and sharing my love of creating, sewing, patterns, fabric, and making beautiful well-fitting garments! ❤
I couldn’t resist purchasing the Pattern Emporium Follow Me Wrap Dress when it first released, even though I am not a flounce or ruffles kind of girl. A girly girl, absolutely! I love dresses and all sorts of womanly things. But frills, flounces and ruffles? Not my gig. The pattern includes a plain wrap version, and four lengths from mini to below knee. But the flounce version just spoke to me, and I knew a knee length sleeveless dress would be the most worn.
When I traced the pattern in my size, I originally added 2″ to the length of the skirt because a lot of my height is in my legs. And I wanted it a flattering knee length that could also be worn to church. Then I tried laying the pattern out. No matter how hard I tried to Tetris the pattern pieces, I could not make them fit on a two yard cut of fabric. After debating whether to skip the flounce, and deciding not to, I set the pattern aside for a while.
Most of the knit fabric in my stash is a one or two yard cut, depending upon the weight and intended use of the fabric. I could have just ordered two and a half yards of fabric, but I prefer to place a larger fabric order to save on shipping costs. Then the pandemic hit, and I kind of lost the desire to sew for myself. I made masks for family members, and found sewing joy making clothes for my granddaughters. It was fun to upcycle unworn clothing and to use some of the older fabric in my stash to make cute toddler and baby clothes. Finally, it sounded fun to sew something pretty for myself.
So I pulled out the pattern and decided to just go for it as written. I cut the added length off the traced skirt pieces, and kept the only other pattern alterations. The seam on the back bodice bugged me, so I folded over the center back seam allowance and cut the piece on the fold instead. To slightly widen the straps, the low round neckline was traced and cut one size smaller than the rest of the pattern.
The ingenious design of the wrap means that even when taking a walk along the windy shoreline, I didn’t have to worry about accidental undie exposure. The wrap crosses over far enough that even when the top panel is lifted by the wind, you still have full frontal coverage.
The dress feels fun and flirty, sexy and yet modest. You can also increase the modesty factor by using the higher neckline, and adding the cap, short, flounce, or long sleeves. The below knee length would change the look as well.
The dress was sewn entirely on my serger, and the actual sewing time was much faster than the pinning time! 🙂 It takes more than a minute to pin all that flounce to the bottom of the skirt. But it is such a fun touch that I definitely plan to use it on the next one. I also figured out a way to make hemming the flounce simple and easy.
Although you may be tempted to skip hemming, especially when using a high quality knit that doesn’t curl, if I’ve taken the time to sew a nice garment, you can bet that I’m going to finish it off nicely! Hemming curved skirts, or in this case a very curved flounce can be challenging. When you pin the hem up, there’s all this extra fabric (due to the curve) and it can get “bunchy” and wrinkly. But, if you serge along the bottom edge of the hem or flounce, and up the differential feed, it will very neatly, slightly “gather” the edge. I upped the differential to 1.3 on my machine, which is one click up from N(eutral) on most of the curve. On the more curved ends, I upped it to 1.5, which is two clicks up.
As you can see on this inside view of the flounce, I used a four-thread overlock stitch. The darker gray thread is my overlock, and the light gray thread is the looper thread of the coverstitched hem. On the bottom left where the flounce has a slighter curve the 1.3 differential made slight gathers. At the center bottom where the curve is sharper, upping the differential to 1.5 kind of gathered it a bit more, while still keeping the fabric smooth and unwrinkled. All I had to do at that point was take it over to my ironing board and press the hem up into place. I used a few clips to keep it in place while the fabric cooled, but it was super easy to coverstitch (or topstitch with a single or twin needle if you don’t have a coverstitch machine) at that point.
Once you start playing with a coverstitch, you tend to coverstitch everything. The binding at the neckline and armscye was coverstitched, the hem was coverstitched, and the seam where the flounce was attached to the skirt got coverstitched. I did not coverstitch the waist seam, because who wants to draw attention to that area? 😉
Technically, this is my “muslin” or “toile”, as I went straight to my nice nylon/spandex tricot from Phee Fabrics, rather than making a test garment. But I know that Pattern Emporium patterns are a good fit with only minor tweaking for my body shape. And sewing with high quality fabric is so much easier than wasting time with flimsy fabric.
I really like my dress, but as with every garment I make, I’d like to perfect it. I’m thinking of raising the waist seam on the next one by approximately 1″ to hit closer to my natural waist. I’m also considering going down a size in the bodice, but doing a full bust adjustment to address the wrinkling across the bust and pulling up into the armpit area. Should I add an inch of length to the skirt to make up for the inch I plan to take out of the bodice? Do you think I’m on the right track with a smaller size and FBA?
Because I need more of these easy breezy summer dresses! Hmmmm, maybe some soft rayon spandex for the next one?
I hope you have found your sewing joy. But if you’re struggling, take the time to breathe deeply, then dive back in to a project that sounds fun to you. ❤
I’ve been guilty of buying a pattern, but not printing and sewing it right away on more than one occasion. Silly, I know! The racerback look is popular, cute, and probably why I hesitated on sewing one up. I’m not a fan of my bra straps showing, strapless bras aren’t really comfortable, and I don’t own a well fitting racerback bra. That sounds so silly, especially when you consider how many Brazi’s I’ve made. But here’s the thing- all the Brazi’s I make for myself have been hacked to have straight straps because I don’t like straps near my neck. My daughter likes the cross back Brazi, and tracing the pattern in her new postpartum and nursing size is on my agenda for today. Anyhow, the Spoxxy sat unprinted in my computer for a few months.
Then I saw someone post a Spoxxy made as a nightgown on the Stitch Upon A Time Facebook page, and quickly decided to make myself one! Who doesn’t need some new nightgowns after a few months of social distancing at home? Not that I lived in nightgowns, hahahahahahaha! 😉 Who am I kidding? I put on shorts and a tank top to go for walks and thoroughly enjoyed being comfortable in a nightie the rest of the day.
Since this was “just going to be a nightie”, I used some lightweight rayon spandex that I found at an estate sale. And of course I end up loving the look and want to just keep it as a dress!
Look at that grin on my face- I couldn’t stop smiling because it’s just such a cute, comfortable pattern. The racerback fits well, and the bands don’t bunch up where the upper back meets the gathered body. Which is a problem I have seen on similar styled patterns by other designers. I thinks it’s the angle of the cut?
The smooth curve of the racerback, the gathering at the back, and the over all shaping of the dress is quite flattering. The pattern calls for a band at the hip for the top version, and elastic at the waist for the dress version. I contemplated adding the waist elastic, but since the shaping hits perfectly at the natural waist and flares out to skim the hips, I didn’t see the need.
After I sent my daughter a photo of my dress, she commented that she needs some comfortable dresses that she can nurse in. So Mama dug through her stash and found bits of charcoal and gray rayon spandex that were just big enough to piece together a color-blocked version for her. Due to fabric constraints, I had to add a seam to the bottom section center back, but it’s still quite wearable and fun. I don’t have any modeled photos of her yet, since it takes a while for packages to get to another state.
Obviously, I need to make myself a few more Spoxxy dresses and/or nightgowns because the fit is just so spot on! Using a more substantial weight of rayon spandex (rather than the flimsy estate sale stuff I started with) will make it even better with improved drape and recovery.
So, the next time you notice an unused pattern sitting in your computer, print it out, and sew it up! Or give the Spoxxy a try, and see if you end up with a happy smile like me!
This post may contain affiliate links. This means that at no extra cost to you, I may receive a small commission if you purchase through my link. As always, I only give my honest opinion. After all, it is my blog, which represents me! 🙂 Thank you for reading and sharing my love of sewing, fabric, and patterns. ❤


 Obviously, I need to make myself a few more Spoxxy dresses and/or nightgowns because the fit is just so spot on! Using a more substantial weight of rayon spandex (rather than the flimsy estate sale stuff I started with) will make it even better with improved drape and recovery.
