Delphi Sports Bra

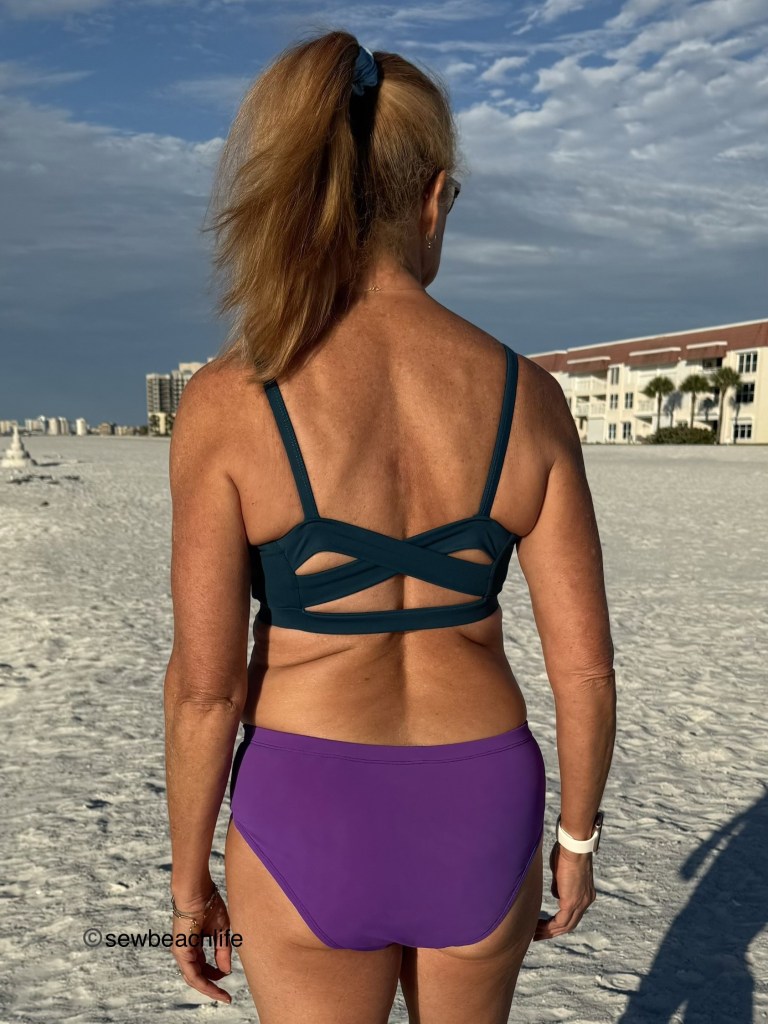
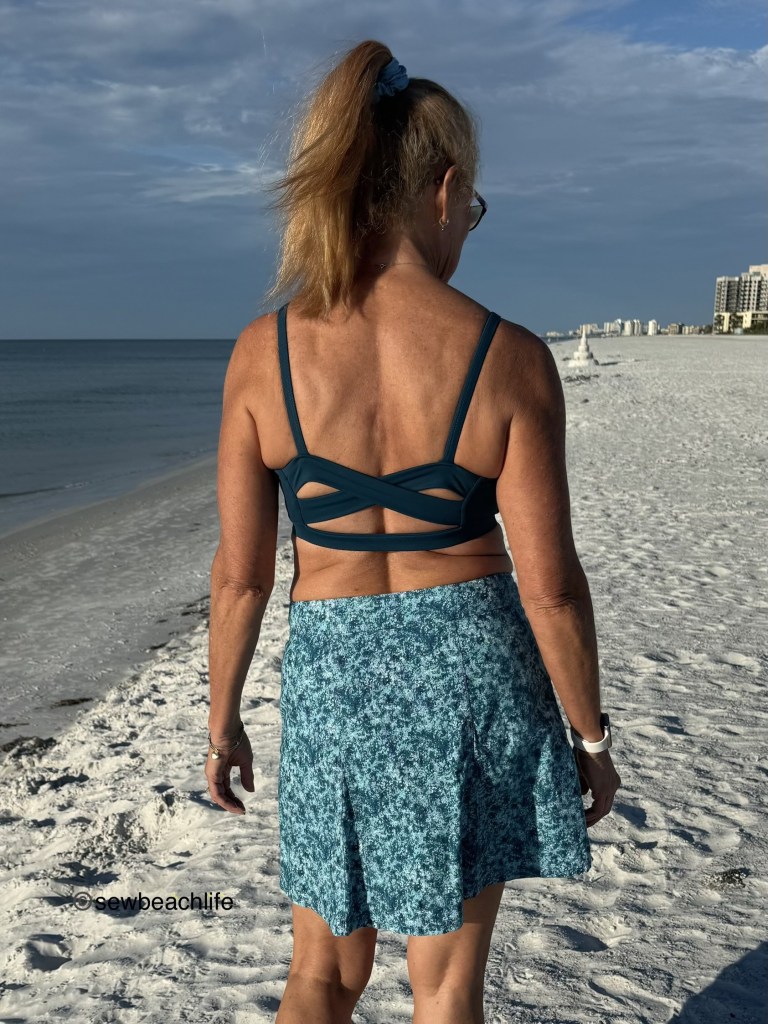
Who can resist a fun new sports bra? Especially with options for a super cute infinity, twist, or simple back design. I am all over trying new sports bra patterns, and the infinity strap design is just so unique and fun.

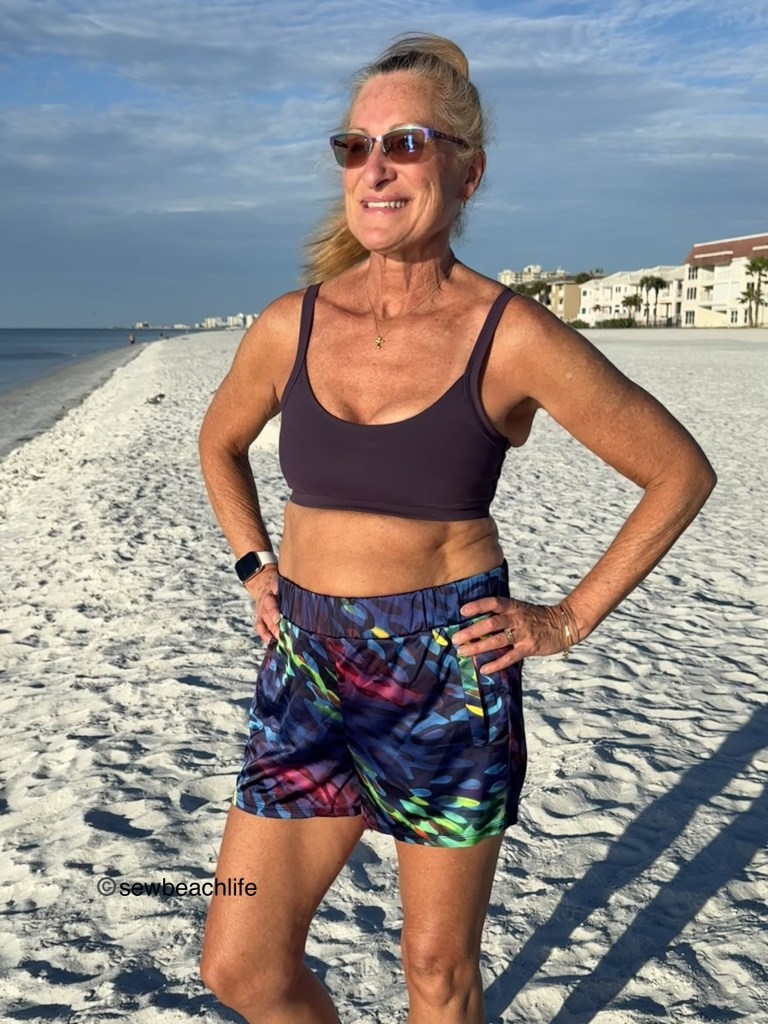
I don’t limit myself when it comes to wearing sports bras. They get worn to the gym, as a swim top at the beach and in the pool, and for everyday wear. They also get worn with shorts when I skate around my neighborhood, because that is #floridalife. πŸ™‚

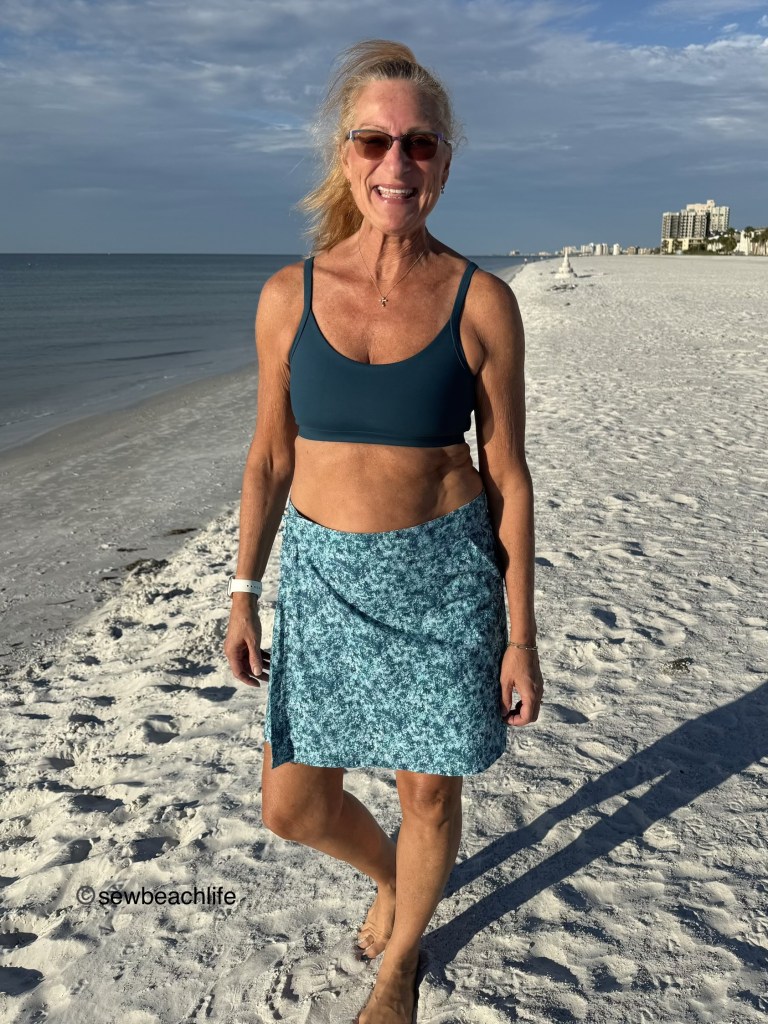
The Delphi Sports Bra pattern calls for athletic fabric. I used nylon/spandex Supplex and nylon/spandex Align 2 for my two bras. You could add powernet if you wanted, but I found that the compression and firmer rebound of Supplex and Align 2 were adequate for me. (For reference, I wear and buy a size 32D bra at Soma.)

I wore one of my freshly made bras all day yesterday and it was super comfortable. The straps stay in place, and the neckline depth is perfect. It’s high enough to be supportive, but low enough to not show under a scoop or V-neck top.

You can use 3/8″ or 1/2″ elastic in the straps. Although the pattern calls for 1-1/2″ or 2″ elastic in the band, because I am rather short-waisted (which seems weird for a tall girl, right?) I chose to use 1″ elastic in my band. Of course that meant adjusting my band height to 2-7/8″, but I love being able to personalize a pattern to fit my body. That’s one of the reasons that I sew my own clothes.

Greenstyle has once again nailed it on a fun, great-fitting, well-designed pattern with the Delphi Sports Bra. It doesn’t take a huge amount of fabric, and can be worn with shorts, skirts, leggings, and under your favorite top. Sizing ranges from 32″ to 61″ at the full bust. If you need it, there are 2″ and 4″ full bust adjustment pattern pieces for the front.

The details:

The Delphi Sports Bra pattern is one of the many awesome patterns by Greenstyle. I had some plum Supplex from Phee Fabrics in my stash for the first Delphi Bra I made. The teal Align 2 for my second bra was purchased from Greenstyle a while back. Although this particular color is no longer available, they have lots of pretty colors in stock. I also recommend the Signature fabric line, which is another high quality nylon/spandex athletic fabric.

For reference, I made a size C1 with the plum supplex. For the second bra, I again used size C1, but cut the front in size B2 width (keeping the C1 length), which feels more comfortable for my shoulder width and at the armscye. I dislike anything being too close in the armscye, and this combination works perfectly for me.

I can’t remember which pattern I used for the swim bottoms, but the Delphi Sports Bra is also shown worn with the Windward Shorts and Tidal Skirt, blogged here and here.

I purchased my 1/2″ and 1″ knit elastic at Wawak, along with the Maxi-Lock serger thread. There are steps in the pattern that I highly recommend using your sewing machine to stitch, such as the side seams, and attaching the back infinity straps. It’s also important to trim those seams to reduce bulk and help them lay more smoothly when turned out to the right side. I drive a Bernina sewing machine and LOVE it! Other seams and the cover-stitching on the straps were done on my Babylock Triumph, which I also love.

I cannot stress strongly enough how much easier and more fun it is to sew when you use high quality patterns, fabrics, and machines. It isn’t that you can’t sew with a cheaper machine, because I sewed for decades on much, much less expensive machines. But once I had saved enough money to purchase my current machines, I really feel like the quality of my work, and ease of sewing (due to less frustration with machine capacity, bobbin struggles, lack of foot height, and motor strength) has greatly improved.

Thank you for reading and sharing my love of patterns, sewing, fabric, and cute sports bras! The links to GreenStyle may be affiliate links (if I did them properly!) which means that I may earn a few pennies if you use my links without it costing you anything extra. Since this is my blog and represents me, I always give my honest opinion about any patterns, fabric, or supplies that I talk about. I do like knowing whether the time I spend writing posts actually interests people enough that they take a look at the patterns I review, but I write for me. It’s one more creative pursuit that I hope is helpful or interesting to others. I write to share my love of sewing and to encourage others to love it as much as I do! ❀

Trying Something New – Sewing A Sydney Bag

I like to challenge myself once in a while by making something totally different than what I usually sew. Greenstyle was testing the new Sydney Bag, so I signed up to test it. I’ve never made a “real” bag before. I’ve made a few lined tote bags, just making up my own patterns. But they were simple rectangles with pockets. Here was a real pattern with zippers, inner and outer pockets, and an adjustable strap.

I felt a bit intimidated, simply because it was so completely different than what I was familiar with. Don’t let the number of pattern pieces scare you. It just seems like a lot because there are outer main fabric, inner lining, and interfacing pieces.

No matter how many layers there were, I knew that my Bernina would have no problem sewing them all. It is truly the most fabulous sewing machine I have ever owned. If you’re ready to move beyond a basic model sewing machine, I recommend going to your local Bernina dealer and checking them out. It’s like driving a luxury car, once you’ve driven one, you can never go back to a “basic” model! πŸ˜‰

The Sydney Bag tutorial walks you through every step whether you’re a beginner bag-maker like me, or you’ve made dozens of bags. There are two sizes: small and medium, I chose small for both of my bags, but I’m here to tell you that they are not tiny. They’re just the perfect size to hold all the things.

The shape is fun, and gives you so much space for all the things.

I used upholstery fabric for the main outer pieces of both my Sydney Bags, and quilting cotton for the lining. The pattern calls for 1-1/2″ wide webbing for the strap. You can get polypropelene webbing in all manner of colors, but I don’t care for the “plastic like” feel of of polypropelene, so I used cotton webbing. I also ordered nylon webbing in black for future bags. It feels similar to the cotton webbing.

Something to keep in mind about cotton and nylon webbing is that you will need to turn the raw edge under twice and stitch it. Whereas you can simply melt the edges of polypropelene. The pattern calls for a yard and a half of webbing for the strap, and I used it on the coral print bag. Even when worn as a crossbody bag by this tall girl, it is longer than necessary. So when I made the leaf print bag, I made it 9″ shorter.

Cutting the webbing 9″ shorter than the pattern called for still gave me plenty of length to wear the bag as a cross-body.

Along with the zipped exterior pocket, there’s an internal pocket. The pattern calls for stitching the internal pocket down the center, making two pockets. I went rogue and added another line of stitching 1-1/2″ from the center line to make a space for a pen or pencil. I don’t like having to dig around when I need a pen, and just adding a second line of stitching customized the pocket for my needs.

My pen stays perfectly in place, and is easy to access.

The pattern calls for the zipper pulls to be on the left when you are looking at the exterior pocket. And I followed the tutorial on my first bag.

Zipper pulls are on the left when closed.

When I carry a bag, I like the strap adjustment to be in the front for security sake. I also like my zipper pulls to the front for the same reason. Since I carry my bags over my right shoulder, this means I like my zipper pulls on the right hand side.

When making the leaf print bag, I simply reversed the direction the pull end of the zipper was facing when following the tutorial. This means I pull the zippers from the front to the back when opening while carrying. Either way works fine, just pay attention during construction if you plan to switch it around like I did.

You can fit so much stuff in the Sydney bag. I’ll be traveling next month and I’m excited that I’ll have no problem carrying my phone, wallet, tissues, lens wipes for my glasses, lip balm, lip gloss, a ponytail holder, hand sanitizer, hand lotion, a book, gluten and dairy free snacks, and a water bottle, leaving my hands free to lug a suitcase and perhaps hold my cardigan if I get too warm while waiting in line at the airport.

I finished up my first bag while my daughter, son-in-law, and granddaughters were visiting. My daughter and granddaughters liked it, and the eldest granddaughter wanted to pose holding it.

She doesn’t need to carry a purse yet, but doesn’t she look adorable?

One of the funnest parts of sewing is choosing fabrics and notions. If you’re already a bag-maker, you probably have several sources for fun hardware. I wanted a quick turn-around and knew that Wawak ships quickly. So I ordered my zippers and hardware from them. I love the fun rose gold rectangle ring and adjustable slider buckle on the coral print bag. I went with simple white zippers so that the fabric and hardware would stand out.

I went for a pop of color and used light green zippers on the second bag. I love the rainbow finished hardware and think it’s so cool how the colors change from purple, blue, and turquoise to pink, green, and rose gold. So I used a rainbow rectangle ring and adjustable slider buckle on the leaf print bag, as well as adding a cute rainbow finish “Handmade” label bar tag to the upper pocket flap.

I took my time centering it on the upper flap to ensure that it wouldn’t be in the way of any stitching. Speaking of stitching, I love how close I can get to the edge when top-stitching just by adjusting the needle position on my machine. It’s those added features that make a high end machine so helpful when sewing.

Don’t get me wrong, you can make this bag on even the most basic machine. I’ve sewn many, many garments and a couple of tote bags on my inexpensive Brother machine. I’m just still excited about having a nice machine even though it’s been a year and a half since I got it. My best tips are to use a fresh needle in the proper size for your fabric (I went with a size 90/14 needle since my fabric was thicker and a bit stiff) and to follow the tutorial, looking at the illustrations carefully if you get confused. They are very helpful.

My final tip is this: DON’T BE AFRAID TO CHALLENGE YOURSELF AND TRY SOMETHING NEW AND DIFFERENT! My second bag went much more quickly than the first because I felt confident in what I was doing. I’ve sewn literally hundreds of garments, so it’s weird that I let myself feel intimidated about sewing a bag pattern. It’s like anything else, the more you do it, the better you get at it. I absolutely will make this pattern again, and won’t be afraid to tackle other bag patterns.

The bottom gusset can be cut as one piece or two. The two-piece option is perfect when your fabric print is directional. All the leaves are upright using the two-piece method.

The details:

The new Sydney Bag pattern from Greenstyle is great! Both my bags were made with upholstery fabric and quilting cotton from my stash. All hardware and notions were purchased from Wawak. (Don’t forget to order washable basting tape, as it’s a big help when installing zippers!)

The blue dress I’m wearing is the Savannah Dress, which you can read more about here.

The links to GreenStyle may be affiliate links (if I did them properly!) which means that I may earn a few pennies if you use my links to purchase, without it costing you anything extra. Since this is my blog and represents me, I always give my honest opinion about any patterns or supplies that I talk about. I hope that the time I spend writing posts and sharing sewing tips interests people enough that they take a look at the patterns I review. I write to share my love of sewing, patterns, fabric, and supplies, and hope that it encourages others to love sewing as much as I do! ❀ Try something new and maybe challenge yourself a little bit today.