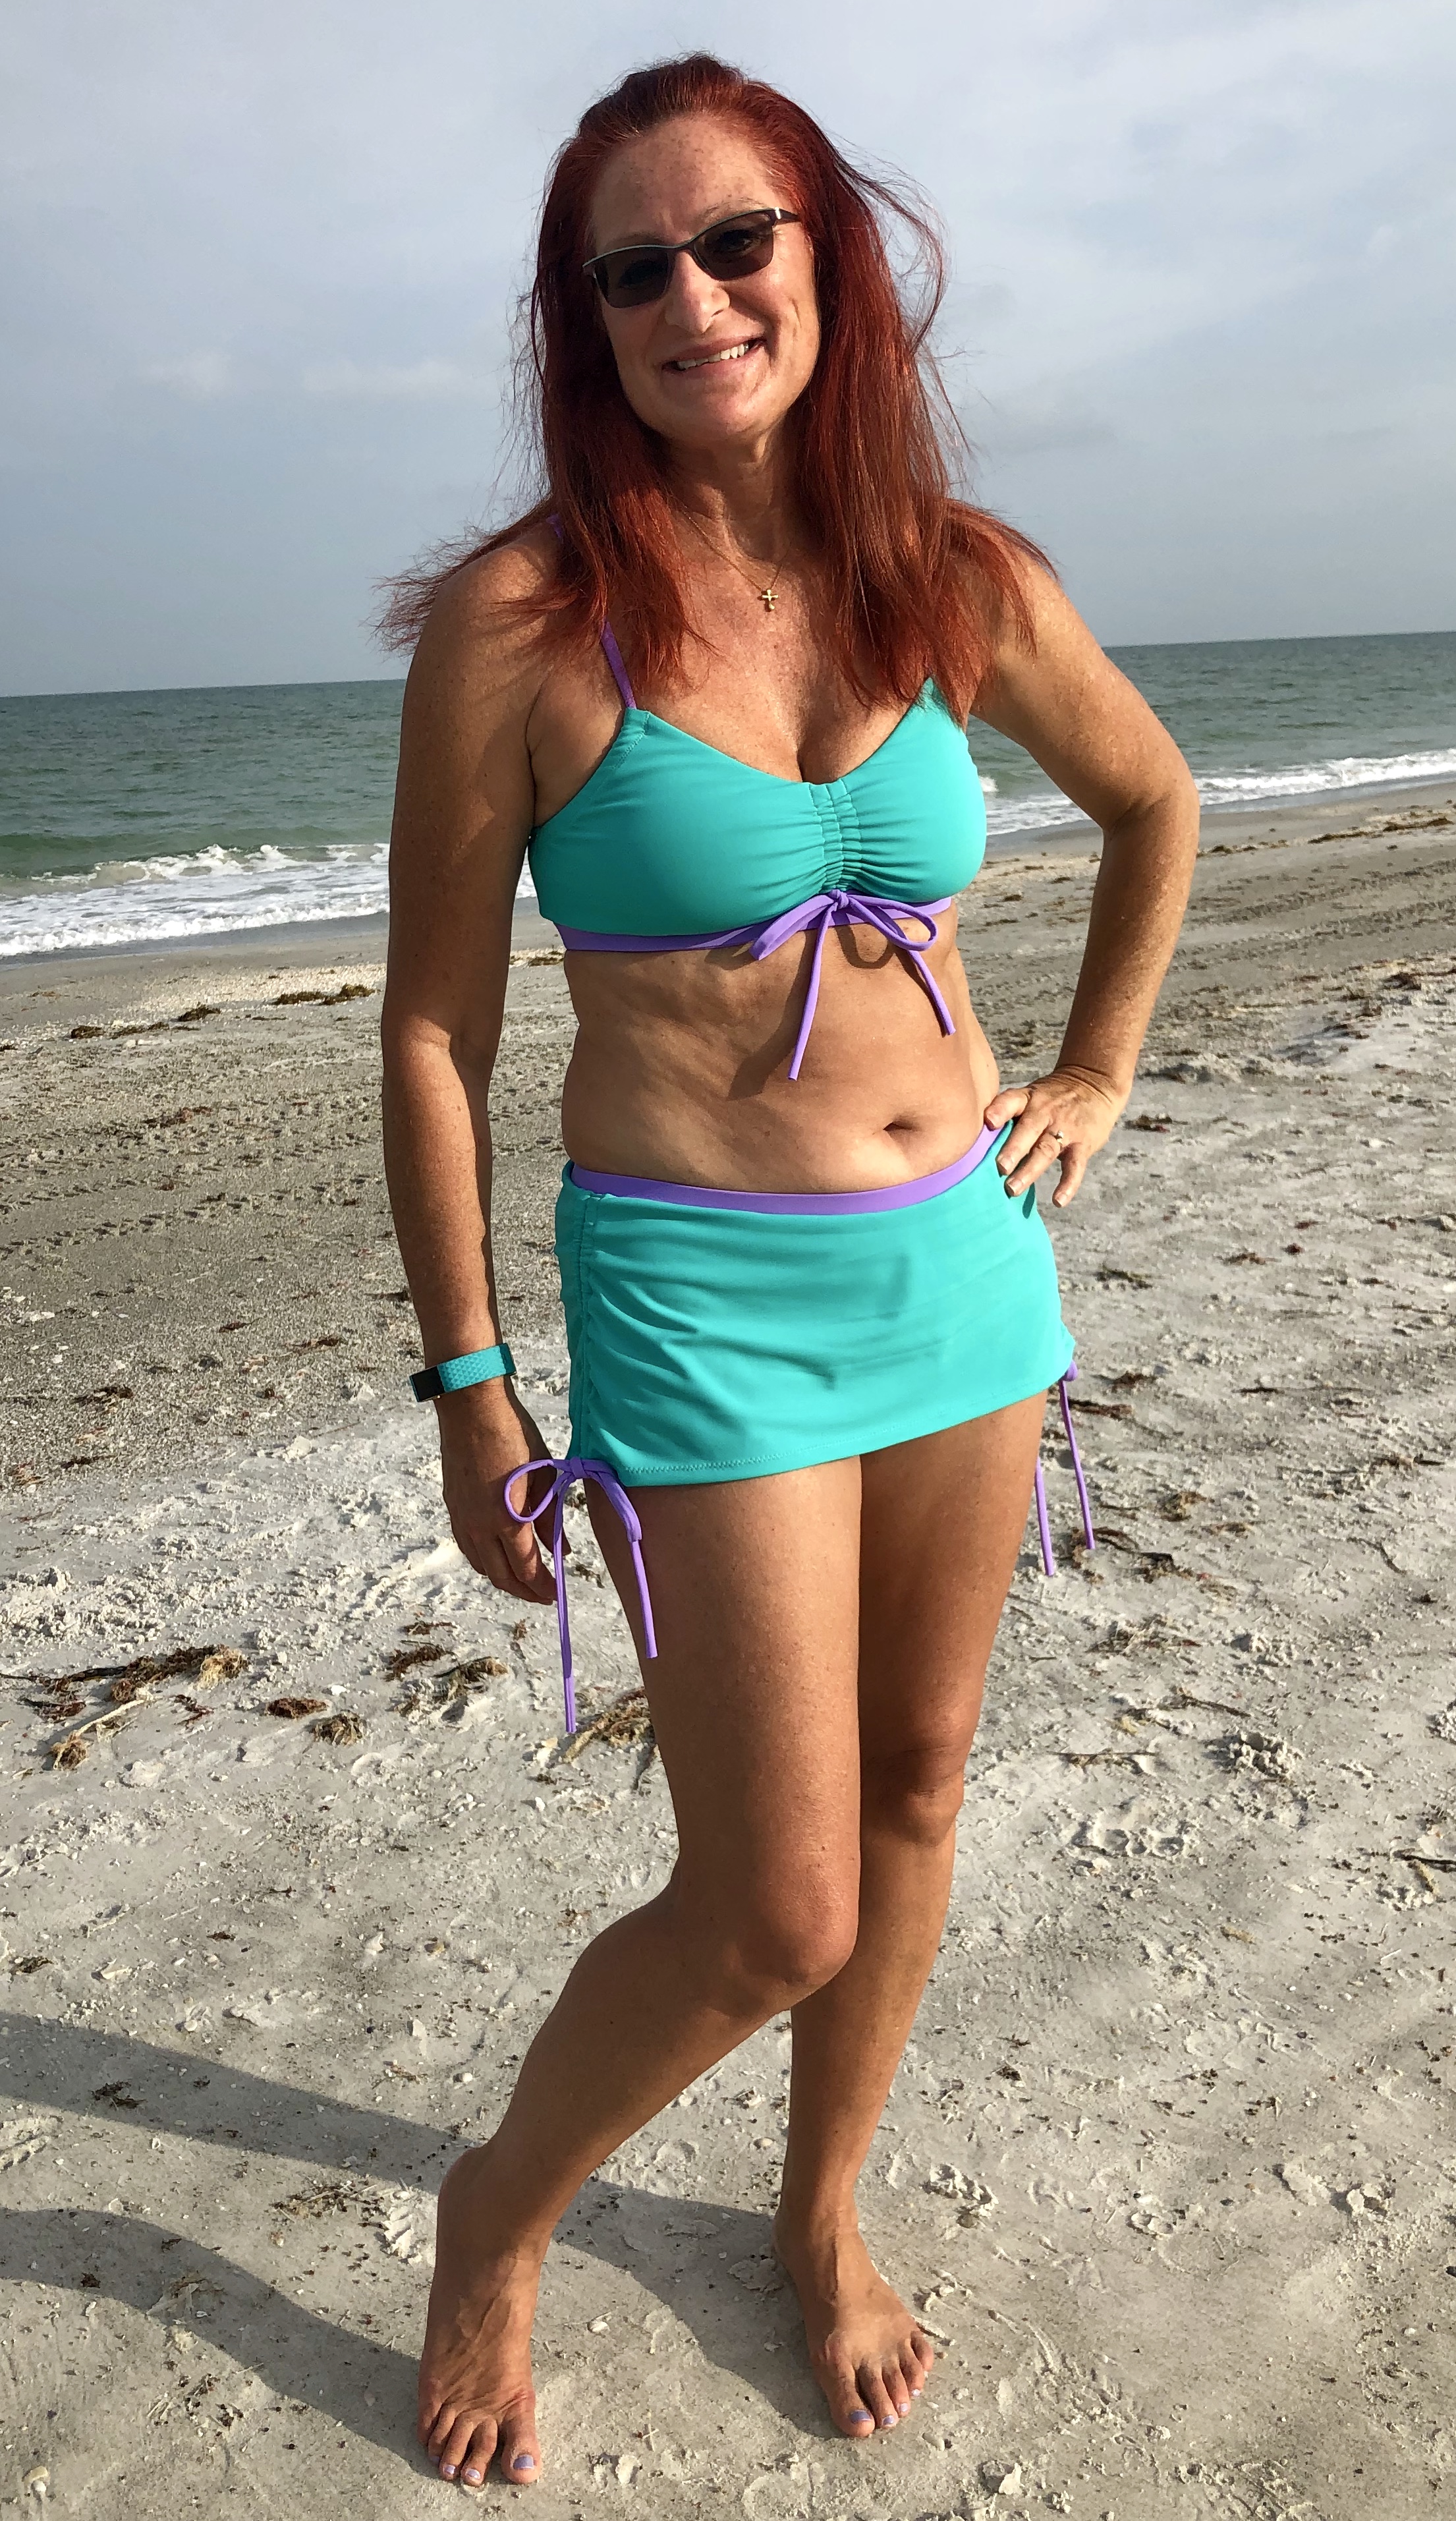
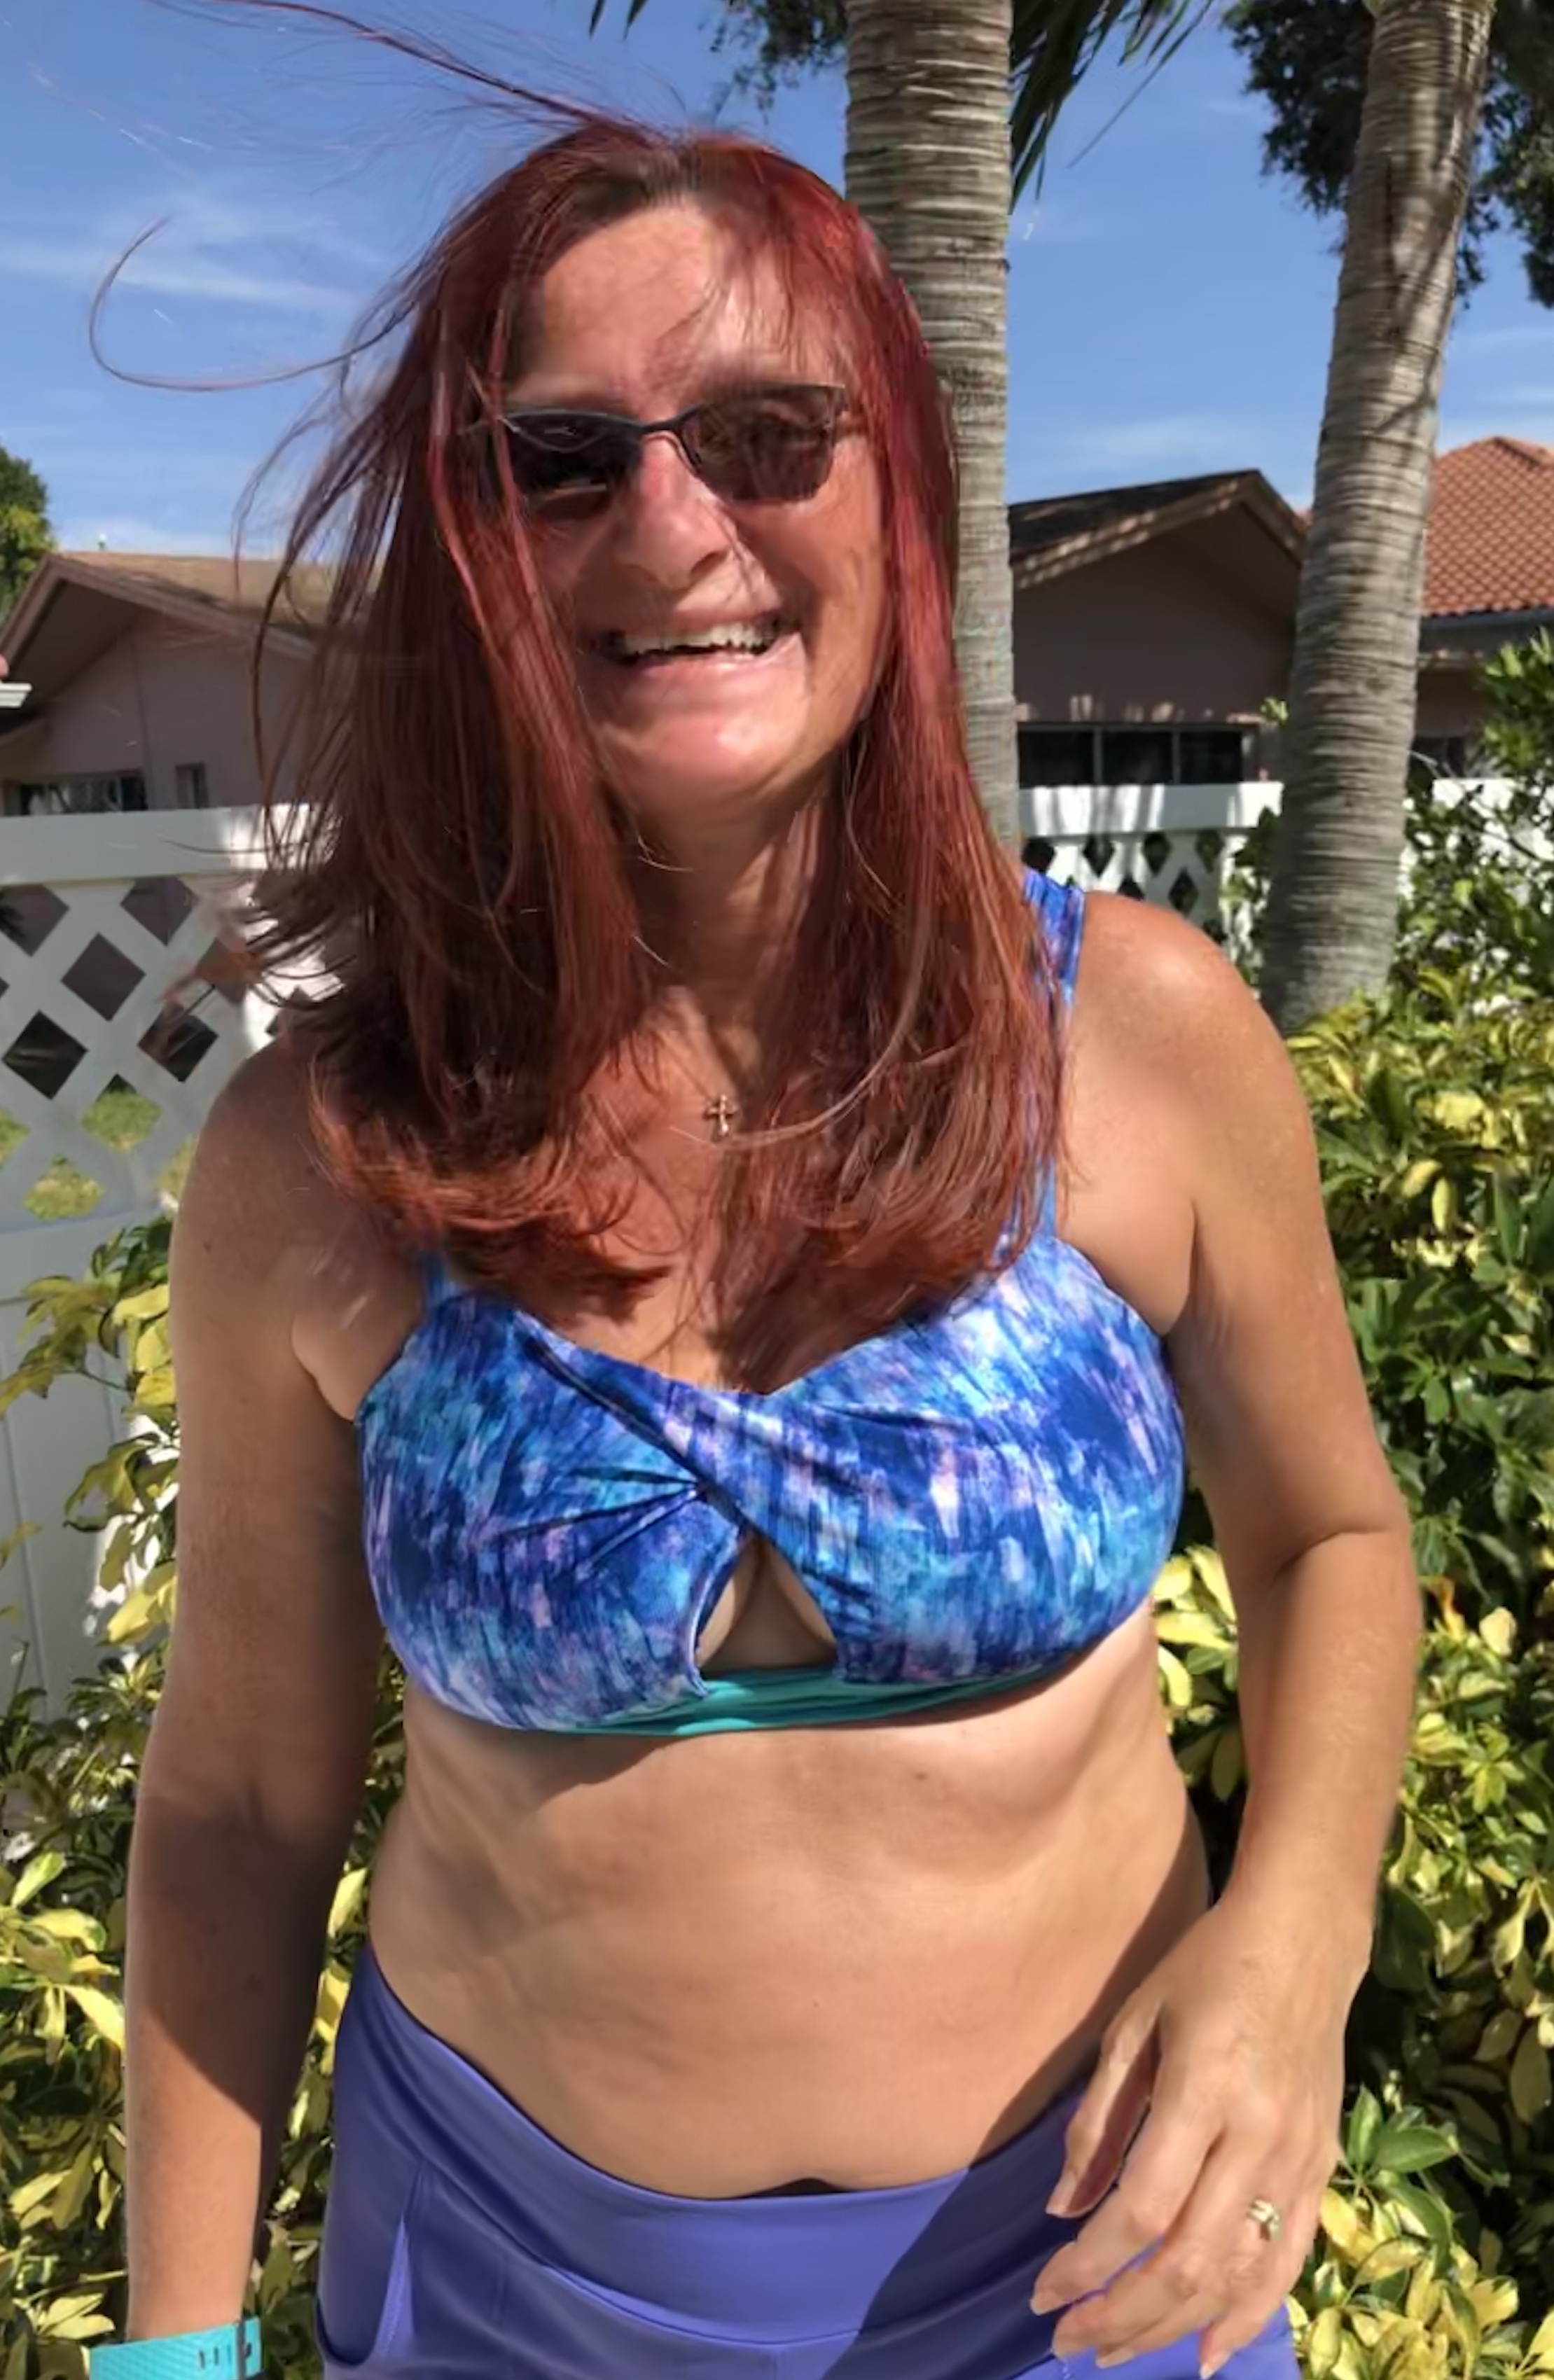
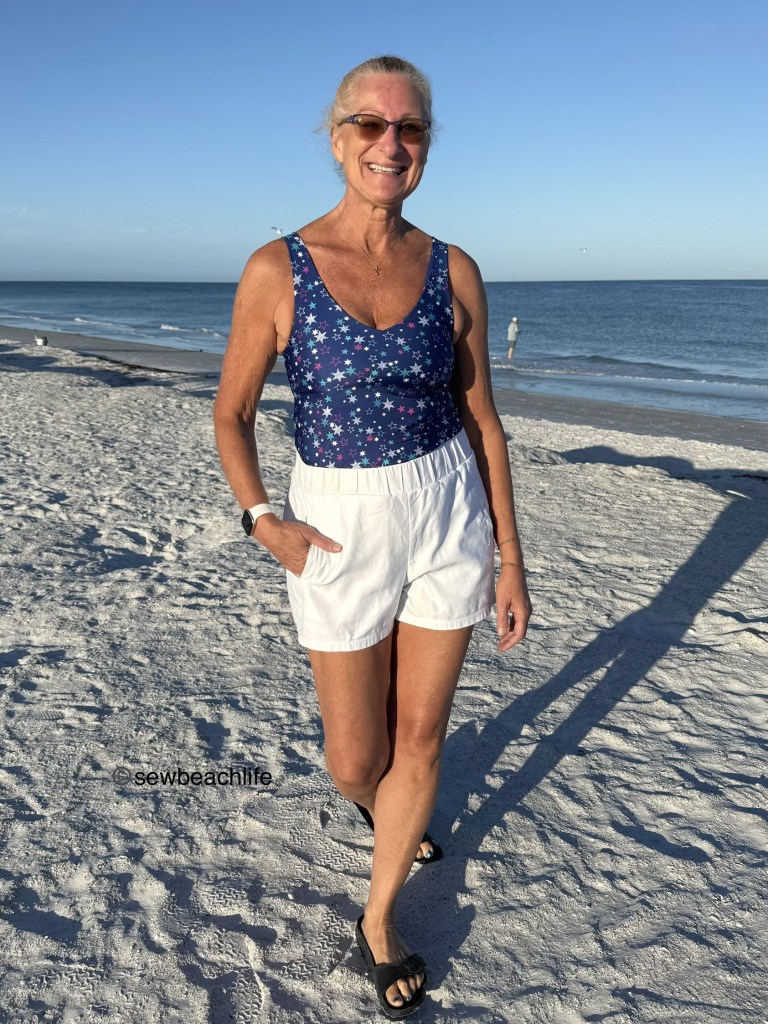
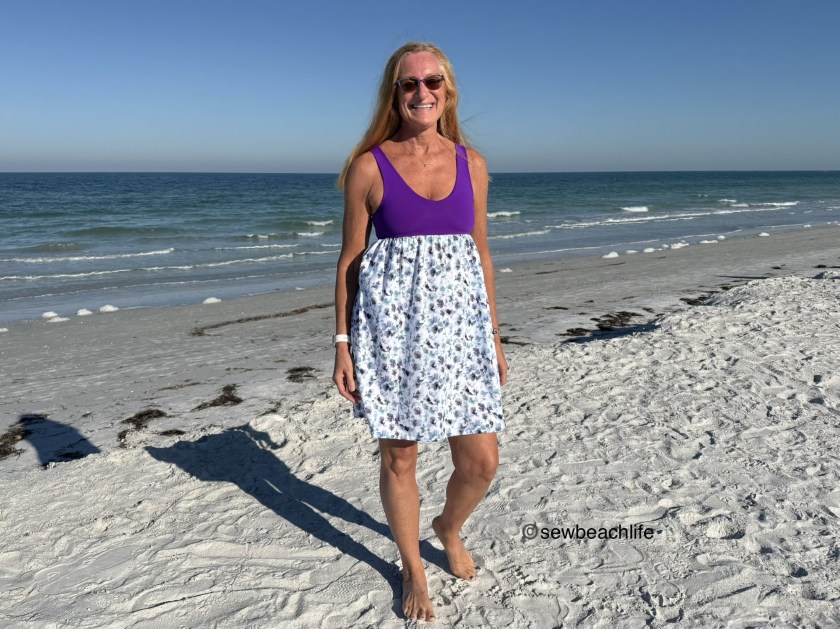
Summer has arrived, so it’s about time for me to get started on sewing up some swimwear! When the Stitch Upon A Time Water Faery swim patterns were released, I eyed them closely, but put off buying a pattern because I couldn’t decide which one to buy. The Retro One Piece has a dress option, which I love the look of! But I never wear one piece swimsuits. I finally settled on the Twist & Swim Top because I knew I would wear the sexy yet modest top and could play around with the pattern.
The swim top has the option of a plain or twisted front. Since I was making the fun twisted front, I decided to follow the pattern exactly for my first version to see how it fit. I made my measured size, using the green extended cut line for the bodice, since I have the noted 4.5″+ difference between bust and under bust, and followed the tutorial. As I’ve come to expect from Stitch Upon A Time Patterns, the tutorial is well written, with lots of photos to help you visualize each step. The elastic measurements are perfect, exactly the right length for support and comfort.
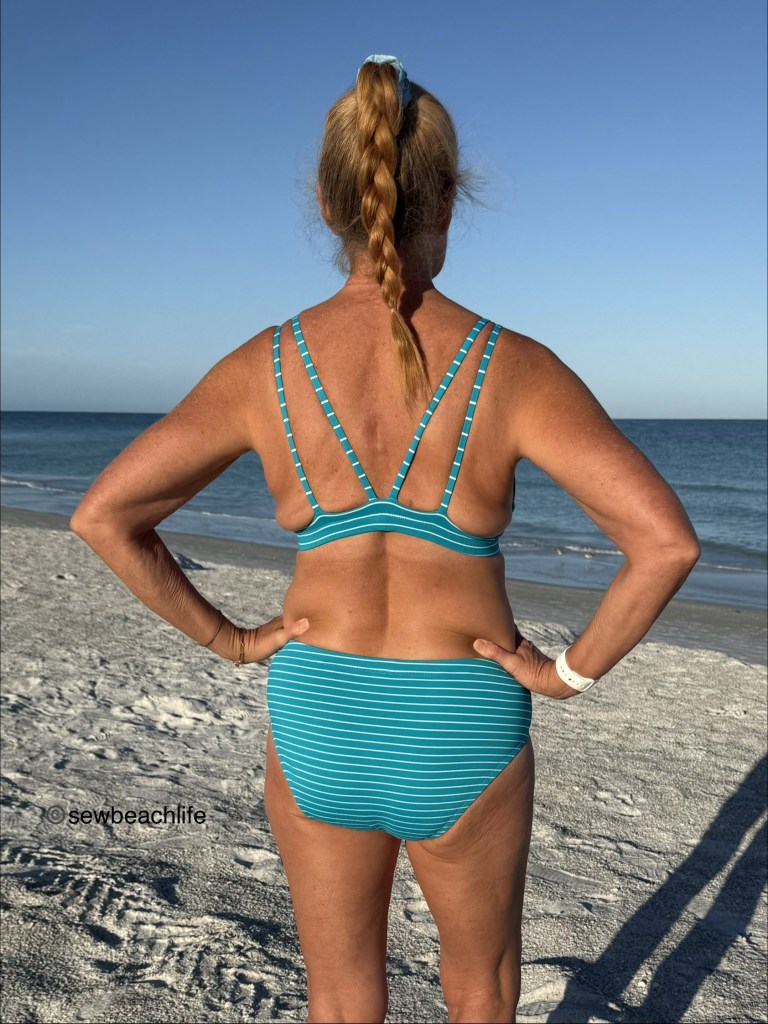
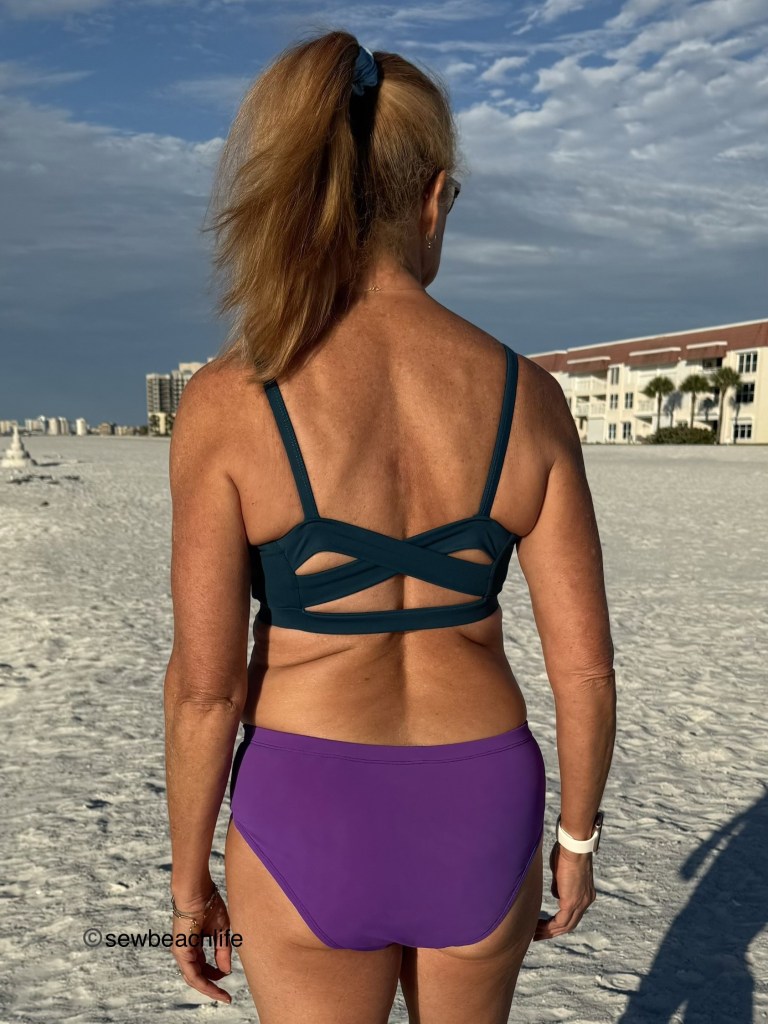
I had some swim fabric from JoAnn’s in my stash that was left over from a project I made last year. There wasn’t quite enough fabric to make the straps the recommended width, so I made them as wide as possible, but had to omit the gathering on the straps. As experience has taught me when making bras or tops that need support, I used powernet in the front and back bodice pieces, as well as the straps. The resulting top is cute, and works great for walks on the beach, but had one small problem.
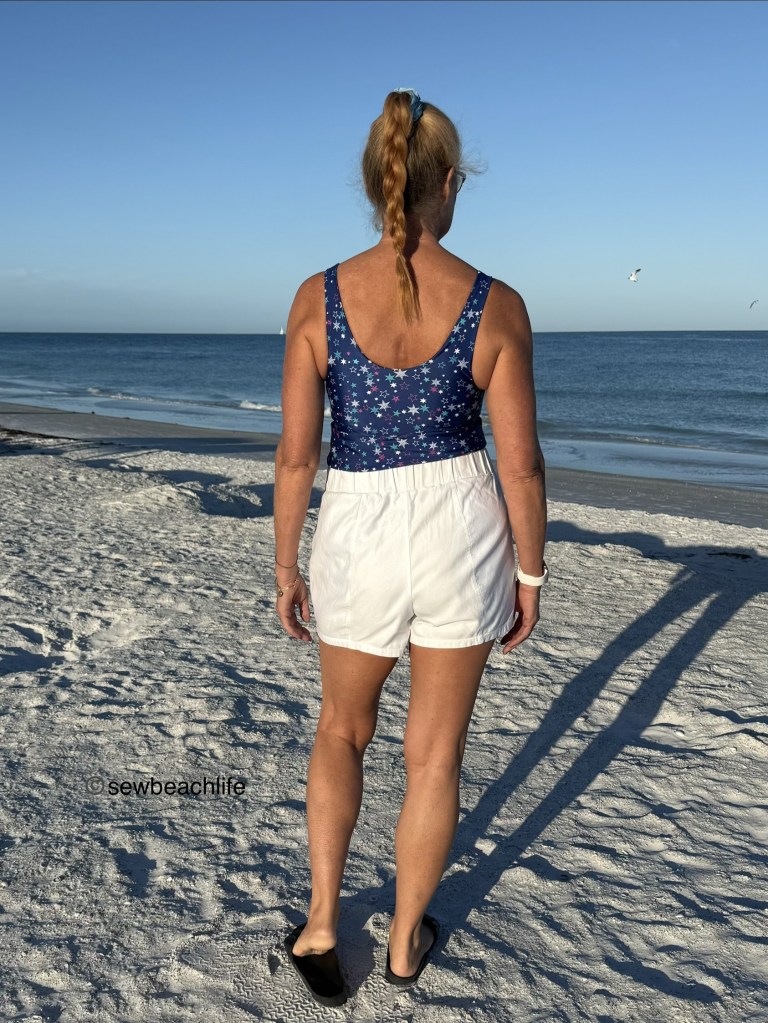
Knowing that my shoulder to bust apex measurement is longer than average, I should have taken that into account and lengthened the straps. Since the straps are too short for my body, the top cuts into my armpits a bit. Because the top is held firmly in place under the bust in front, the back is pulled forward and up, which keeps the back from laying properly. Fortunately, it’s a simple fix.

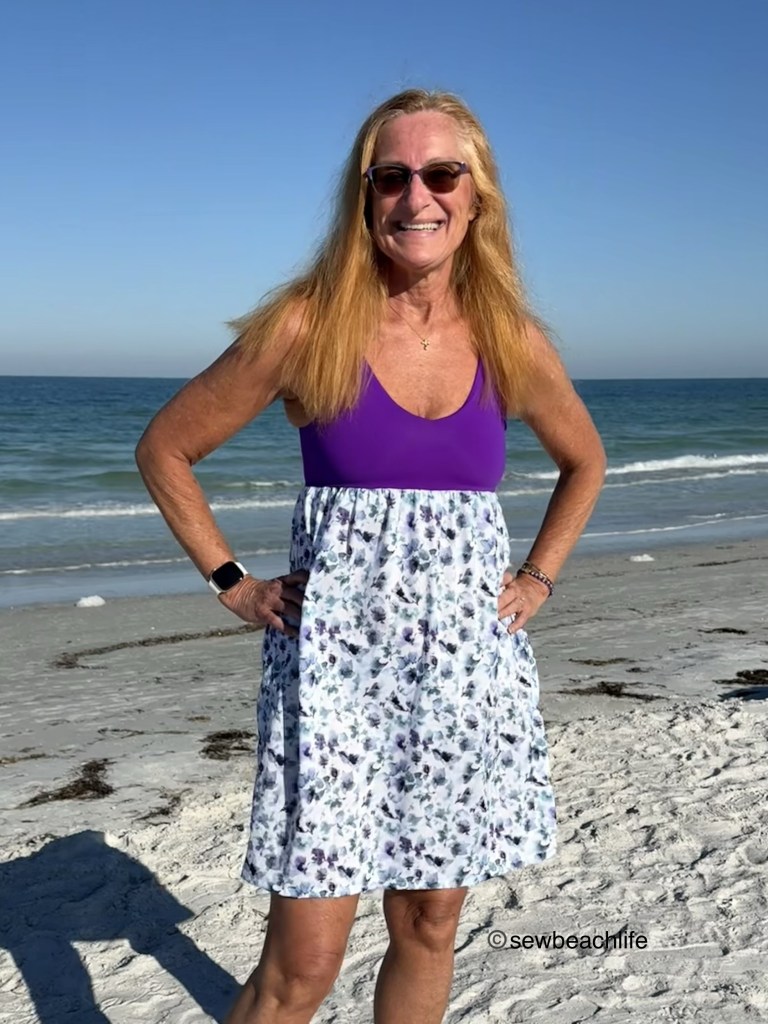
I just added an inch to the strap length before cutting out my next version. This time I used Tricot from Phee Fabrics. I think the hardest part was narrowing down which colors to use, since it’s available in so many pretty colors! Because I liked the way the narrower straps turned out, I decided to cut them at 3.5″ wide again. I also decided to play around with the bottom band construction, to use one piece of 1.25″ wide elastic in the band, rather than elastic at the top and bottom seams of the band.
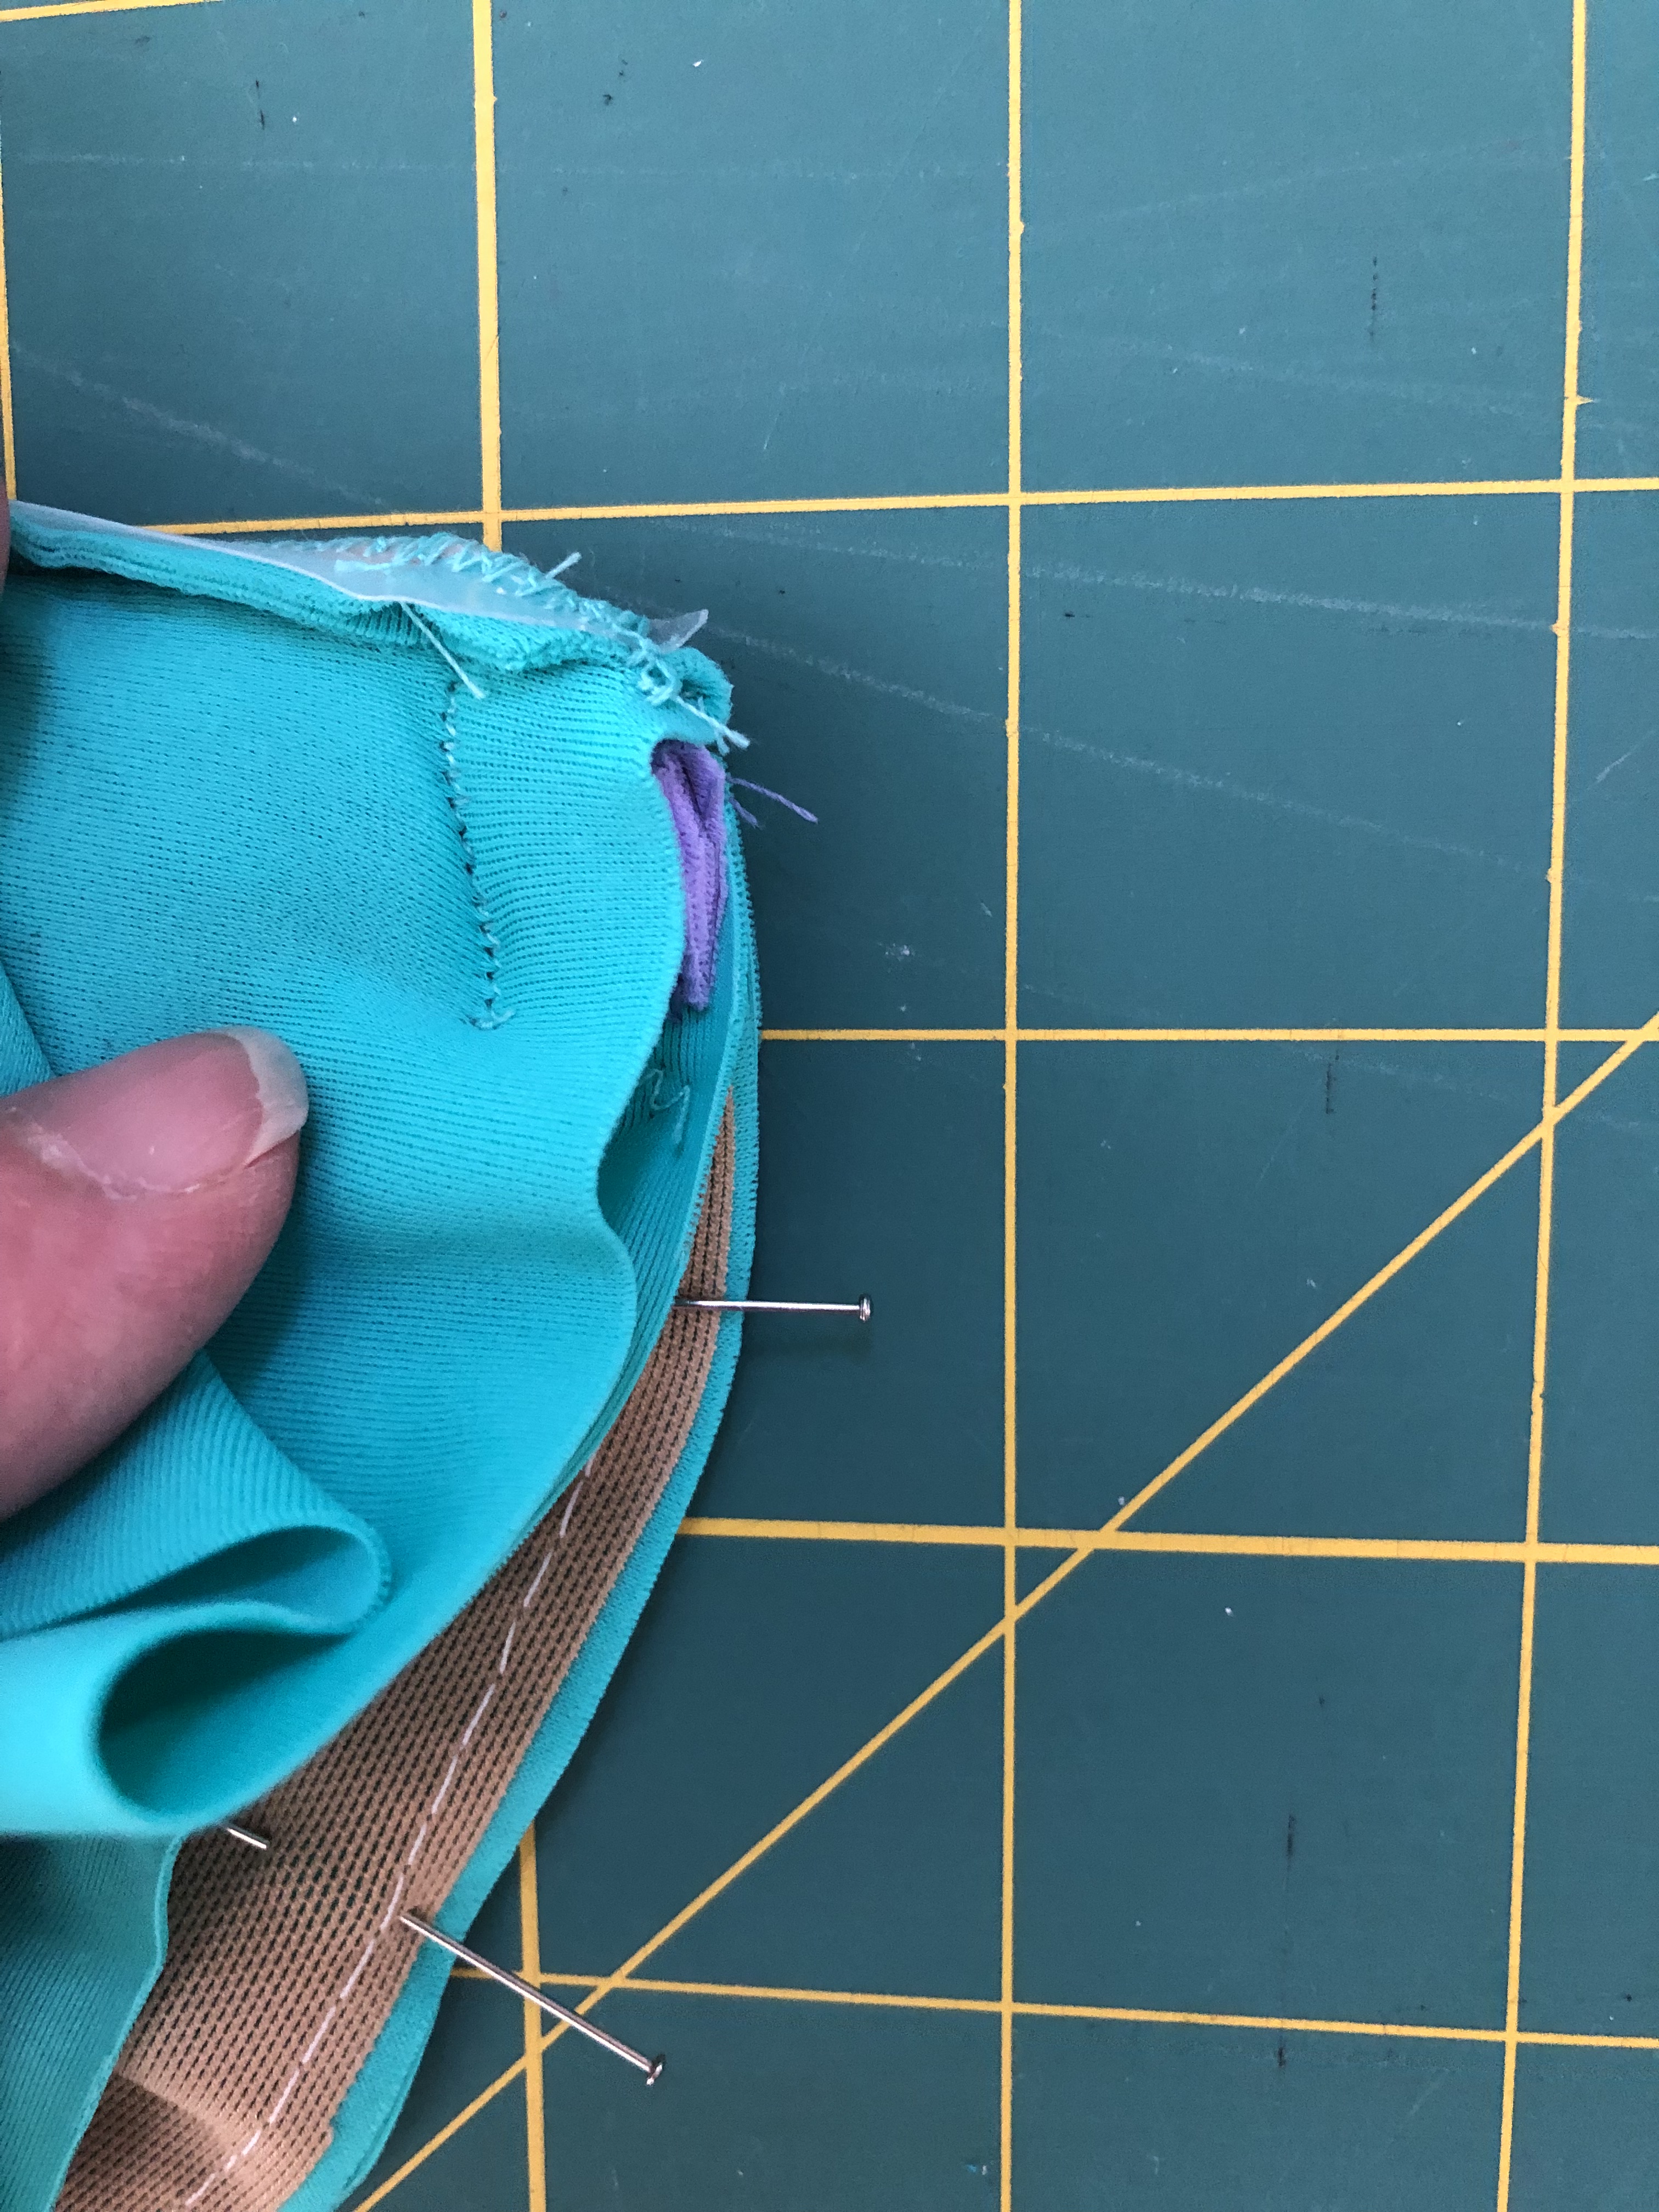
I made the top as directed until I got to the band. I sewed the bands right sides together, along the bottom edge. I marked the band at the midpoint, then marked the quarter point by folding one end over and 1/2″ past the center pin, to account for the 1/2″ seam allowance. I also placed pins on either side of my center front pin to mark the V placement. I stitched between the two outer pins, using a 3/8″ seam allowance. (Note: I used a 3/8″ seam allowance on the top and bottom seams of my band so that I could use 1.25″ sport elastic. You can also stick to the 1/2″ seam allowance and use 1″ wide elastic.)
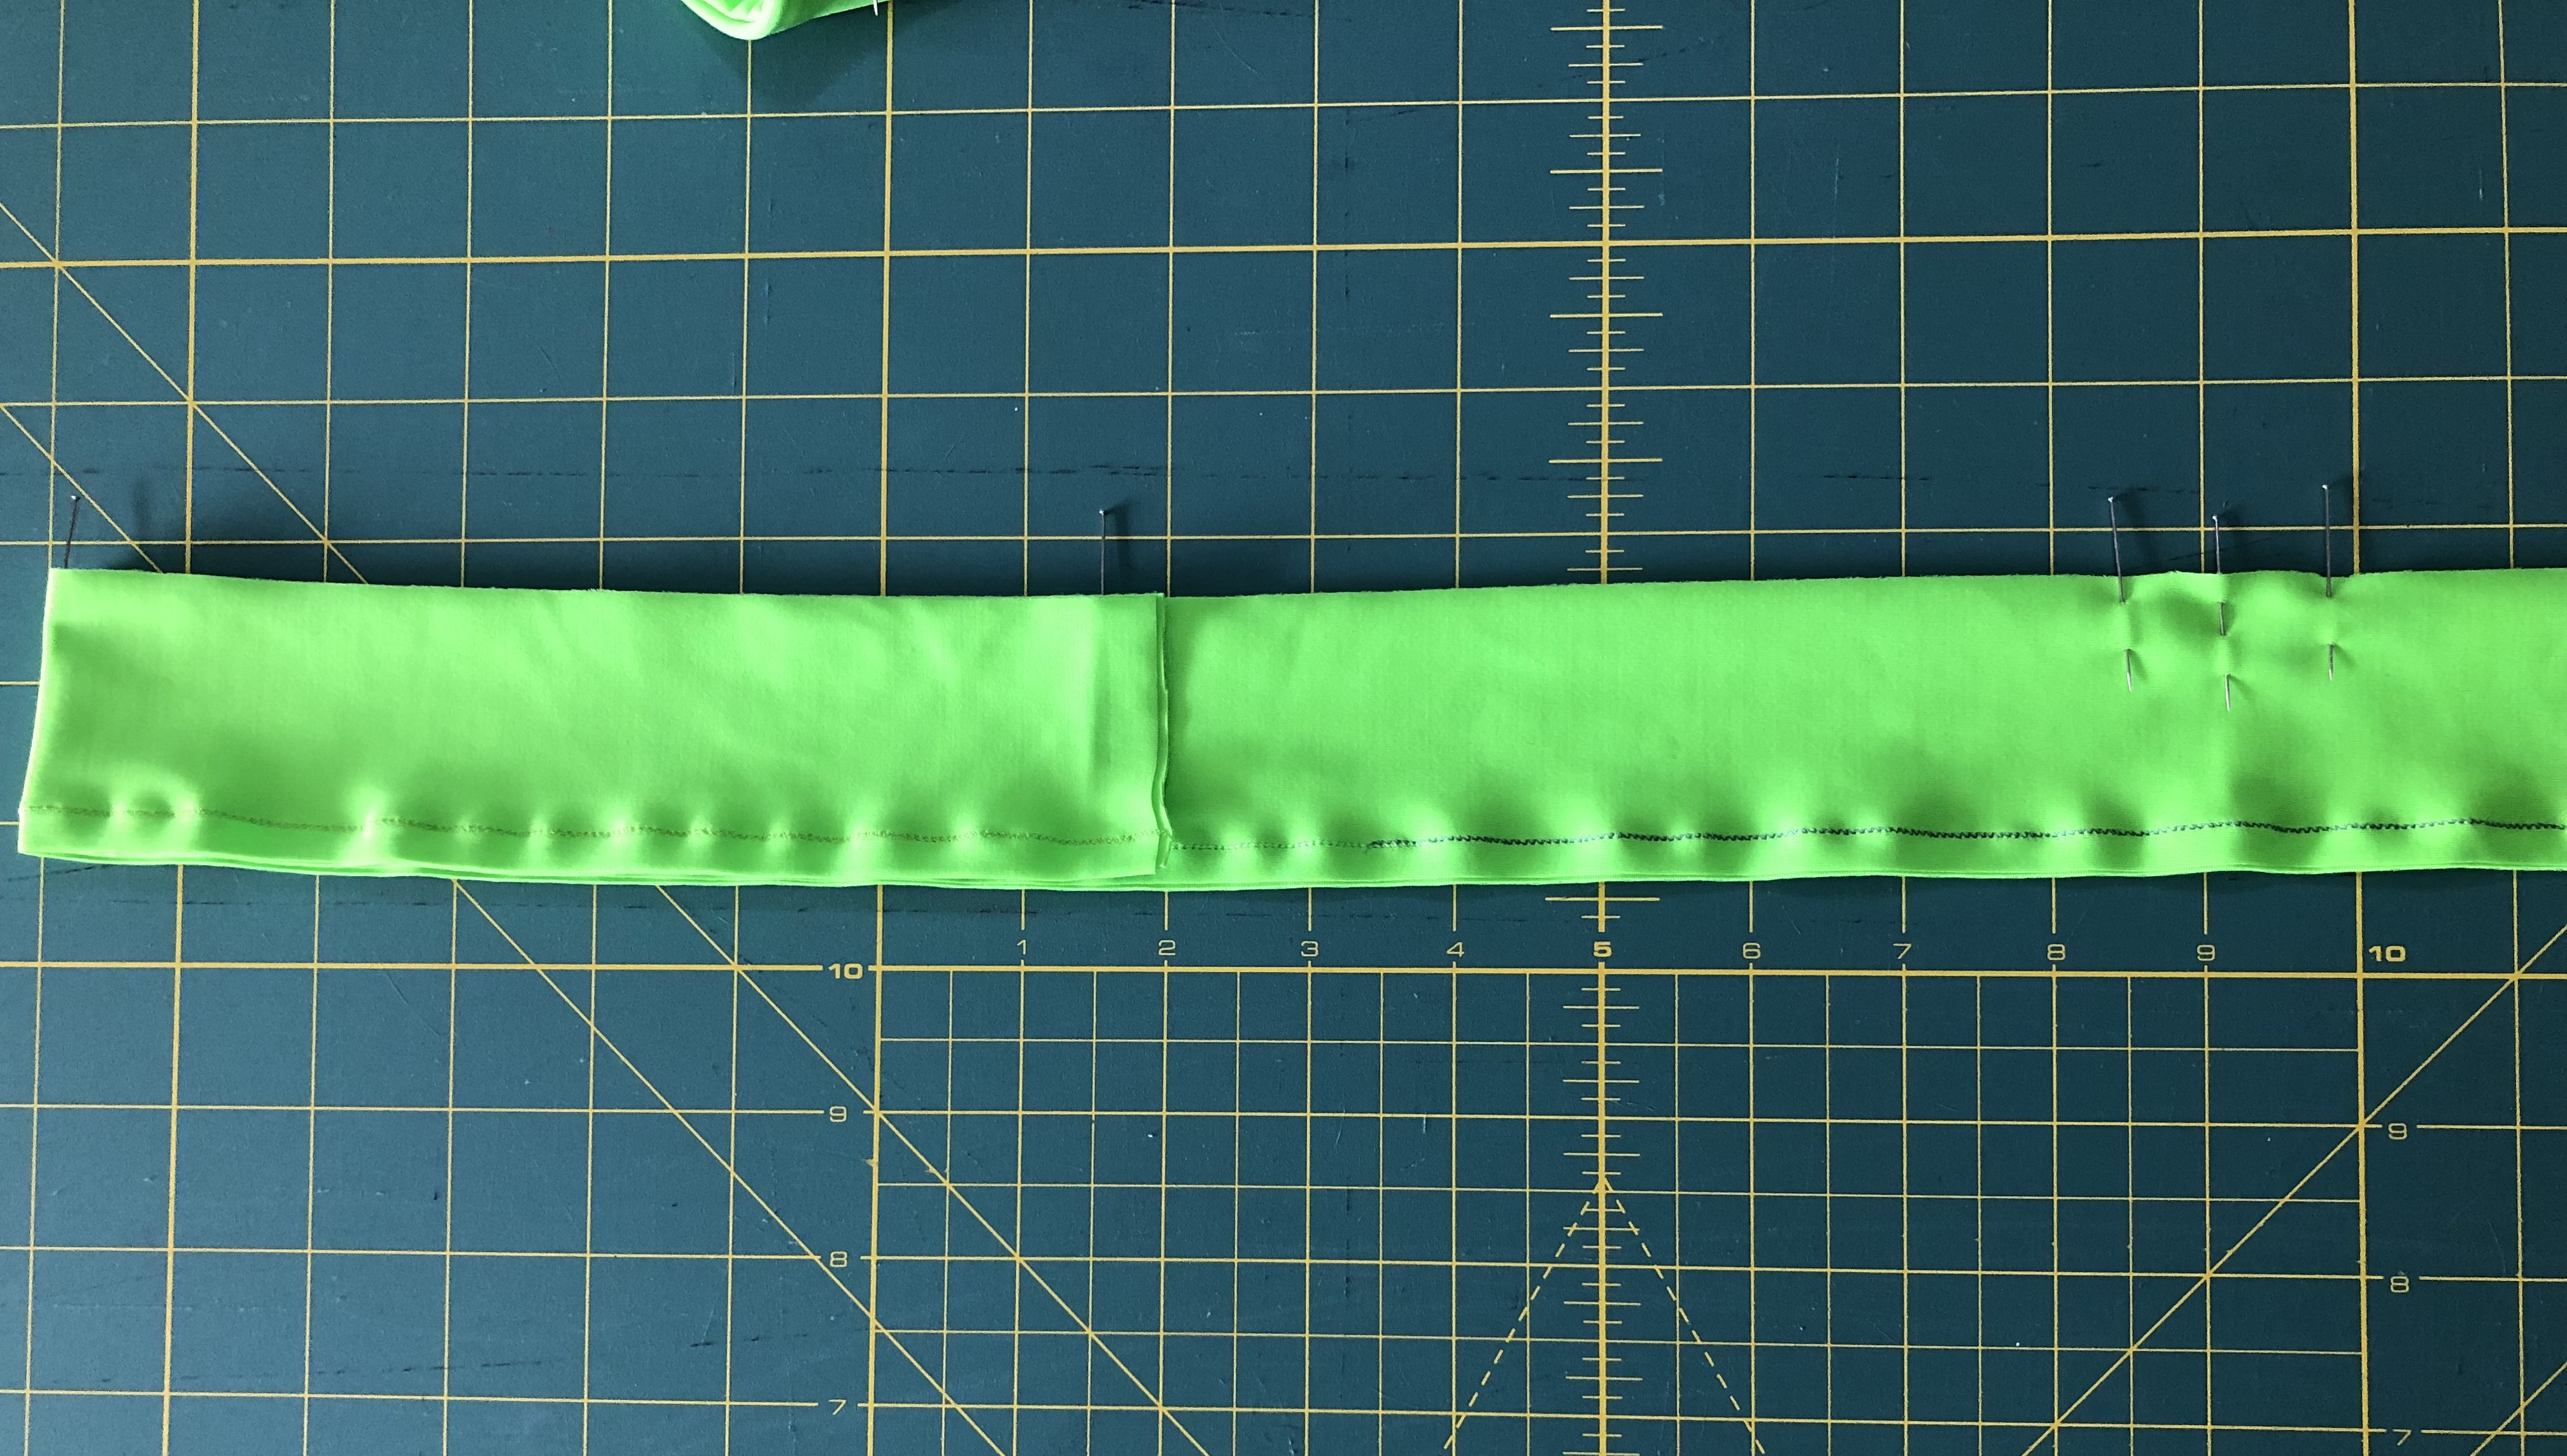
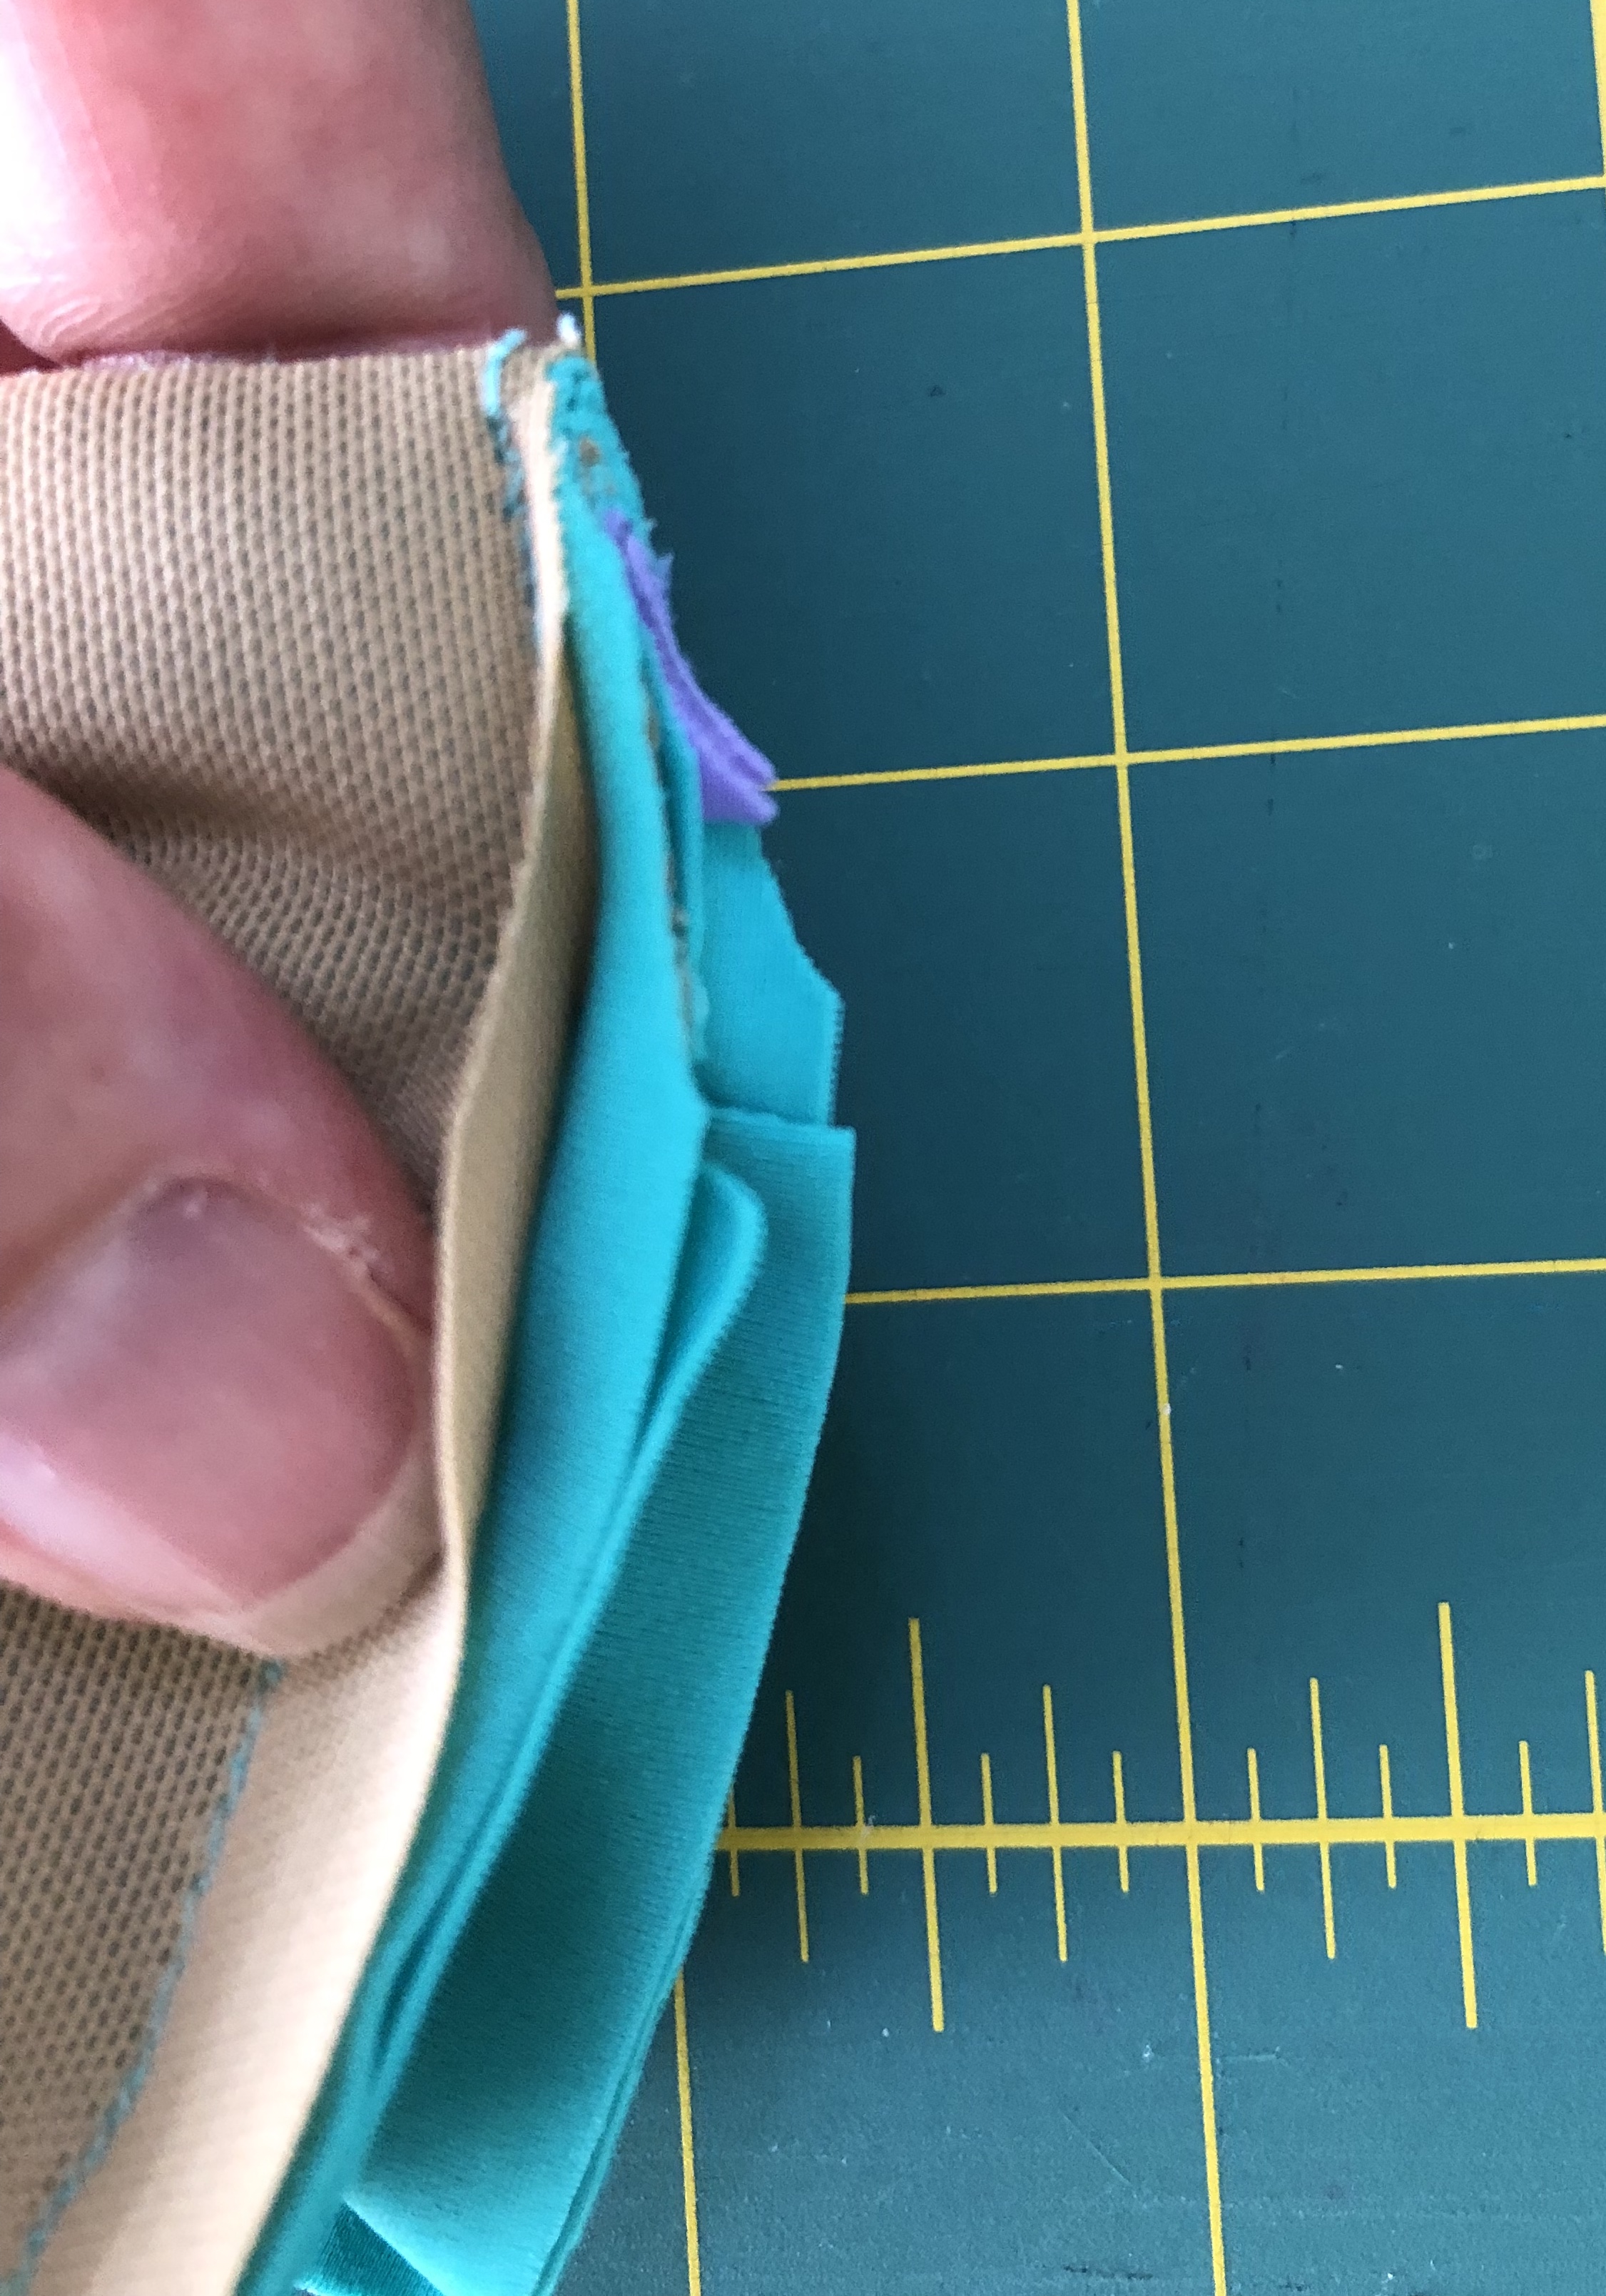
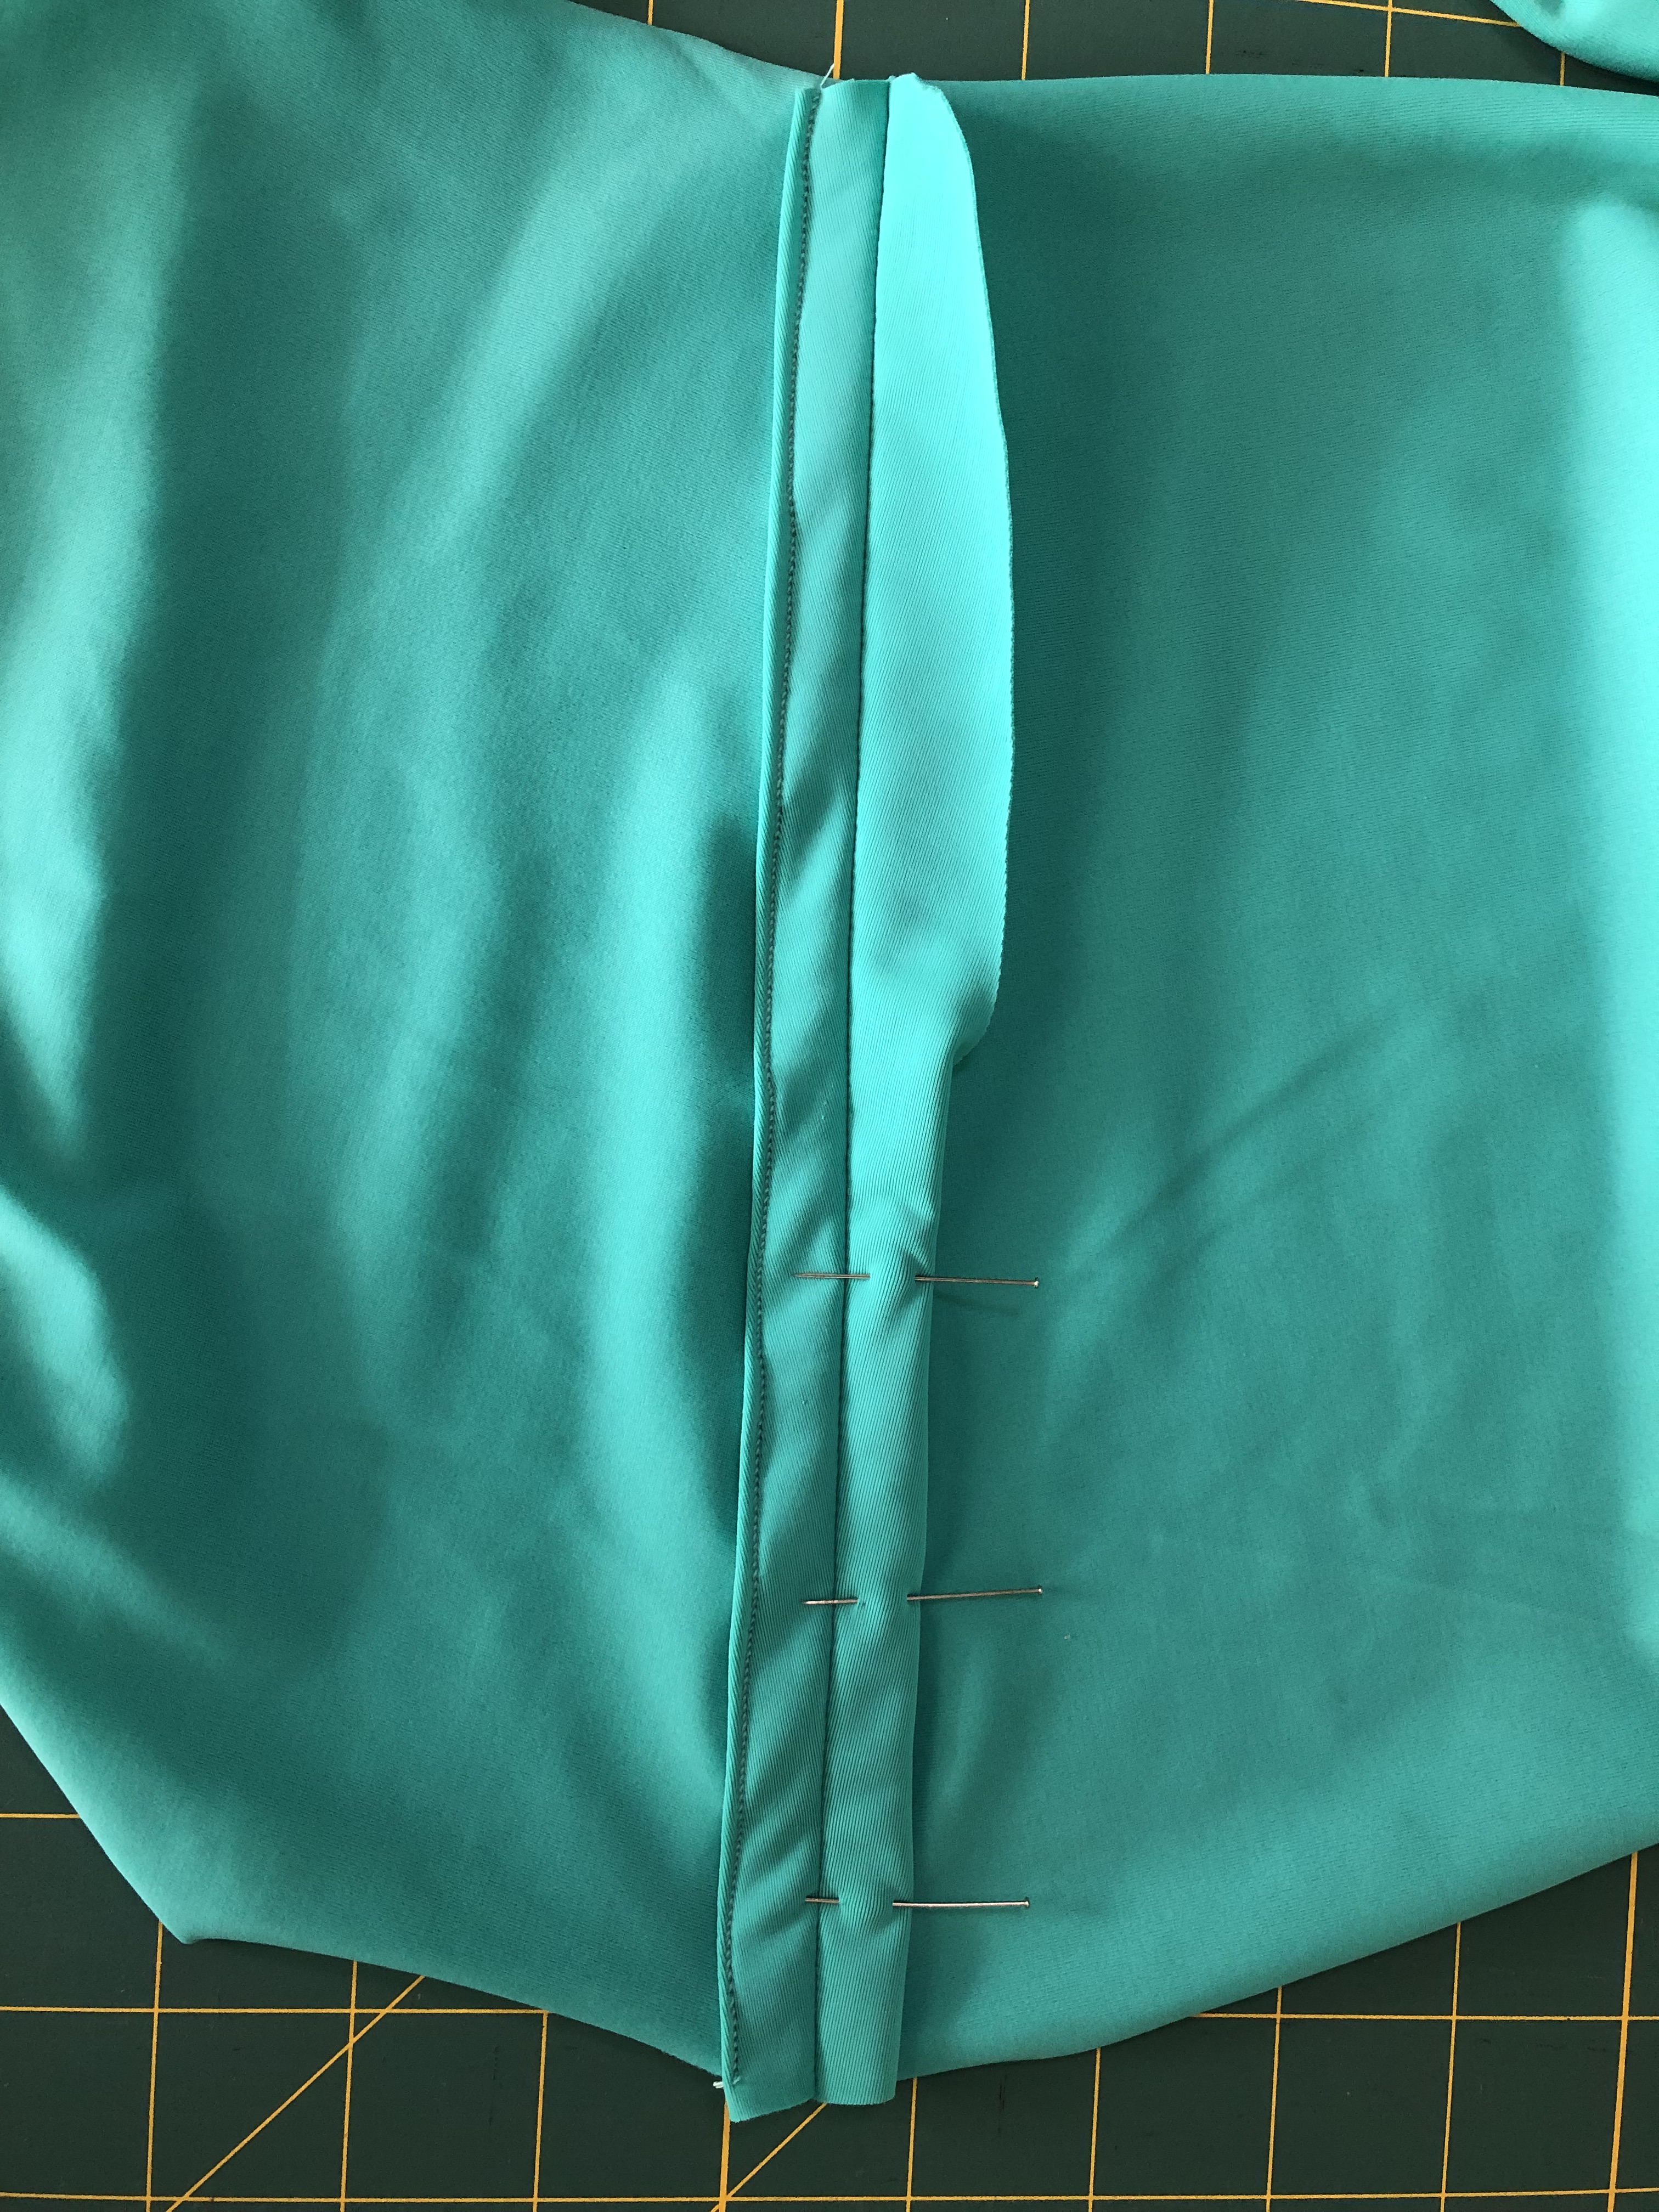
Then I carefully cut down to, but not through the stitching at both ends of this V stitching, and turned the band right sides out. Because I would need an opening to thread my elastic through the band after I attached it to the bodice, I had to carefully plan out stitching the short ends together. Placing the short ends right sides together, I stitched from one side for 1/2″. Then I stitched from the other side to just past the bottom seam. This left me enough opening to thread my elastic through, but ensured that the side seam was completely sewn on the outer side.

I turned the band right side out and basted the long edges together. When sewing the band and bodice together, make sure that the opening for the elastic ends up on the inside of your top!

Then I matched up the center front, center back, and the quarter points of the band and bodice, right sides together. Keep in mind that the quarter points may not exactly line up with the side seams, especially when you use the extended bodice cut lines. Stitch the band and bodice together and insert the elastic. Use the recommended underbust elastic length, and overlap and stitch the ends of the elastic together. You can stitch the opening on the inside of the band closed if you want, but since tricot doesn’t fray, I didn’t bother.
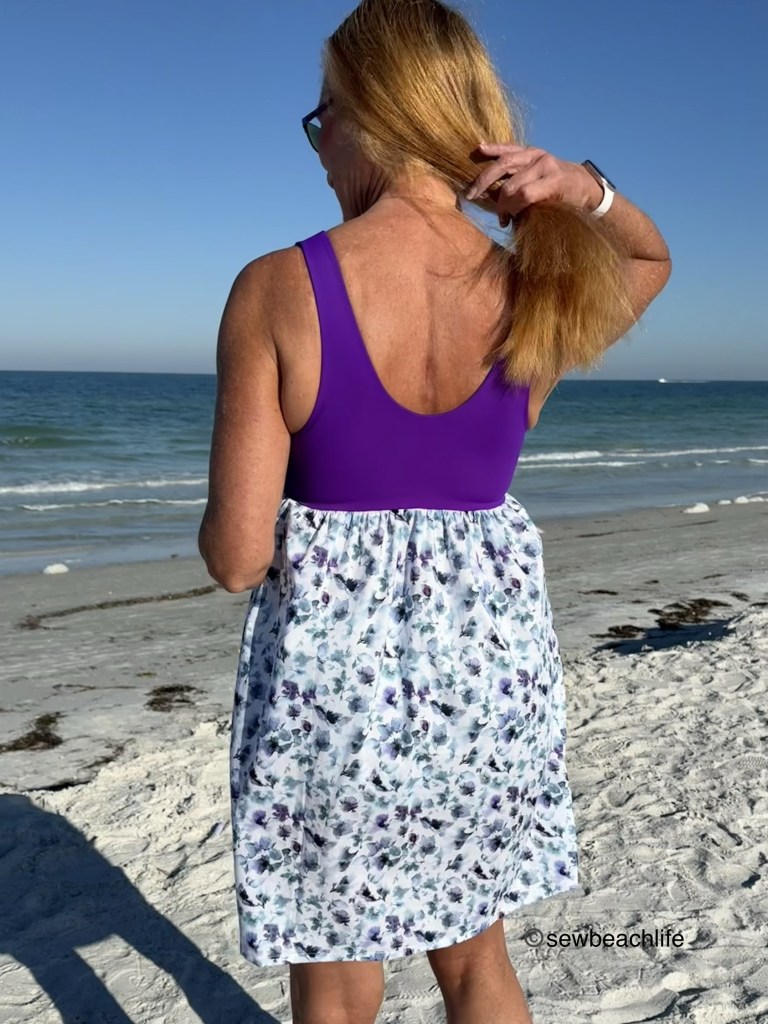
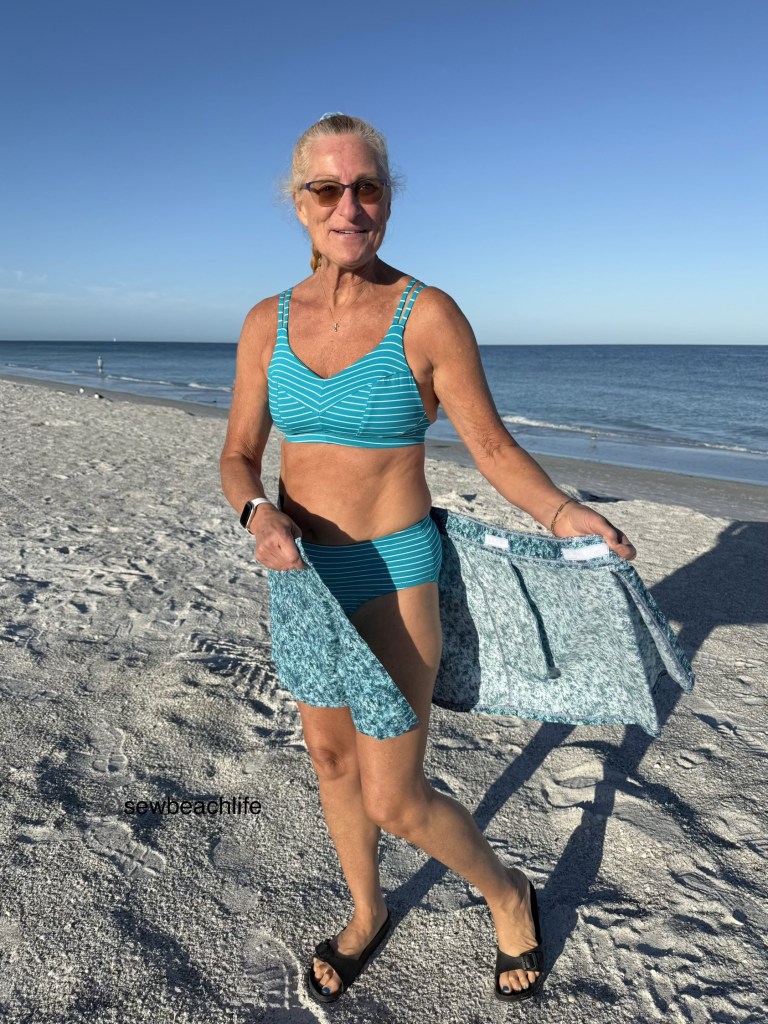
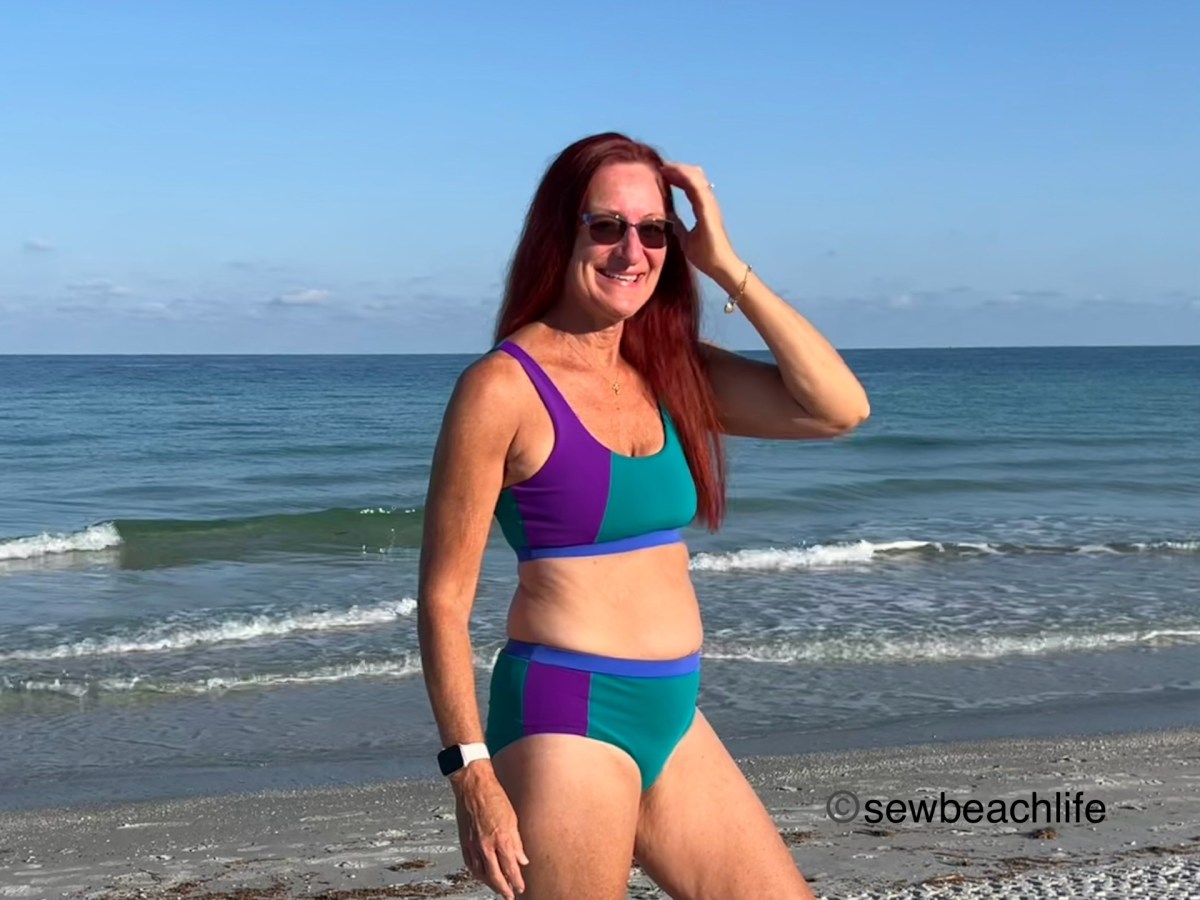
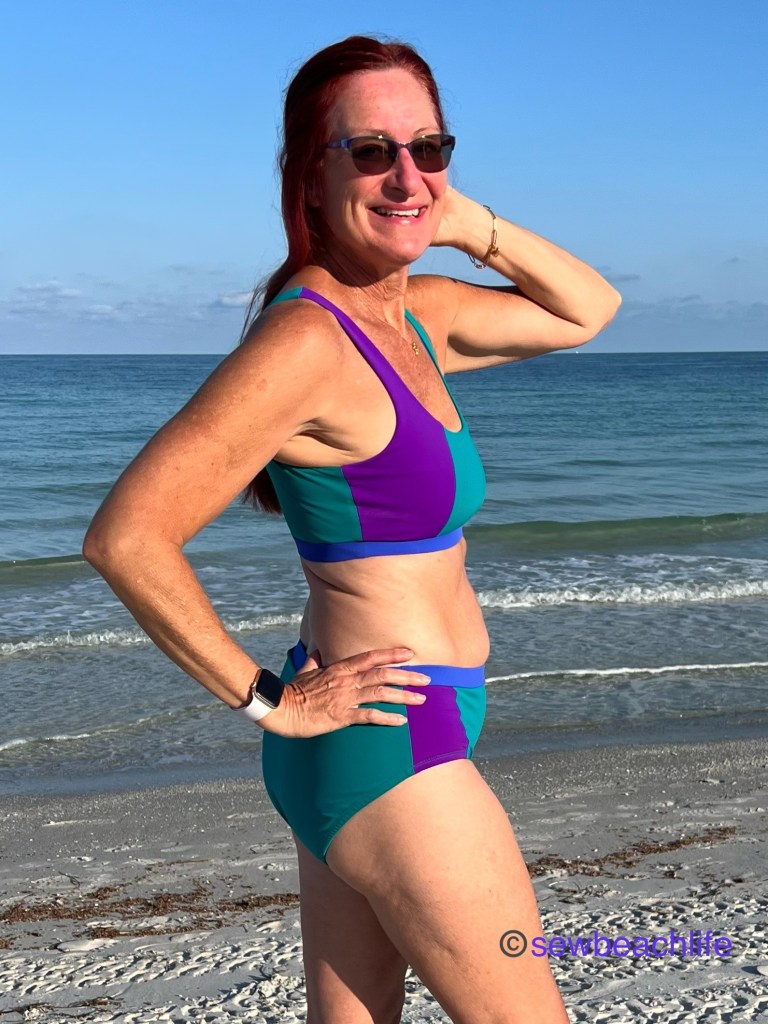
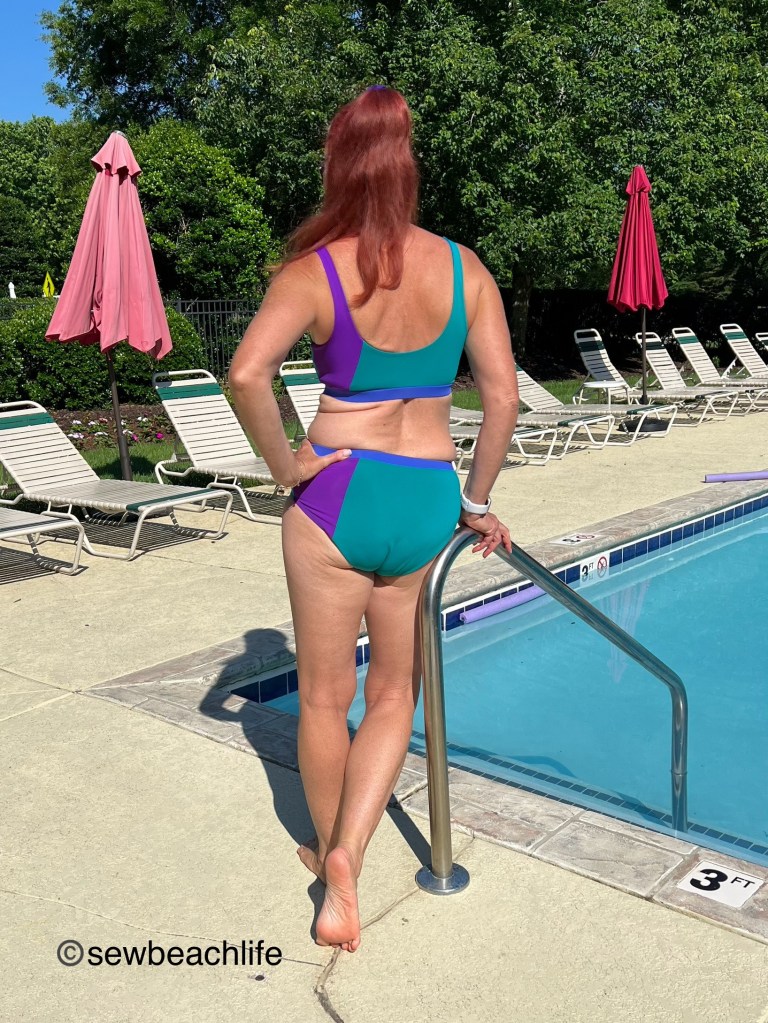
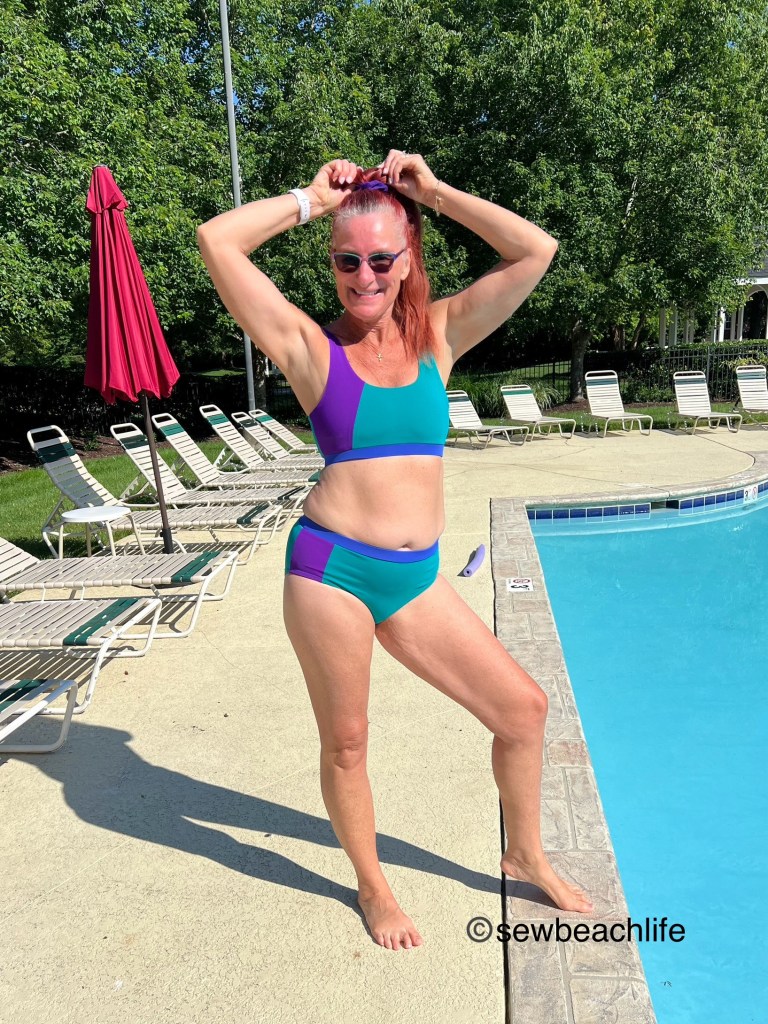
Yay! I had a perfectly fitting swim top! Now for some bottoms. I’ve owned the Scrundlewear 2.0 pattern for months, but had never made a pair. Since everybody seems to love Scrundies, I figured they would make great swim bottoms. I cut on the foldover waistband line, tapering in at the top following the side seam cutline to give me a high waisted look. The front height was great, but the back was too high. I tapered from 1-5/8″ down at center back over to the height of the front side seam.
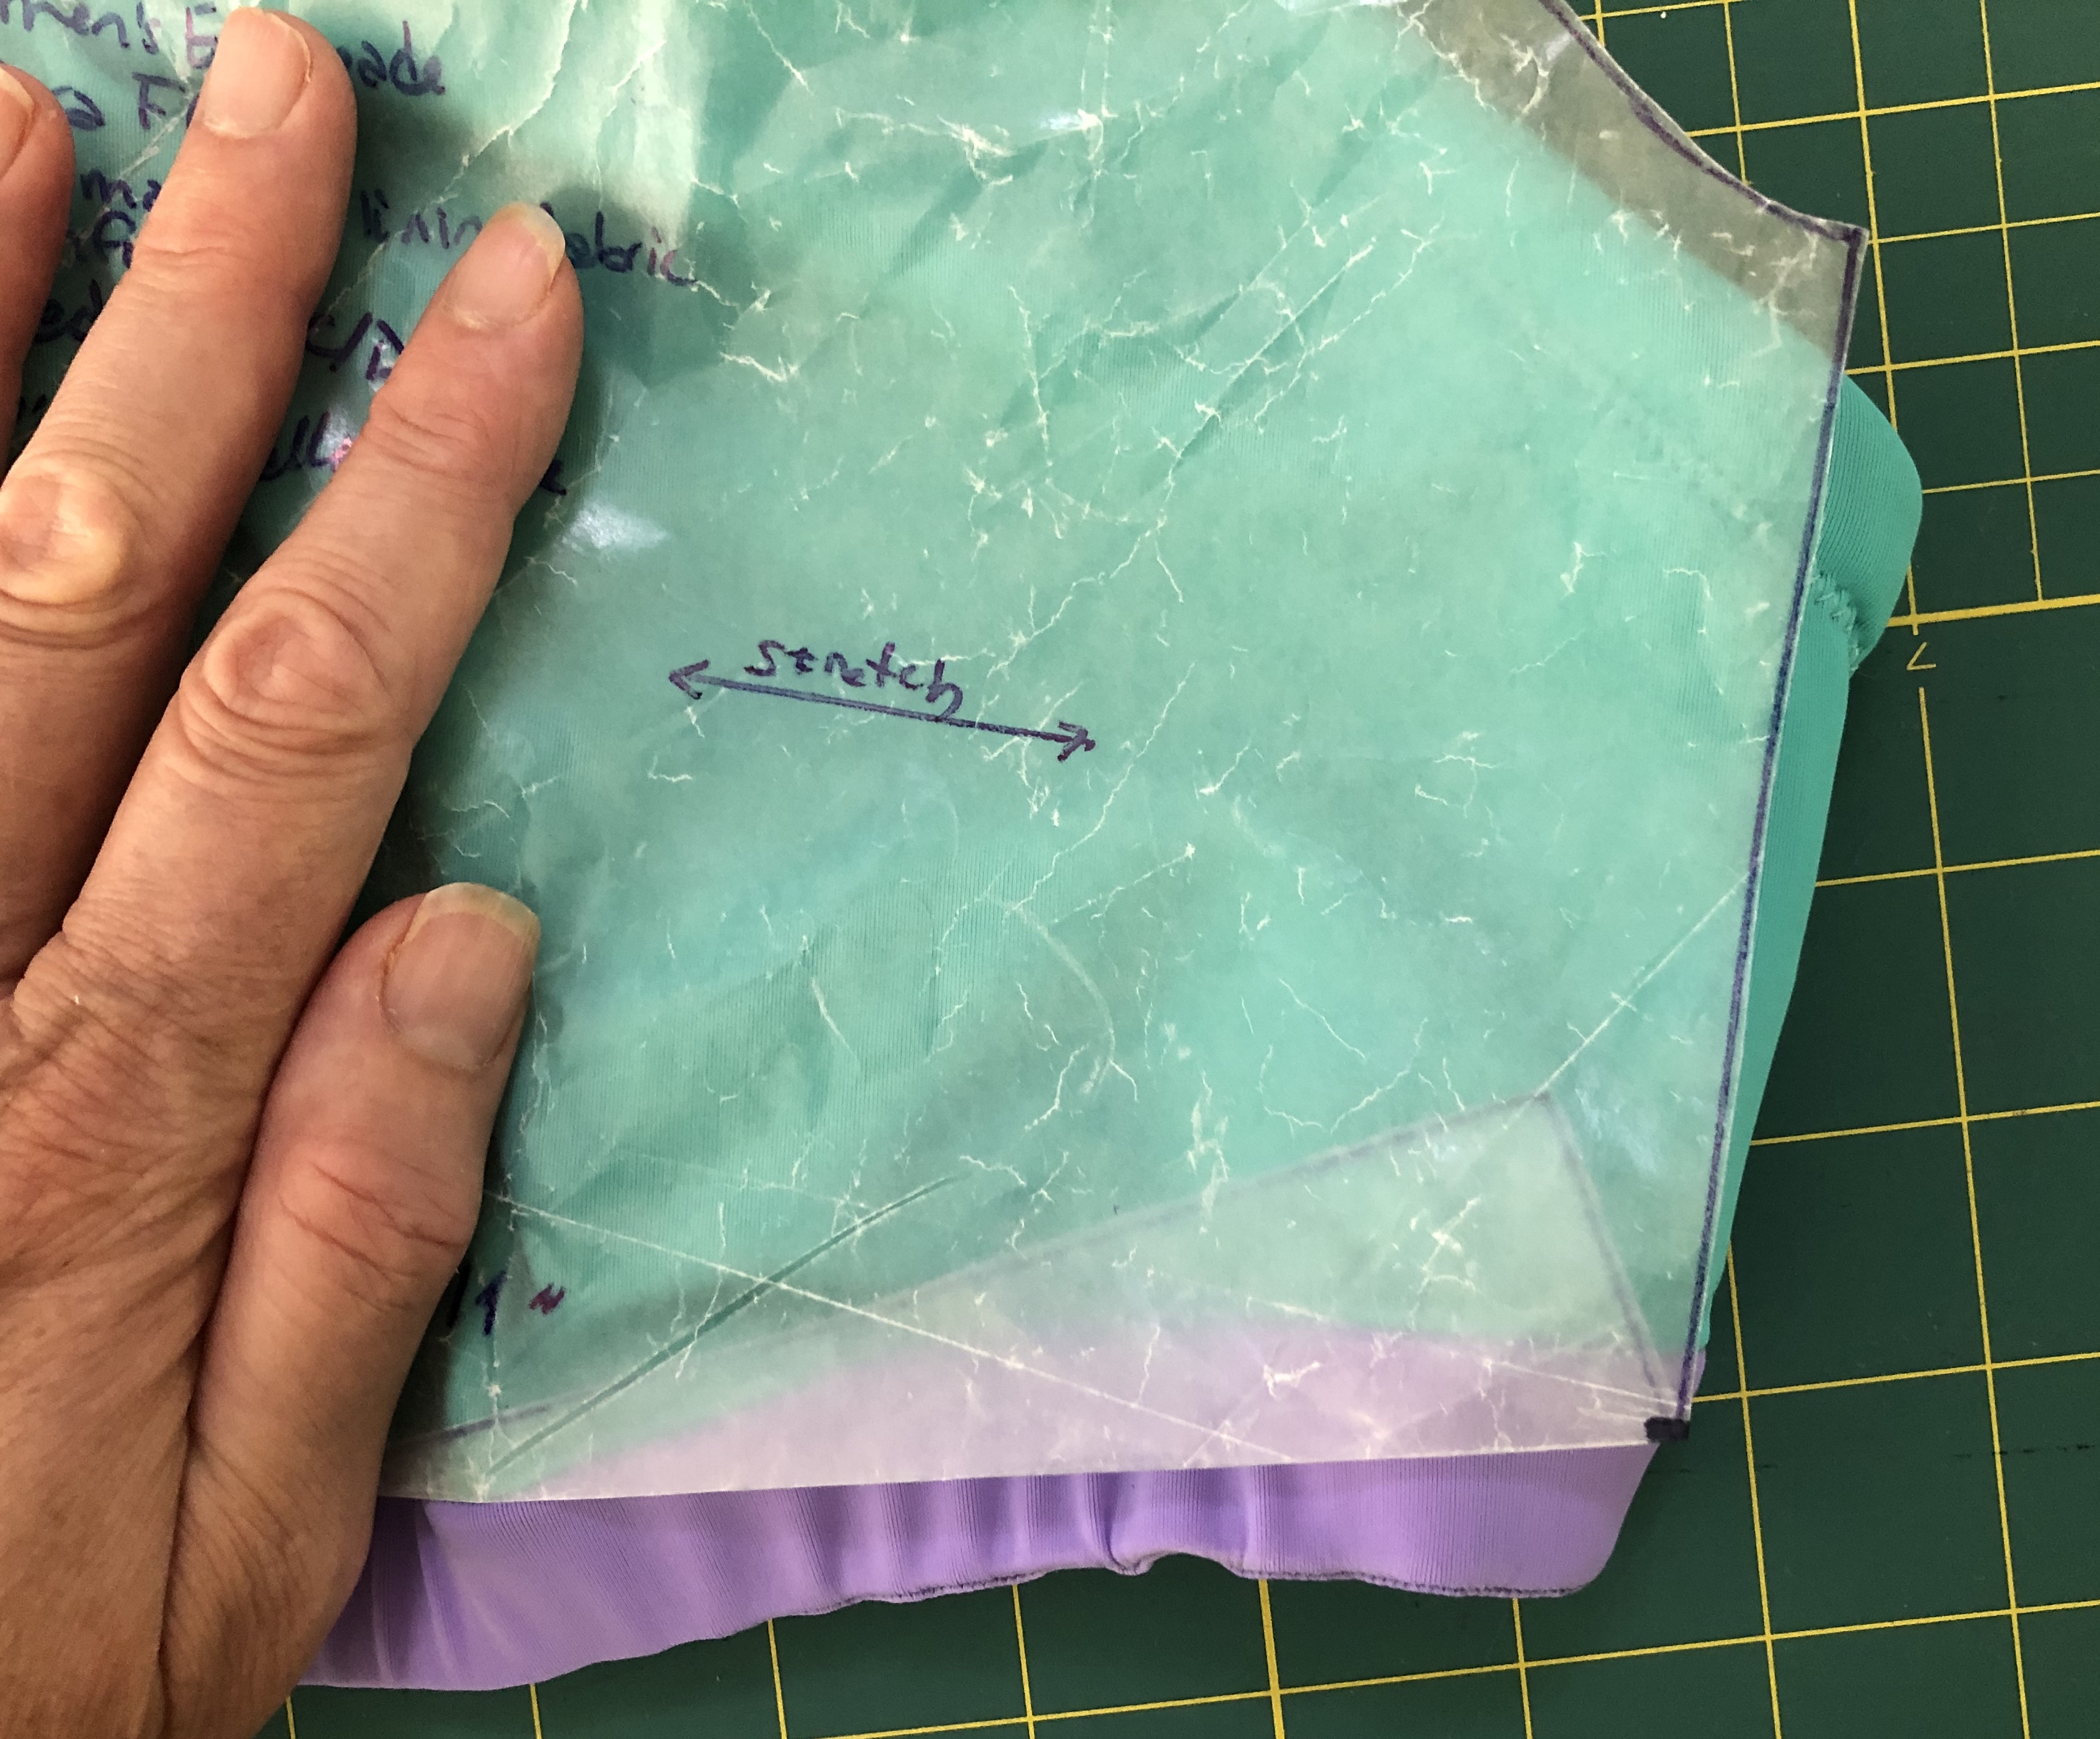
The legs felt too low, so while wearing the bottom, I carefully pinned where I wanted the leg line to end. I added in the 3/8″ seam allowance I was going to use for turning my swim elastic under, marked my pattern, and cut off the excess fabric. The photo below shows how much fabric I cut off compared to my new higher leg cut line.

I also cut a front and back out of swim lining. And as you can see, the swim lining from Phee Fabrics is nothing like the stuff I’ve bought from JoAnn’s. It’s soft and lays smoothly. The edges don’t curl up, and it’s super easy to sew with! I also cut a front piece out of powernet. Hello tummy control! Not only is powernet great for bras and swim tops, it works fabulously to smooth out the tummy and hold everything in place. Baste the powernet to the fabric front, and sew the front and back together at the side and bottom seams. Sew the swim lining front and back together as well. Place the swim lining layer inside the fabric layer wrong sides together, and baste at the leg and waist openings. Using a zig zag stitch, sew the elastic on the inside of the leg openings with the elastic lined up with the edge of the fabric. Turn the fabric under and top stitch using a zig zag with the stitch length set to 2.5, and the stitch width set to 3.0. This will give you a professional, even finish.
I used a strip of 2″ wide fabric to make my waistband. I sewed the two short ends right sides together, then layered the swim bottoms and waistband, right sides together, with 3/4″ knit elastic on top. I stitched through all three layers, using a 1/4″ seam allowance. This was easier than anticipated, since all three layers were the same length. I didn’t have to worry about stretching or pulling. I flipped the waistband open, and carefully folded the waistband fabric around to the inside and pinned it in place. Using the same zig zag settings, I topstitched the fabric in place just below the waistband.
 My Scrundie swim bottoms were a success, and I have a cute new swimsuit! I love that it’s modest enough, while still being sexy. My husband definitely approves of my creation!


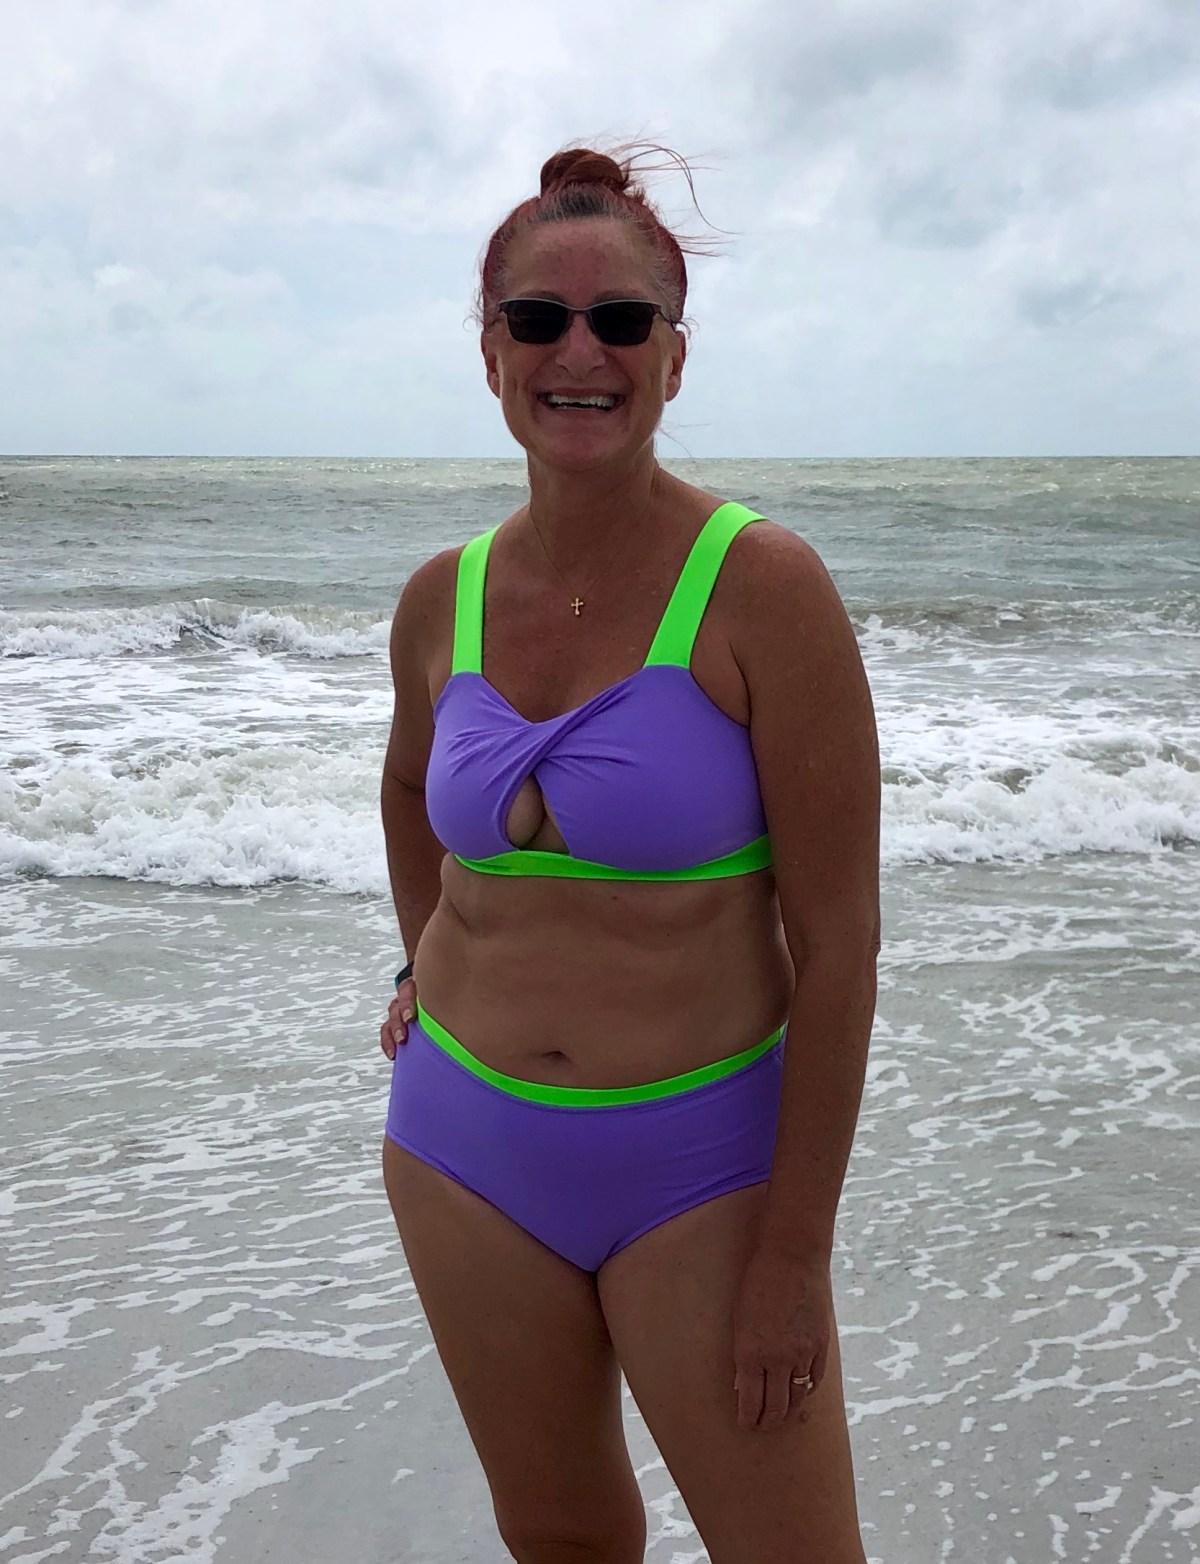
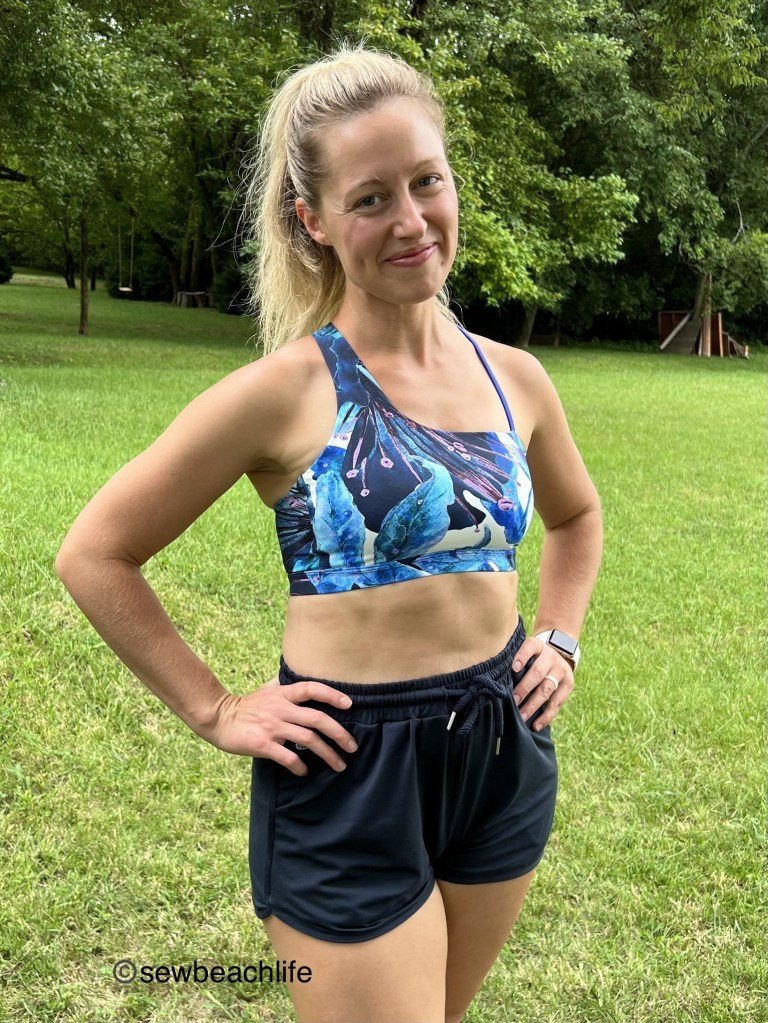
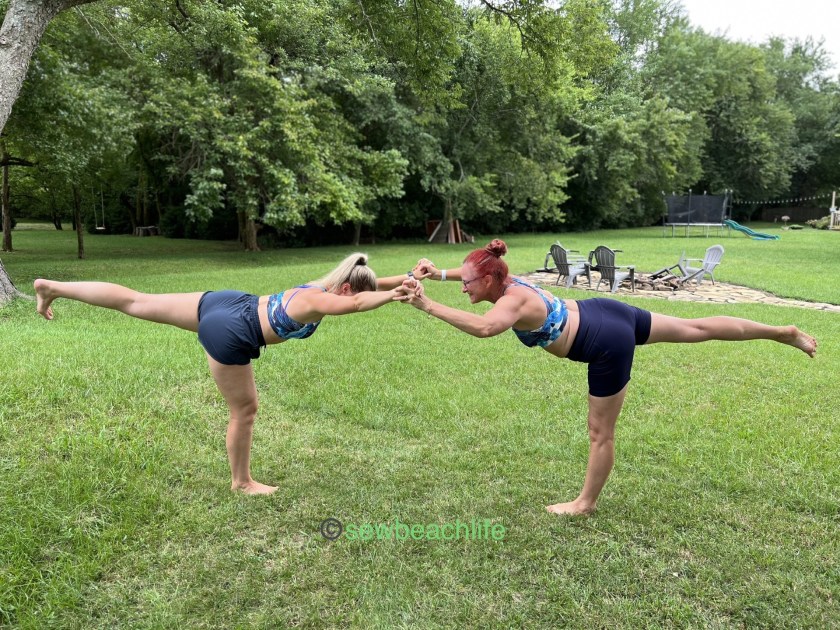
Since I seem to think that every bra or swim top can be made into a workout top, read the 5oo4 Escapade Experiment, Hack At It, and the GreenStyle Power Sports Bra Workout Top Hack as proof of my workout top obsession! 🙂 I decided to make the Water Faery Twist Top into a workout top too. I made the Twist & Swim Top out of Tricot, per directions (with the narrower and longer straps out of Supplex) through to basting the completed bodice layers together along the bottom. Then I got to work on the tank portion. Supplex is my absolute favorite fabric for workout wear, so that’s what I used for the tank. The pattern includes a tankini option, but since I was making a workout top rather than a swim top, I didn’t want the negative ease that the swim top has (to keep the tank from floating up while in the water).
If you have a well fitting tank pattern, you can use that, or you can just trace the tankini piece wider, with a gentle slope down to the bottom, rather than with the inwardly shaped waist curve of the original. I thought it would be fun to color block a stripe down the center back, and add some pockets to the front for practicality and a pop of color. I cut a strip of tricot 4.5″ wide by the length of the center back tank piece. Then I folded my tank pattern piece in 1.5″ at the center back. That way, when I cut out the two back halves (not on the fold), I would be missing 3″ from the center back. Sewing the strip to each of the back pieces right sides together, with a 3/8″ seam allowance meant that the color-blocked back ended up the same size as my tank pattern piece.
 I cut out two 4-3/4″ x 7-1/2″ rectangles for my front pockets. I wanted them to be hidden seam pockets like the one I did on the GreenStyle Jillian Tank. I laid the pocket pieces on the tank front and marked the 3/8″ seam line at the top and bottom of the pocket with a pin. I flipped the pocket toward the center, and with right sides together, pinned the pocket to the tank, then stitched 3/8″ in from the pocket edge.
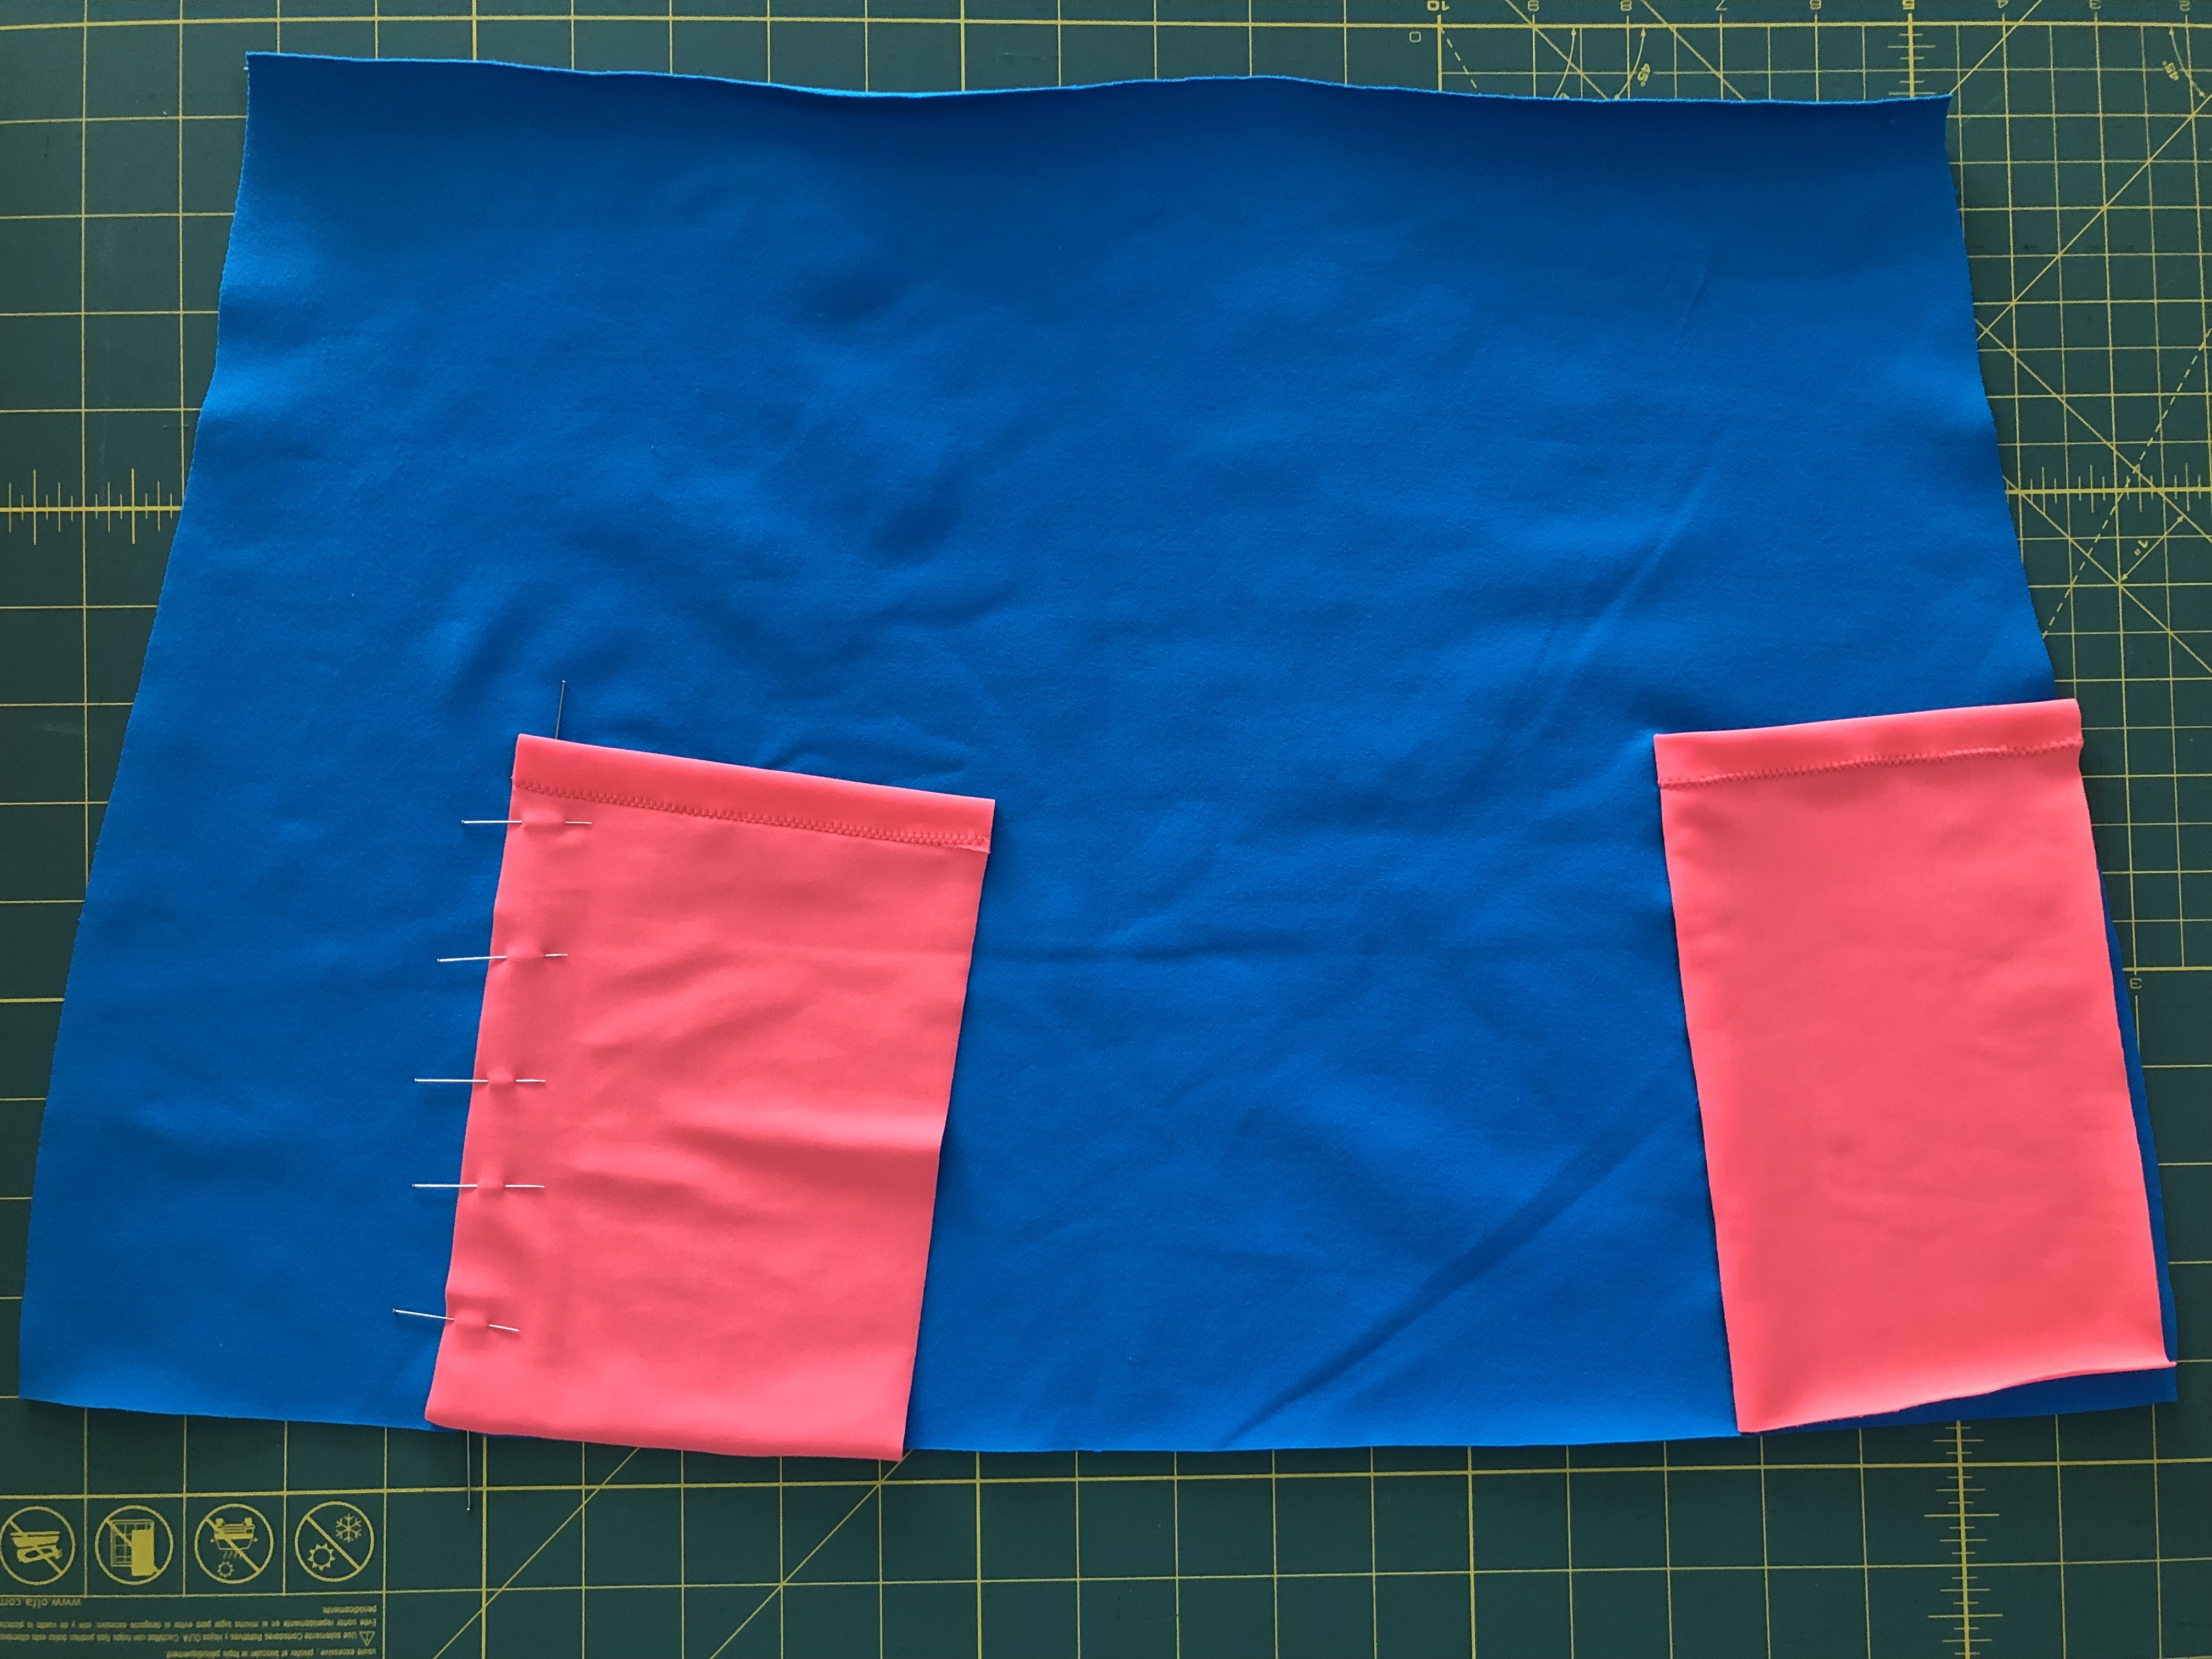 I flipped the pockets back to the outside edges after stitching and basted them in place.
 At this point, I should have been able to sew the tank front and back together, and sewn the bodice to the tank. But I had made a couple of rookie errors. 😦 The first was that I had made the tank too wide at the top. This was easily remedied by angling the tank in at the top so that it was the same width as the bodice (and the original tankini pattern piece.) The second error was not considering the fact that I am tall, and should have added an inch to the length of the tank. The problem was remedied easily enough by adding a band. I cut out the band pieces, and sewed them onto the bodice per the pattern tutorial, except using a 3/8″ seam allowance, and spacing my bodice front center V only 1/2″ apart. I don’t want to show too much skin at yoga class!
Because the 1.25″ wide sport elastic had worked so well on my swim top, I decided to use it for my workout top as well. With the bands still folded up on the bodice, I used pins to mark the quarter points on the top, and a pencil to mark the quarter points on the elastic, and stretching to fit, stitched the elastic to the seam allowance. I had the elastic lined up with the stitching line, and hanging down below the bodice. Then I folded the inner band down, and stitched the elastic to the band.
 I brought the outer band down and basted it in place before attaching the tank portion. I sewed on the tank, hemmed the bottom, and I’ve got a cute new workout top!
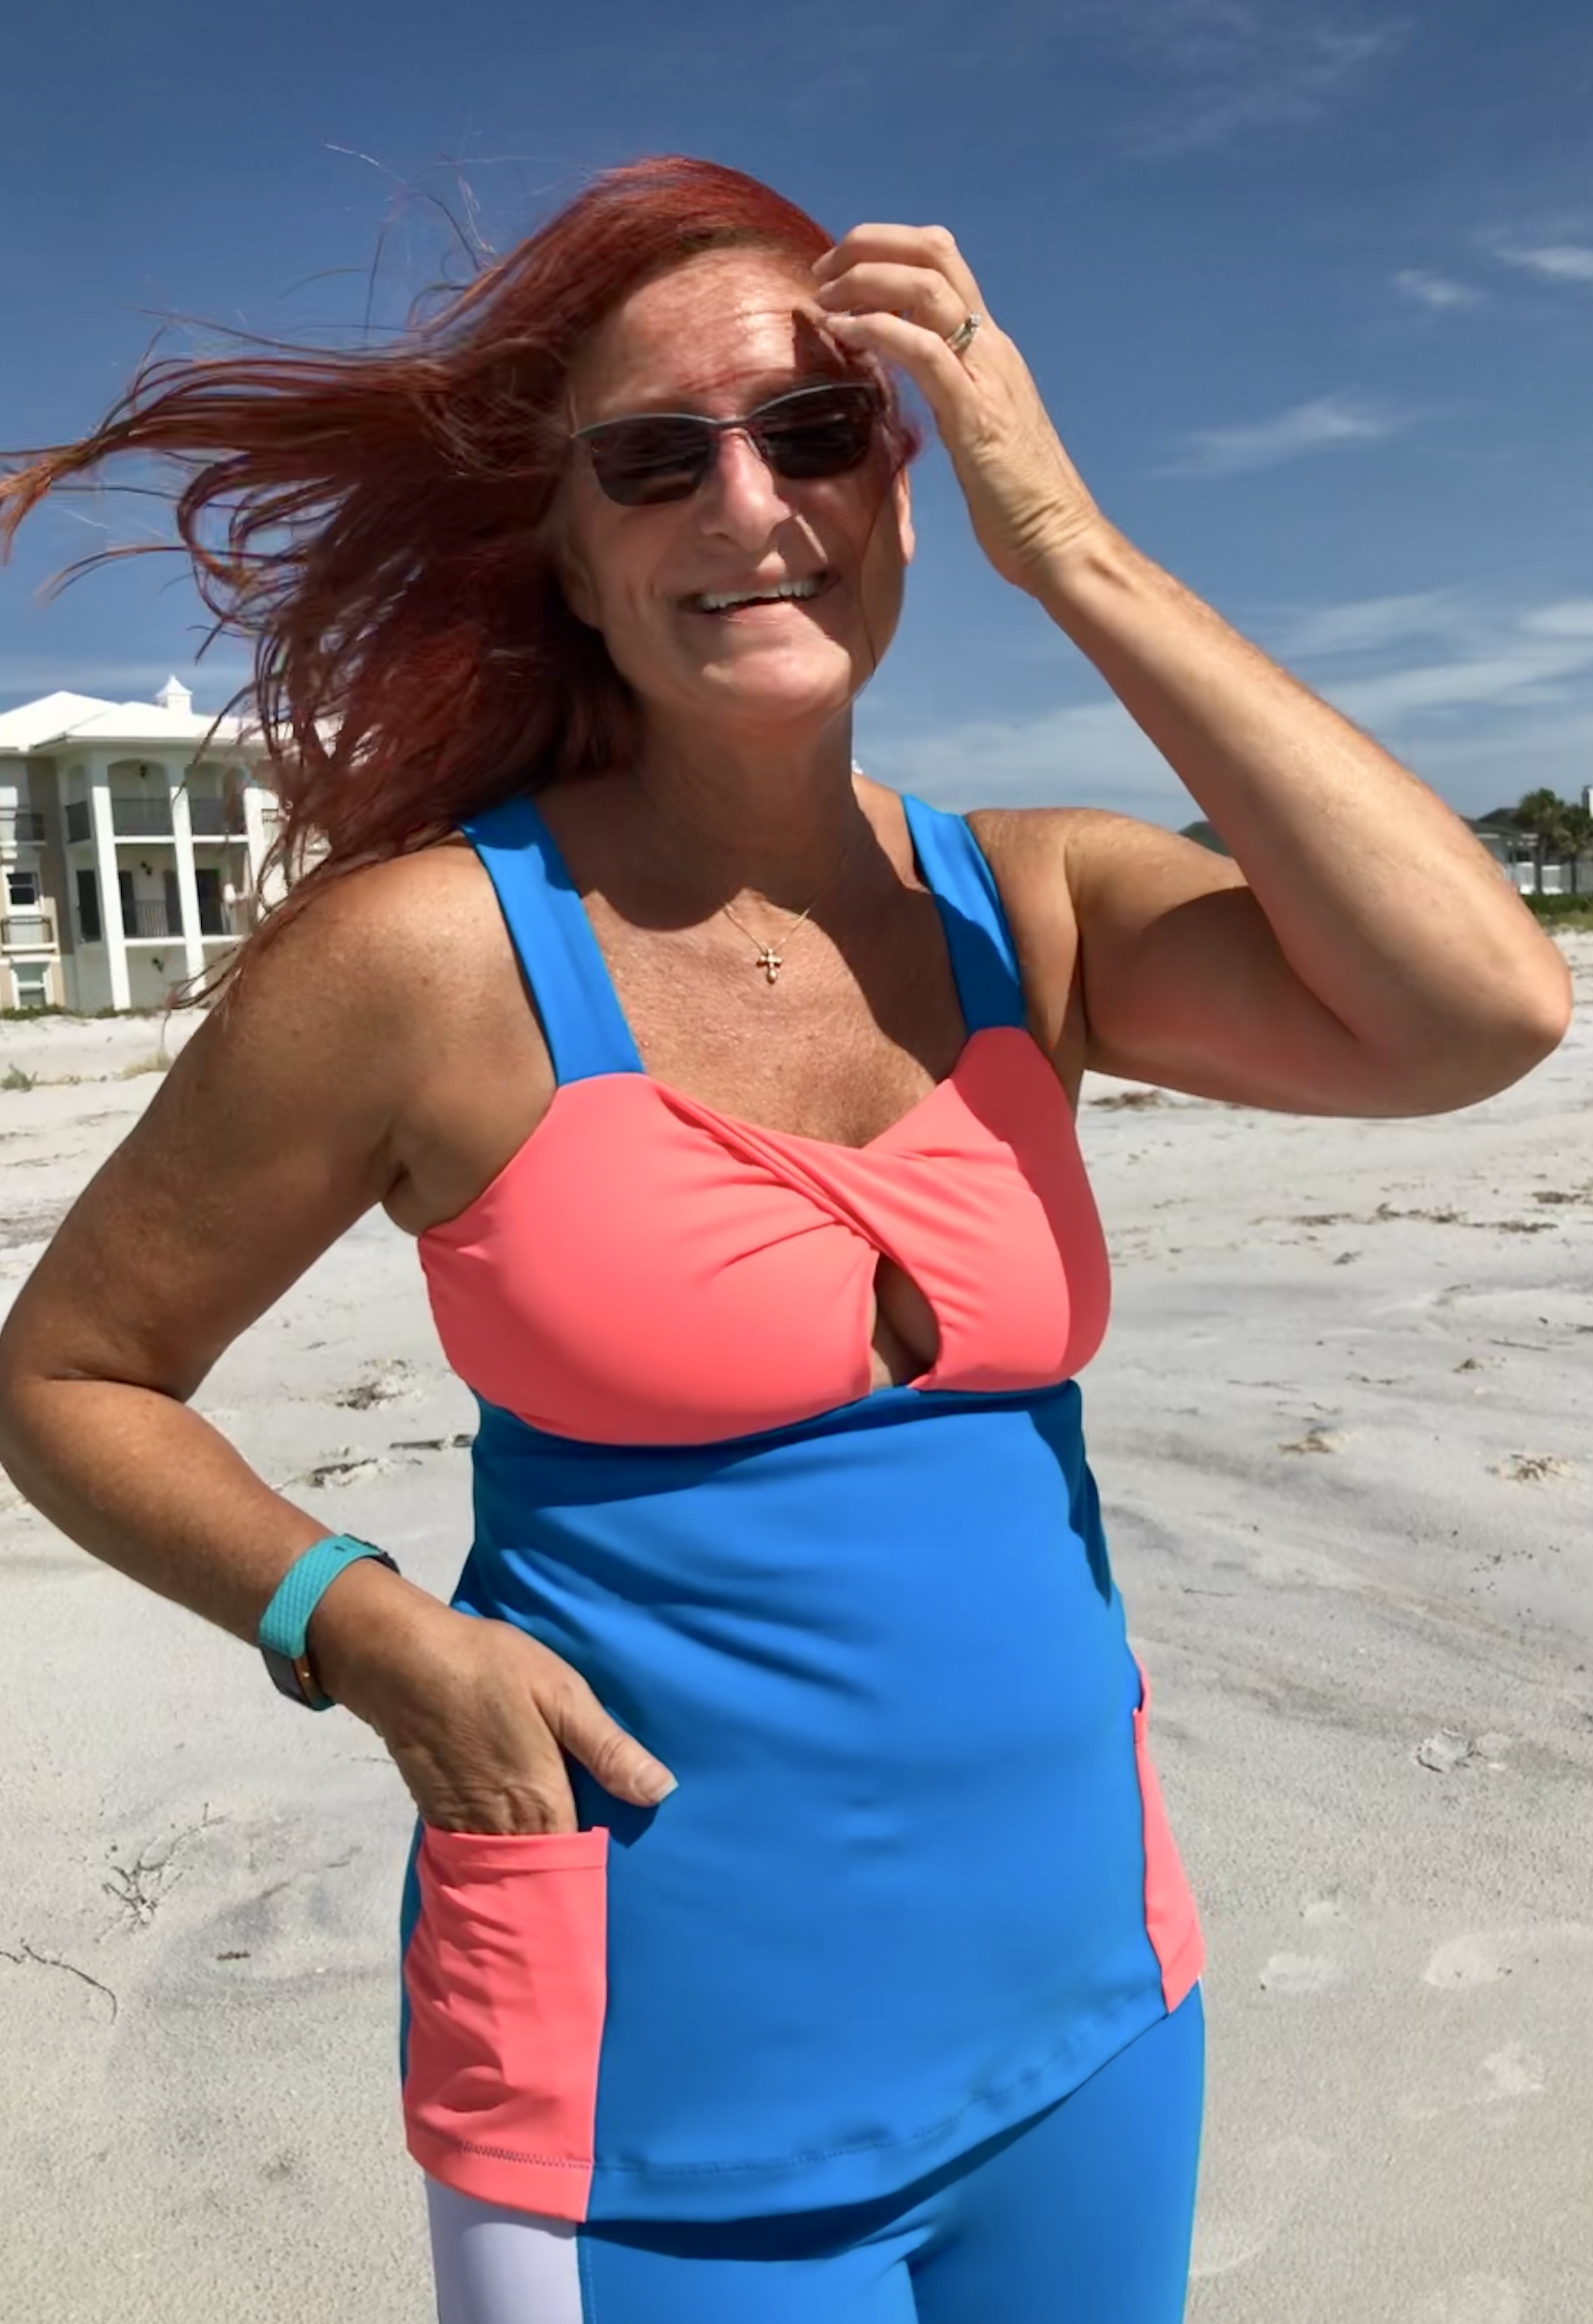

Everything stayed perfectly in place during a sweaty Vinyassa Flow class that included inversions. Everyone in the lobby when I walked into the yoga studio commented on my top. None of them could believe that I made it, including the instructor, who knows how to sew. I went for a walk later in the evening, and the pockets worked great to hold my phone and house key. It looks like I’ve got a great new swimwear and workout top pattern to add into my rotation!
*This post may contain affiliate links. This means that at no extra cost to you, I may receive a small commission if you purchase through my links. As always, I only give my honest opinion. After all, it is my blog, which represents me! Thank you for reading and sharing my love of sewing, patterns, fabric, and pattern hacking. 😉


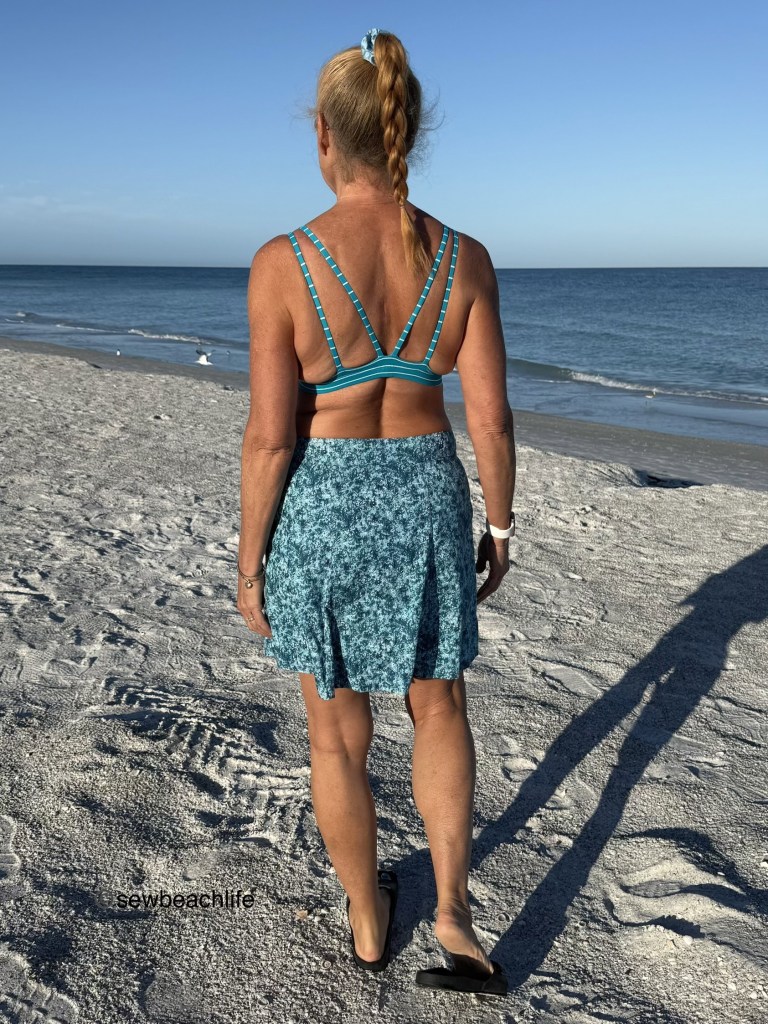


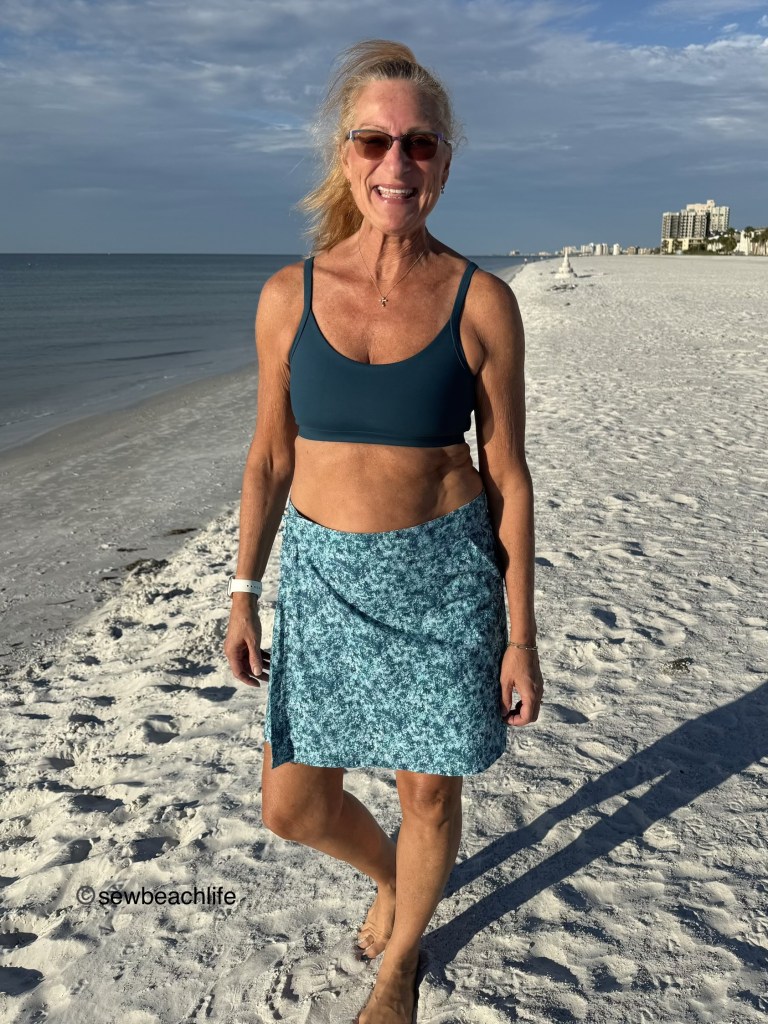


 You need that extra width to make your drawstring casing, and for your skirt to have a little bit of ease. The skirt back should also match the curve of your briefs and have the same extra width. Because I’m tall and have a booty, I added a little extra length to the center back of my skirt, tapering up to the side length. It’s just enough to cover my bum when the skirt isn’t gathered up on the sides. Sew the skirt front and back right sides together with a 1″ seam. Make drawstrings by cutting four 1-1/2″ wide strips of fabric twice as long as the side seam of your skirt. Fold each strip right sides together and using a stretch stitch sew with a 3/8″ seam allowance. Use a safety pin or bodkin to turn the strips right side out.
 Fold the bottom hem under 1/2″ and use a zig zig or other stretch stitch to hem. On the right side of your skirt, make a small horizontal slit in each casing, about 3/8″ above the hem. Thread a drawstring in each casing and tack the drawstring in place at the top.
 Align the center front, center back, and side seams of your brief and skirt and pin or clip in place. Try it on to ensure everything feels comfortable and lines up nicely. This is your opportunity to trim the rise a little bit if needed for better alignment. Easing the skirt to fit the brief, baste them together. Then sew on your waistband and elastic and you’ve got a new swim skirt!


 You’ll need to poke one side of the back through the narrow space at center back to turn the back right sides out. Then it’s time to sew your side seams. I hate bulky side seams, and with the straps, and elastic, and layers of fabric and powernet the seam could get bulky! So I do it a little differently than you may have seen. Since the front strap casing is folded down at the top front, my normal method of sewing the main front to main back, and lining front to lining back, lining up the top seam isn’t going to work.