
It’s never a bad time to sew yourself some new workout wear, but losing some weight necessitates making new items that fit! My drawer full of workout wear is nearly all too big. Going to yoga class 4 times a week means that I need multiple outfits that fit.
Obviously making new workout wear is much more fun than seam-ripping apart your reverse triple coverstitched old outfits, cutting them down to a smaller size, and then re-sewing them! So I traced off a tried and true pattern (the GreenStyle Power Sports Bra) and tried a new pattern (the Sinclair Flex Leggings).
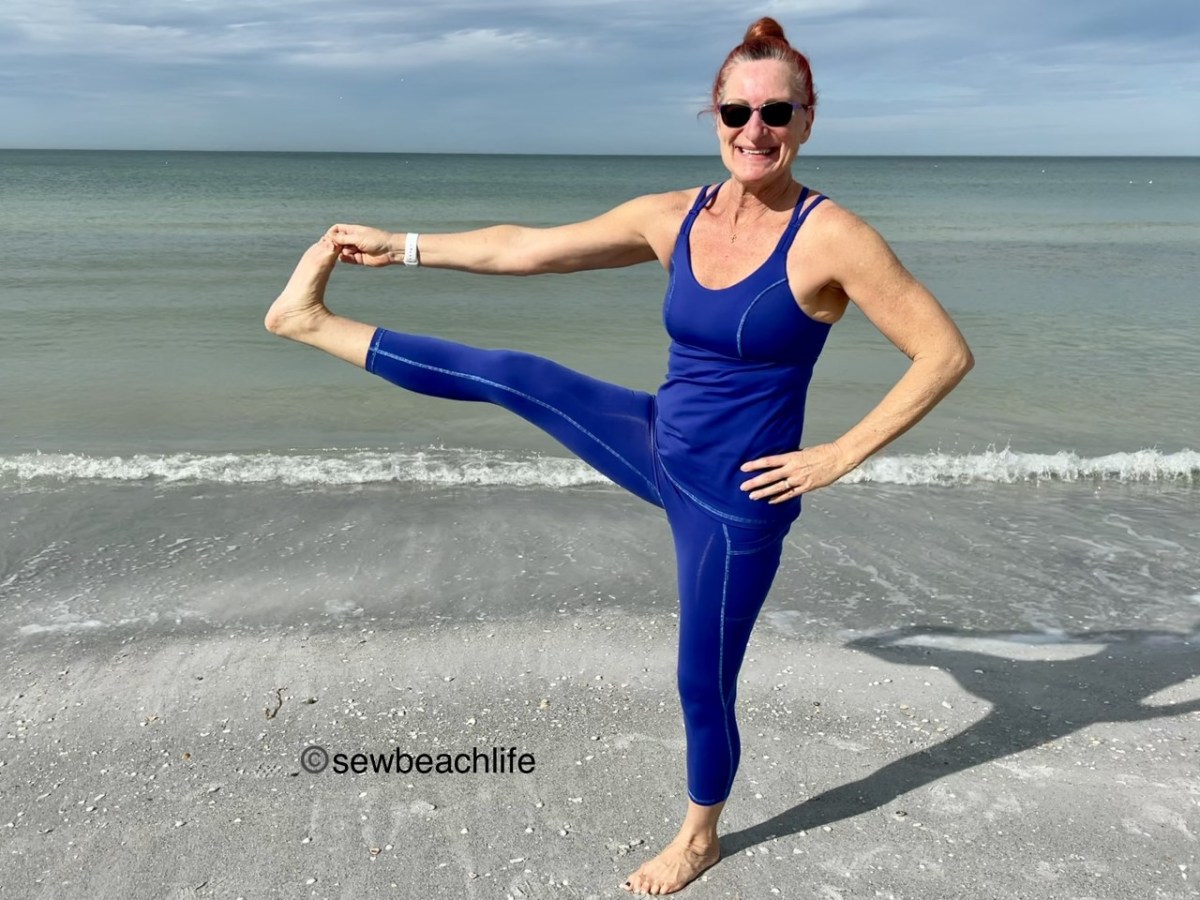
As a sewist, I always notice when someone in yoga class is wearing a new style. Several women had worn workout leggings with a deep V side panel with pocket, and I knew just the pattern to try. Sinclair Patterns is known for well drafted patterns that include petite, regular, and tall options in their files. There are quite a few Sinclair dresses, skorts, shorts, and tank tops in my wardrobe. They aren’t necessarily known for workout wear, but the Flex Leggings pattern is super cute, so I had to give it a try.
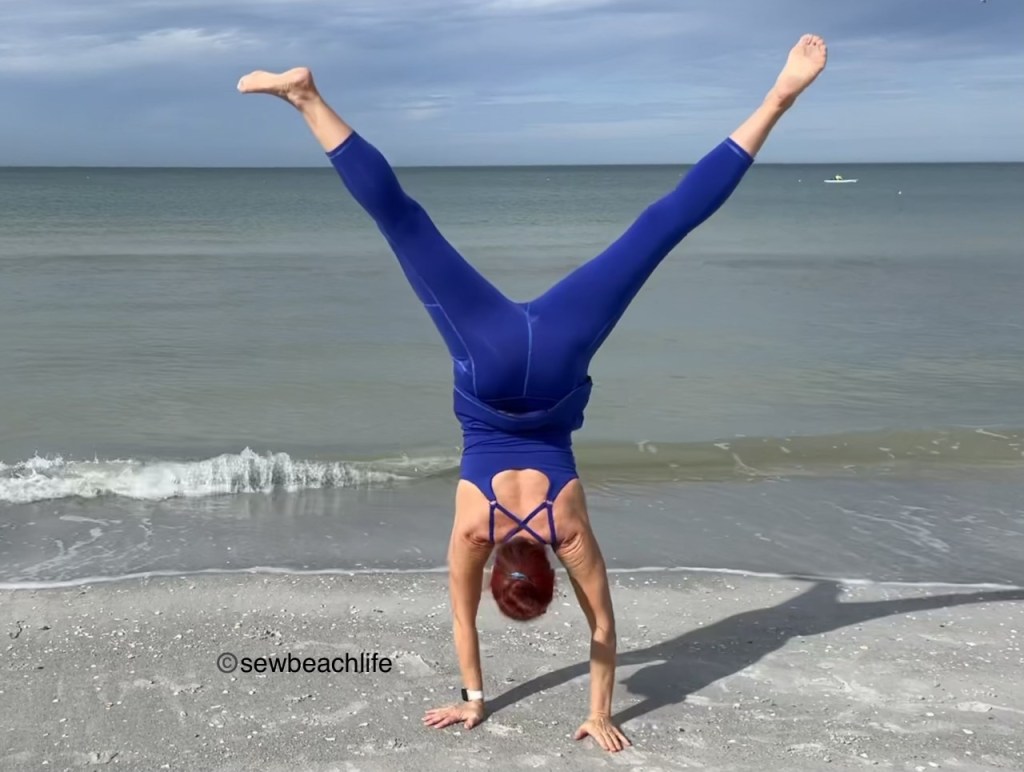
With no center front seam, the leggings fit smoothly across the abdomen and hips. The color-blocked V side inserts can include a pocket, which in my mind is a necessity. The pocket is deep, as in deep enough for even the largest phone to fit securely down into the pocket. I wore my leggings to Christmas dinner at my sister-in-laws house, and my phone never felt like it was going to fall out of my pocket. Of course I had my phone in and out of my pocket all day capturing moments with people that I love! (There’s one of us in every family 😉 and people sort of count on me to catch a few photos to share!)


The above photo also illustrates the only thing I disliked about the pattern. I need a contoured waistband, and always serge 1/4″ clear elastic into the top waistband seam in other patterns. The front and back waistband pieces on the Flex pattern are contoured, but fold-over. I added powernet to the front waistband piece, basting it to the wrong side of the fabric before sewing the waistband pieces together. Even with a double layer of powernet (since the piece is folded over) the waistband slid down all day long.
In all fairness, the tutorial does include optional directions to add narrow elastic threaded through buttonholes in the inner side of the waistband that could be tied to fit. I own one pair of Athleta leggings with an inner drawstring that in the past I have never bothered to tie. Since I’ve lost weight, I currently have the drawstring pulled tight and tied in a knot. But with a smooth front and smooth waistband, I didn’t really want a knot of elastic bumping out in the front. So I unpicked a small section of the waistband to leggings seam, inserted 1″ wide knit elastic, overlapped the ends by 1/2″ and zig-zagged the overlap, and serged the small section of waisband seam closed. I wore my new outfit to yoga class this week, and they stayed up perfectly! Problem solved!

As with every pattern, it is important to grade to fit your body. I have well developed calves (thanks to skating and yoga), so I knew I needed to grade my pattern pieces. The size chart doesn’t include calf measurements, but I’ve made enough workout wear and know my body shape well enough to estimate that my calves are about two pattern sizes larger than my hips. My knees are slender and I wanted to ensure that the leggings didn’t get baggy at the knee, so I started my grading just below the knee.

Since I couldn’t know for sure whether my grading was perfect or not, I basted the outer leg seam and tried the leggings on before serging the seam and reverse triple coverstitching. No one wants to have to seam rip that as an experiment! The grading ended up being just right, and now that I have the pattern perfected for my body, future pairs will sew up much more quickly!
These are the 7/8 length, and of course I want to make a pair with the lower leg color-blocking. So I’ll have to play around with transferring my changes to the color blocked pattern piece. What fun is sewing if you don’t challenge yourself, right? 🙂
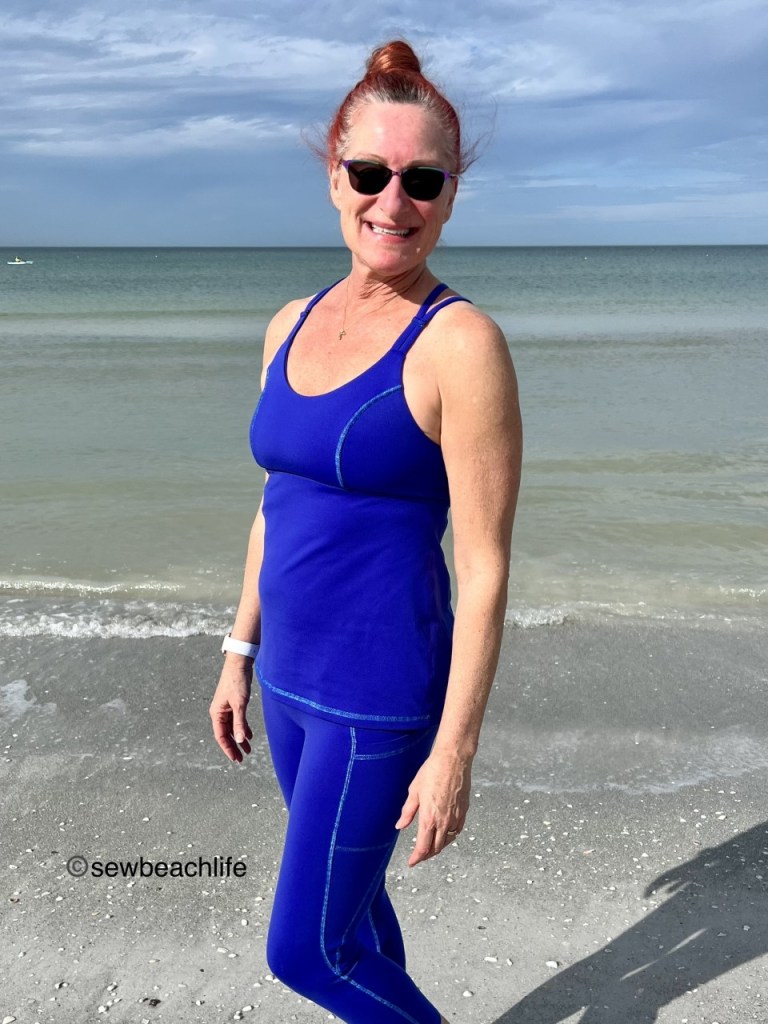
The Power Sports Bra is a staple workout and/or swim top pattern for me. Women with smaller cup sizes can get away with flat front bras/tops, but a fuller bust is curvy and princess seams are great for fitting smoothly over your bust projection. I love playing around with it and trying new hacks. Doing double narrow straps with a criss cross was a fun, easy hack. It’s important to take your measurements and compare them to the size chart on a regular basis. I started by tracing my pattern in a smaller size. Previously I’ve used the 34 band size in cups E/F. The F is a little too high in the armpits, so I blend the E and F. My current measurements put me in a 32F. But my bust is fuller at the bottom than at the top. So I take away a bit of the upper curve on the side cup piece. Customizing the pattern pieces to fit your body is the key to a perfectly fitted garment.
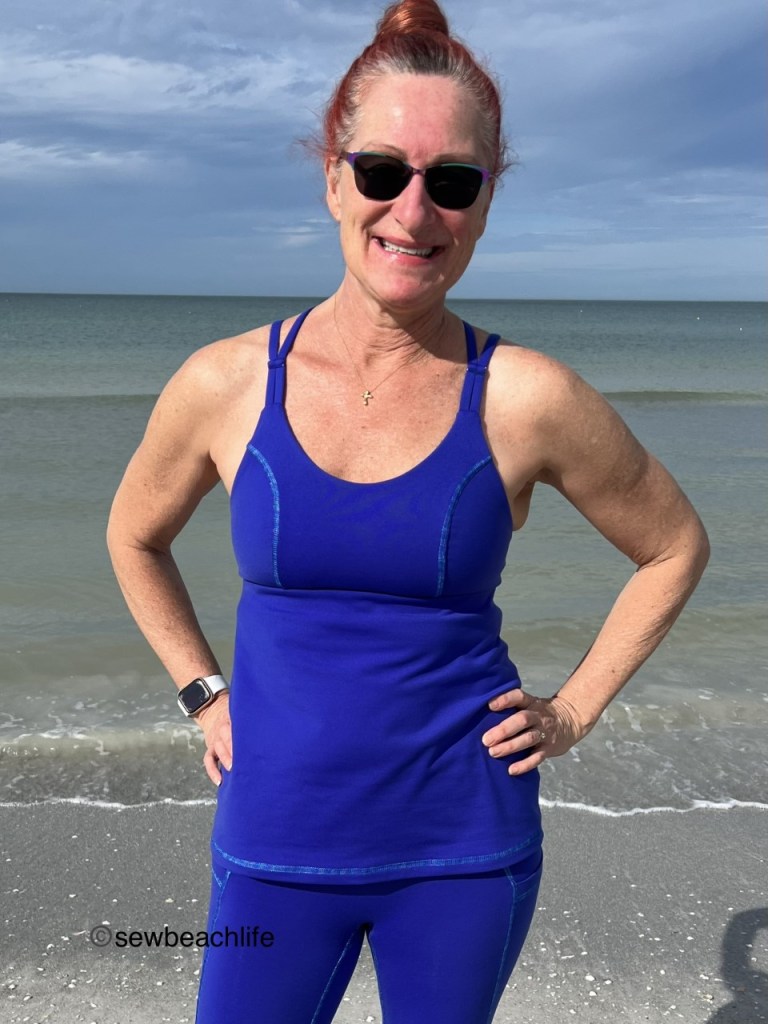
Porcelynne has some really pretty rainbow finish rings and slides that I wanted to incorporate into my top. Generally I use wide straight straps on the U-back Power Sports Bra because I don’t like straps pulling on my traps or up near my neck. I’ve found that I need the 1″ wide (final size) straps to be about 13″ long with either elastic or powernet in them, as in this post.
After cutting my four 1.5″ wide straps longer than needed, I zig-zagged 3/8″ knit elastic into the seam as shown here. It’s important to press your straps after turning, so they are as flat and smooth as possible. Also, pressing as you sew gives your garments a much more polished and professional finish.
Extending the strap connection point on the strappy U-back pattern piece by 1/2″ gave room to add the 3/4″ rings to the back by folding the fabric over the ring and stitching it in place. Then two straps were folded over each ring and stitched in place. The two outer straps were kept straight and the two inner straps were criss-crossed.

You control how close to the neck your crossed straps are by the placement of the 3/4″ slides. Slide them up, and the straps are pulled farther from the neck. Slide them down for maximum crossing. Once you’ve found the perfect placement for you, the straps get tucked into the bra front and stitched in place as per the pattern tutorial. My straight straps ended up 13″ long, and the crossed straps ended up 15″ long.

I’m definitely going to use rings and slides again because it’s just such a fun look! Making even a few small changes to a pattern is not only fun, it personalizes the pattern for your needs. I was also excited to try a new fabric called stretch eclon jersey from Mood Fabrics. Eclon is a brand name of nylon, and if you’ve read my blog before, you know that I am a big fan of nylon spandex. I avoid polyester, especially for workout wear because it doesn’t breathe and tends to absorb sweaty odors. Ewwww! Florida is usually hot, and my workout wear fabric needs to be moisture wicking.
I hope this inspires you to play with your patterns, and work towards a perfect fit as well as trying new looks.

The details:
Sinclair Flex Leggings and GreenStyle Power Sports Bra, made of stretch eclon jersey from Mood Fabrics. This and several rayon spandex prints were my first purchase from Mood, so it’s a new supplier to me. I have to say that I liked all of the fabric that I ordered, except one (because it’s only a two way stretch instead of four way. Apparently I didn’t notice that in the fabric listing!)
The rings and slides were purchased from Porcelynne, along with some lovely nylon spandex fabric that I need to share. I made the cutest outfits for my granddaughters! Porcelynne isn’t new to me, I’ve purchased from her before but I don’t really think I’ve shared my makes using her findings before.
Seams were accented with a reverse triple coverstitch on my wonderful Babylock Triumph using Fantastico varigated thread #5028 Peacock Plume from Superior Threads in the looper using a stitch length of 3. Fantastico is one of my favorite threads to use for reverse coverstitching. It has such a beautiful sheen, and the short color repeat is perfect for adding a classy look to garments.
I’m very happy with my new favorite workout outfit, and will definitely be making more! Thank you for reading and sharing my love of creating, hacking, sewing, patterns, fabric, notions, thread, and making beautiful, well-fitting garments! ❤


Oh my gosh Wow! You are awesome! Love the cartwheels 🙂 Was curious, what coverstitch machine are you using?
LikeLike
Thank you! I am blessed to own a Babylock Triumph, which is a combination serger and coverstitch. I LOVE it! It’s quick and easy to switch back and forth, and since I don’t have a sewing room, it doesn’t take up the space it would to store two separate machines.
LikeLike