When pattern companies note under fabric choices that you will need “Any knit fabric like cotton Lycra, double knit, ITY, sweater knit, French terry, etc….with at least 50% 2-way stretch”, I’m sure they must realize sewists are always going to push the boundaries of the intended fabrics! The listed fabrics for the GreenStyle Sunday Cardigan are generally pretty stable knits, which is why they are great for cardigans.
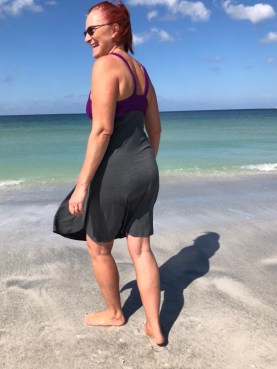
Which brings me to my fabric choice- a pretty navy blue rayon/spandex from Phee Fabrics. I live in Florida, so a thick, heavy knit cardigan isn’t likely to get much use by me. There are chilly days, and restaurants and grocery stores always seem to blast the A/C, so cardigans are a must! Rayon/spandex is light enough to keep me comfortable without being too warm. I knew I wanted the duster length cardigan because it would look nice no matter what length of dress I wear, and equally as nice with pants or leggings.
I’ve mentioned before that Phee’s rayon/spandex is much more substantial than average, so I knew it would work for this cardigan, even in duster length. The GreenStyle Sunday Cardigan doesn’t have bands, all the edges are simply pressed under and stitched. This makes it a simple sew with a clean look. I wanted to ensure crisp edges, especially since I wanted the side slits. My simple solution was interfacing. I cut 3/8″ wide strips of a light to mid-weight interfacing. It was probably Pellon Shirtailor, but since all my various weights of interfacing are just in a bag and not individually wrapped with their respective strip of directions, who knows? It wasn’t featherweight and it wasn’t a stiff heavyweight, so light to mid-weight will suffice!
I ironed the strips along the front edges and along the curve of the neckline, (which was the only place I actually traced the pattern shape). I just used my rotary cutter and ruler for cutting the long strips. I also used strips along the low slit edges. I didn’t need to use it, but it made it super easy to press over the edges without having to use a hem guide and pin all along the edges. I didn’t bother with it at the hemline, as the fabric hems beautifully.


Other than adding two inches to the sleeve length for my long arms, and ironing on the interfacing, I followed the pattern directions and ended up with a soft, cute, comfortable cardigan that will get tons of use!


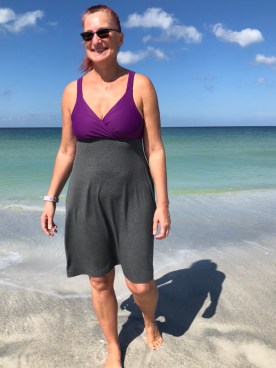
My other make was the Sinclair Patterns Sienna drawstring dolman top. I have owned this pattern for months, and this is the first time I’ve made it. Why did I wait so long? Probably because every time I’ve tried on a dolman top at a store, I’ve thought they just looked baggy and sloppy on me. I have got to say that I am really growing to love the genius of Sinclair Patterns fit! I’ve previously blogged about the Sinclair Kai tee shirts I made for my husband and son. And I love that Sinclair patterns come in short, regular and tall. I think that having the pattern in tall is part of what makes this fit so well. The patterns are also drafted with a shaped hemline, and the design makes them lay well on a real body.

I made the short sleeve version for myself, and wore it with the drawstrings fully extended as a dress. The winter white rayon/spandex top looks equally as cute with the drawstrings pulled up to tunic length. In fact it’s so cute, that I texted a photo to my daughter and asked her if she wanted a top. Her answer? “I love dolman tops! I think they’re cute and give the illusion of a smaller middle.” Not that she’s implying I don’t have a small middle. It’s pretty obvious that I am not a small person! 🙂 She actually is a small, slender woman, which is why I can’t model the Sienna I made for her. She lives in a colder climate, so I made hers with the 3/4 sleeves.
Since I didn’t think I’d have quite enough fabric to make the sleeves per pattern (which has the sleeves drawn as part of the body), I cut them at the short sleeve line. Then I added the seam allowances at the top of my sleeve pieces. I think it would be easy enough to hack the sleeves to be long using this method. Since I didn’t have my daughter here to measure for that, I stuck to the 3/4 sleeves.


I sewed the sleeve pieces to the front and back pieces, then just followed the pattern directions. Her top turned out just as cute as mine and I can’t wait to see her in it!


I really like both of these patterns, and want to make them in all the colors! And I wonder how my sewing list gets so long. Hah!

May your patterns and fabric be plentiful, and your sewing time enjoyable!
*This post may contain affiliate links. This means that at no extra cost to you, I may receive a small commission if you purchase through my links. As always, I only give my honest opinion. After all, it is my blog, which represents me! Thank you for reading and supporting my love of sewing!


 Please note that out of respect for the designers, and protection of their intellectual property, I will not show full pattern pieces. I bought the cross-front add-on when I bought the Brazi pattern because I love the look and knew that it would be the most flattering for my body type. But you can do the straight strap hack on the original pattern. I simply marked my pattern where it curves from cup to strap, and folded it under 1/2″ above that. I folded the back straps under and cut out my modified pattern pieces. I cut four 2″x13″ rectangles out of my fabric as my strap and strap lining pieces.
 being successful at supporting “the girls” is
 Pin the trimmed powernet pieces to your lining pieces and baste in place. Do not baste along the side seams! To make the pocket for your bra cups, lay your cups on top of the bra front and mark the height. Sewing a horizontal line across the height mark will keep your cups from shifting out of place.
 Sew your main and lining front pieces right side together. The pattern tutorial recommends using elastic along the front edge of the cups. Using the elastic adds another layer of security if you are concerned about anything showing when you lean forward.


 Repeat the process with the other side seam. At this point you can follow the pattern directions about matching your center front notches, adjusting strap length, sewing on your bra band or skirt and adding the elastic.
 Since I was adding the Calista skirt to the Brazi top, and the bottom of the two bras are different shapes, I knew that I might need to make some adjustments. You might like the look of the dipped hem my mash produced, but I am kind of old school, and like my hems to be level with the floor. I had an easy fix for my problem.