Sage Top and Cinder Skirt

An Easy, Breezy Summer Outfit

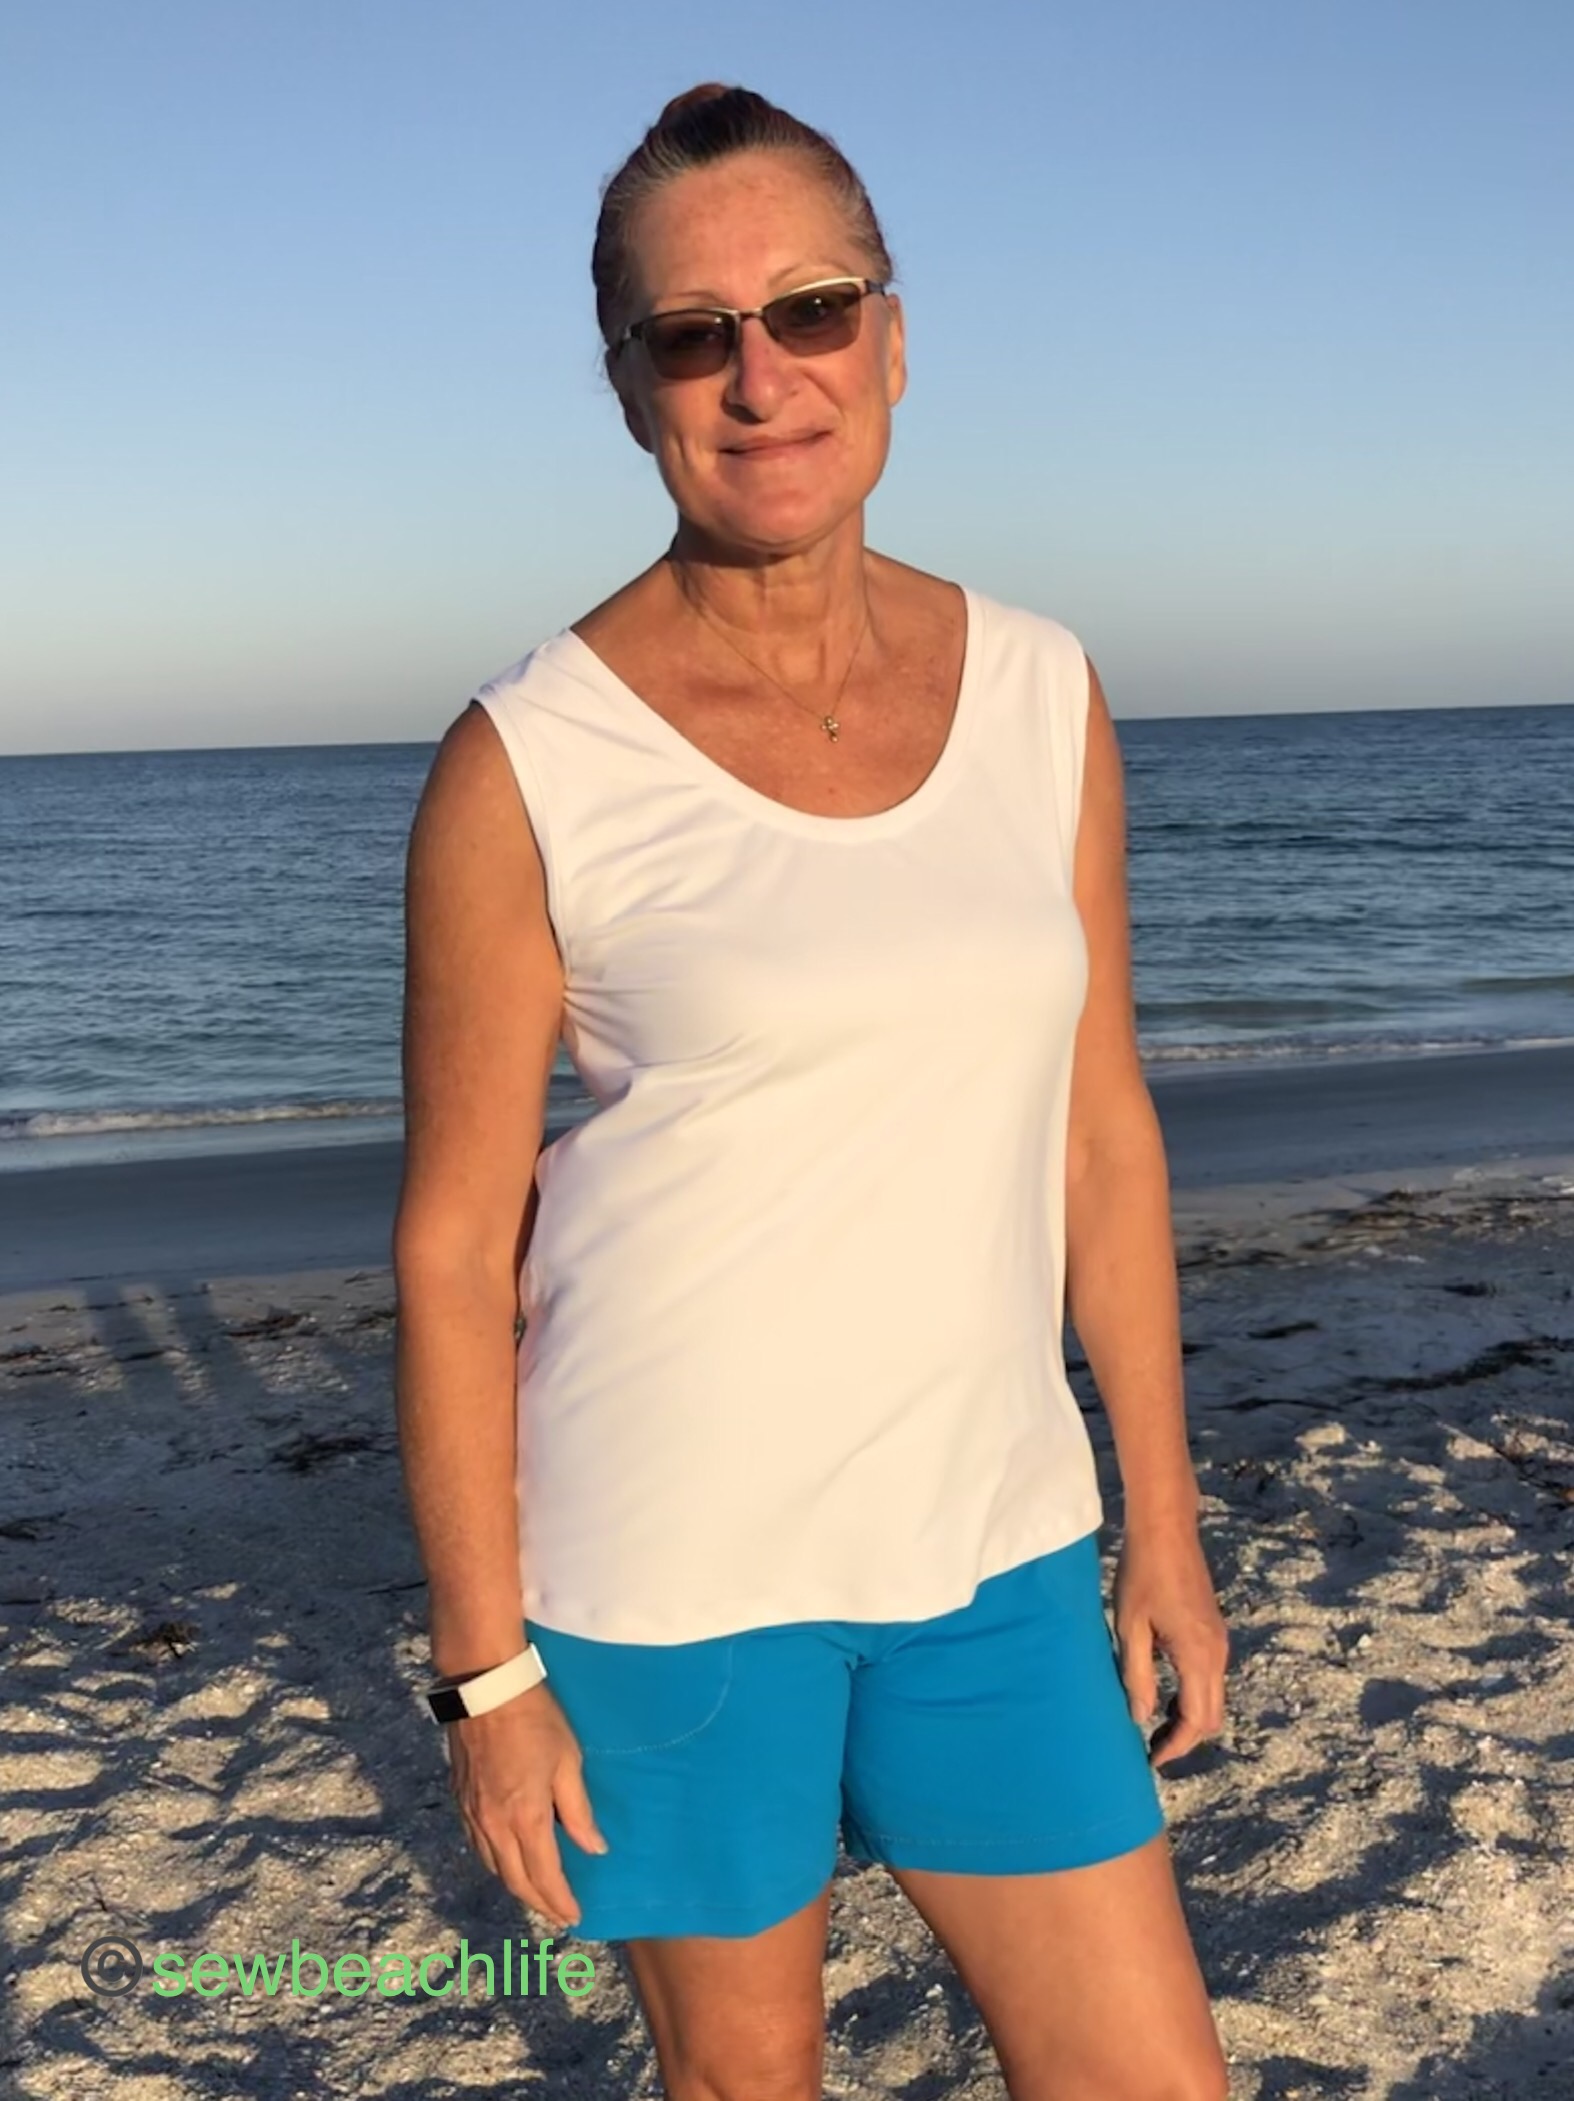
A fitted strappy top or crop (with an optional shelf bra!) is the perfect complement to a light breezy skirt. I love it when Stitch Upon A Time brings an on-trend look to life!

About a month ago, I was sitting at the beach with family and friends and noticed the skirt a woman walking by was wearing. I know people watching is a common “sport”, but garment sewists, we tend to clothing watch. 🙂 Whenever I see a cute dress, top, skirt, or outfit, I start thinking: do I have a pattern for that? Anyways, the maxi length skirt she was wearing was made of a white gauzy fabric, had overlapping sides, and an elasticated waistband. It looked so cute, but I had never seen a pattern like it. About a week later, the testing call for the Cinder Skirt popped up and I was so excited to sign up for it! The Sage Top was also being tested, and I couldn’t resist the opportunity for a cute new summer outfit.

It’s a perfect beach walking outfit!

The design of the Cinder Skirt is perfect, with beautiful, clean finishes. There are no exposed raw edges, all the seams are enclosed. With quality finishes like this, no matter how many times you wash and wear this woven skirt, it won’t fray. The secret to the hem on the curved sides is the facing. My best tip for the facing is to serge along the inner curve with a four thread overlock, then press that inner curve to the wrong side of the fabric. This will make it easier to press, and keep your fabric from fraying inside the hem, even when using fabric that tends to fray a lot, like linen.

The facing is pinned to the skirt panel right sides together. See how smoothly that inner curve lays? And how badly the linen fabric (along the outer cuve) frays before serging?

When serging the facing to the skirt panel, up the differential to 1.3 or even 1.5 when serging the outer curves. This will help the curved seam lay flat when the facing is flipped to the inside and pressed. Just don’t forget to put it back on N for the straight sections!

I love the beautiful details of the elasticated waistband and overlapped panels on the sides of the skirt!

The waistband calls for either two rows of 1″ elastic, or one row of 2″ elastic, stitched in the middle. The directions call for top-stitching the upper edge of the waistband, inserting the elastic, then top-stitching below the elastic, and inserting the second row of elastic. I followed the rules on my first test version, but decided to try using my coverstitch and a different method on my second skirt.

I thought it might be easier to leave an opening for elastic, stitch the waistband, then insert the two pieces of elastic. To prepare the waistband for this, I serged along both short ends to finish them. Then I sewed the short ends together 1/4″ past the halfway fold of the waistband. I stitched the bottom 1/2″ of the short ends together too. This left me an opening for the elastic on the inside of the waistband. I pressed the seam open and stitched along the opening to finish it.

Notice how the bottom of the waistband is serged and pre-pressed? This will make it easier to do the final top/cover-stitching on the waistband.

Since even a narrow coverstitch is wider than a single row of top stitching, I had to make small changes. Rather than top-stitching 1/2″ from the upper edge of the (folded in half) waistband, I coverstitched 1/4″ from the upper edge. Leaving 1″ of room for the 1″ wide elastic, I ran the next row of coverstitching. As per the pattern tutorial, the raw edge of the waistband was serged onto the gathered skirt. The pre-pressed bottom of the waistband was folded over the serged waist seam, carefully pinned in place, then coverstitched.

It’s important to stitch slowly, and pause to remove pins to avoid breaking a needle or damaging your machine.

I love the beautiful clean finish on the waistband, and the professional look of coverstitching. I will admit though, that it took a bit of work to get both pieces of 1″ elastic threaded evenly through the waistband with this lightweight fabric! It’s such a fun skirt though! And I love that there are three length options- mini (which is what I made), knee, and maxi length. I still need to find some white gauzy fabric to duplicate the maxi skirt that I saw at the beach!

Here’s what the inside of the waistband looks like before adding the skirt and elastic. I could have hand-stitched the openings closed after adding my elastic, but because I finished the edges, I don’t feel the need to get out a needle and thread! Also, my cat obviously likes to hang around and requires petting while I am sewing! 🙂

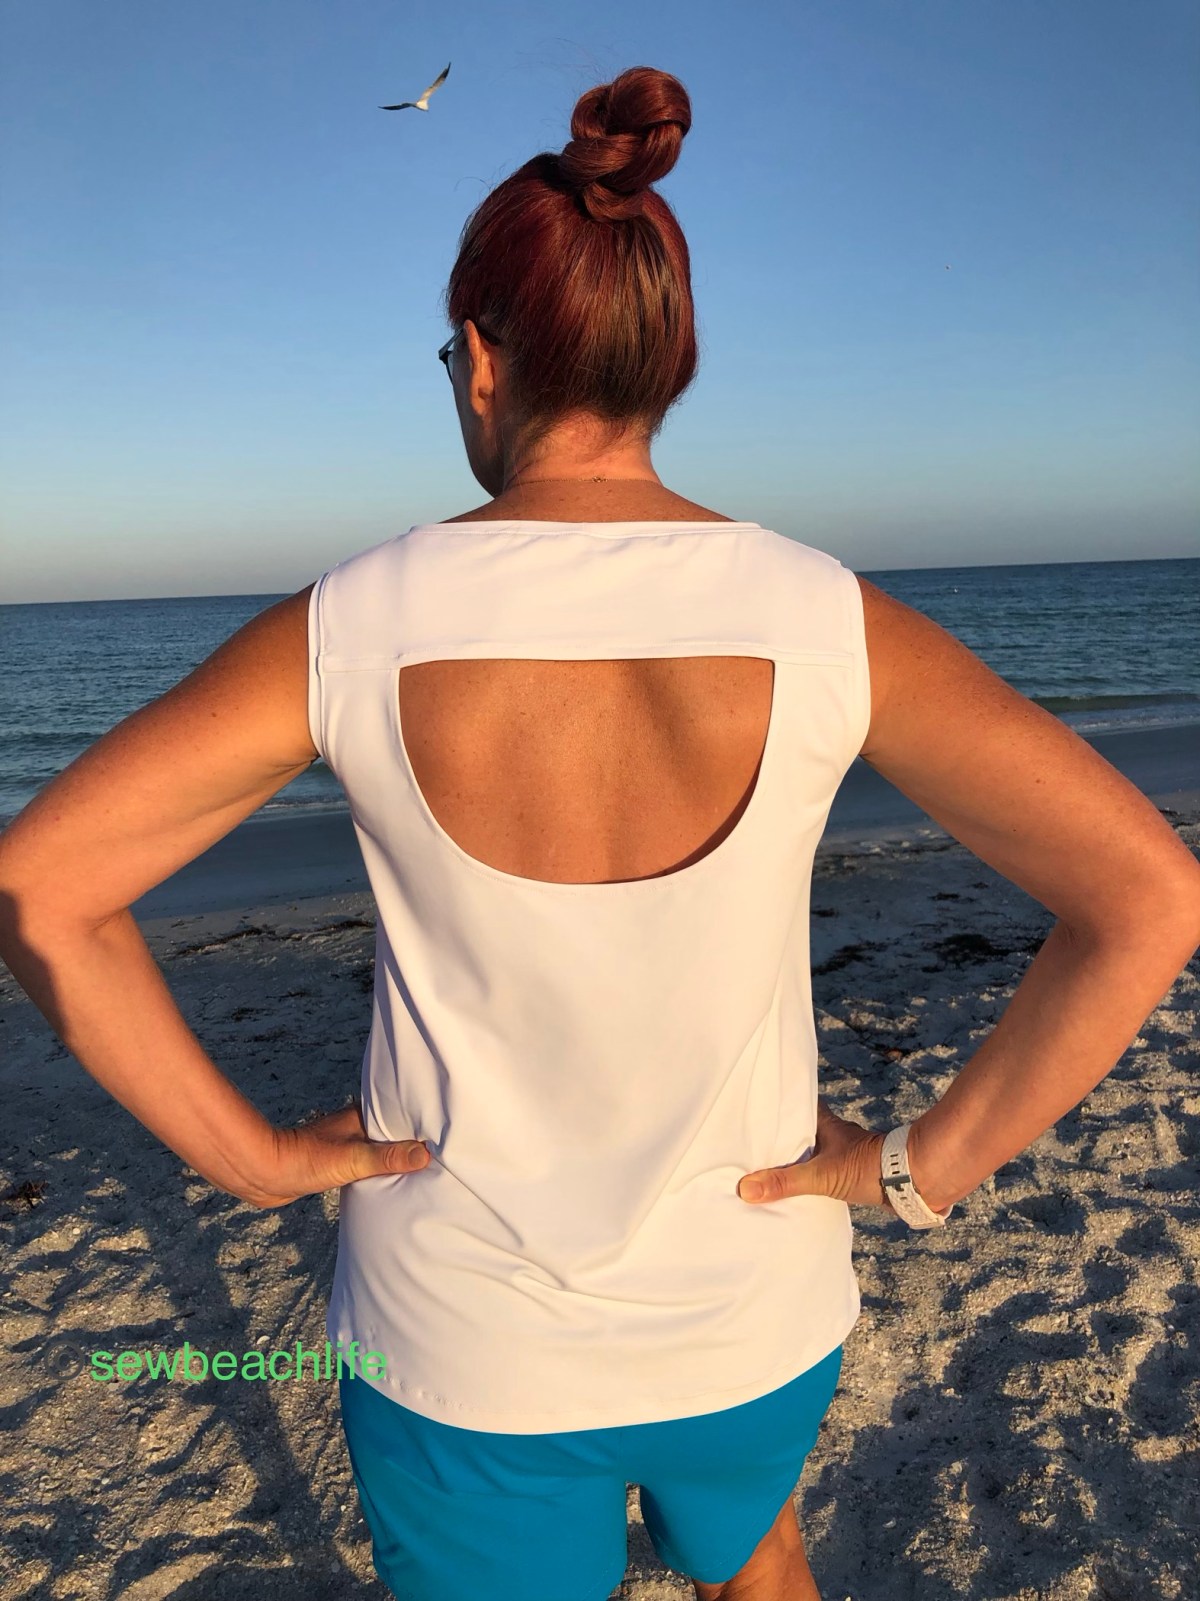
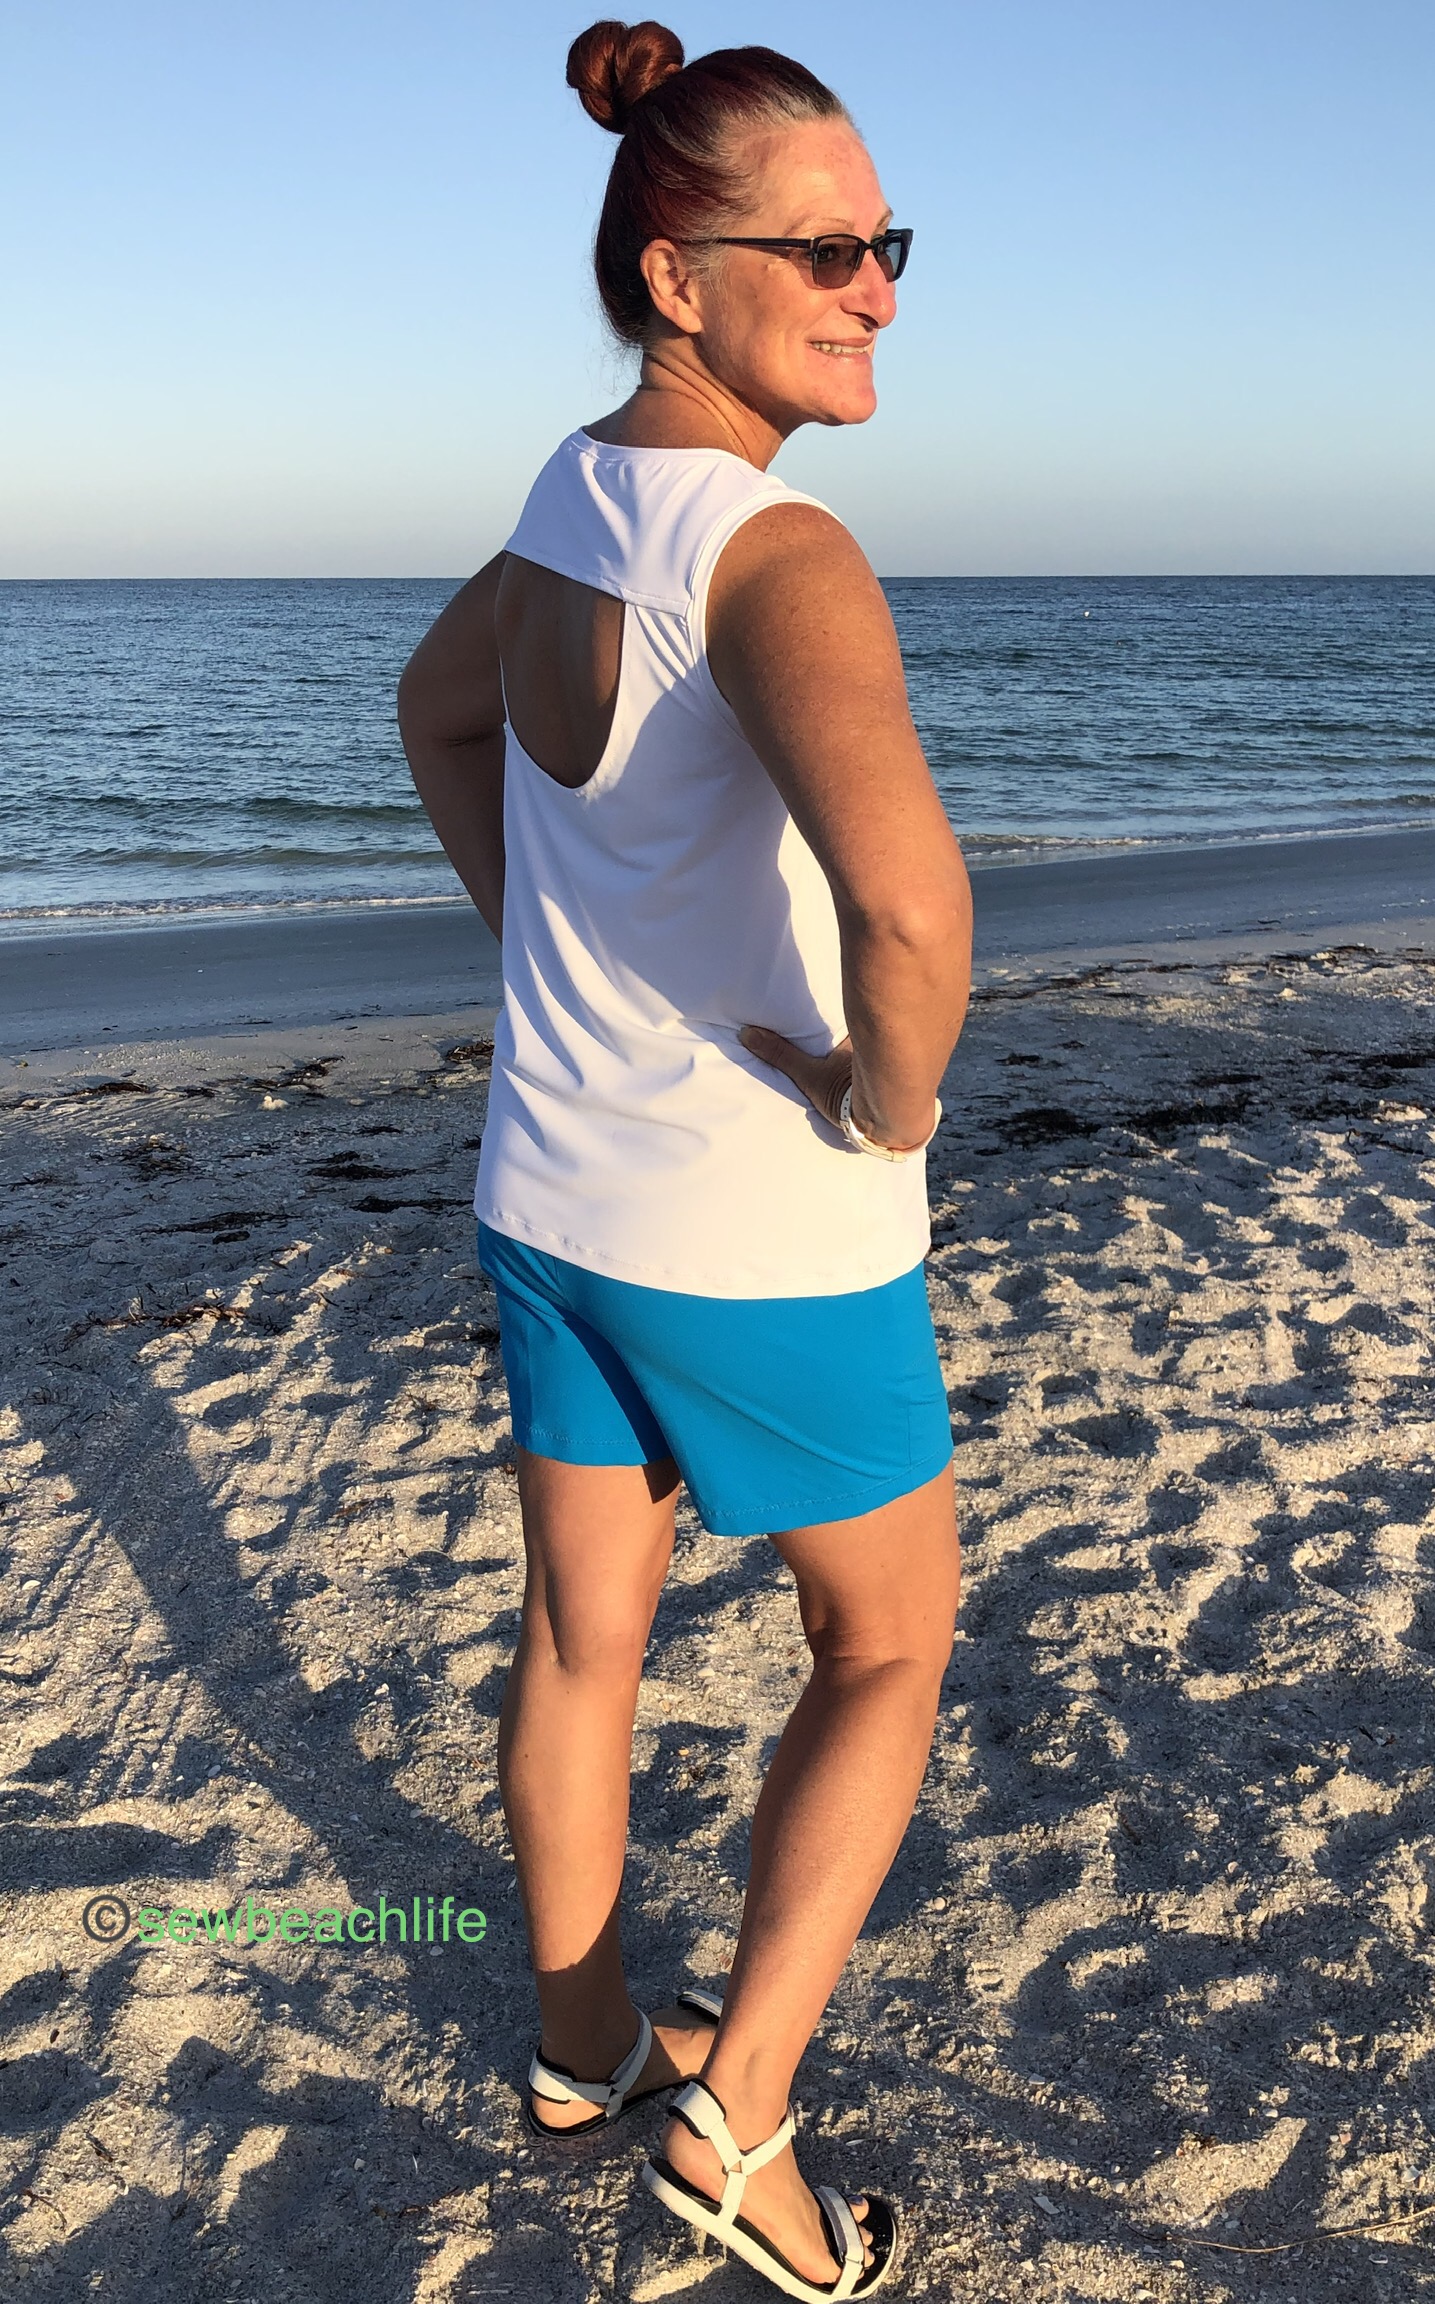
The Sage Top is such a great companion to the Cinder Skirt! Being a fitted tank, it skims the body and works well with the gathered skirt. I love that it has a built-in shelf bra so that I don’t have to wear an uncomfortable strapless bra.

The shelf bra is surprisingly supportive and comfortable.

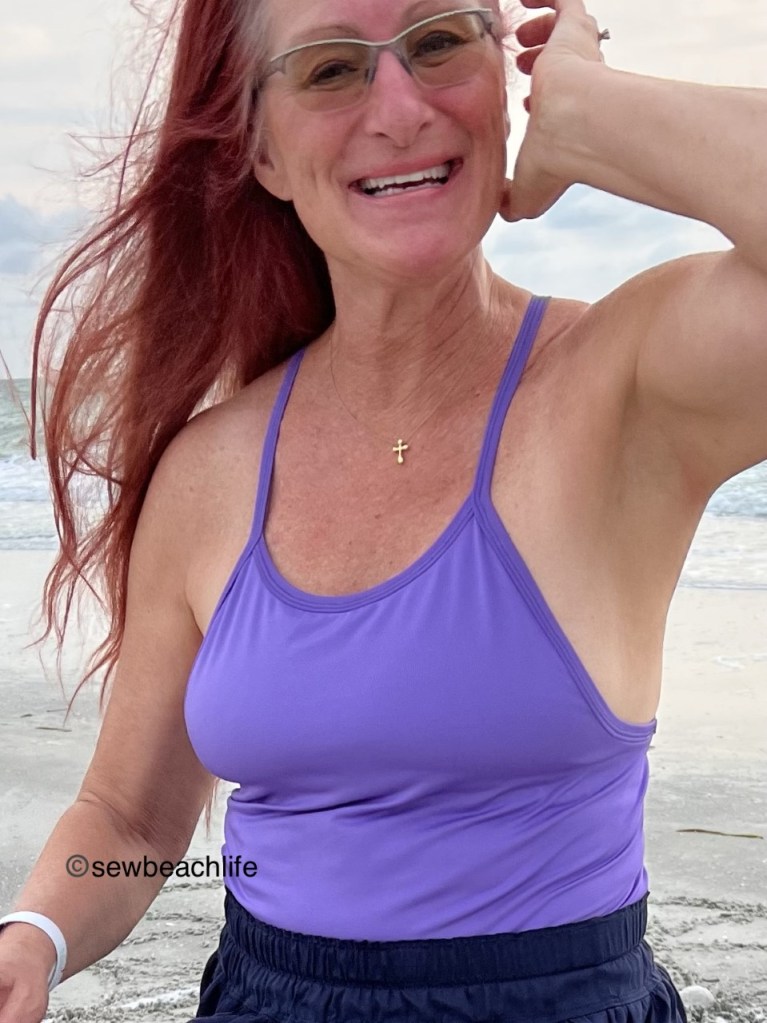
The Sage Top with shelf bra is not designed to wear as workout top (unless of course your bust doesn’t really need support for exercise). But for casual wear, it provides adequate support to wear comfortably. Because I have a larger cup size, and have a “grandma” bust, I always use powernet in every bra/shelf bra/swimwear/workout top I make.

The main fabric I used is a lighter weight nylon/spandex circular knit. It is super soft and comfortable, but doesn’t have as much recovery as say an athletic or swim knit. So I used a nylon/spandex swim fabric, and a layer of powernet for the shelf bra. And, I snuck some clear elastic in on the strap section of my binding.

I love that it’s so easy to thread 1/4″ clear elastic through the presser foot of my machine, and it feeds evenly as it’s serged into the seam.

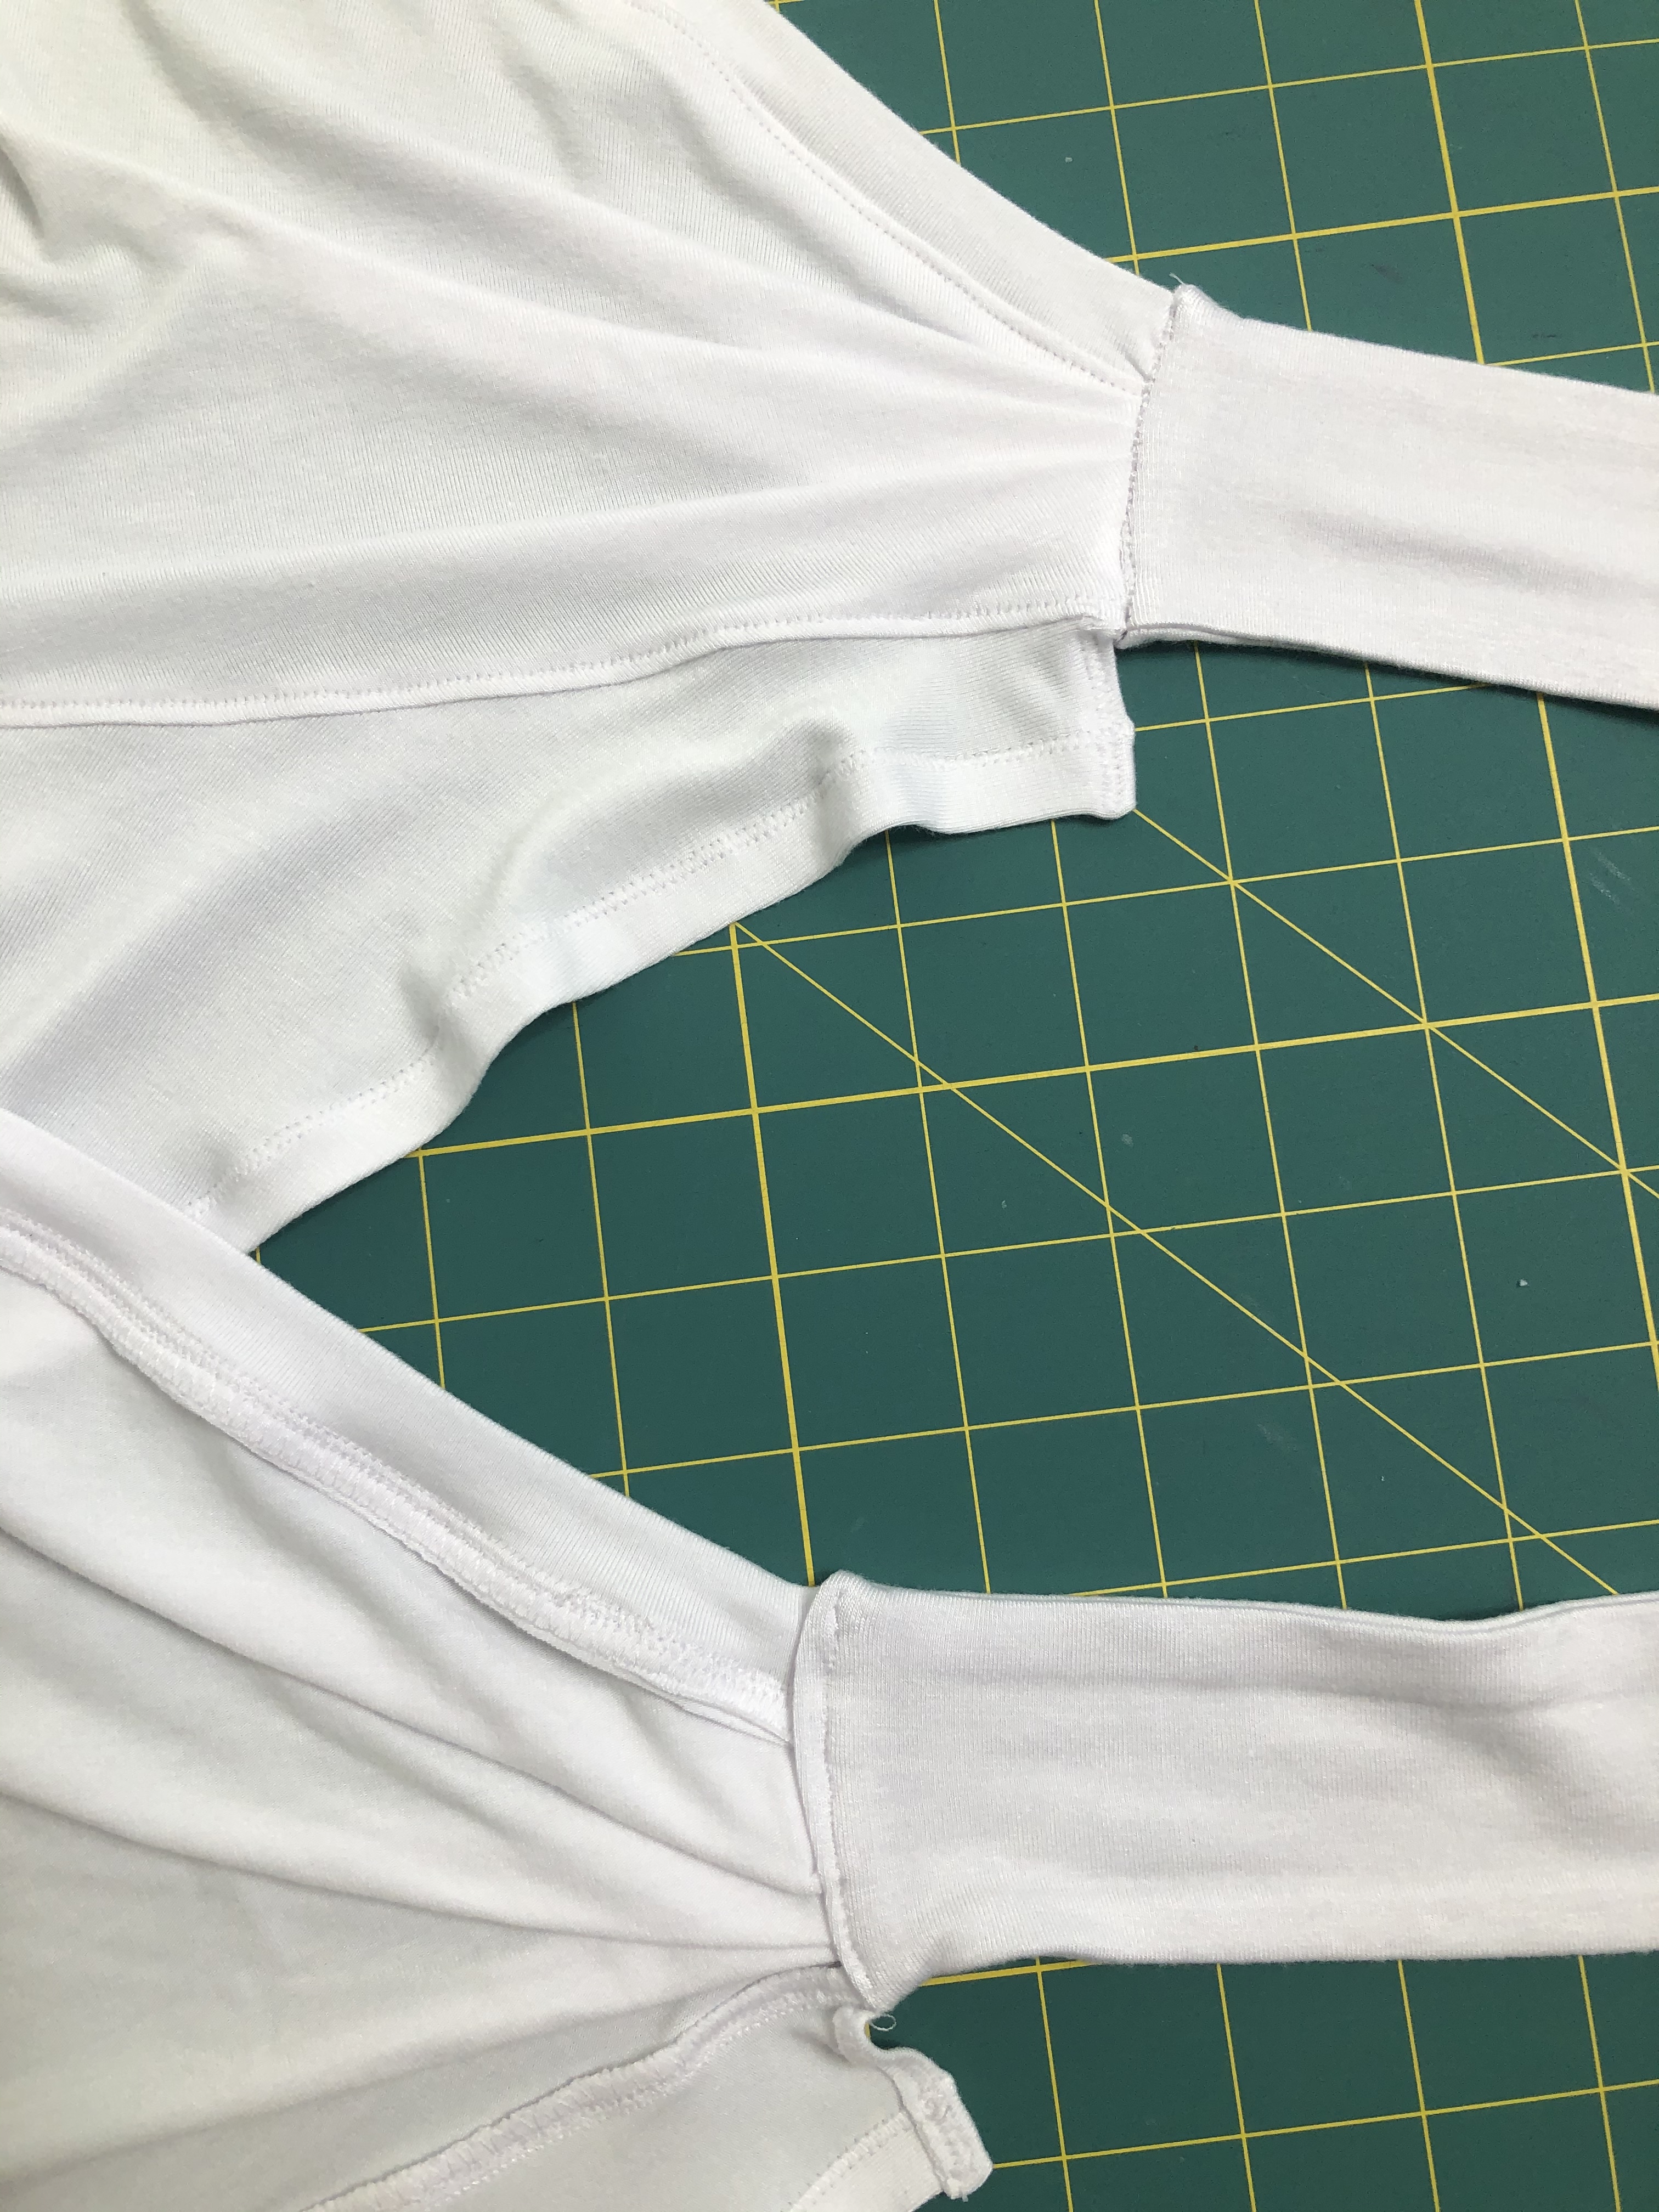
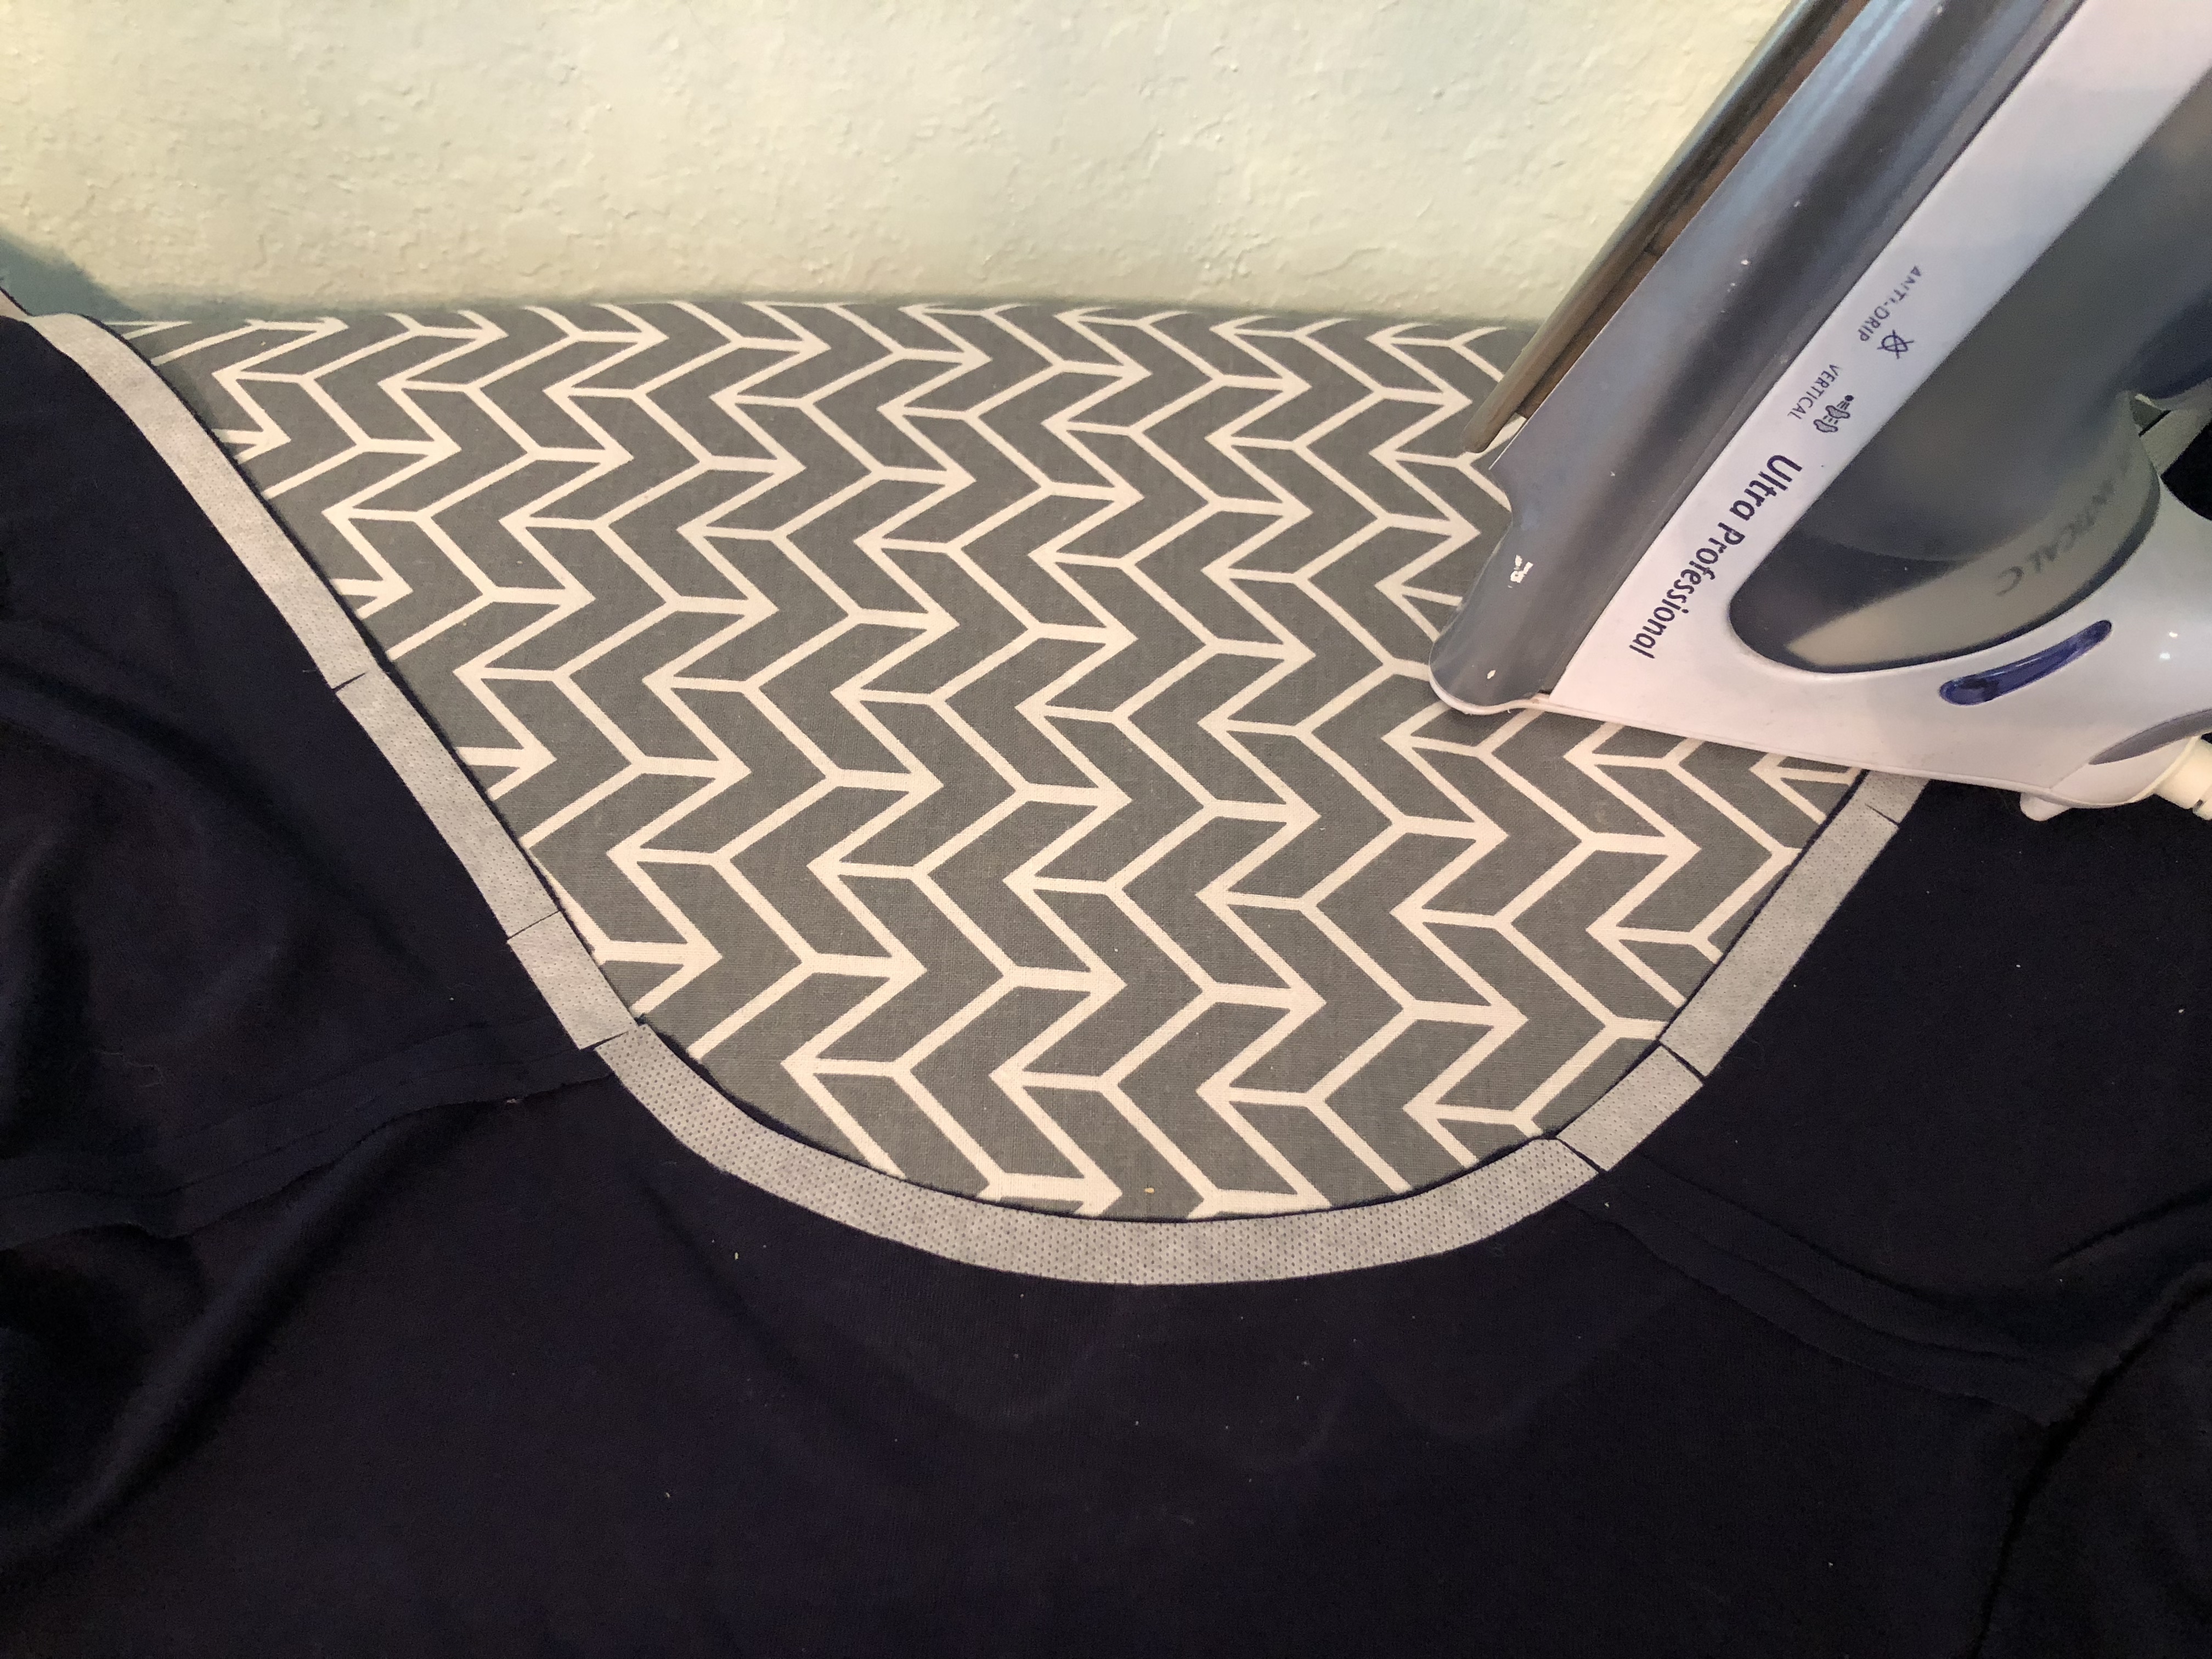
This photo makes it obvious that I didn’t follow the pattern tutorial and do a double folded binding. When doing binding on a knit garment, I just find it easier to use 1/4″ seam allowances, and use the faux binding method. Should I be advising people to not follow the tutorial and go rogue? Possibly not, but it’s what works best for me, and gives such beautiful results that I’m unlikely to change my faux binding habit! 🙂 To accommodate the method, I cut the binding strips at 1-1/4″ wide, instead of the called for 2″. (1/4″ seam allowance + 1/2″ wide binding + 1/2″ folded under).

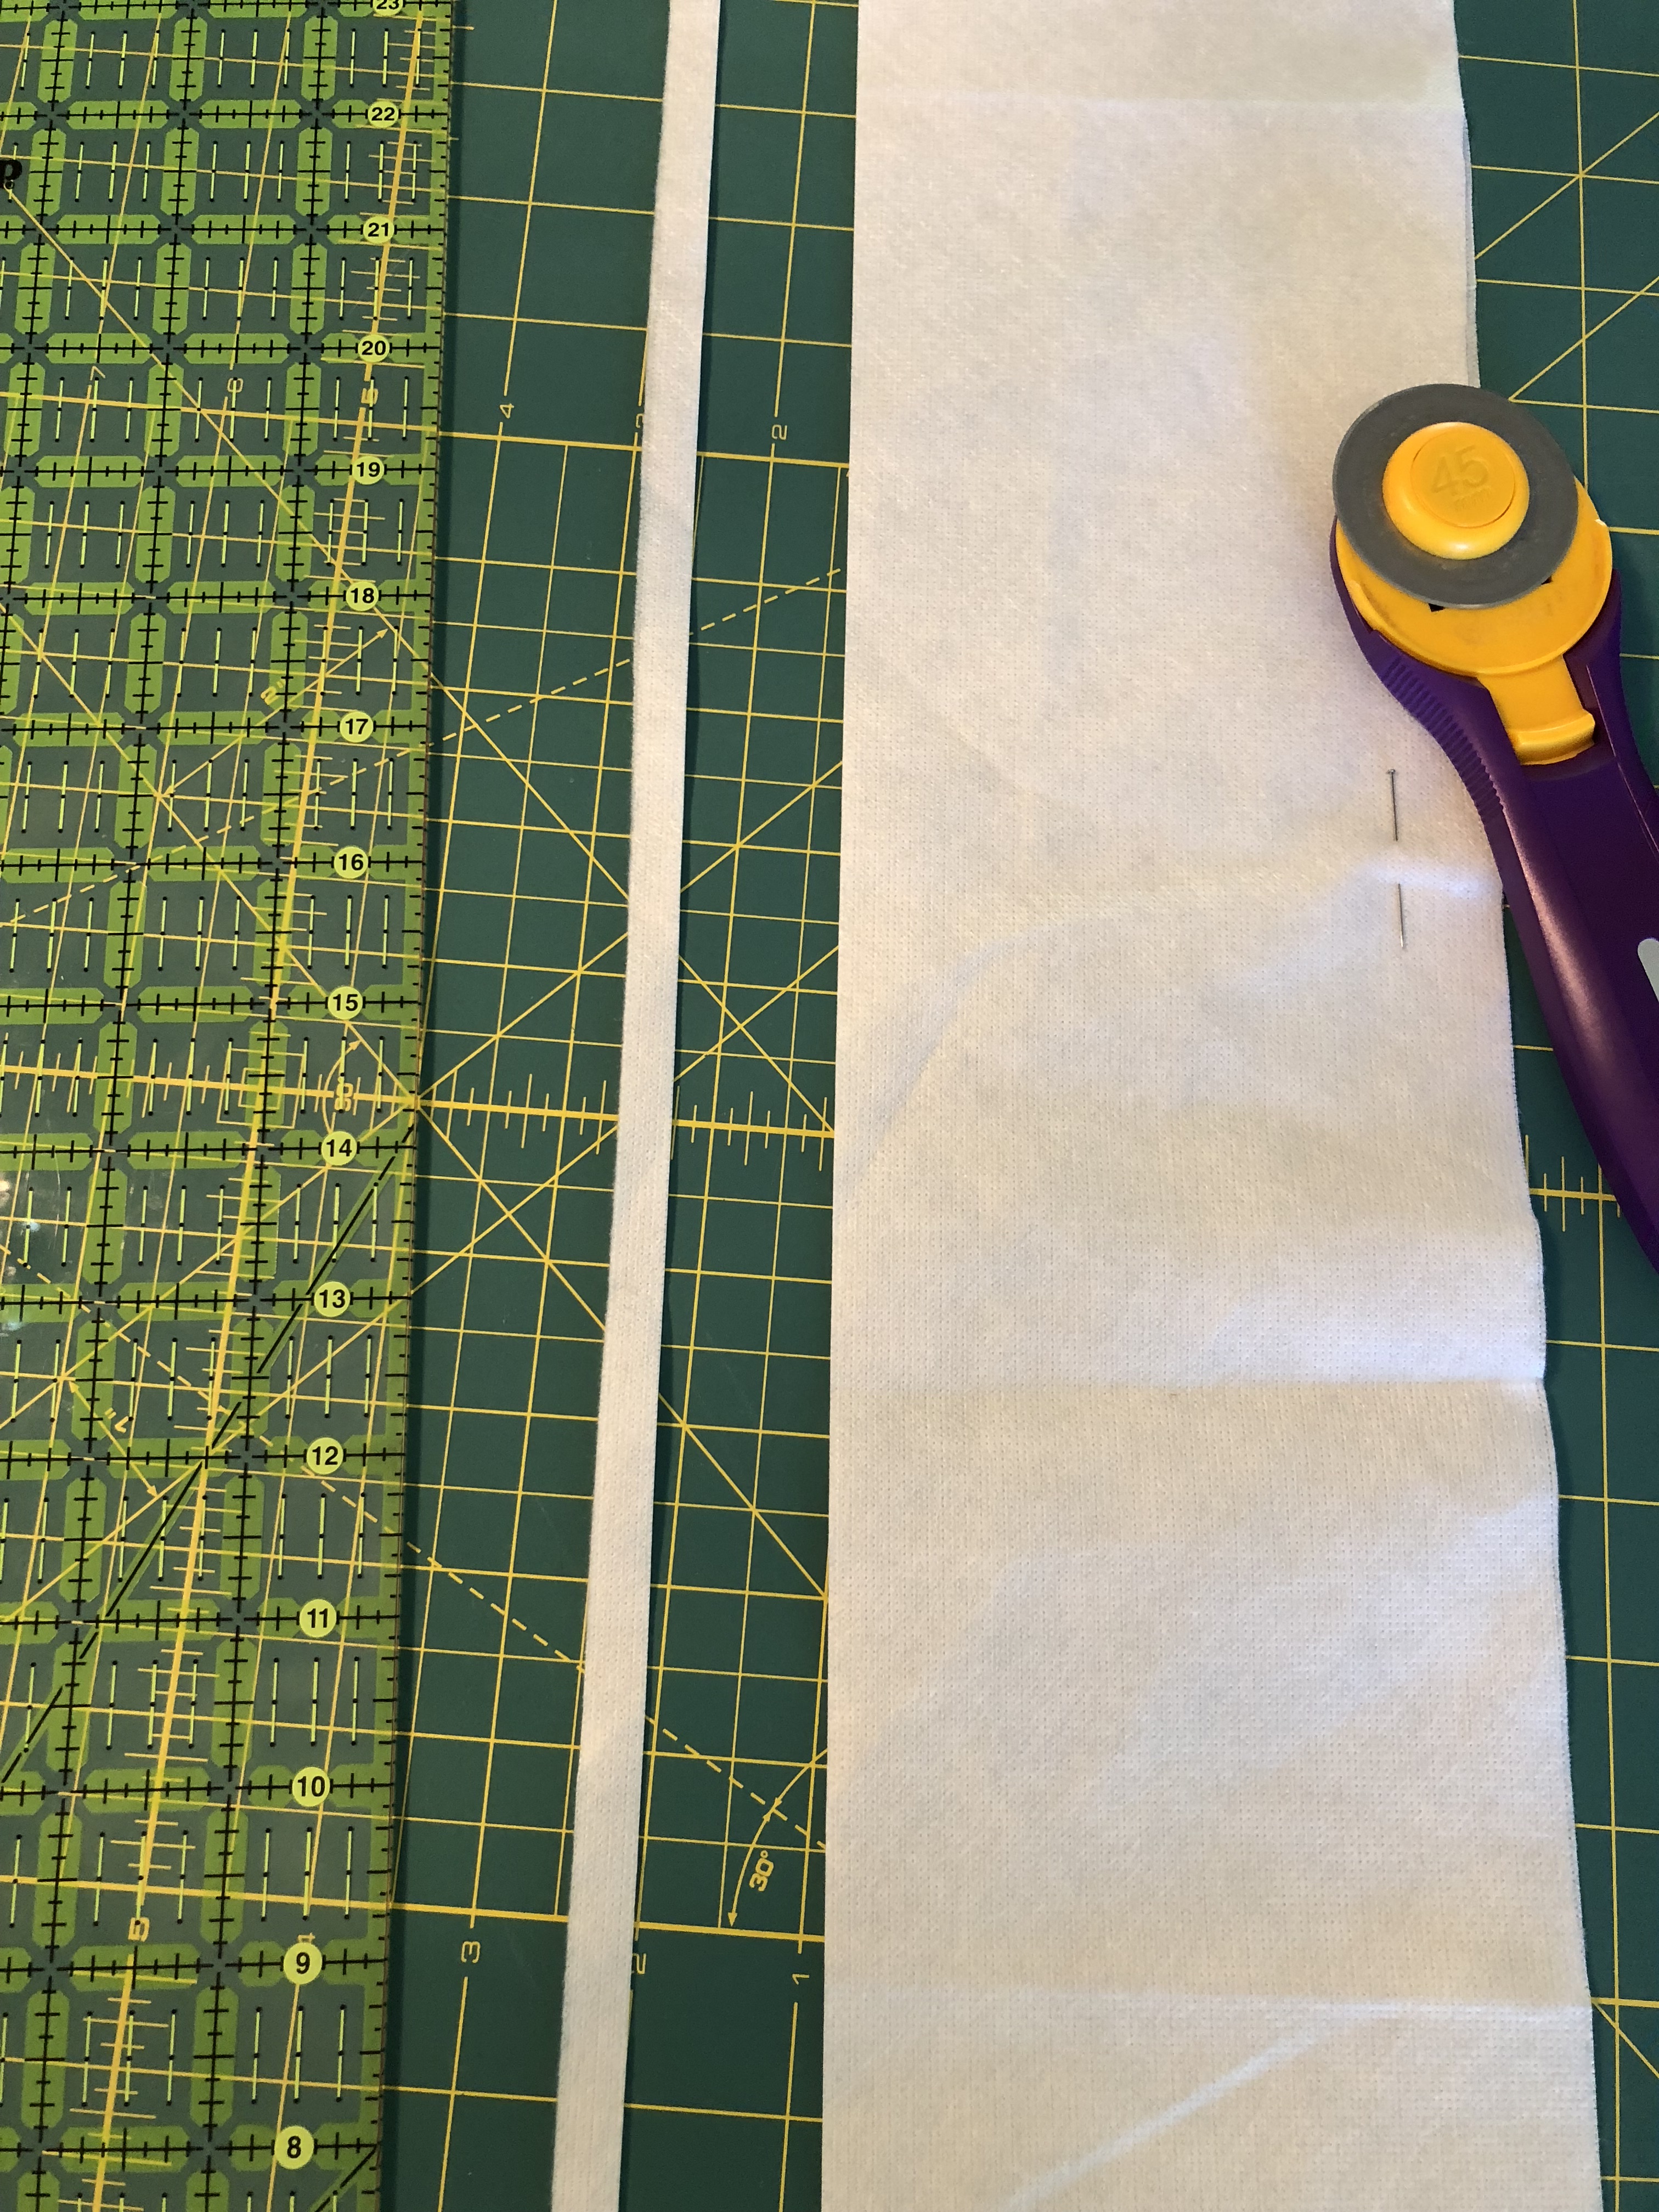
To prep my binding strips, I serge along one long edge of the binding, using a four thread overlock with a stitch width of M, and a stitch length of 2, upping my differential to 1.3 to add stability to the straps. Then I serge the binding to the garment right sides together, and press the binding up. Then I fold the binding around to the back until the raw serged edge aligns to cover the seam. Use plenty of pins to keep the binding in place, and coverstitch.

I love finding random designs, sandcastles, and messages left by beach-goers. I don’t know who drew this cool design in the sand, but I admire the precision and time it must have taken! It added an interesting background for my photos. So, thank you to whoever made it!

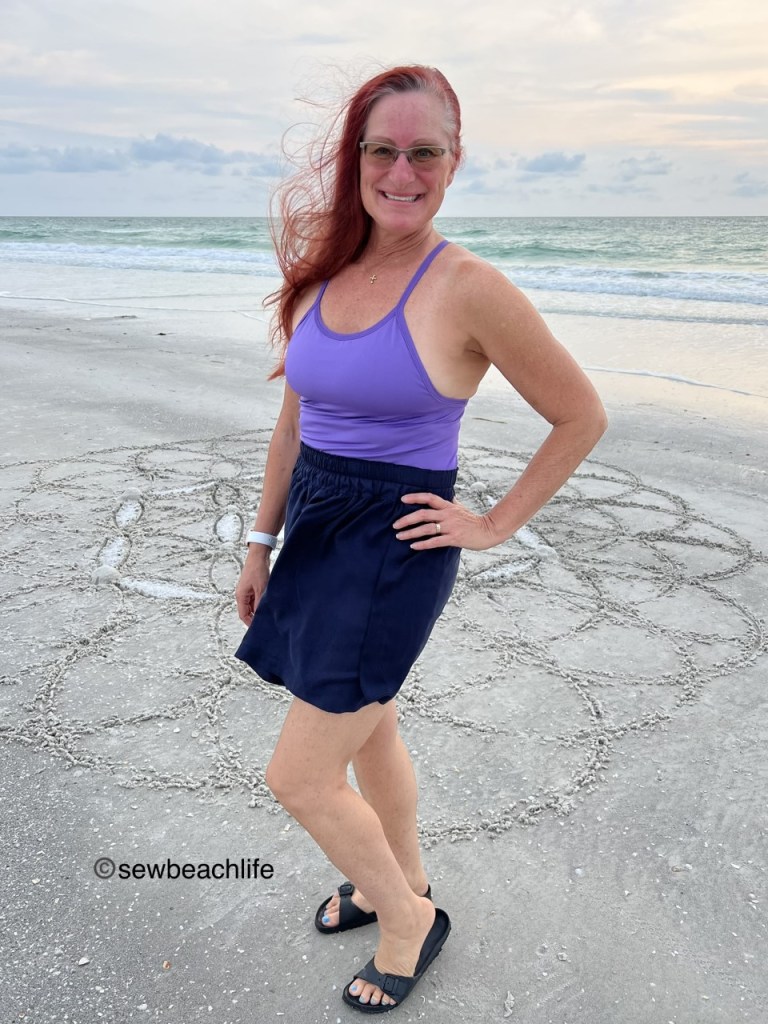
The design of the Sage Top and Crop is so elegantly simple- a seam up the center back, and binding. Easy breezy! Center back seams are great for shaping. In for the waist, and curving out to fit smoothly over the bum.

Yoga has given me some rather serious lat muscles 😉 even if this isn’t the most flattering photo. We were losing the light and it was a cloudy evening, so Dan (my sweet accommodating husband) just took a quick snap.

I’ll wear my Sage Tops with shorts to go skating. It’ll be nice to not have to wear a bra on hot, muggy Florida days. Since we’re busy working on a home updating project, I haven’t had time to skate in weeks. It’s killing me to miss out on my normal Wednesday morning skate around the neighborhood, but such is the life of avid DIYers! It’s also taken away pretty much all of my sewing time, which is why I don’t have any more of these outfits made yet.

The wind didn’t blow the overlapped sides on the skirt open. So there is enough modesty for general wear. Along with knee and maxi lengths if mini length isn’t your style.

So, I’ll have to content myself with this cute outfit until I get some more sewing time! I’d also like to hack the Sage Top, by cutting the crop length, and adding either the Max Top and Dress skirt, or the Wylde Dress skirt. Ah, so many possibilities!

The details:

The Sage Top and Cinder Skirt are new patterns from Stitch Upon A Time.

I used nylon/spandex circular knit, nylon/spandex tricot swim knit, and powernet from Phee Fabrics for the Sage Top.

The 1″ wide knit elastic for the shelf bra in the top and the waistband of the skirt was purchased at Wawak, along with the MaxiLock serger thread used for construction.

The navy lyocell twill fabric for the skirt was a surprise clearance section find at JoAnn Fabrics. I would definitely buy it again, as it was the perfect weight and drape for this skirt.

Thank you for reading and sharing my love of creating, sewing, patterns, patterns, fabric, and making beautiful, well-fitting garments! ❤

The links to Stitch Upon A Time may be affiliate links, which means that at no extra cost to you, I may receive a few pennies if you purchase through my link. As always, I only give my honest opinion. After all, it is my blog, which represents me!

Wrap Up A Holiday Outfit

Do you attend fancy Christmas parties that involve dinner, dancing, and drinking adult beverages?  Or do you prefer a simpler setting that includes sweatpants, eggnog, snuggling your kiddos and pets, and perhaps a Hallmark Christmas movie (or two)?  I used to really enjoy attending the fancy fun parties, because other than a wedding reception, how often do you get to dress up, enjoy a nice dinner and dance the night away?  But I also enjoy the simple (and sometimes noisy, chaotic, crazy, and wonderful) days or evenings gathered with family and friends.

Either way, I like to feel comfortable in what I’m wearing.  There aren’t any super fancy parties on my schedule this year.  Just a couple of gatherings that are sure to include delicious food, conversations with people I love, and the normal fun and silliness that ensues whenever people get together.  So I decided to make a fun wrap top, that could also work as a cardigan.

The first step was choosing comfortable fabric.  I strongly considered using Phee Fabrics nylon/spandex Tricot.  It would be a great choice- it has a pretty drape, excellent recovery, and would give the top a more elegant look.  But in the end I went with Rayon Spandex for a softer, more cozy feel.  Because of the more substantial 13oz. weight, the drape is beautiful, and even the white isn’t sheer.

The Joanne Faux Wrap Dress & Top by Sinclair Patterns easily became an actual wrap top.  I love the fit of my Joanne dresses (blogged here), and knew that I wanted to make a top version.  With a little bit of customization, it was easy to make my vision come to life.  I wanted the peplum to be a bit longer than designed, so I traced the peplum front and back pieces on my size for width, and followed the lines for the largest size for the length.  Since Sinclair Patterns come in Petite, Regular, and Tall, all you may need to do is print the Regular or Tall version of the peplum pieces to get extra length.

bow

A true wrap top needs nice long ties.  I cut four pieces at 2-3/4″ high, by the 60″ width of the fabric.  I also cut strips of knit interfacing 2-1/4″ high, and ironed them onto the wrong side of two of the tie pieces.  After laying an interfaced and a non-interfaced tie piece right sides together, I trimmed one end at an angle.  I used the markings on my quilting ruler to get a perfect 30% angle, but you can use whatever angle looks good to you.  Then stitch along one long side, along the angled end, and back along the other long side using a 3/8″ seam allowance.  (I know the pattern uses a 1/4″ seam allowance, but my sewing machine prefers 3/8″!) 🙂  Turn the tie right sides out and press, and repeat with the second tie.  Do you want to know my trick for helping to push the long sides of the tie out in order to press them?  A yardstick!  It really made it easier to press and not worry that the fabric was still folded inward.  An interesting thought occurs to me.  If you live where the metric system is the common form of measurement, I suppose it’s not called a yardstick.  Is there such a thing as a meter-stick?  Go ahead and laugh, I might bother to google it later.  Or not.

The basic construction of the top is the same as the pattern tutorial, except the pleats, and the side seams.  Sew the shoulder seams together,  then sew on the neckband and top stitch.  Without overlapping the two front pieces, stitch the front and back bodice together at the sides, starting at the armscye, and stopping 2-1/4″ from the bottom.  Stitch the bottom 1/4″ of the seam.  Repeat with the other side seam.  Cut four pieces of interfacing 2-1/2″ long by 1/4″ wide.  Press the interfacing within the seam allowance of the bottom side seams of the bodice on the wrong side of the fabric.  This will help stabilize the open slits on the side seams when the seams are pressed open.  Press, then top stitch around the slits.

Insert the sleeves, being sure to put the back of the sleeve toward the back of your top.  (The pattern piece is clearly marked.)  Sew each peplum front and back together at the side seams, and attach the peplum to the bodice, leaving 1/4″ unsewn at either end of the seam.  This will allow you to turn the peplum under 1/4″ at the ends for a clean finish.  Now for the trickiest part of the top, the pleats.  Basically, you need to accordion fold 1″ wide sections, leaving the band at the top free, and leaving an extra 1/4″ at the bottom to fold under.  I kind of gently spread the folds a little bit, so that the folded section ends up two inches wide.  Baste.

wrap attach

With right sides together, pin just one layer of the tie to the basted bodice pleat.  You’ll have to carefully get your presser foot inside the end of the tie to stitch the tie to the bodice.  Clip your threads and flip the tie out.  Fold the raw edge of the tie under and pin it in place, being sure that it covers the seam line.  Then stitch in the ditch to secure the back side of the tie.  Repeat with the other tie.  Hem your sleeves and the peplum and your top is done!

Joanne wrap angle

I love that the long ties allow a bigger bow for an extra bit of drama.  I like that since it’s a true wrap, I can throw it on over a dress or top as a cardigan.  The extra length in the back gives me a little more coverage and looks great with a slim skirt.

Joanne wrap back

The high low look of the peplum just seems to dress it up a bit.  But being made out of soft rayon spandex, it would look just as great worn with some joggers.  No matter what I wear it with, it’s super comfortable, and is a great way to wrap up a holiday outfit.

Joanne wrap hair

In case you’re wondering, my skirt is the Shenanigans Skort by 5 out of 4 Patterns, made in Supplex.  This simple style, that’s just long enough, made in a stretchy, smoothing, moisture-wicking fabric is a comfortable basic for your wardrobe.

Have you wrapped up your holiday outfit?


This post may contain affiliate links.  This means that at no extra cost to you, I may receive a small commission if you purchase through my link.  As always, I only give my honest opinion.  After all, it is my blog, which represents me! 🙂  Thank you for reading and sharing my love of sewing, fabric, patterns, and pattern hacking. ❤

Open Back Pullover

With A Simple Hack

Do you ever look at patterns and think, I really like that, except for…?  That’s how I felt about the GreenStyle Open Back Pullover.  I like the open back, I like that there’s a deeper scooped back, as well as a closed back option.  I like that it can be sleeveless, or have long or short sleeves.  I like that there is a crew neck, as well as a scoop neck, along with a hood option.  Most people love “hoodies” and banded sweatshirts.  I am not one of those people.

Banded bottom shirts are not a good look on me.  I own one banded bottom shirt, and it hangs unworn in my closet.  I’ve tried to wear it, it looked cute on the hanger when I bought it years ago, but on me, it looks like a maternity top.  If I were an expectant Mama I would wear it and look adorable.  But since I am a Grandma and long past the age of having babies, it’s just not the look I am going for!

Luckily, it is super easy to hack the Open Back Pullover to not need a band.  You are going to want to pay attention to your hip measurement.  Make sure you measure the widest/largest part of your hips and booty.  If it falls within the measurements for the size you are making, you’re good to go.  But if it’s at the upper end or bigger than the size for your bust and waist, you will want to grade your pattern out to a larger size, starting at the waist.   Then use a ruler to add 4″ of length at the bottom of the front and back pattern pieces.

Follow the pattern tutorial, (it’s a pretty easy pattern) and instead of sewing on a band at the bottom, simply pin and press the hem up 3/4″ and zigzag or coverstitch to finish the hem.

OB frontOB side

I like that I can wear a regular bra with the high scoop back, and wear it like any other top.  The low scoop back would really show off a cute Power Sports Bra and be fun for yoga class or working out.  I thought about using powernet in the scoop opening, (there is a pattern piece for that), but the open back is just the right amount of sexy.  It would also be fun to use powernet as the upper back pattern piece for an even airier feel.

I made my top out of Circular Knit, and would totally consider a long sleeved, closed back version in Rayon Spandex or Ribbing for cooler days.  If you’re looking for a more traditional hoodie feel, Cozy French Terry would be so soft and plush!  Supplex would give a more athletic feel, and would coordinate nicely with Super G’s or Stride Athletic Tights.  I’m glad I gave the Open Back Pullover a shot.  It’s a simple, slightly sexy 😉 , comfortable look.

My shorts are the Brassie Joggers, made out of Supplex.  I purchased all my fabric from Phee Fabrics.

This post may contain affiliate links.  This means that at no extra cost to you, I may receive a small commission/credit if you purchase through my links.  As always, I only give my honest opinion.  After all, it is my blog, which represents me! 🙂  Thank you for reading and sharing my love of sewing, patterns, fabric, and pattern hacking. ❤

GS Sunday Cardigan and Sinclair Sienna

When pattern companies note under fabric choices that you will need “Any knit fabric like cotton Lycra, double knit, ITY, sweater knit, French terry, etc….with at least 50% 2-way stretch”, I’m sure they must realize sewists are always going to push the boundaries of the intended fabrics!  The listed fabrics for the GreenStyle Sunday Cardigan are generally pretty stable knits, which is why they are great for cardigans.

Which brings me to my fabric choice- a pretty navy blue rayon/spandex from Phee Fabrics.  I live in Florida, so a thick, heavy knit cardigan isn’t likely to get much use by me.  There are chilly days, and restaurants and grocery stores always seem to blast the A/C, so cardigans are a must!  Rayon/spandex is light enough to keep me comfortable without being too warm.  I knew I wanted the duster length cardigan because it would look nice no matter what length of dress I wear, and equally as nice with pants or leggings.

I’ve mentioned before that Phee’s rayon/spandex is much more substantial than average, so I knew it would work for this cardigan, even in duster length.  The GreenStyle Sunday Cardigan doesn’t have bands, all the edges are simply pressed under and stitched.  This makes it a simple sew with a clean look.  I wanted to ensure crisp edges, especially since I wanted the side slits.  My simple solution was interfacing.  I cut 3/8″ wide strips of a light to mid-weight interfacing.  It was probably Pellon Shirtailor, but since all my various weights of interfacing are just in a bag and not individually wrapped with their respective strip of directions, who knows?  It wasn’t featherweight and it wasn’t a stiff heavyweight, so light to mid-weight will suffice!

I ironed the strips along the front edges and along the curve of the neckline, (which was the only place I actually traced the pattern shape).  I just used my rotary cutter and ruler for cutting the long strips.  I also used strips along the low slit edges.  I didn’t need to use it, but it made it super easy to press over the edges without having to use a hem guide and pin all along the edges.  I didn’t bother with it at the hemline, as the fabric hems beautifully.

inter stripsinter neck

Other than adding two inches to the sleeve length for my long arms, and ironing on the interfacing, I followed the pattern directions and ended up with a soft, cute, comfortable cardigan that will get tons of use!

Sunday backSienna Sunday down

My other make was the Sinclair Patterns Sienna drawstring dolman top.  I have owned this pattern for months, and this is the first time I’ve made it.  Why did I wait so long?  Probably because every time I’ve tried on a dolman top at a store, I’ve thought they just looked baggy and sloppy on me.  I have got to say that I am really growing to love the genius of Sinclair Patterns fit!  I’ve previously blogged about the Sinclair Kai tee shirts I made for my husband and son.  And I love that Sinclair patterns come in short, regular and tall.  I think that having the pattern in tall is part of what makes this fit so well.  The patterns are also drafted with a shaped hemline, and the design makes them lay well on a real body.

Sienna church

I made the short sleeve version for myself, and wore it with the drawstrings fully extended as a dress.  The winter white rayon/spandex top looks equally as cute with the drawstrings pulled up to tunic length.  In fact it’s so cute, that I texted a photo to my daughter and asked her if she wanted a top.  Her answer?  “I love dolman tops!  I think they’re cute and give the illusion of a smaller middle.”  Not that she’s implying I don’t have a small middle.  It’s pretty obvious that I am not a small person! 🙂  She actually is a small, slender woman, which is why I can’t model the Sienna I made for her.  She lives in a colder climate, so I made hers with the 3/4 sleeves.

Since I didn’t think I’d have quite enough fabric to make the sleeves per pattern (which has the sleeves drawn as part of the body), I cut them at the short sleeve line.  Then I added the seam allowances at the top of my sleeve pieces.  I think it would be easy enough to hack the sleeves to be long using this method.  Since I didn’t have my daughter here to measure for that, I stuck to the 3/4 sleeves.

cut sleevessa sleeve

I sewed the sleeve pieces to the front and back pieces, then just followed the pattern directions.  Her top turned out just as cute as mine and I can’t wait to see her in it!

J SiennaJ Sienna fold

I really like both of these patterns, and want to make them in all the colors!  And I wonder how my sewing list gets so long.  Hah!

Sunday cardi

May your patterns and fabric be plentiful, and your sewing time enjoyable!

*This post may contain affiliate links.  This means that at no extra cost to you, I may receive a small commission if you purchase through my links.  As always, I only give my honest opinion.  After all, it is my blog, which represents me!  Thank you for reading and supporting my love of sewing!