I go to yoga class four days a week, so workout wear is an important part of my wardrobe. Roller skating has made it’s way back into my life as well, and I’m here to tell you, you can’t skate without smiling. I seem to break out into a grin every time I put my skates on. Having these two forms of exercise in my life brings a certain balance that just feels right.
It makes me happy that I was able to complete two workout outfits as part of the GreenStyle Fit Capsule Challenge. Even though both outfits are Spark Tights and Power Sports Bras hacked into workout tops, they’re very different looks. My first purchase of GreenStyle fabric was this super cool Super Nova Power Flex. It’s a nylon/spandex blend, and I love how colorful it is. Scraps of grape supplex (a color no longer available) from Phee Fabrics was the perfect accent fabric to pair with it, so I decided to go wild and color-block the bodice and then accent everything with a reverse triple coverstitch using MaxiLock radiant turquoise.
Coverstitching in turquoise really accented the fun colors and contrasted with the grape pockets and panels and cool Super Nova print.
I added a panel of white powernet to the back of my top for extra airflow during sweaty workouts. If you’re like me, and dislike straps near your neck, doing straight straps is such a game changer. There’s no need to ever adjust your straps again! To see how to do straight straps and add panels, check out this post.
I love using bra strapping and doing straight straps with the U-back.
My other Power Sports Bra workout top and Spark Tights combination is completely solid. I used a shimmery, almost glittery nylon spandex athletic fabric from JoAnn Fabrics. Since the fabric was shimmery I kept everything one color and achieved an extra pop of color by reverse triple coverstitching with Superior Threads Fantastico #5028 Peacock Plume. I just love their variegated threads!
The rising sun really picks up the sparkle in the fabric, and the beautiful sheen of the thread.
Once again I chose the U-back of the Power Sports Bra and used straight straps. Can you tell that these are well-loved patterns? 🙂 The straps were cut along the edges of the fabric where it wasn’t shimmery, just for a bit of accent. And to not waste that couple inches of fabric! 😉
My non-shimmery straight straps.
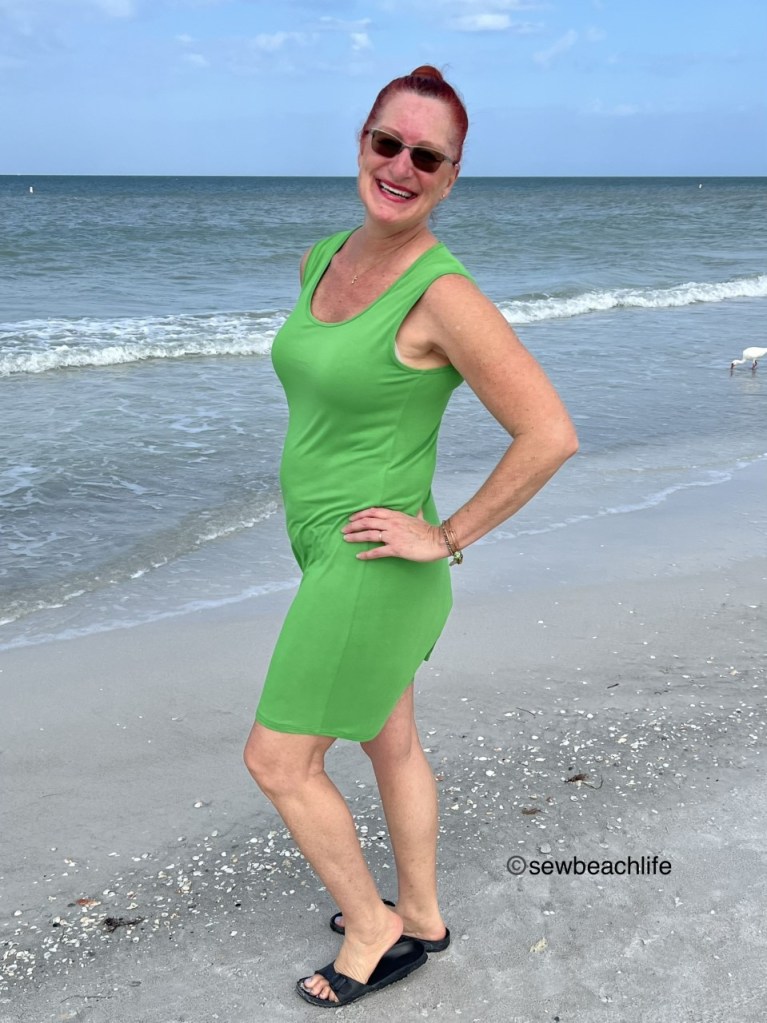
The Valerie Dress, another well-loved pattern, hacked to be sleeveless and made in green rayon spandex will get a lot of use. I wear my Valerie Dresses all the time. Sometimes as a dress, sometimes as a nightgown or loungewear. I’ve also mashed it with the Staple Tank for a slightly different look, seen here.
It was a windy day, which made the dress cling to my body.
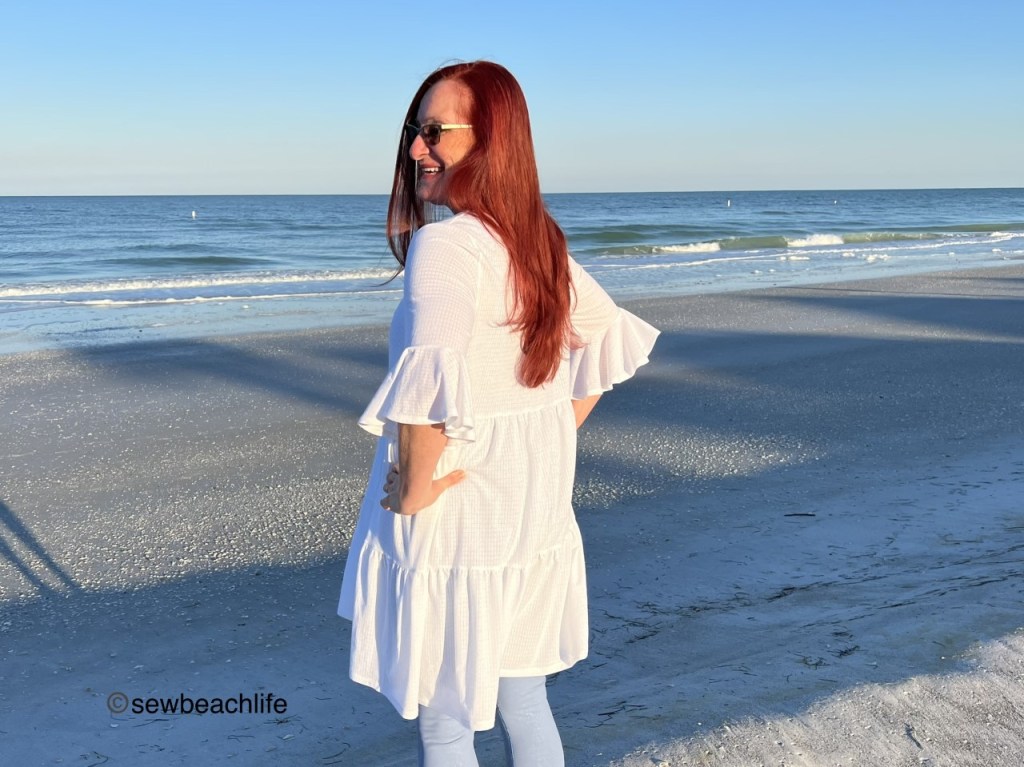
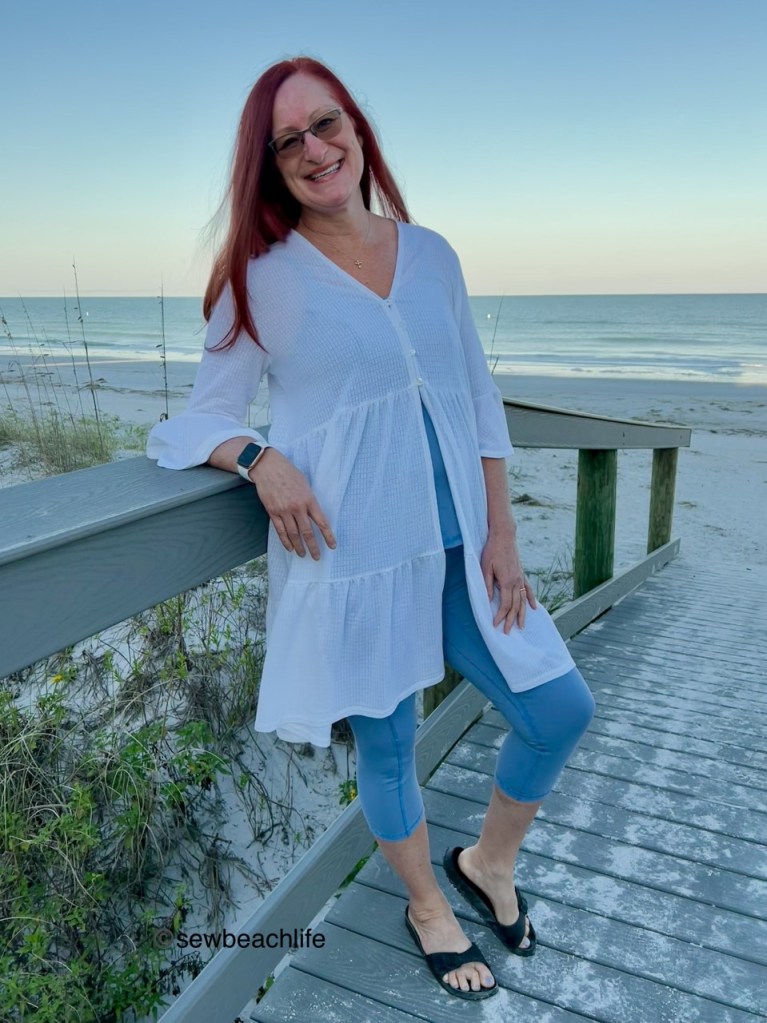
If it gets chilly, I can slide on my new Sunday Cardigan, hacked to have tiers, butttons, and a sleeve flounce. You can read about that here.
The cardigan works over dresses, shorts or pants, swimwear or workout wear. I love it!
Last but not least, I had to make another Staple Tank! You can never have too many of these tanks. I was gifted some pretty fabric scraps by a woman in one of my Facebook sewing groups. And this fun crocodile skin rayon/spandex print was actually large enough to eek out a new tank! It makes me smile to have such a fun printed tank!
I like using binding to finish my Staple Tanks. It gives it such a clean look.
Whew! That was a lot of sewing and posing for photos. 🙂 I was pretty inspired by the Fit Capsule Challenge this year, and I’m excited to have made so many cute things. It speaks volumes about how I feel about GreenStyle patterns and the way they fit my body so well. I may have plans to make myself another workout outfit. 😉 I bought some navy supplex, and have some pretty fabric scraps to coordinate with it. But I need to make a few things for other people first.
Thank you for reading and sharing my love of creating, sewing, patterns, pattern hacking, fabric, and making beautiful, well-fitting garments! ❤
The links to GreenStyle may be affiliate links, which means that at no extra cost to you, I may receive a few pennies if you purchase through my link. As always, I only give my honest opinion. After all, it is my blog, which represents me!
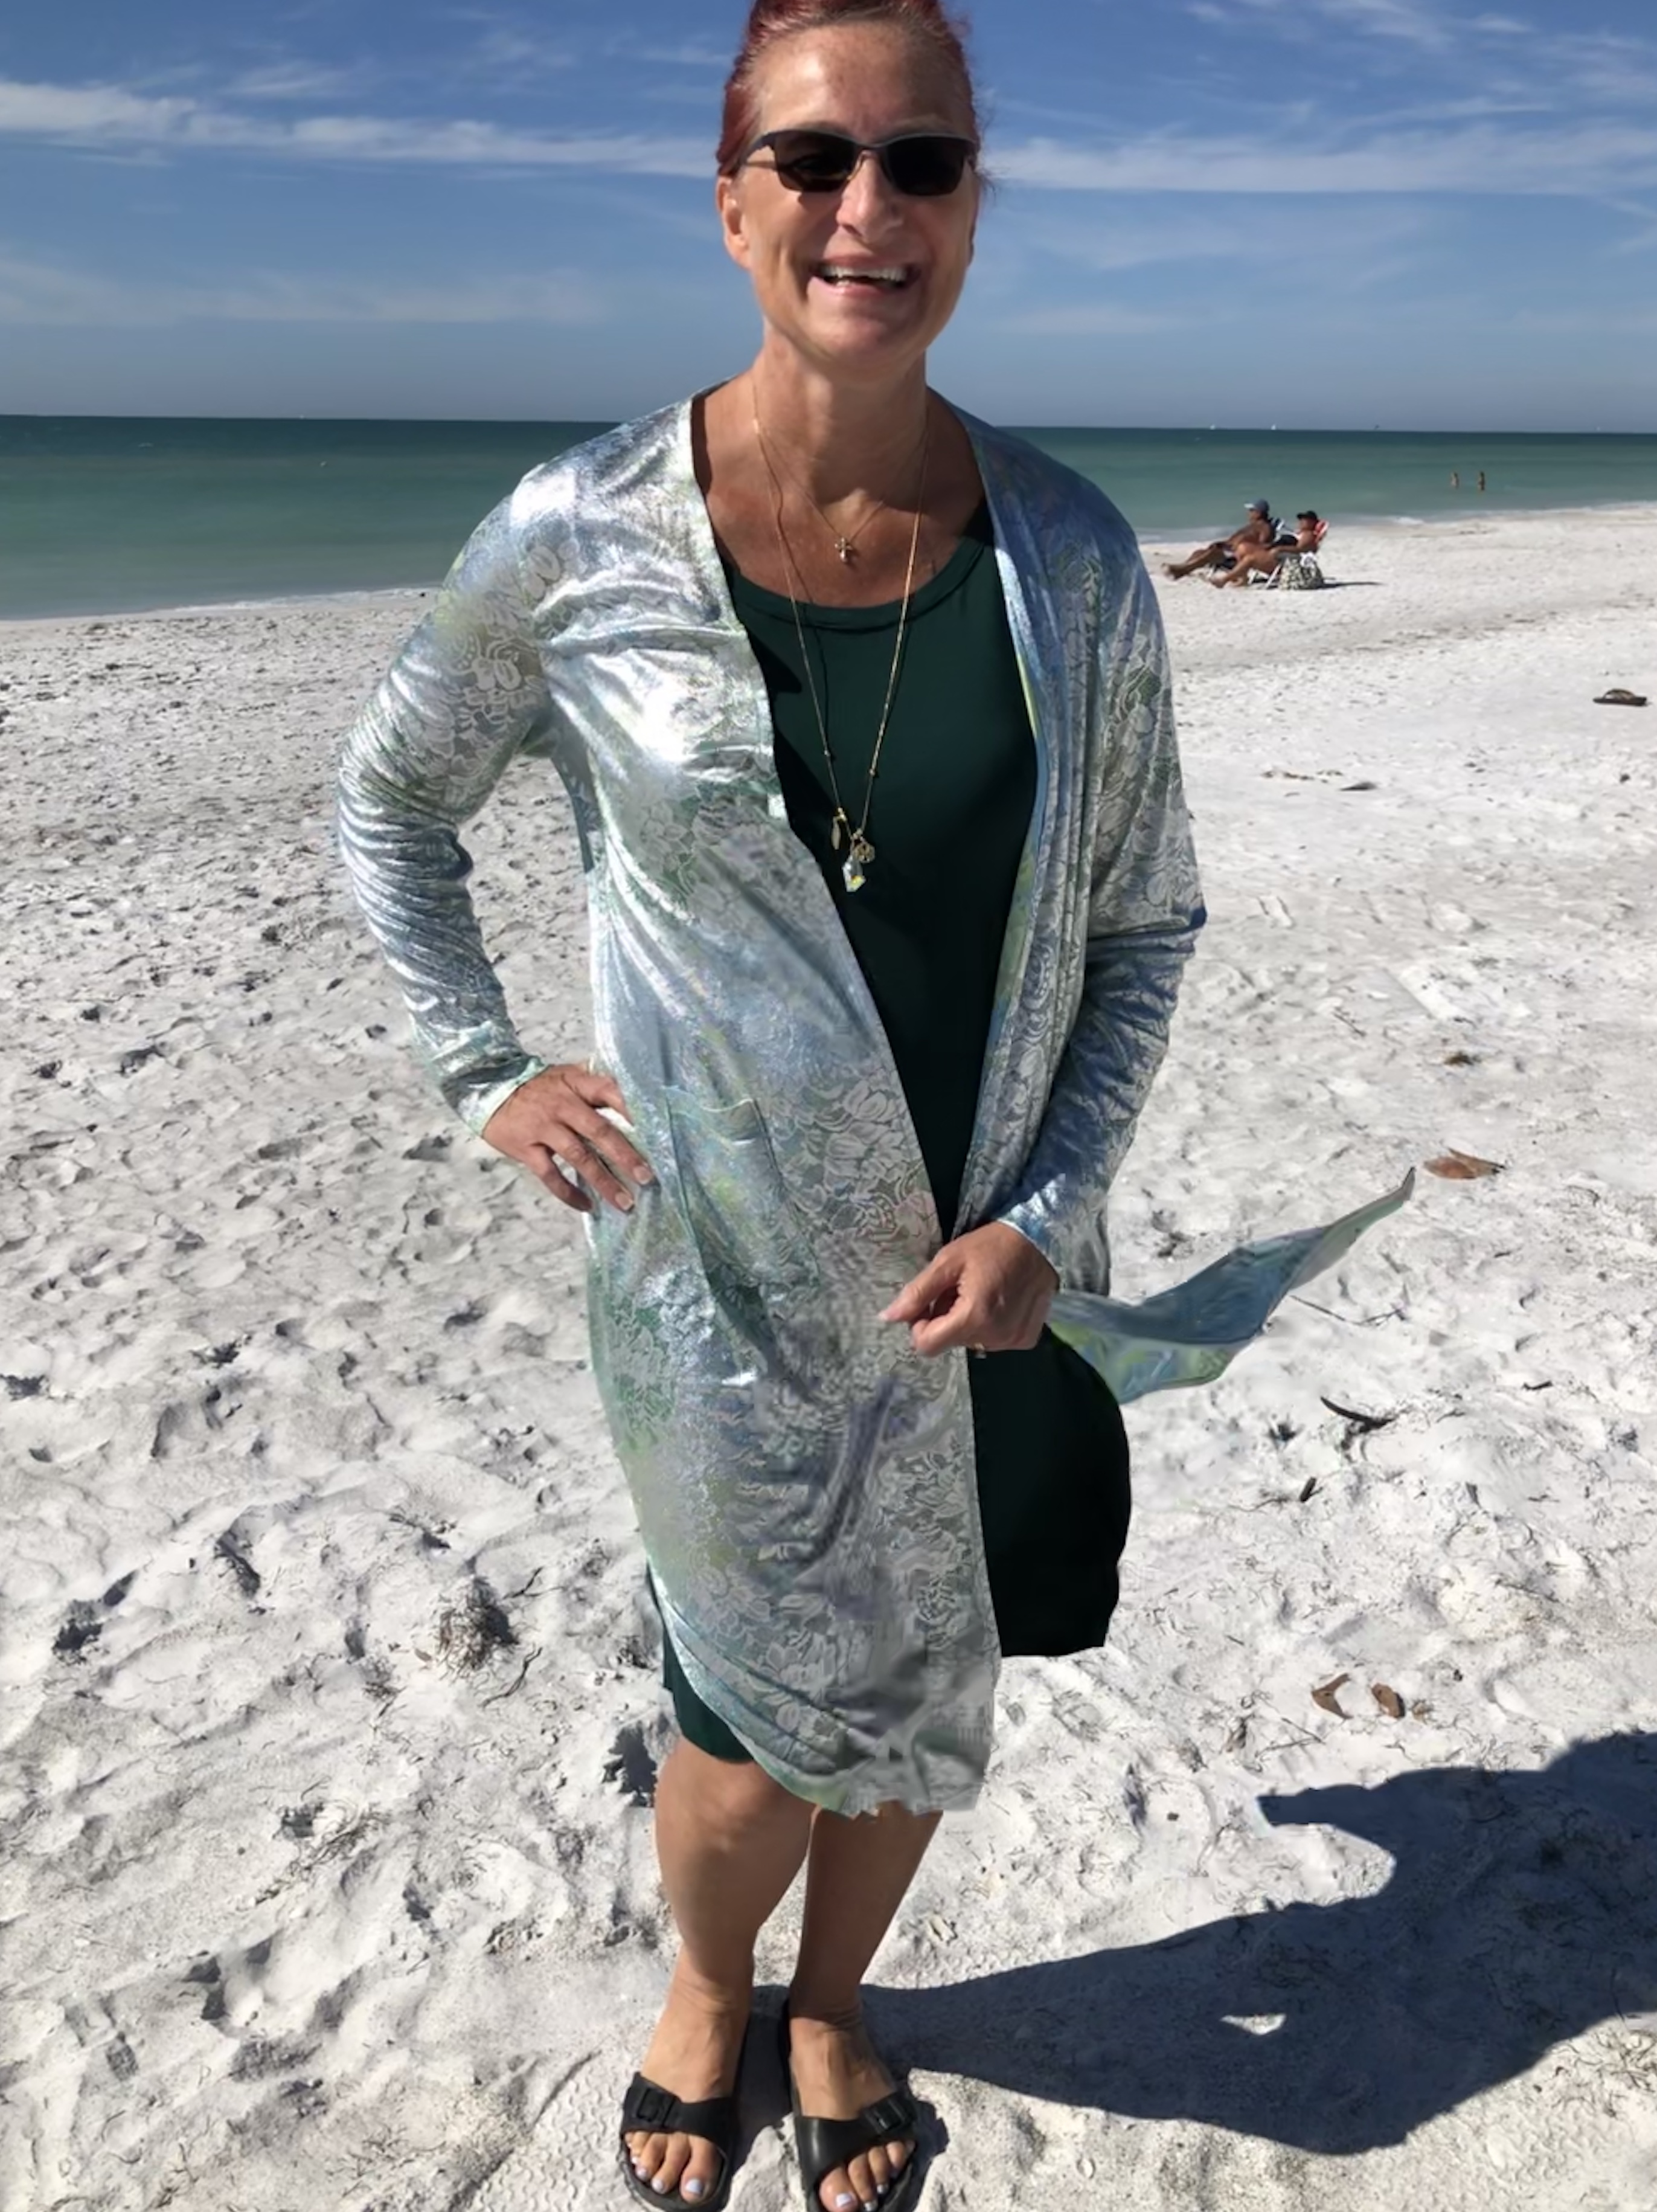
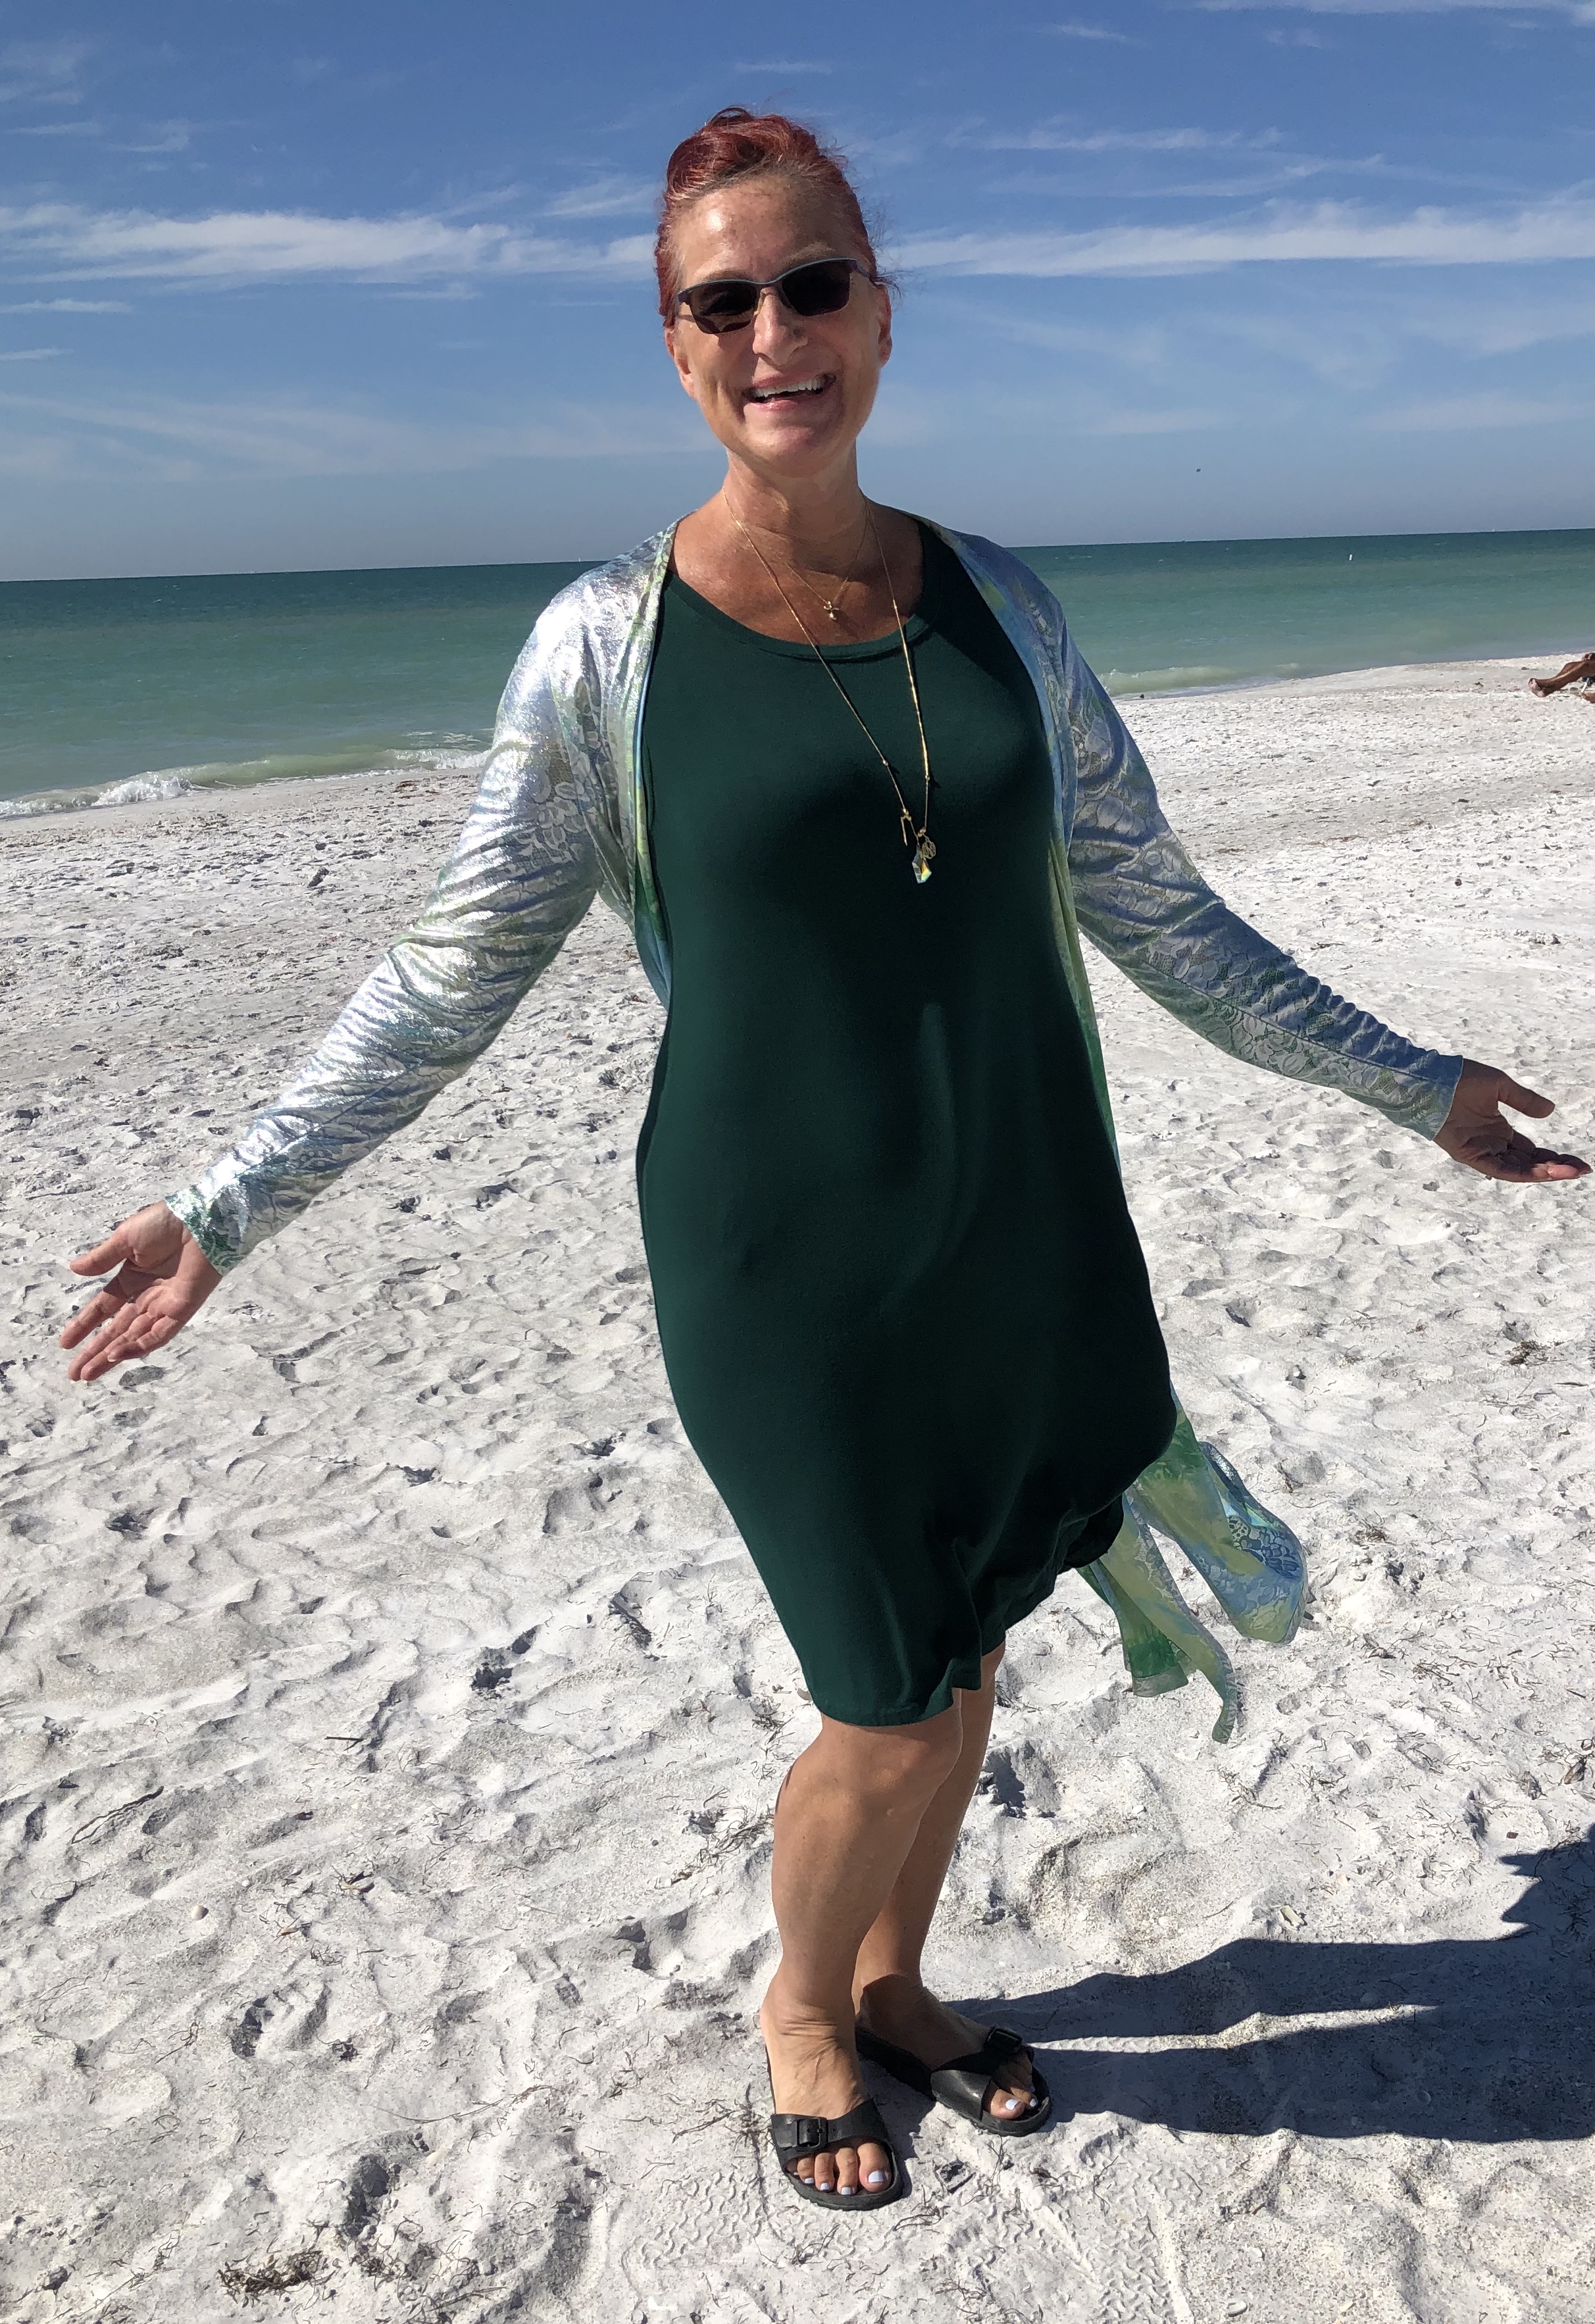
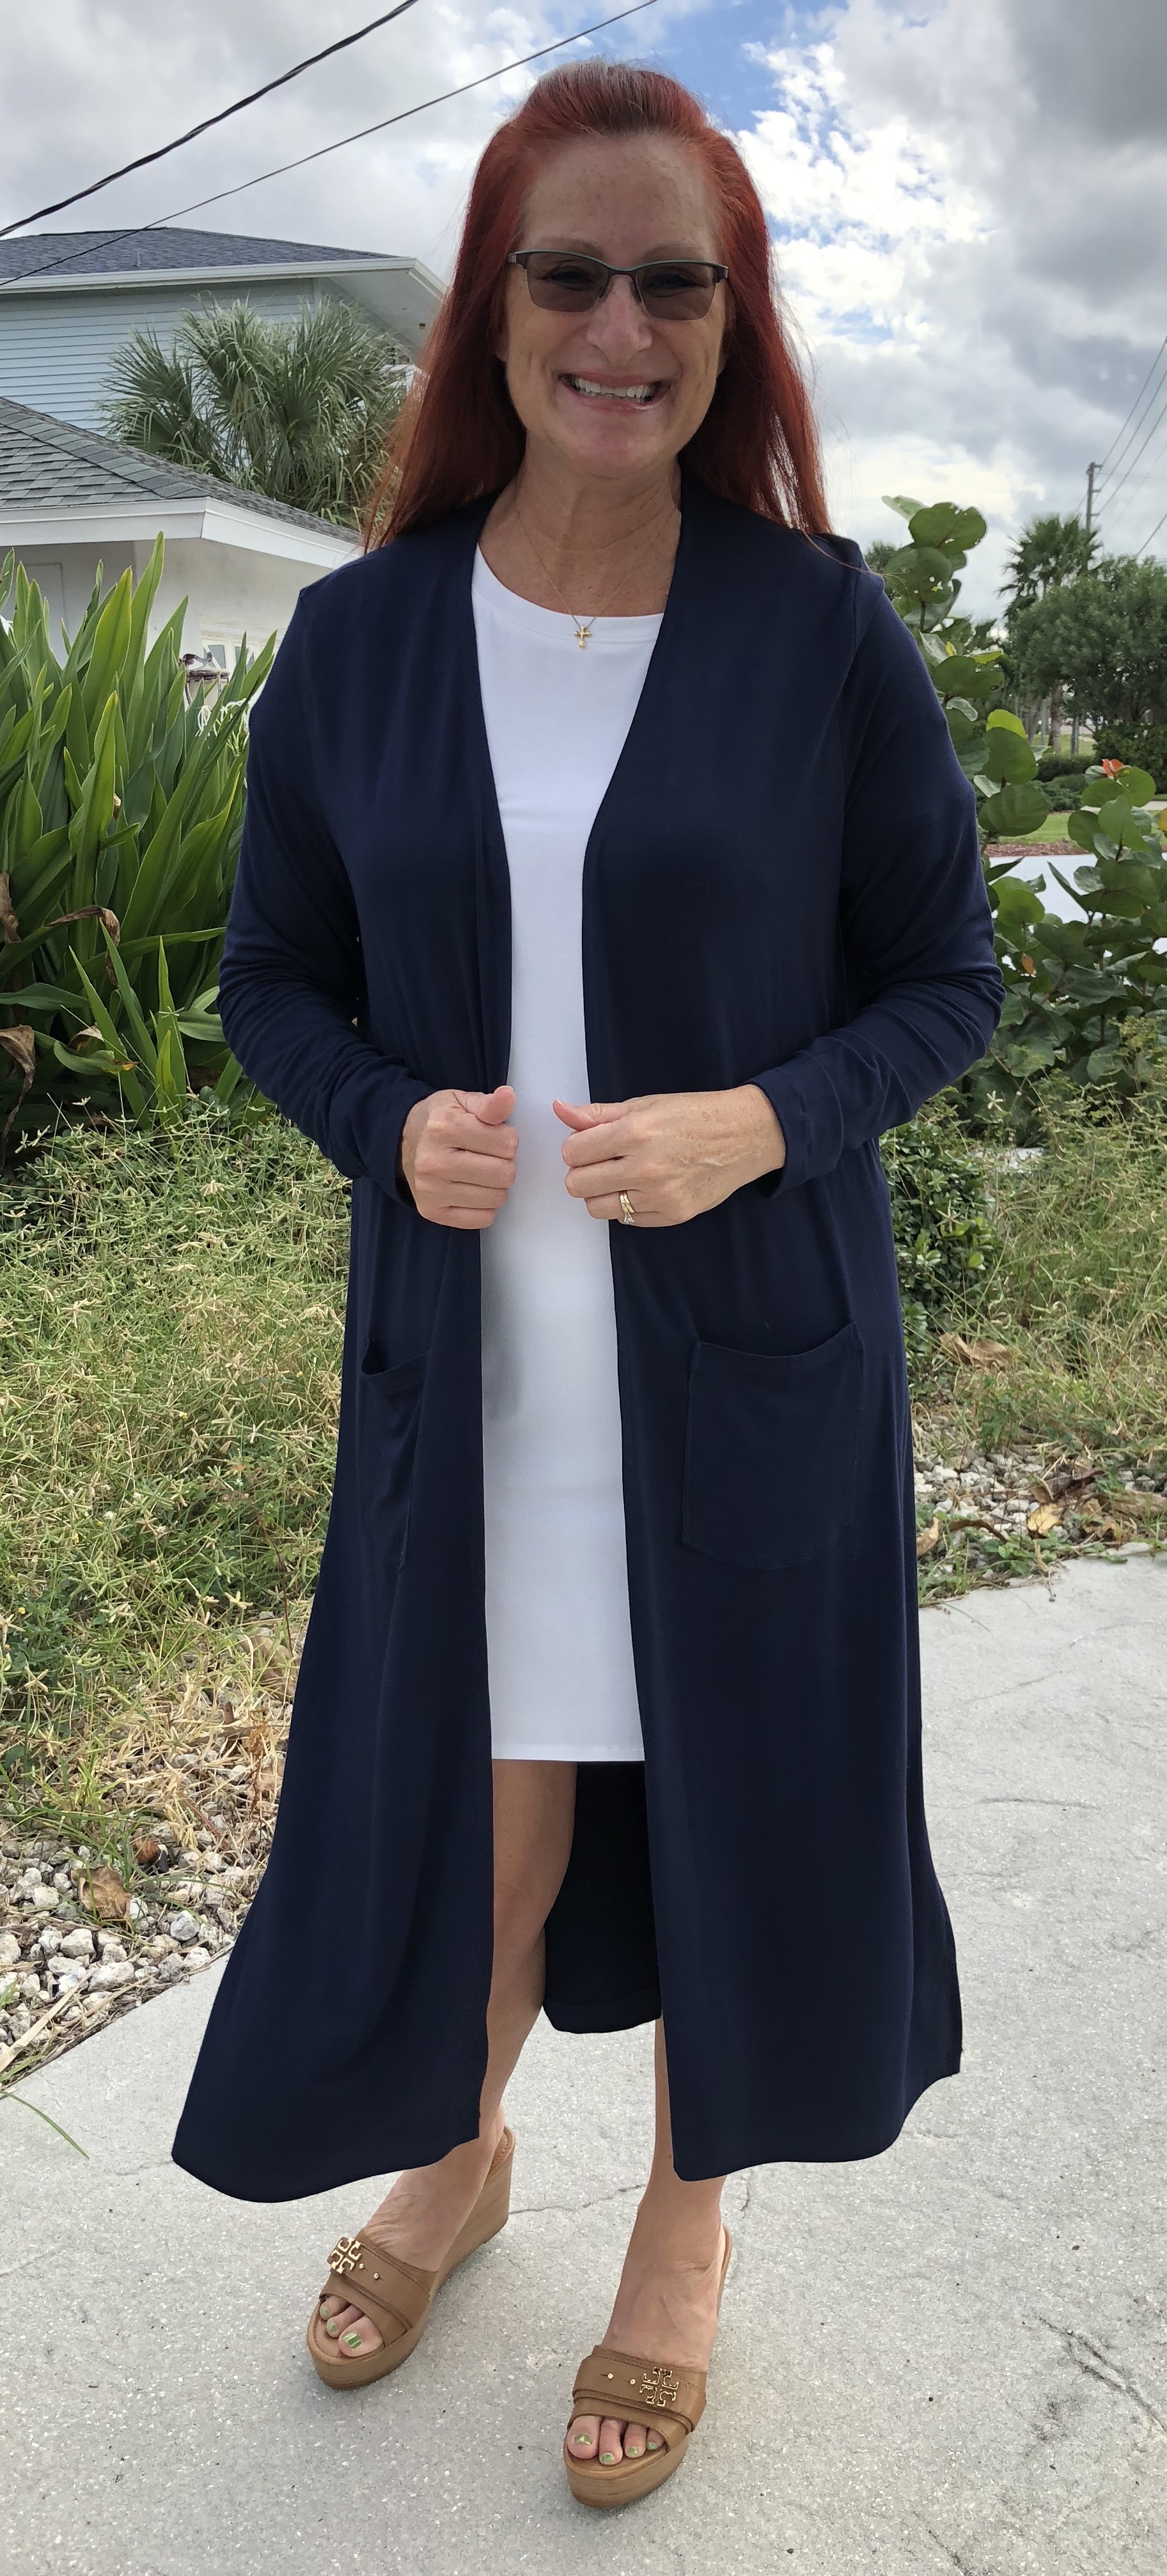
This idea for hacking the GreenStyle Sunday Cardigan has been floating around in my mind for a while. Finally, I took the time to make a plan, get it done, and I love it! It’s exactly what I wanted. It’s fun and flouncy, lightweight and flowy, and super comfortable. It looks cute with a dress, is easy to toss on when I need a layer, and elevates a simple outfit.
Windy days make photography challenging. And sometimes, not super attractive! 🙂
I suppose I should start with my sketch. Obviously, I’m a sewist, not an artist! 🙂 But sketching out my ideas helps me clarify exactly what I want to do, and it’s helpful to note how I plan to do it! A well-fitting pattern with the basic shape you want is always a great place to start. Set-in sleeves are a must, since dropped shoulders and boxy shapes are not particularly flattering on my body. Clean edges, rather than bands were also important. The GreenStyle Sunday Cardigan met all my requirements, and, I know it fits well since I’ve made several. See here and here.
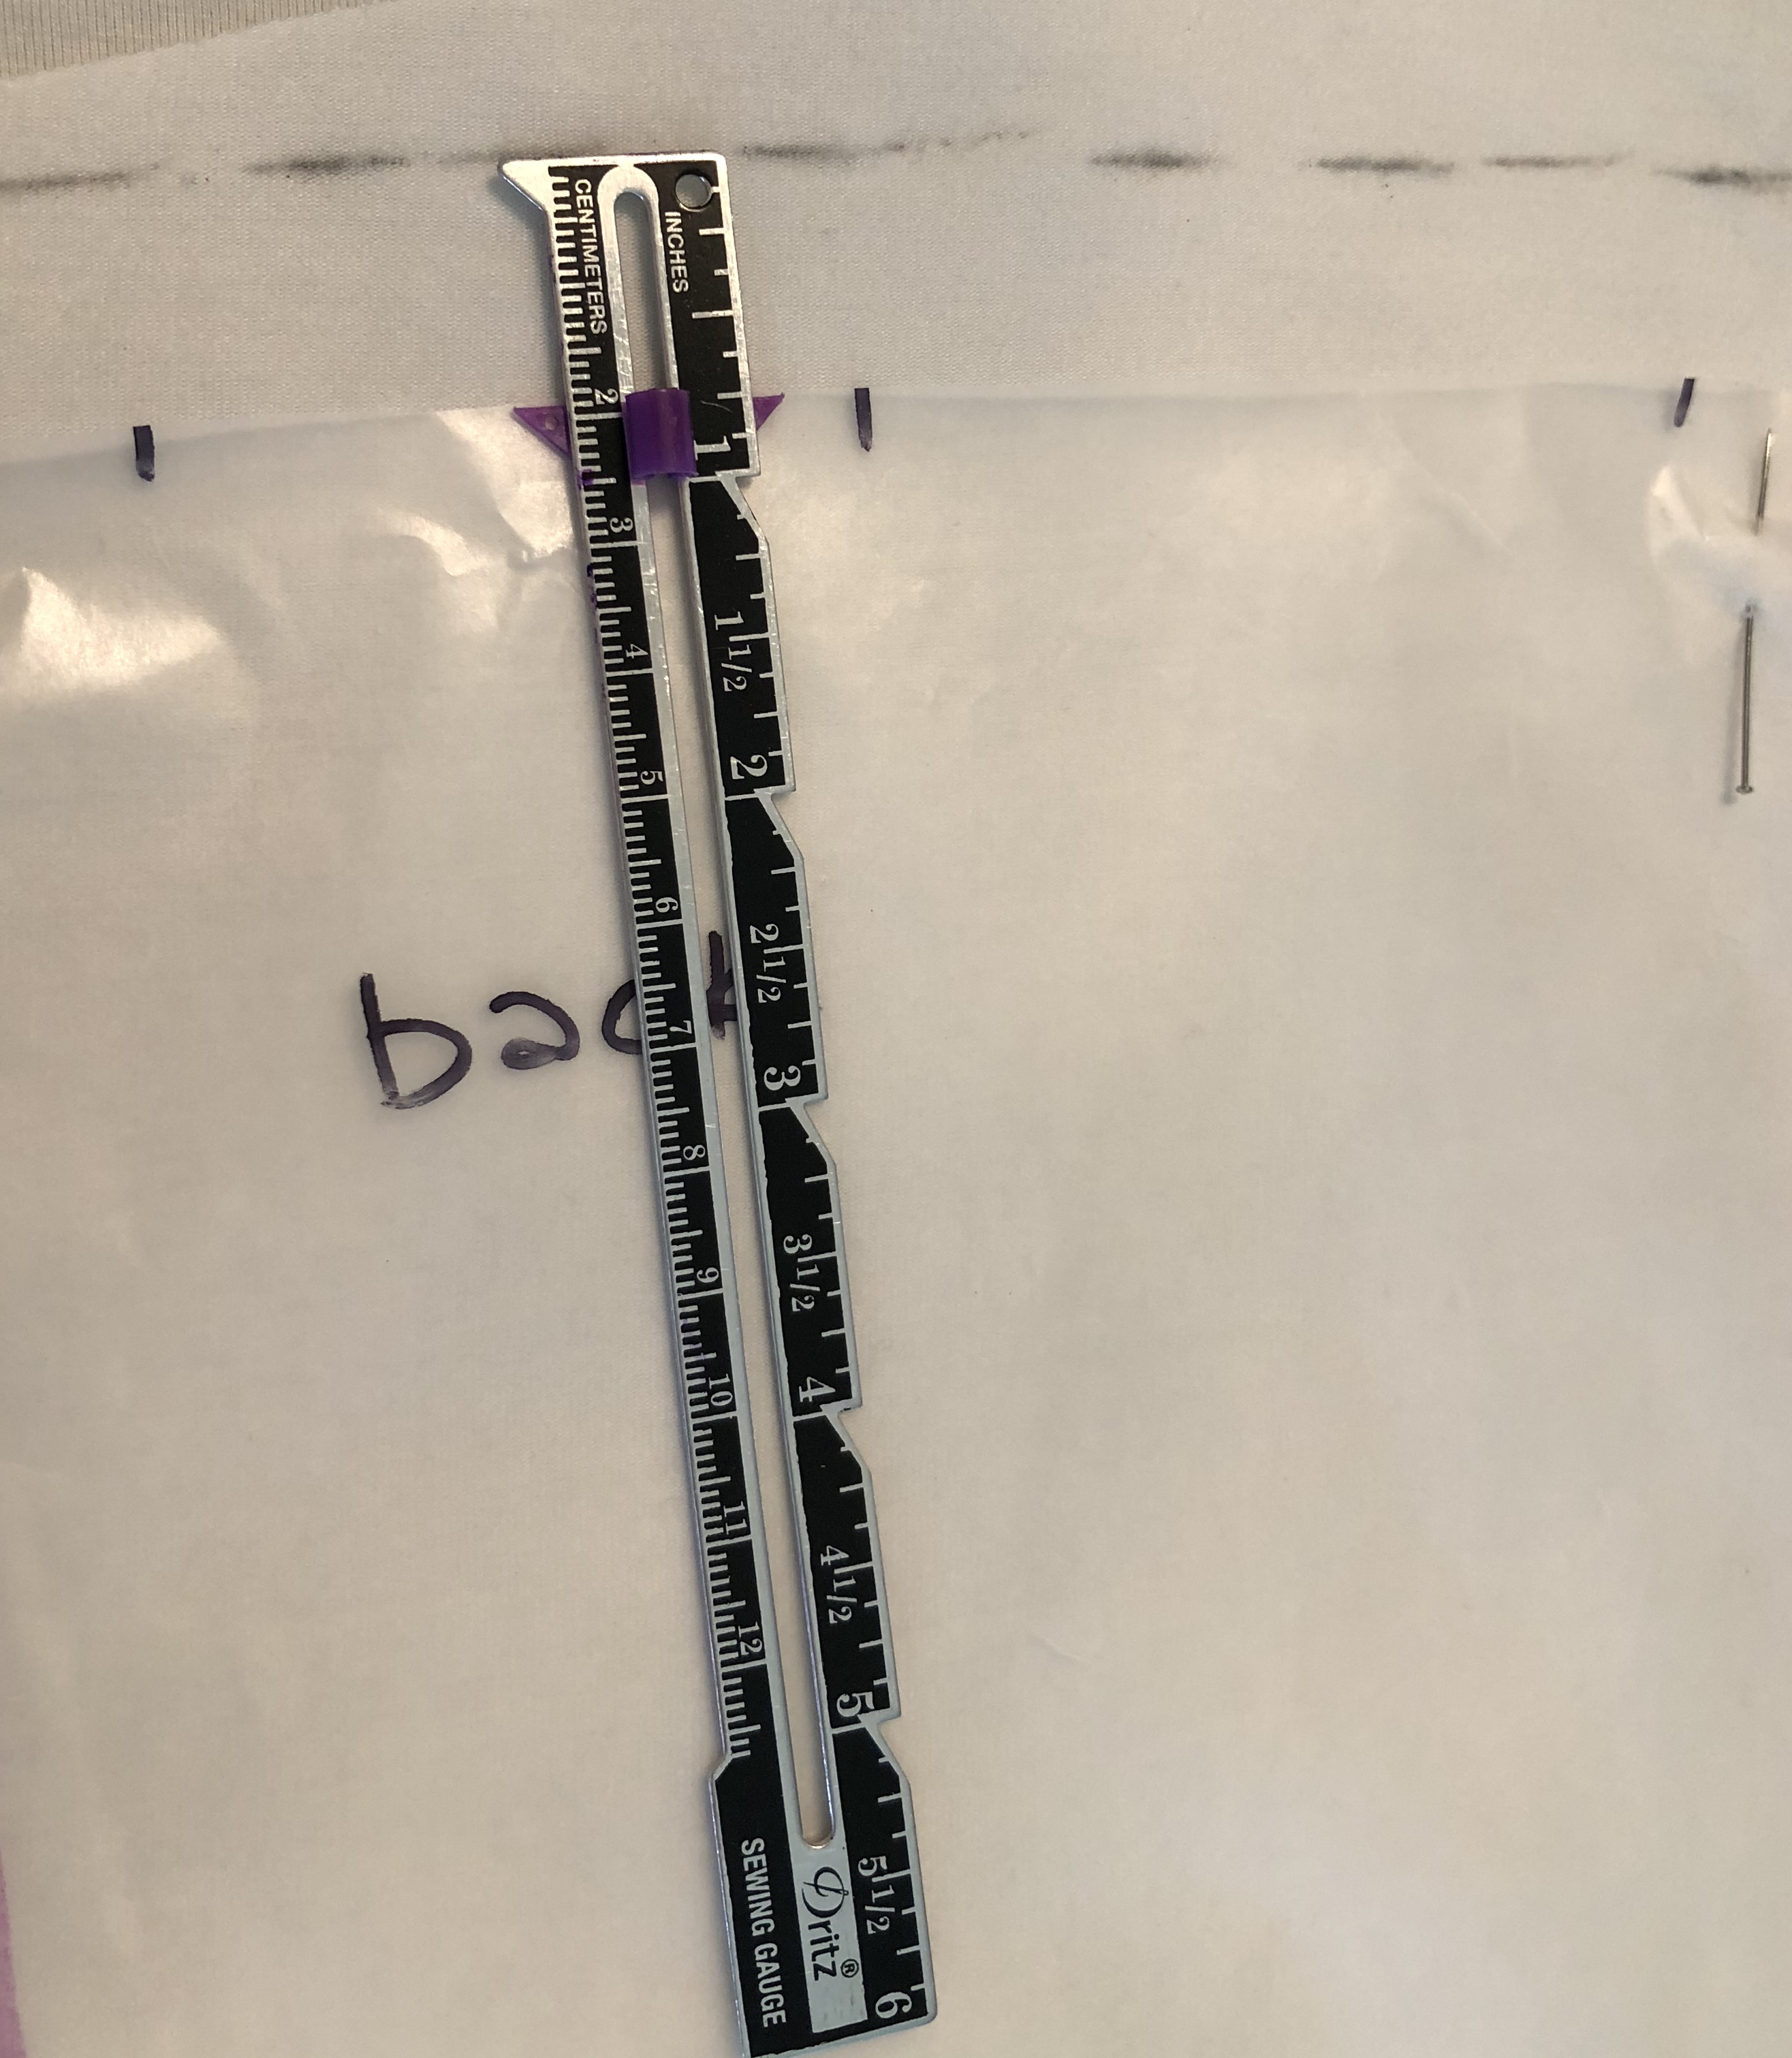
Noting dimensions really helps when you’re planning to start cutting into your fabric.
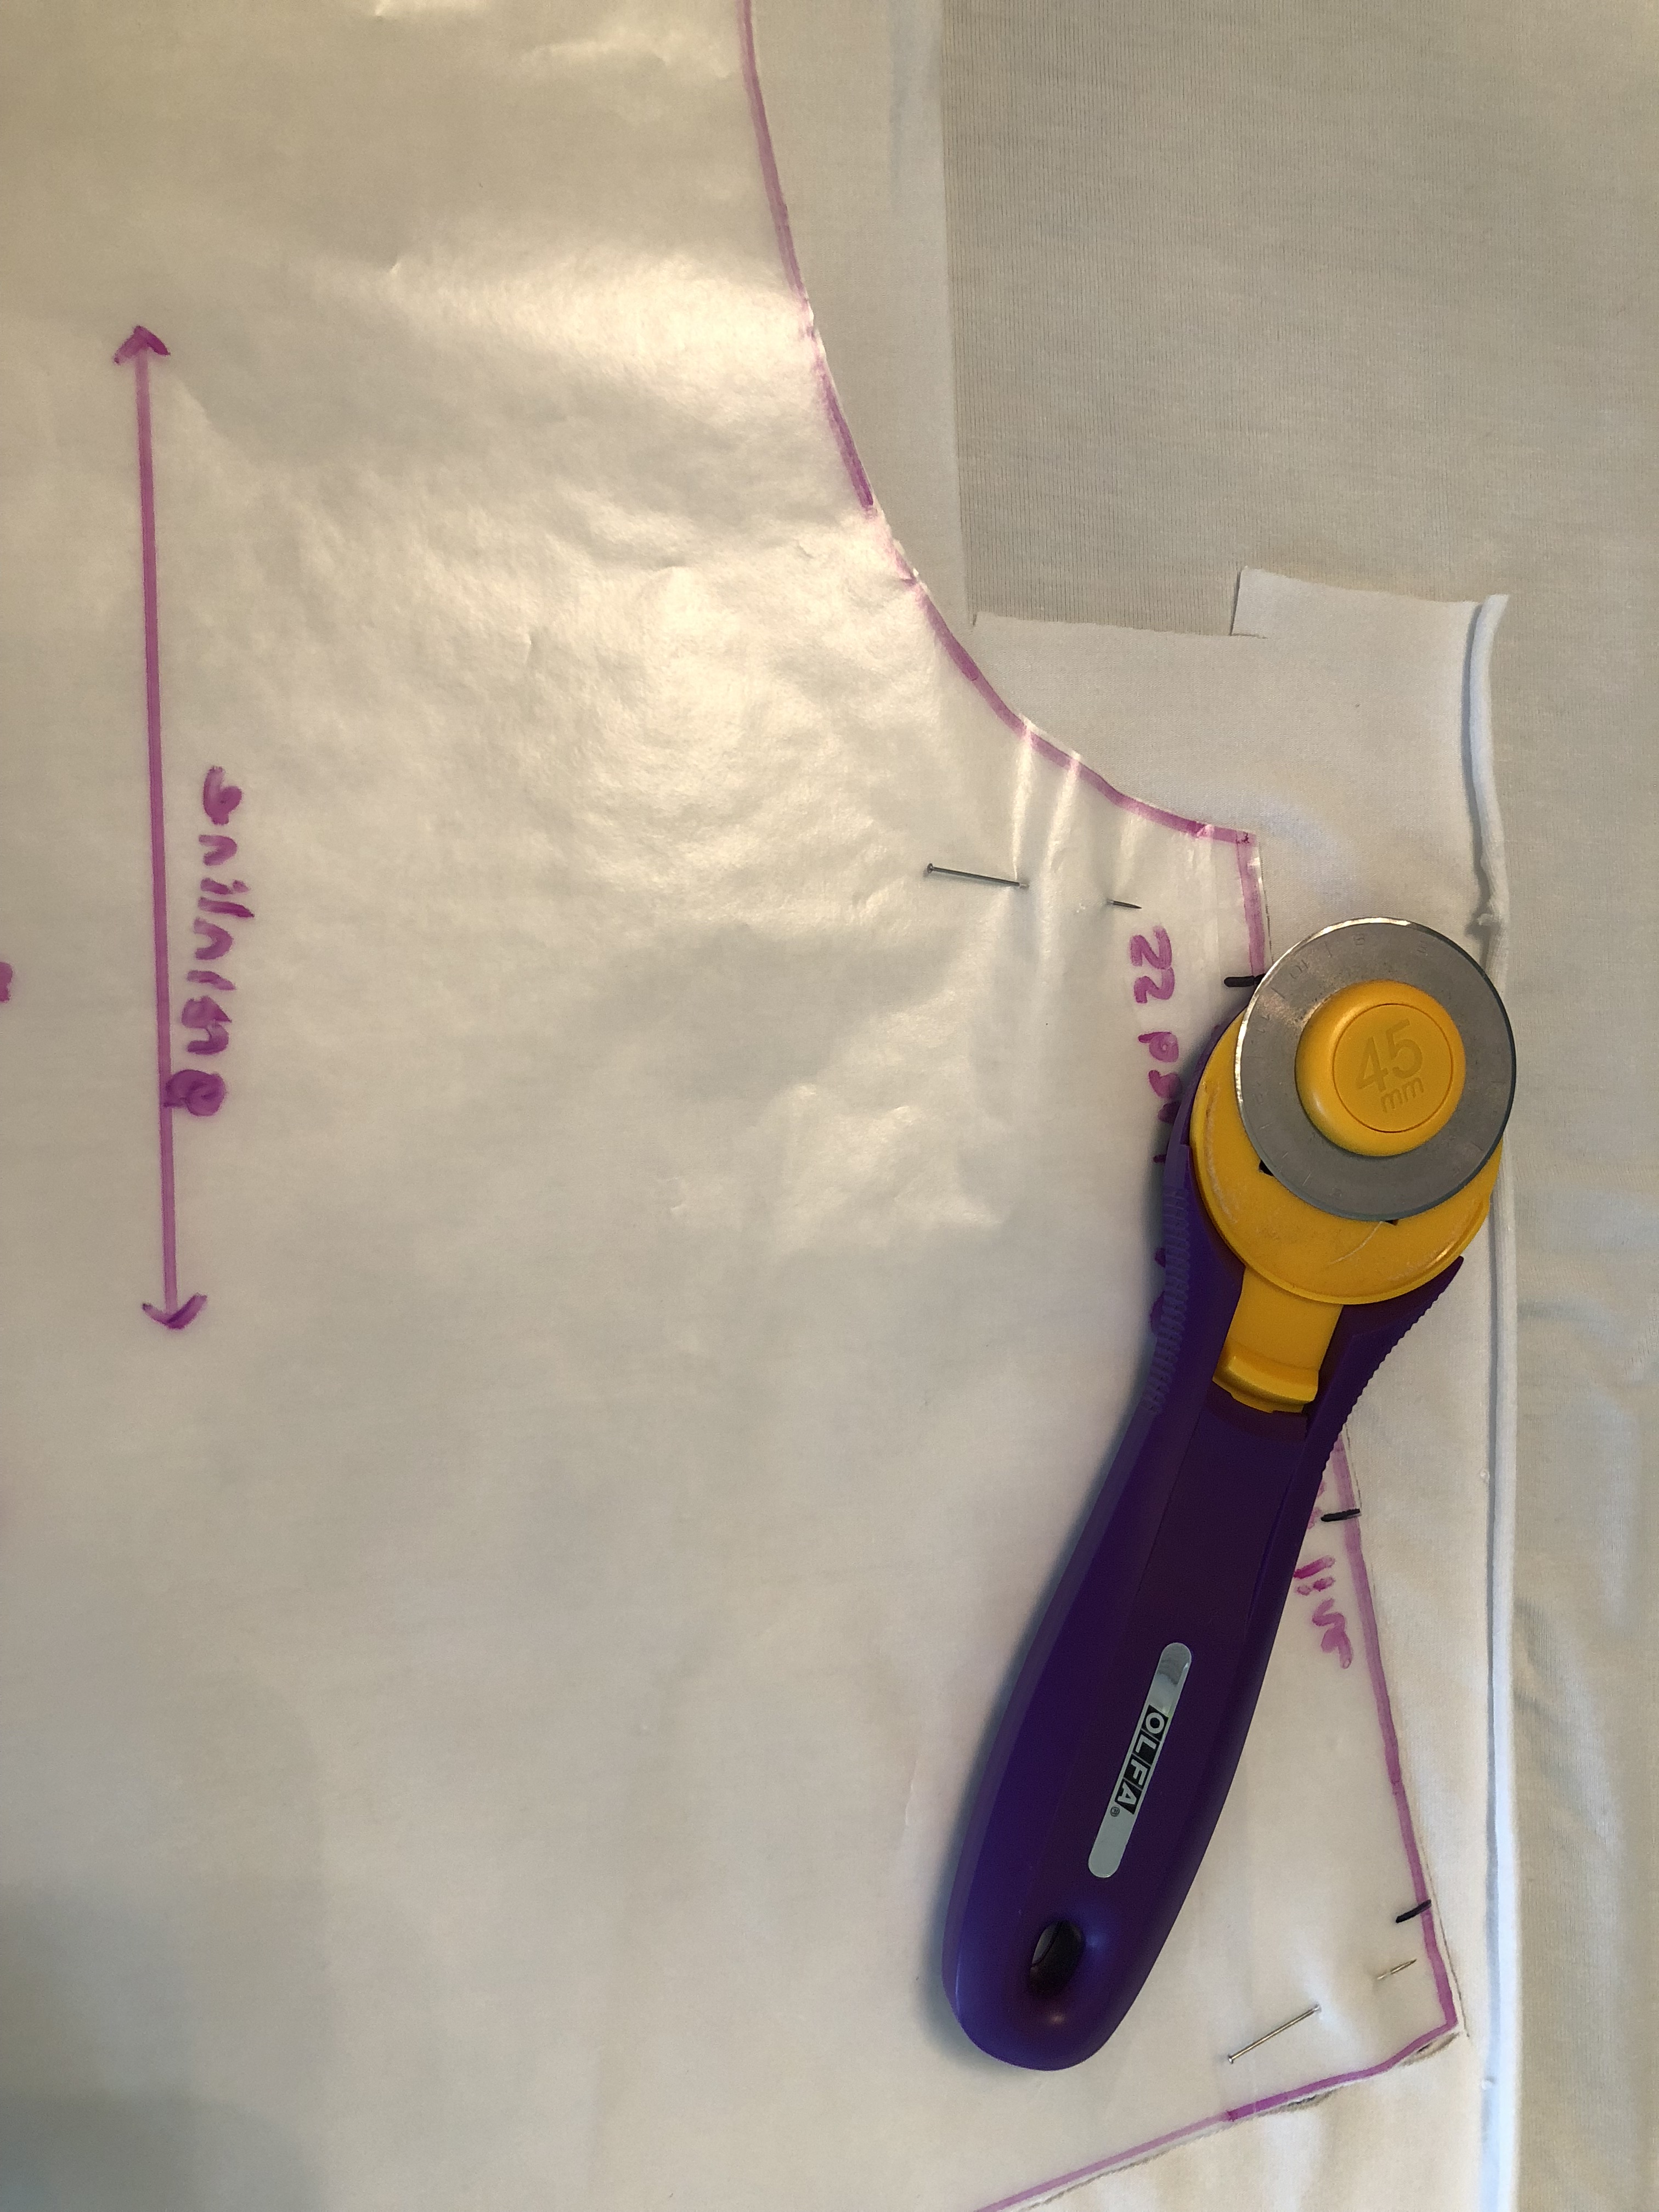
The tiers needed to start below the bust, because it’s much more attractive than having a seam slice through the bustline. A bit higher than my natural waistline, almost an empire look was the plan. Since the average side waist is 8″, I figured 6″ would work well. Keep in mind that if you have a very large or full bust, or a longer than average side waist, you may want the top section of your cardigan to be a bit longer. I marked my pattern pieces 6″ down from the armscye on the side seam, and folded the excess pattern under. The sleeves were also shortened to 6″ below the armscye.
It may have been easier if I had just cut the bottom of the patterns off rather than folding, but I didn’t want to have to tape them back together or retrace the pattern pieces the next time I want to use it!
Since I was looking for a knee length cardigan, I measured down to the knee length mark on the pattern, and figured I needed another 23″ or so from my 6″ mark on the side seam. Since I wanted two tiers, I made them each 12″ high to give me a seam and hem allowance. To figure out the width of the first tier, multiply the bottom of the bodice (where you folded or cut off the bottom of the pattern) by 1.5, and multiply that number by 1.5 to give you the width of the second tier. My first tiers ended up being 12″ high by 20″ wide for the front, and 40″ wide for the back. My second tiers are 12″ high by 30″ wide for the front, and 60″ wide for the back. Since my fabric was only 58″ wide, this was a case of “close enough is good enough”!
See? There’s no way to tell that the back bottom tier isn’t quite as wide as it “should have” been.
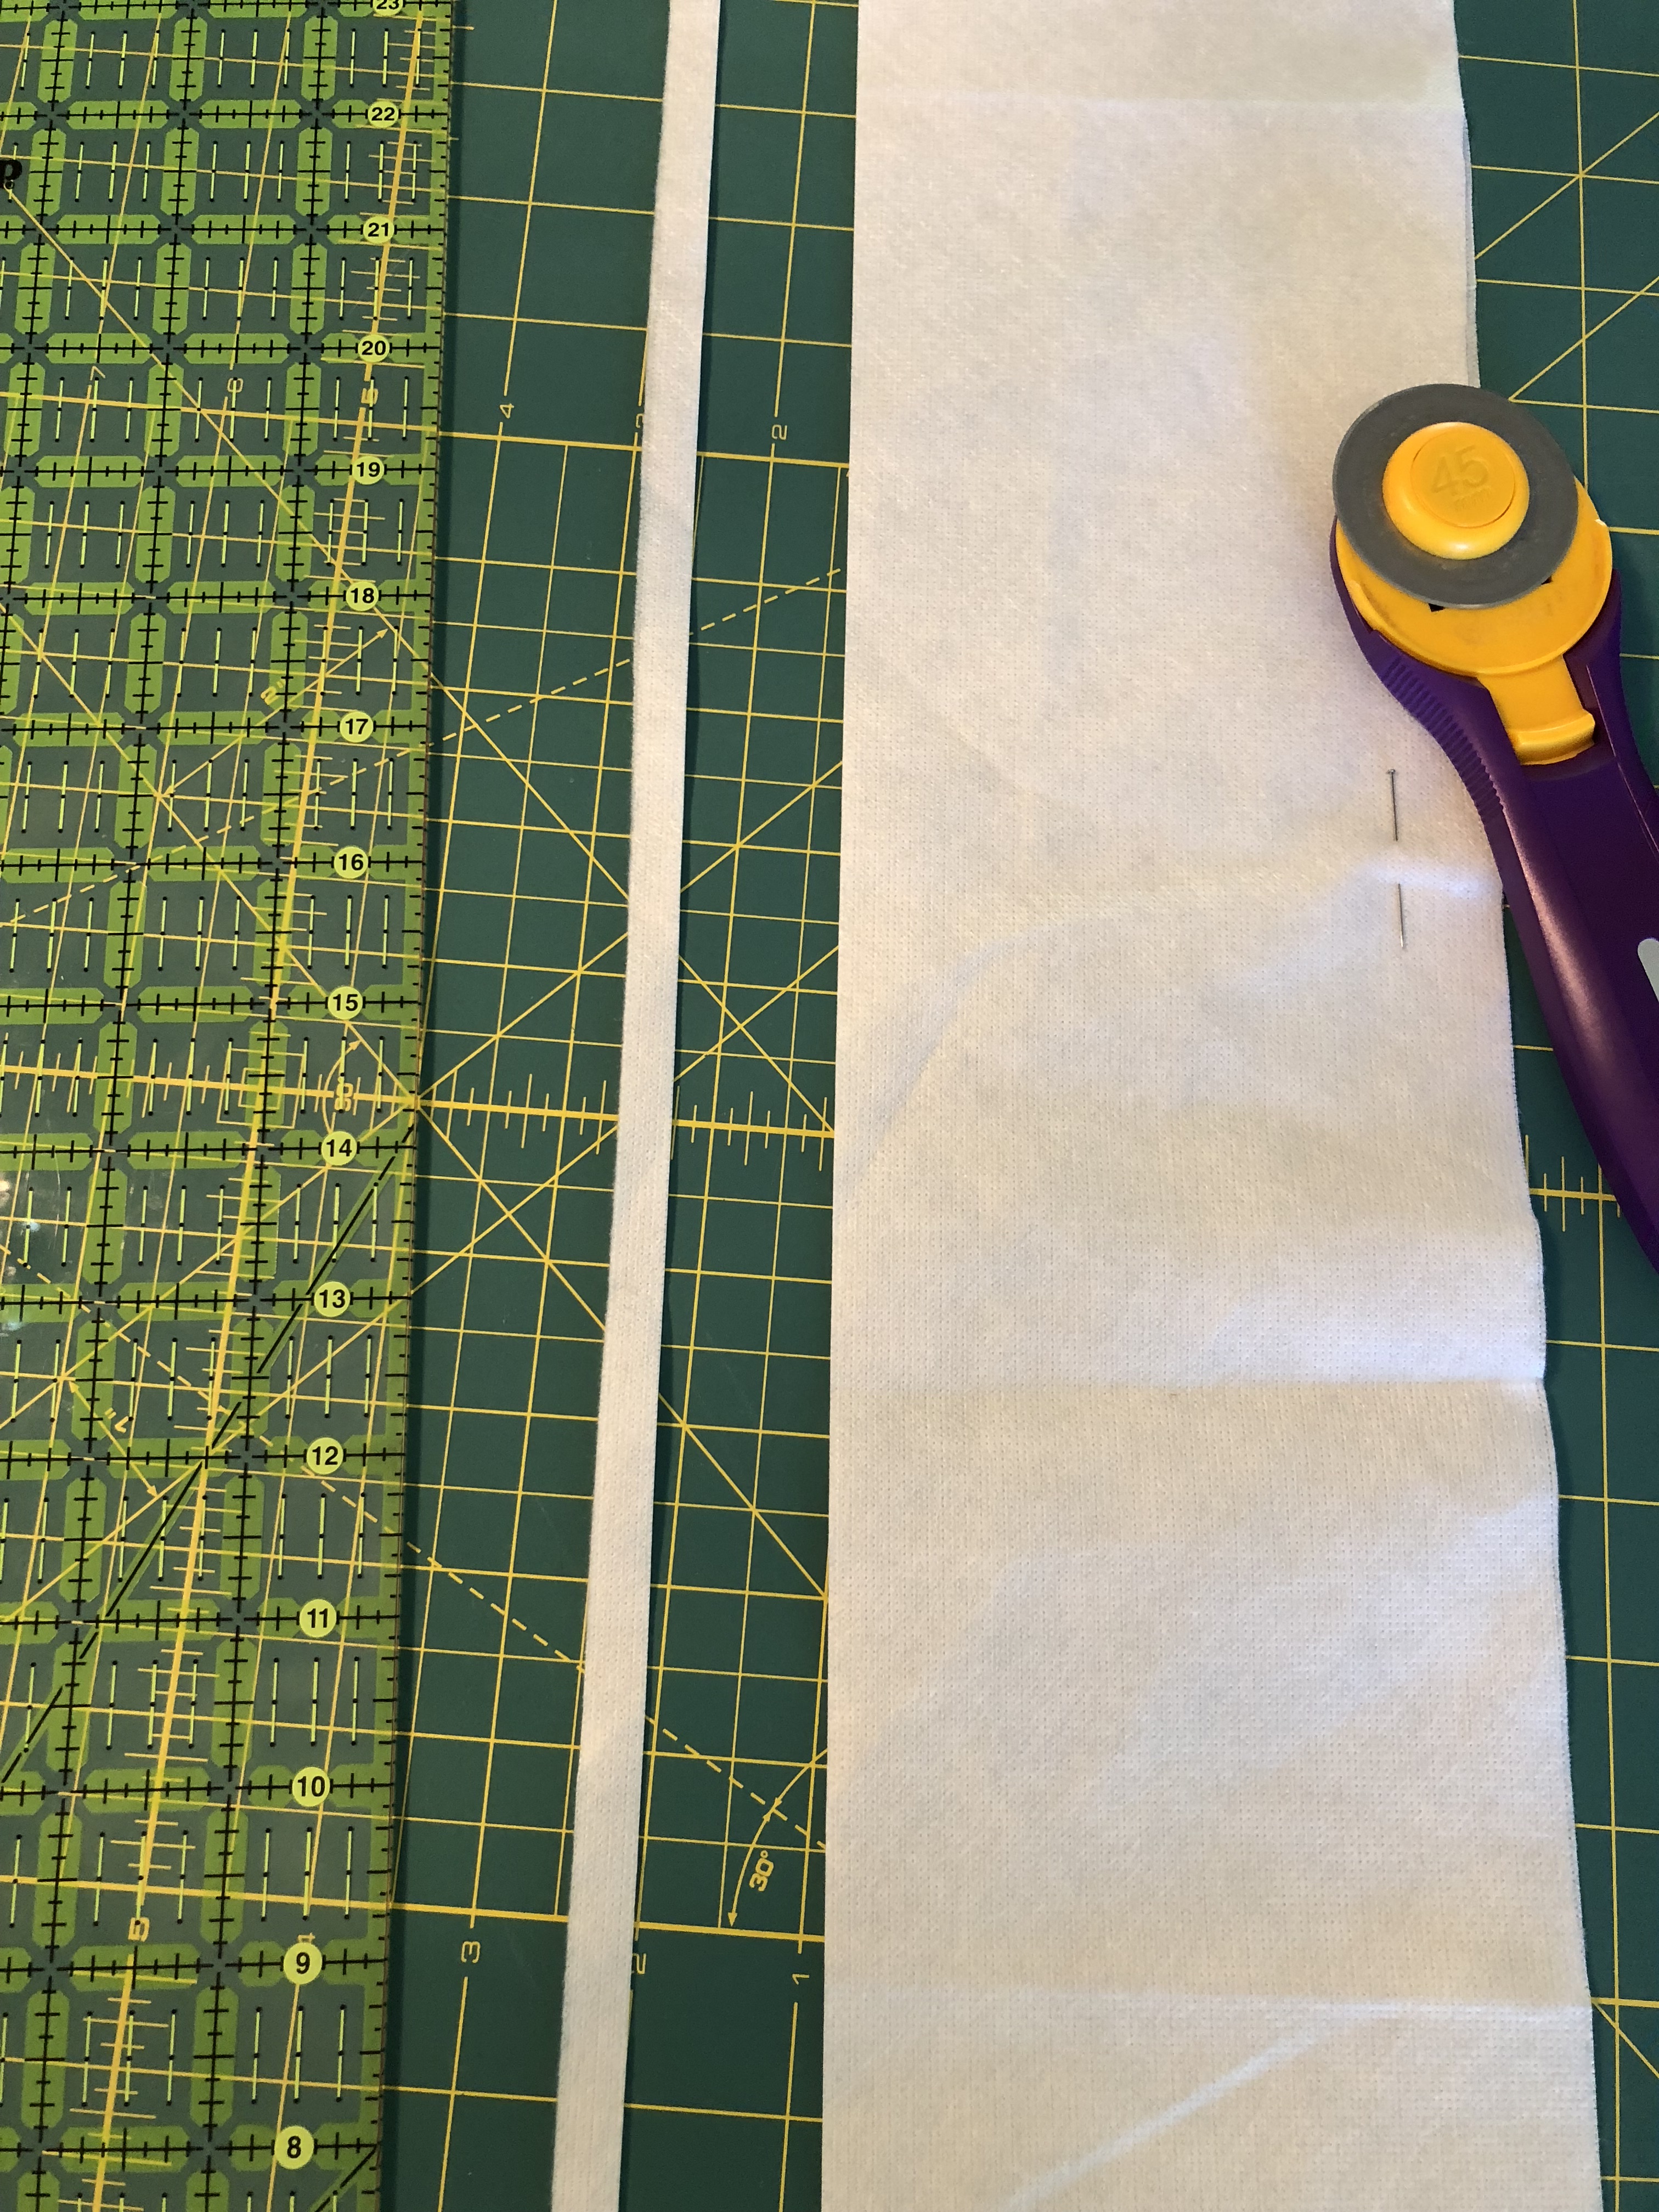
Cutting the tiers was pretty easy using my quilting ruler and rotary cutter. I use a ruler and rotary cutter all the time when cutting out bands, bindings, cuffs, or any other rectangular piece. It’s so much faster and easier, and much more precise than cutting around a pattern piece. Making the sleeve flounce was much less precise! 😉
My fancy method of making the flounce pattern piece involved tracing around the largest bowl in my cupboard. You know the big bowl you use when hosting a large backyard party and you make a huge taco/pasta/(insert your favorite) salad? Yeah, that bowl. That’s the outside of your circle. Then measure across the bottom of the (folded under or cut off) sleeve piece, and subtract the seam allowance. That’s how big you want the seam line of the circle to be. Since I used a 1/4″ seam allowance to attach the flounce to the bottom of the sleeve, the cutting line needs to be 1/4″ inside the seam line. I’m sure there is a math whiz who could tell me how to arrive at the proper inner circle circumference, but I just found a mug in the cupboard that was the same circumference as my seam line circle, and used a compass to make my cutting line circle 1/4″ inside the seam line circle.
My super scientifically designed sleeve flounce ended up 15″ across, and the inner cut line 3-3/4″ across. This gave me a flounce depth of 5-3/4″.
With all the pieces cut out, it was time to sew everything together. Gather each first tier piece and attach the front tiers to the bodice fronts, and the back tier to the bodice back. Gather the second tier pieces and attach the front tiers to the bottom of the front top tiers. Attach the back tier to the bottom of the back top tier.
The cardigan is really starting to take shape!
With right sides together, sew the shoulder seams and side seams. Sew the sleeves together, and mark the quarter points on the sleeve bottom and the quarter points of the flounces. Match up the quarter points and serge the flounce onto the sleeve. Set in the sleeves and get ready to hem. My best hemming tip for circle sleeves, skirts, or anything with a steeply curved bottom is to four-thread overlock the hem using a stitch length of 2, stitch width of M, and up the differential to 1.5. This will slightly gather the hem so that when you fold it under it will lay nice and flat for you. Pin up your sleeve hems and cover or top-stitch.
Once everything is cover-stitched and pressed, the flounce hem will be smooth and hang perfectly.
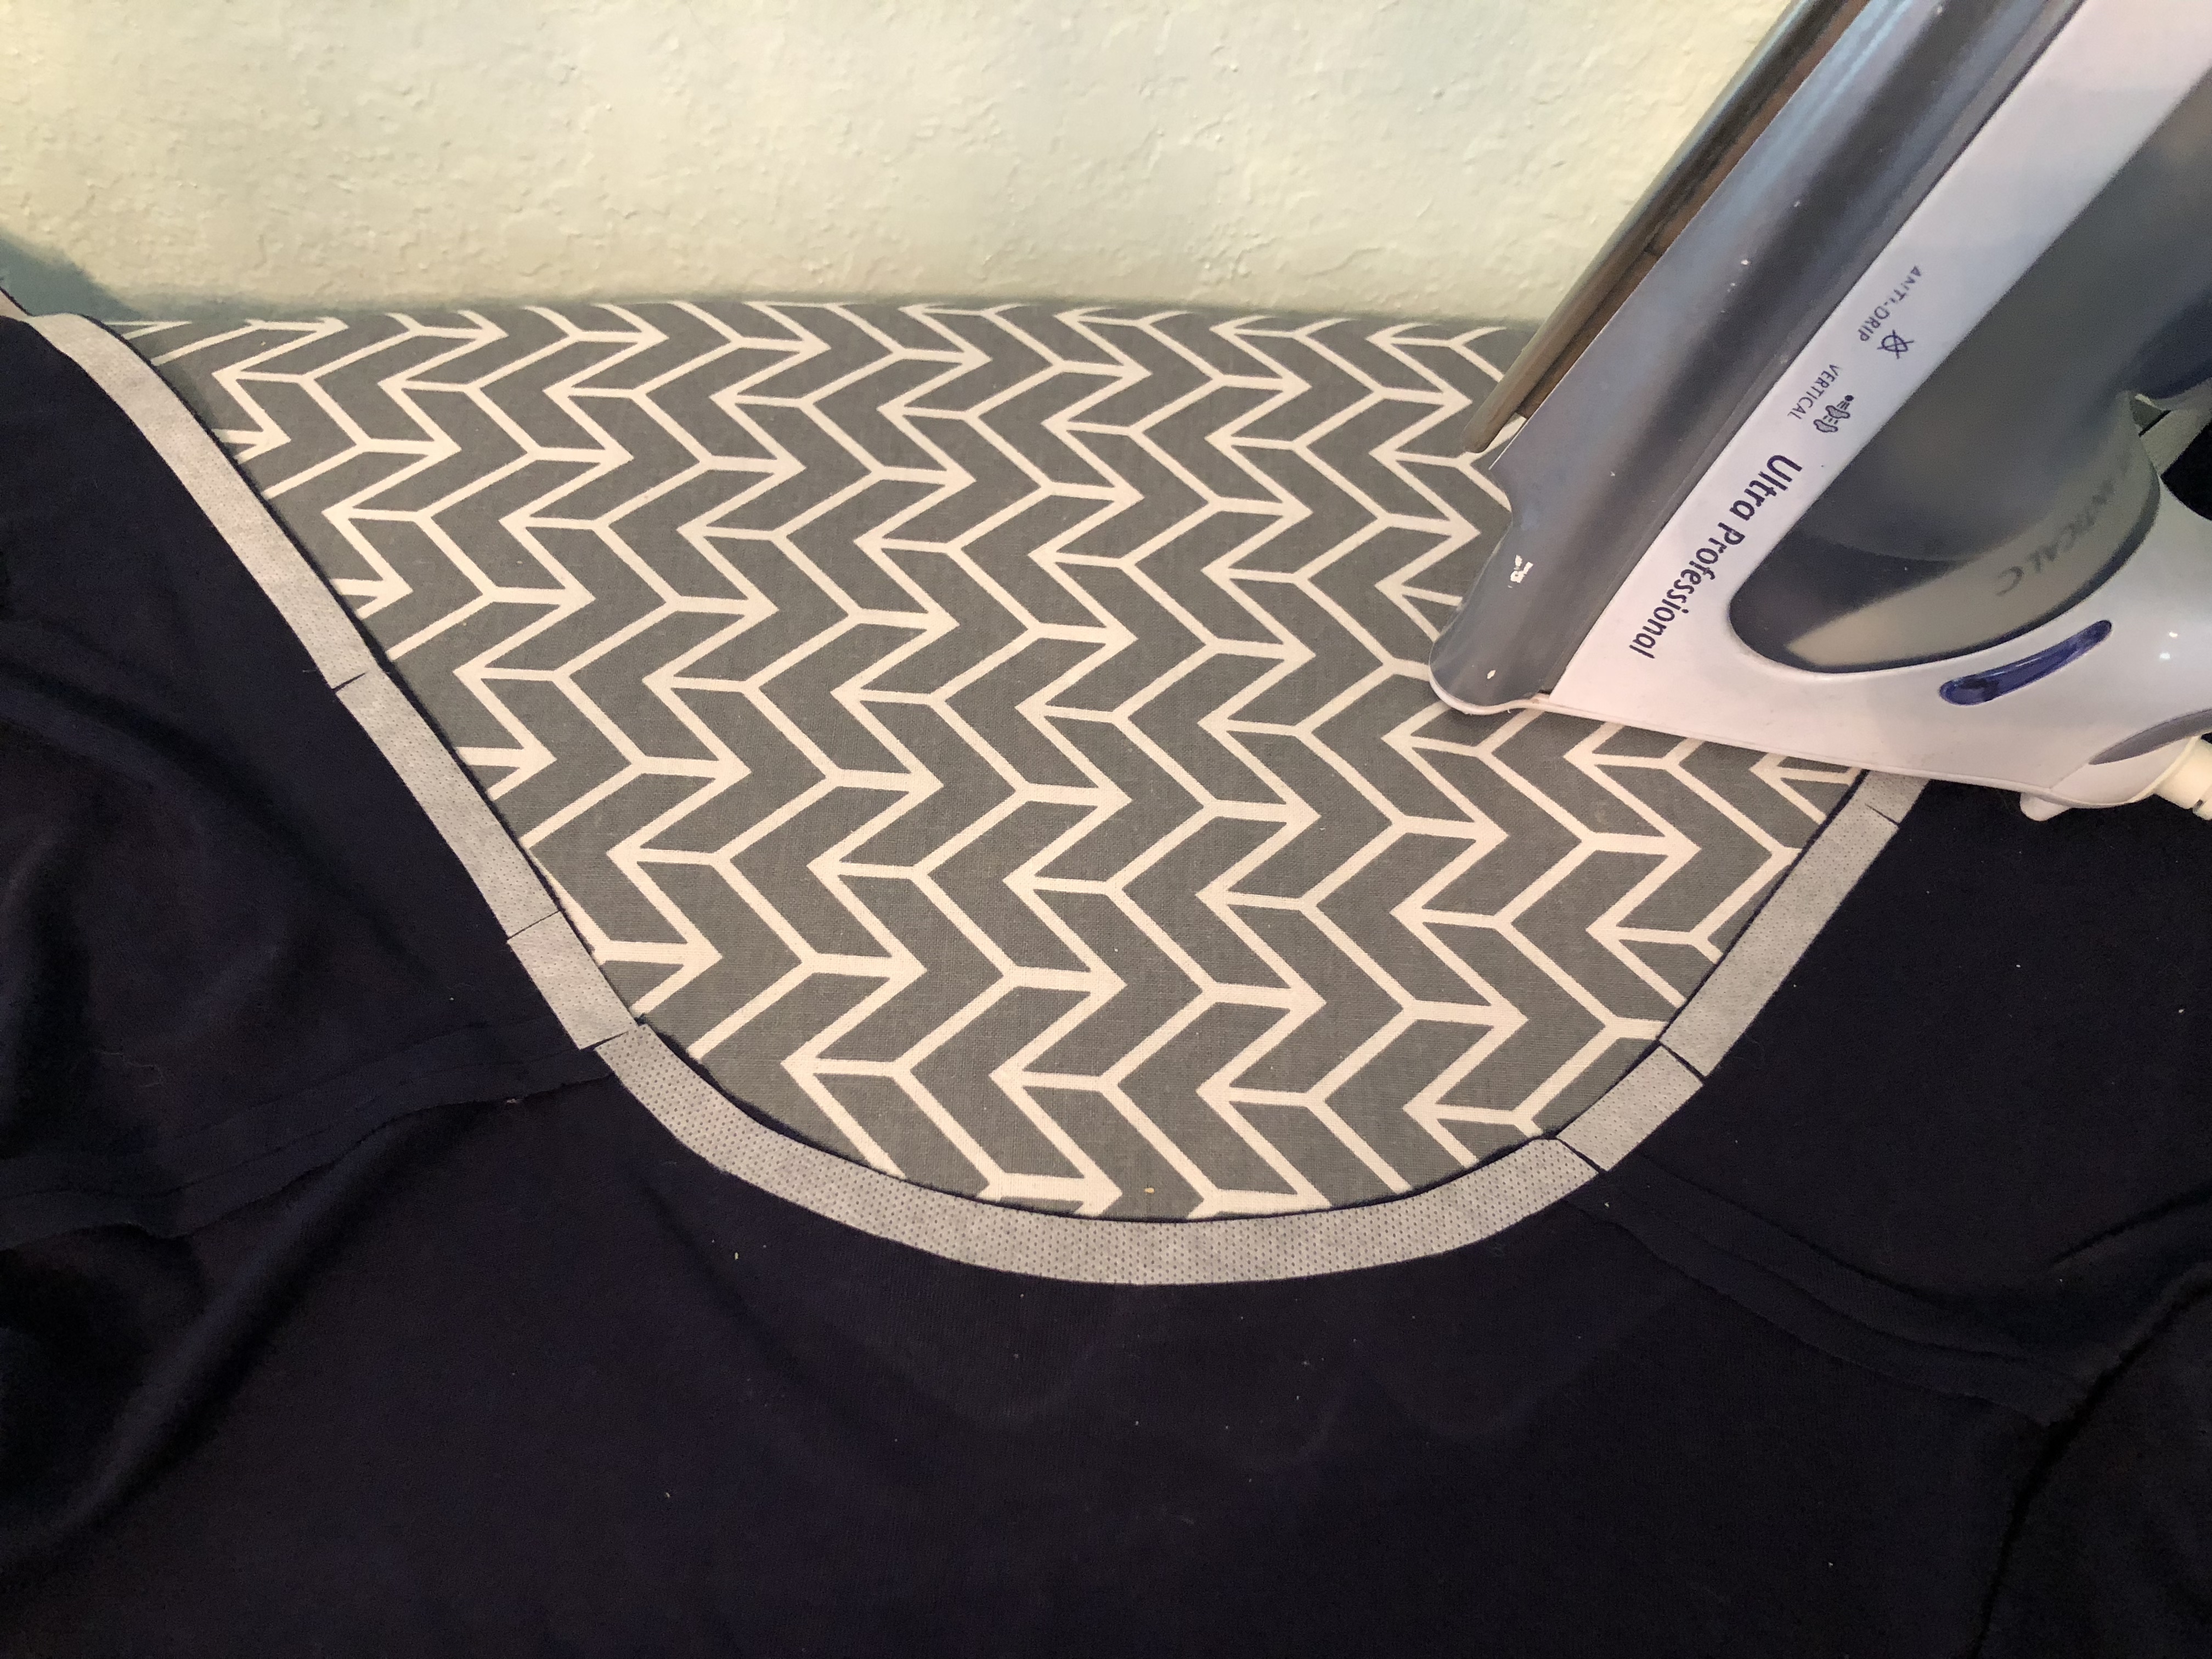
Now it’s time to finish the front edges of the cardigan. I do this little trick on every Sunday Cardigan I make. Cut 3/8″ wide strips of feather-weight fusible interfacing. Press the strips along the wrong side of the entire front edge of the cardigan. Snip the interfacing strips almost all the way through to help it curve when going around the neckline. Then press the edges under 3/8″ and cover-stitch.
Using interfacing along the front edges of your cardigan makes finishing it so easy! It helps the fabric stay perfectly smooth and flat, and keeps it from getting stretched out when you top-stitch.
All that’s left to do is hem the bottom edge. I use the same four-thread overlock settings as above, except I only up the differential to 1.3. Then pin the hem up and coverstitch. You can leave the cardigan with an open front, add buttons and loops at the top bodice, or go as far down the front as you want. I decided on 4 buttons and loops to hold the bodice closed when desired.
I love the dreamy look of the buttoned bodice with the ruffled tiers and flounce sleeves.
This is a super fun and super useful cardigan. It’s pretty over a dress when you want a fancier look, and simple enough to throw on over workout wear. It’s a lightweight cover-up at the beach, and would work as a bathrobe too. I could see it made in a stretch mesh or a soft rayon spandex. My version is made from a pointelle knit that I’ve had in my stash since the ’90s. The store it was purchased from has been out of business for decades, so who knows the exact fabric content. I’m usually pretty good at identifying fabric content by look and feel, and my best guess is that it’s a cotton/maybe a bit of rayon?/spandex blend. I just know that I’m super happy with my pattern hack, and am dreaming about another one!
Floaty, flowy, and fun. What more can you ask for?
The details: the Sunday Cardigan is one of the older patterns that hasn’t been updated to the extended size chart yet. It includes sizes XXS-3XL, and has an optional hood and pockets.
In these unprecedented times, when virtually the entire world is under “Safer At Home” orders, it is surreal to look back to a month or two ago when most of us led what now feels like rather carefree lives. It’s important to remember the beauty and joy of life, increase our faith, and do useful things that make us happy. Sewing is certainly one of my happy places! Except when I have to seam-rip because I’ve done something silly, like sew the front and back right and wrong sides together. 😉 Which happened, by the way. Fortunately I had only sewn part of the way up the side seam before I realized it!
The Pattern Emporium Going Places Dress was the perfect pattern to sew at this time. Florida is already quite warm, and dresses are a staple in my closet. There are multiple neckline options from ballet to babe, and high and low square necklines. And the dress can be fitted or flared. I chose the deeper babe neckline and love the fit of the flared skirt. Having a fitted bodice is quite figure flattering, and the skirt flares out at the perfect place so that it skims and shapes the waist without being tight across the midriff.
The neckline and straps can be finished with bands or binding. But let me tell you- once you have the ability to cover-stitch, binding is just as easy as bands, and looks so beautiful! I’m becoming more comfortable with using the cover-stitch feature of my machine, and am absolutely loving the results! It just looks so professional and is so much faster than top-stitching with my old sewing machine.
I used rayon spandex from Phee Fabrics for my dress, and it is the perfect weight and drape for dresses. And tank tops. I literally make all my tank tops out of Phee’s rayon spandex, and a good portion of my dresses. It’s safe to say that this is one of my favorite fabrics!
So, is there anything that I would change the next time I make this pattern? I think I’ll make the back bodice one size smaller. Yoga class has given me a pretty decent back taper, and the back is little looser than I need. I also think I’ll widen the back straps just a smidge. While the straps cover my bra straps quite well, my “old lady” bras widen out before meeting the back band, and the straps of the dress don’t quite cover that area. The Going Places Dress is a pretty quick sew, doesn’t take a lot of yardage, and is definitely worth adding to your pattern collection! The square neckline option is next on my list.
To complement my dress, I made the Pattern Emporium Songbird Kimono & Cardi. I own several cardigan patterns, and bought this one specifically because it was designed for woven fabrics. I found some chiffon at an estate sale for a really good price, and thought it would make beautiful cardigans. While I love the two cardigans I’ve made, let me tell you, sewing chiffon is not for the faint of heart!
Using chiffon is like trying to cut, pin, and sew a cloud! It’s a bear to try and get it to lay flat and smooth and not get wavy and distorted when you cut it out. You have to use so many pins to try and hold everything in place while you’re sewing. The fabric is so fine that pins tend to slide right out as you handle the fabric. And it frays, badly. So a serger is almost a necessity when sewing chiffon. That being said, I absolutely love the result of my efforts!
It’s flowy and fun, and looks great with a dress. This is the first of the two Songbirds I’ve made, and I sized down for the second one. I have long arms, and added two inches of length to the sleeves, but certainly could have gotten away with just an inch. I’ve worn my Songbirds with a T-shirt and skirt, long-sleeved shirts and pants, and dresses. I’ll certainly throw them on with a tank top and shorts on chilly evenings or in air conditioned spaces.
Here are my tips for sewing with chiffon. Take your time. It takes time to smooth and even out your fabric. Use all the pins. It really helps to keep the fabric from shifting as you sew. This also means that by necessity you have to sew more slowly to ensure that you pull the pins before accidentally sewing over them! Because chiffon is super flowy and has no body, you may want to add some body in certain areas. I used knit interfacing (specifically Pellon SK135 Sheer-Knit fusible interfacing) to stabilize the band. I chose this interfacing because it is sheer, and wouldn’t be visible through the chiffon. I cut the interfacing half as wide as the band, and carefully lined it up with one edge of the wrong side of the fabric to press it on. Follow the manufacturers instructions and use a pressing cloth! Even a paper towel works to help keep the residue from getting on your iron. Just be sure to peel it up as soon as you press a section so that it doesn’t stick to the interfacing. And enjoy trying new patterns, techniques, and experimenting with a new look.
Embrace life, and enjoy every moment of laughter and silliness! And sew a little happiness, while we stay at home rather than Going Places! ❤
I have grown to love cardigans. It’s not that I haven’t always liked them, it’s more that I didn’t know how to rock one. In the corporate world, I was more of a suit or dress and jacket kind of girl. If only I had owned this pattern then. Because a duster length cardigan over a dress is a great look!
I’ve made the GreenStyle Sunday Cardigan before, and I’ve even written about it in a previous post. I just keep on making them because I love the look. The pattern has several options: knee length; duster length; sleeveless; cuffs, lace-up sleeve cuffs; two sizes of pockets; and a hood. You can get so many different looks with this pattern. But I have to admit that I keep making the duster length because I just love the simple drama of it.
I live in a state without a real winter, am “of a mature age” and easily overheat, so I have no need for a hood. But the hooded version made in a soft hacci would look so cute on my daughter, who lives where it still snows.
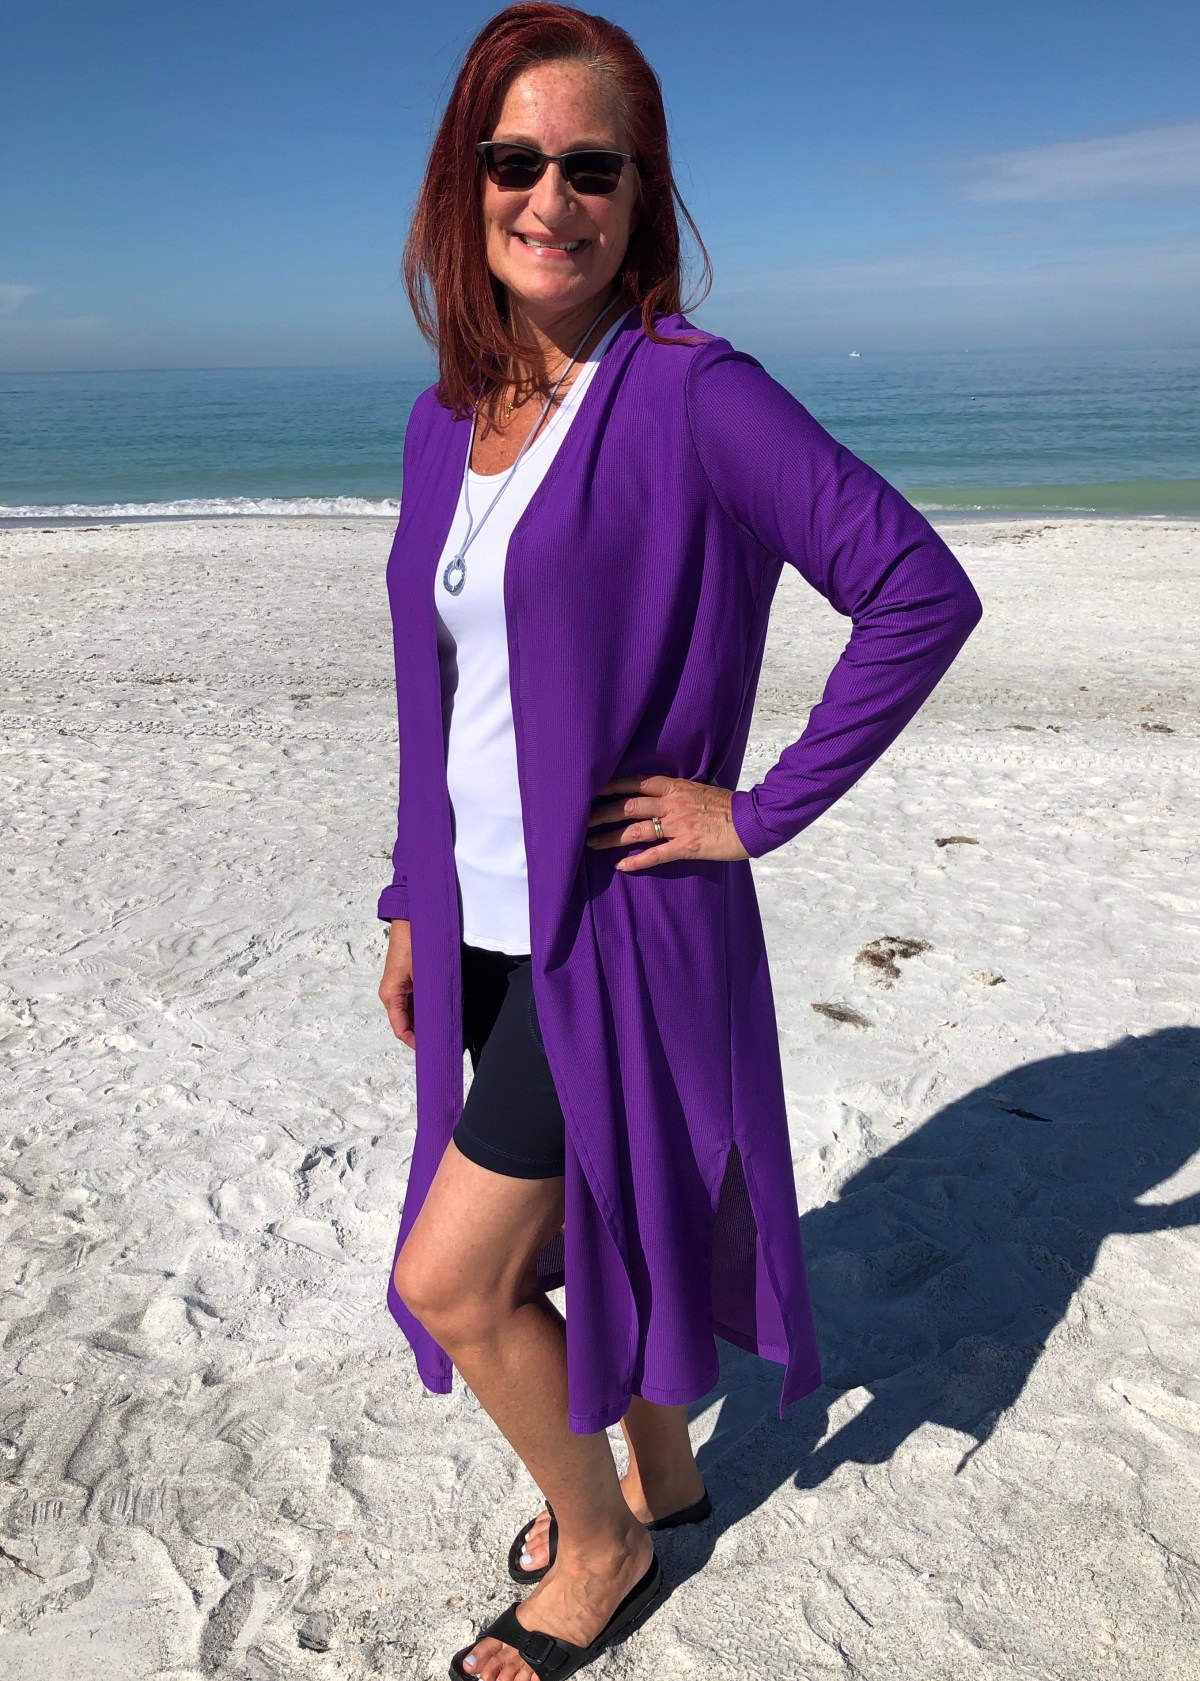
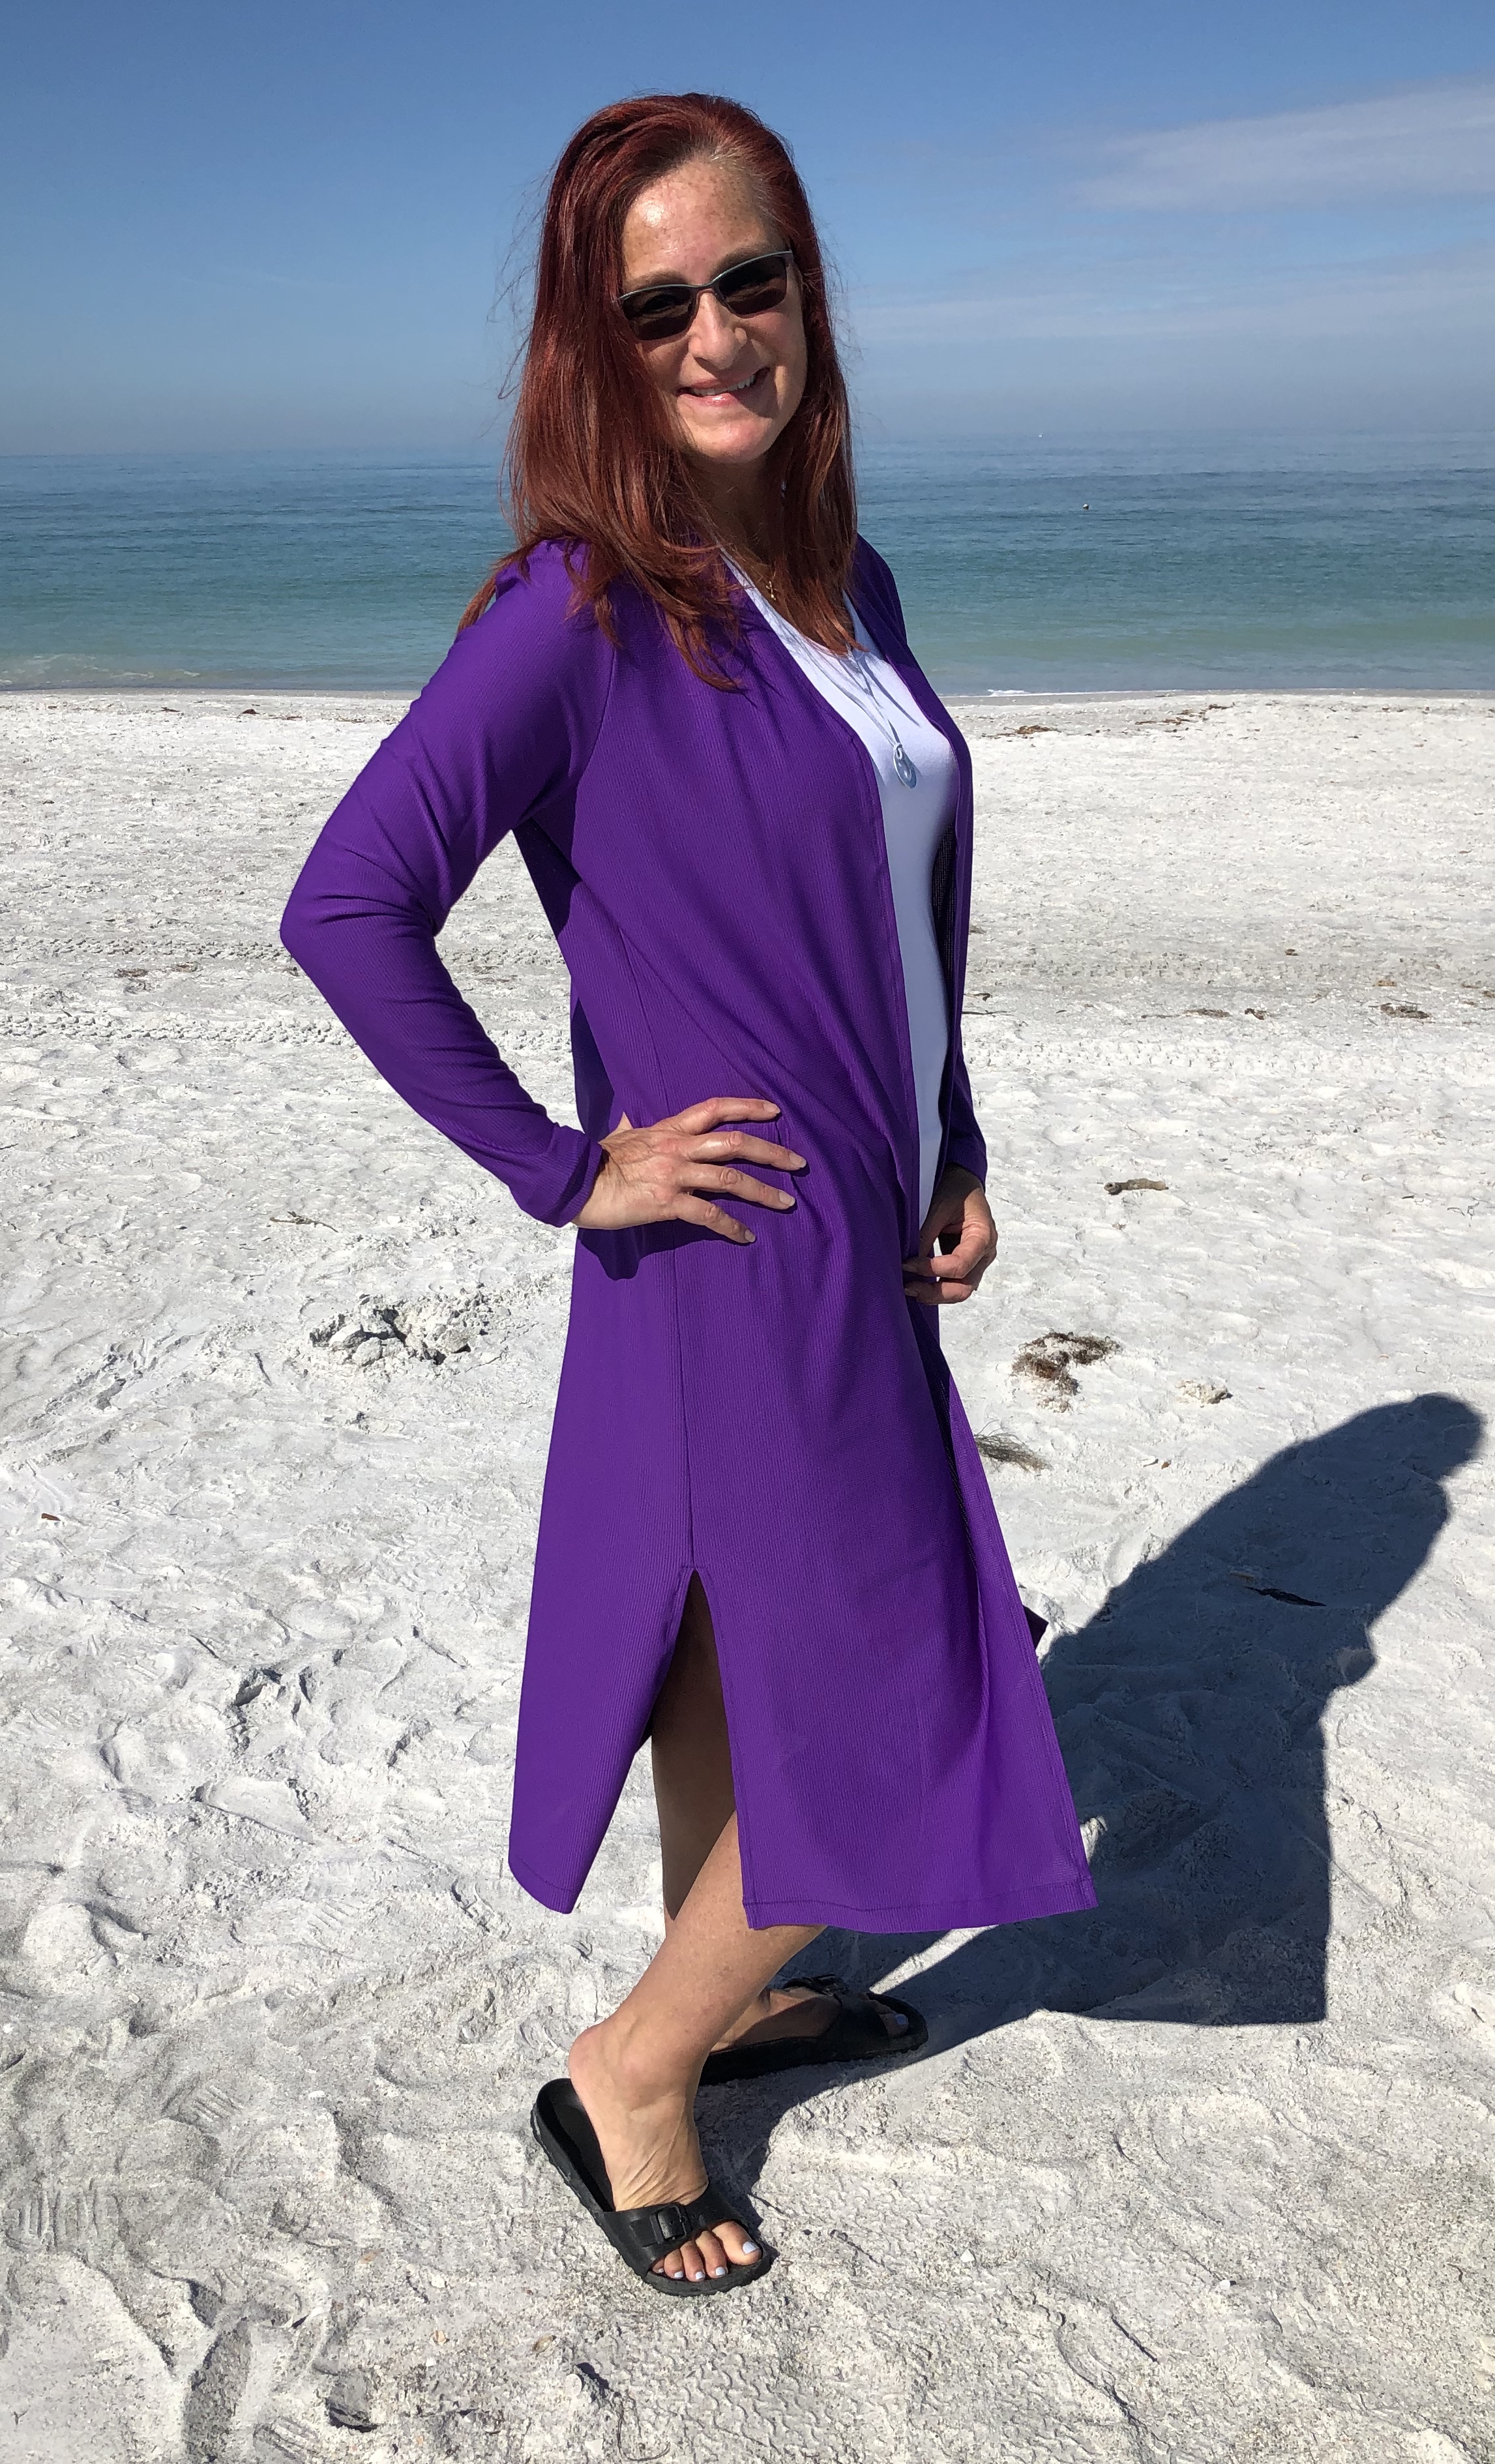
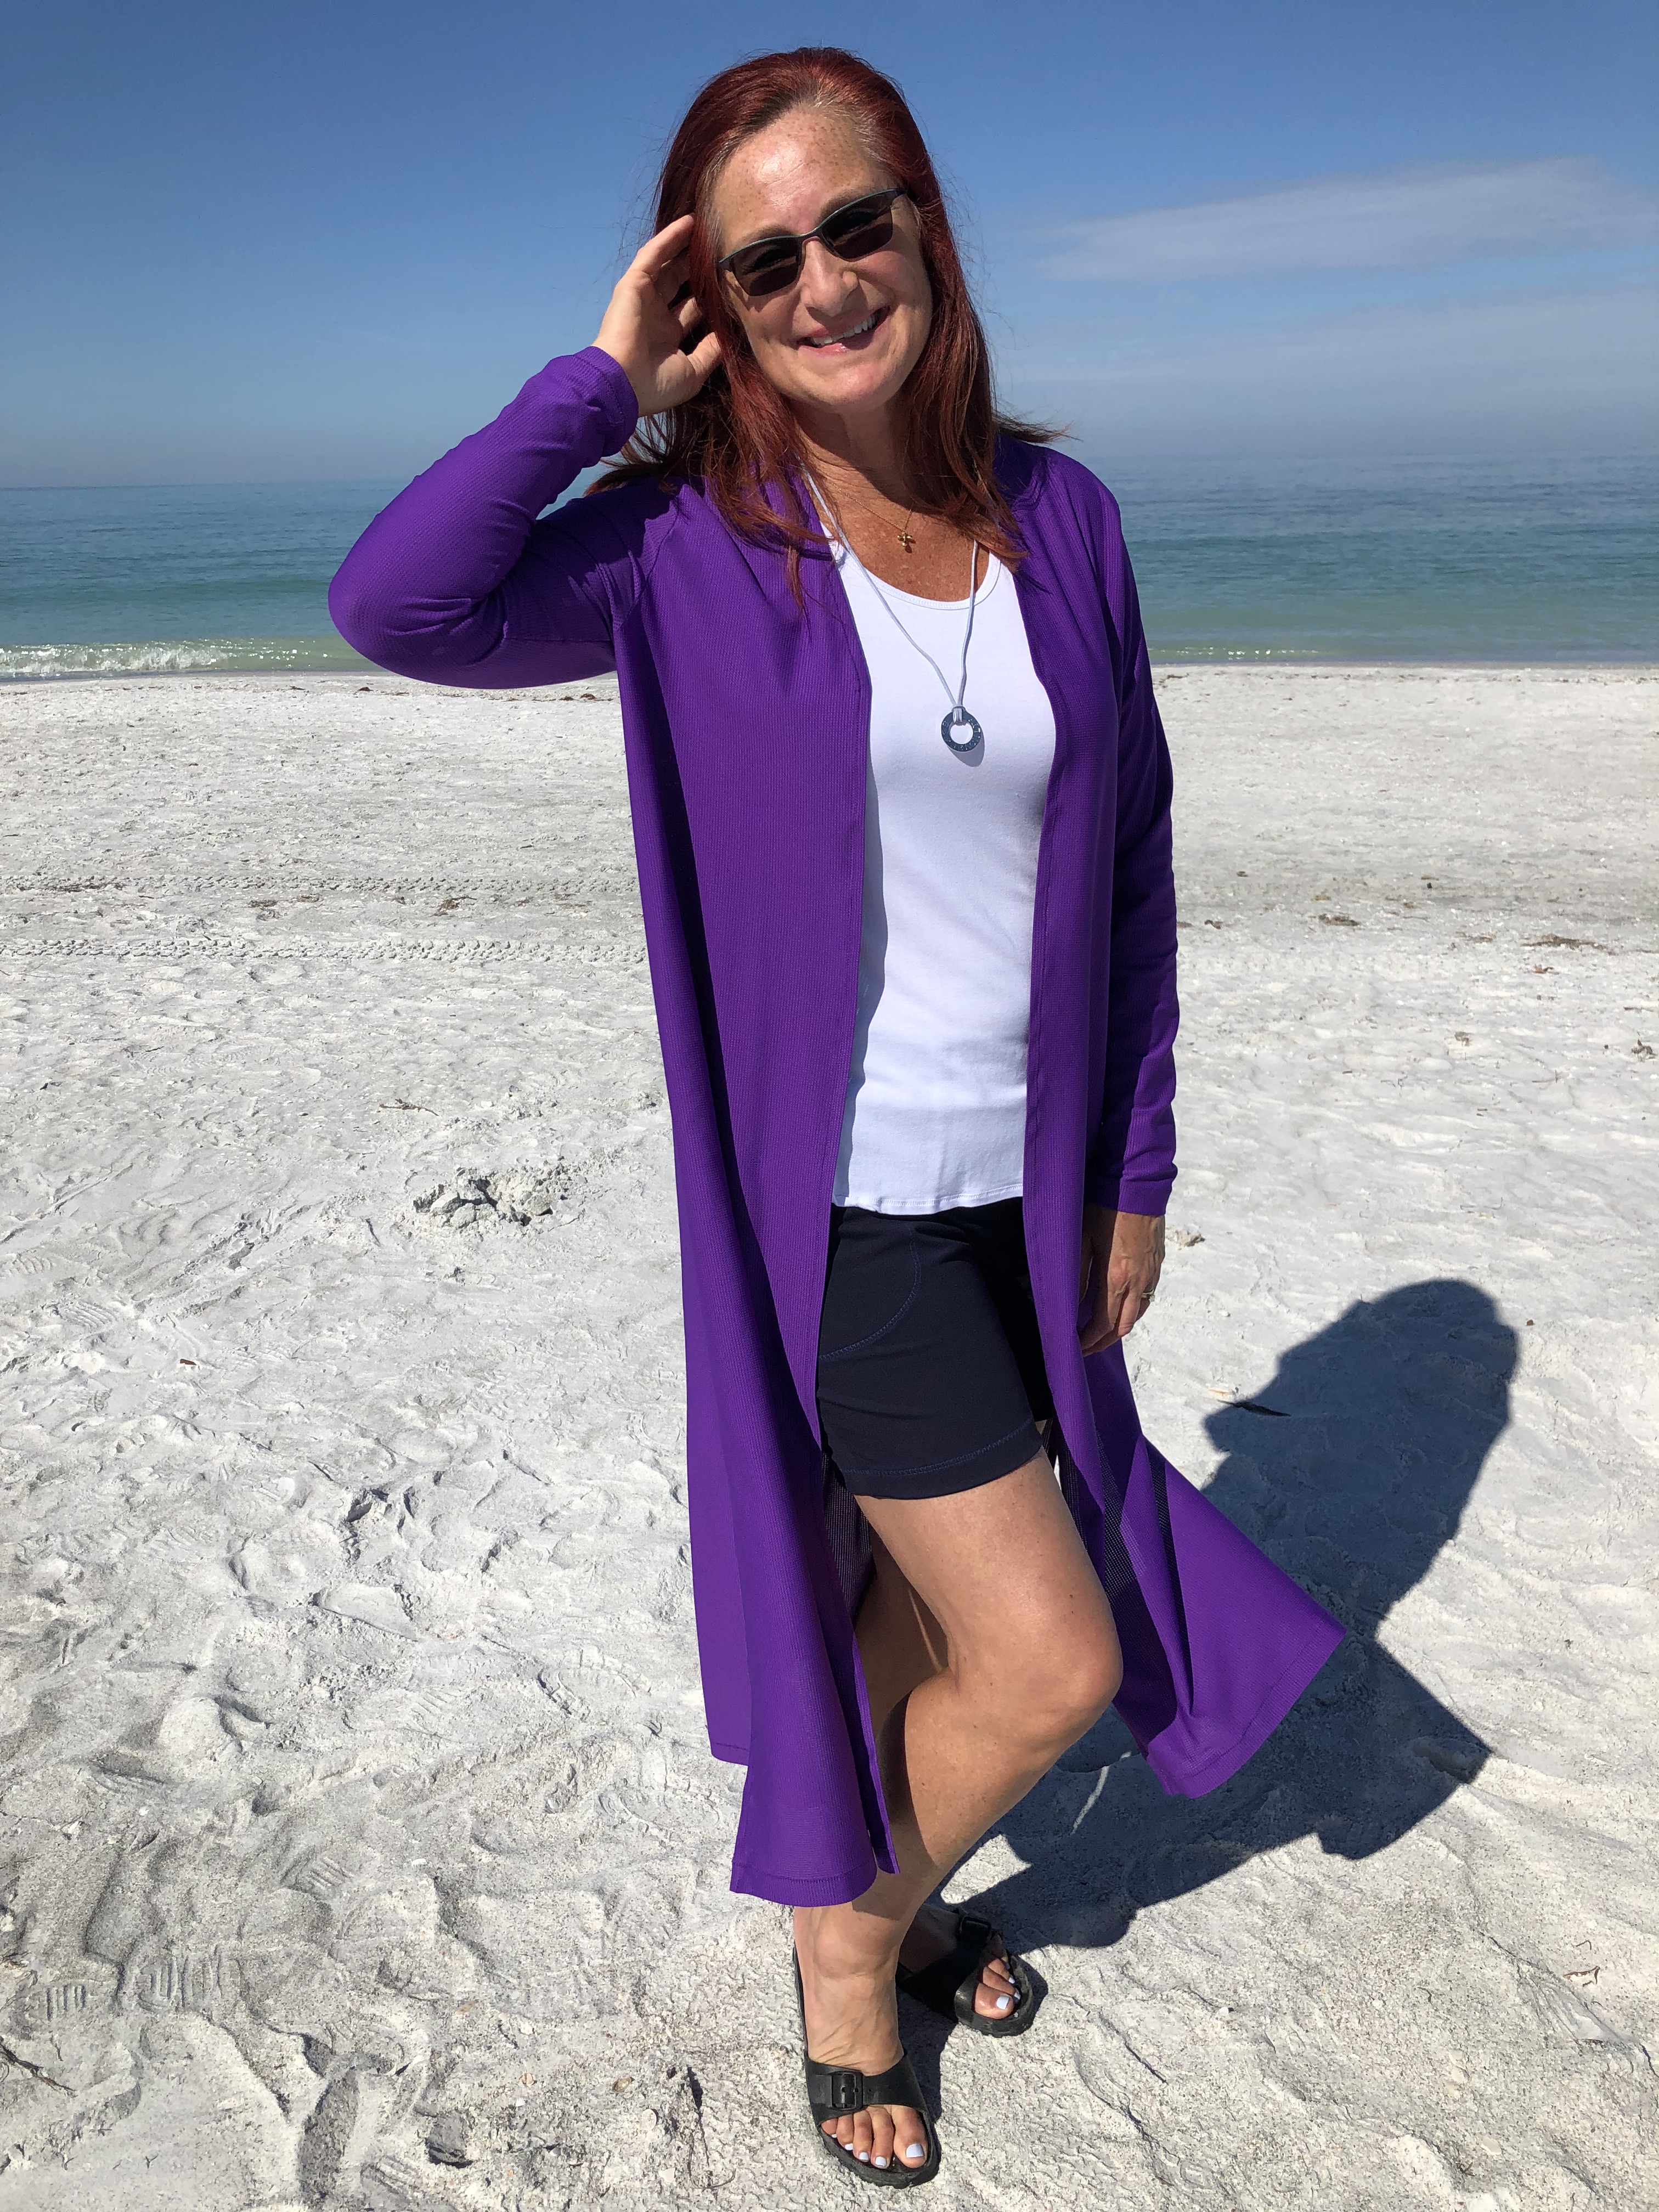
I remember reading a discussion on the GreenStyle Facebook group page about whether you can rock a long cardigan with shorts. The answer is yes, you absolutely can! I think the key is using a lightweight fabric to keep it flowy and seasonally appropriate. I used a fun purple waffle mesh from Phee Fabrics for my latest cardigan. I purchased the fabric late last year knowing that I wanted to make this cardigan with it. Sadly, the fabric is no longer available, but the Sunday Cardigan looks great in so many different types of fabric!
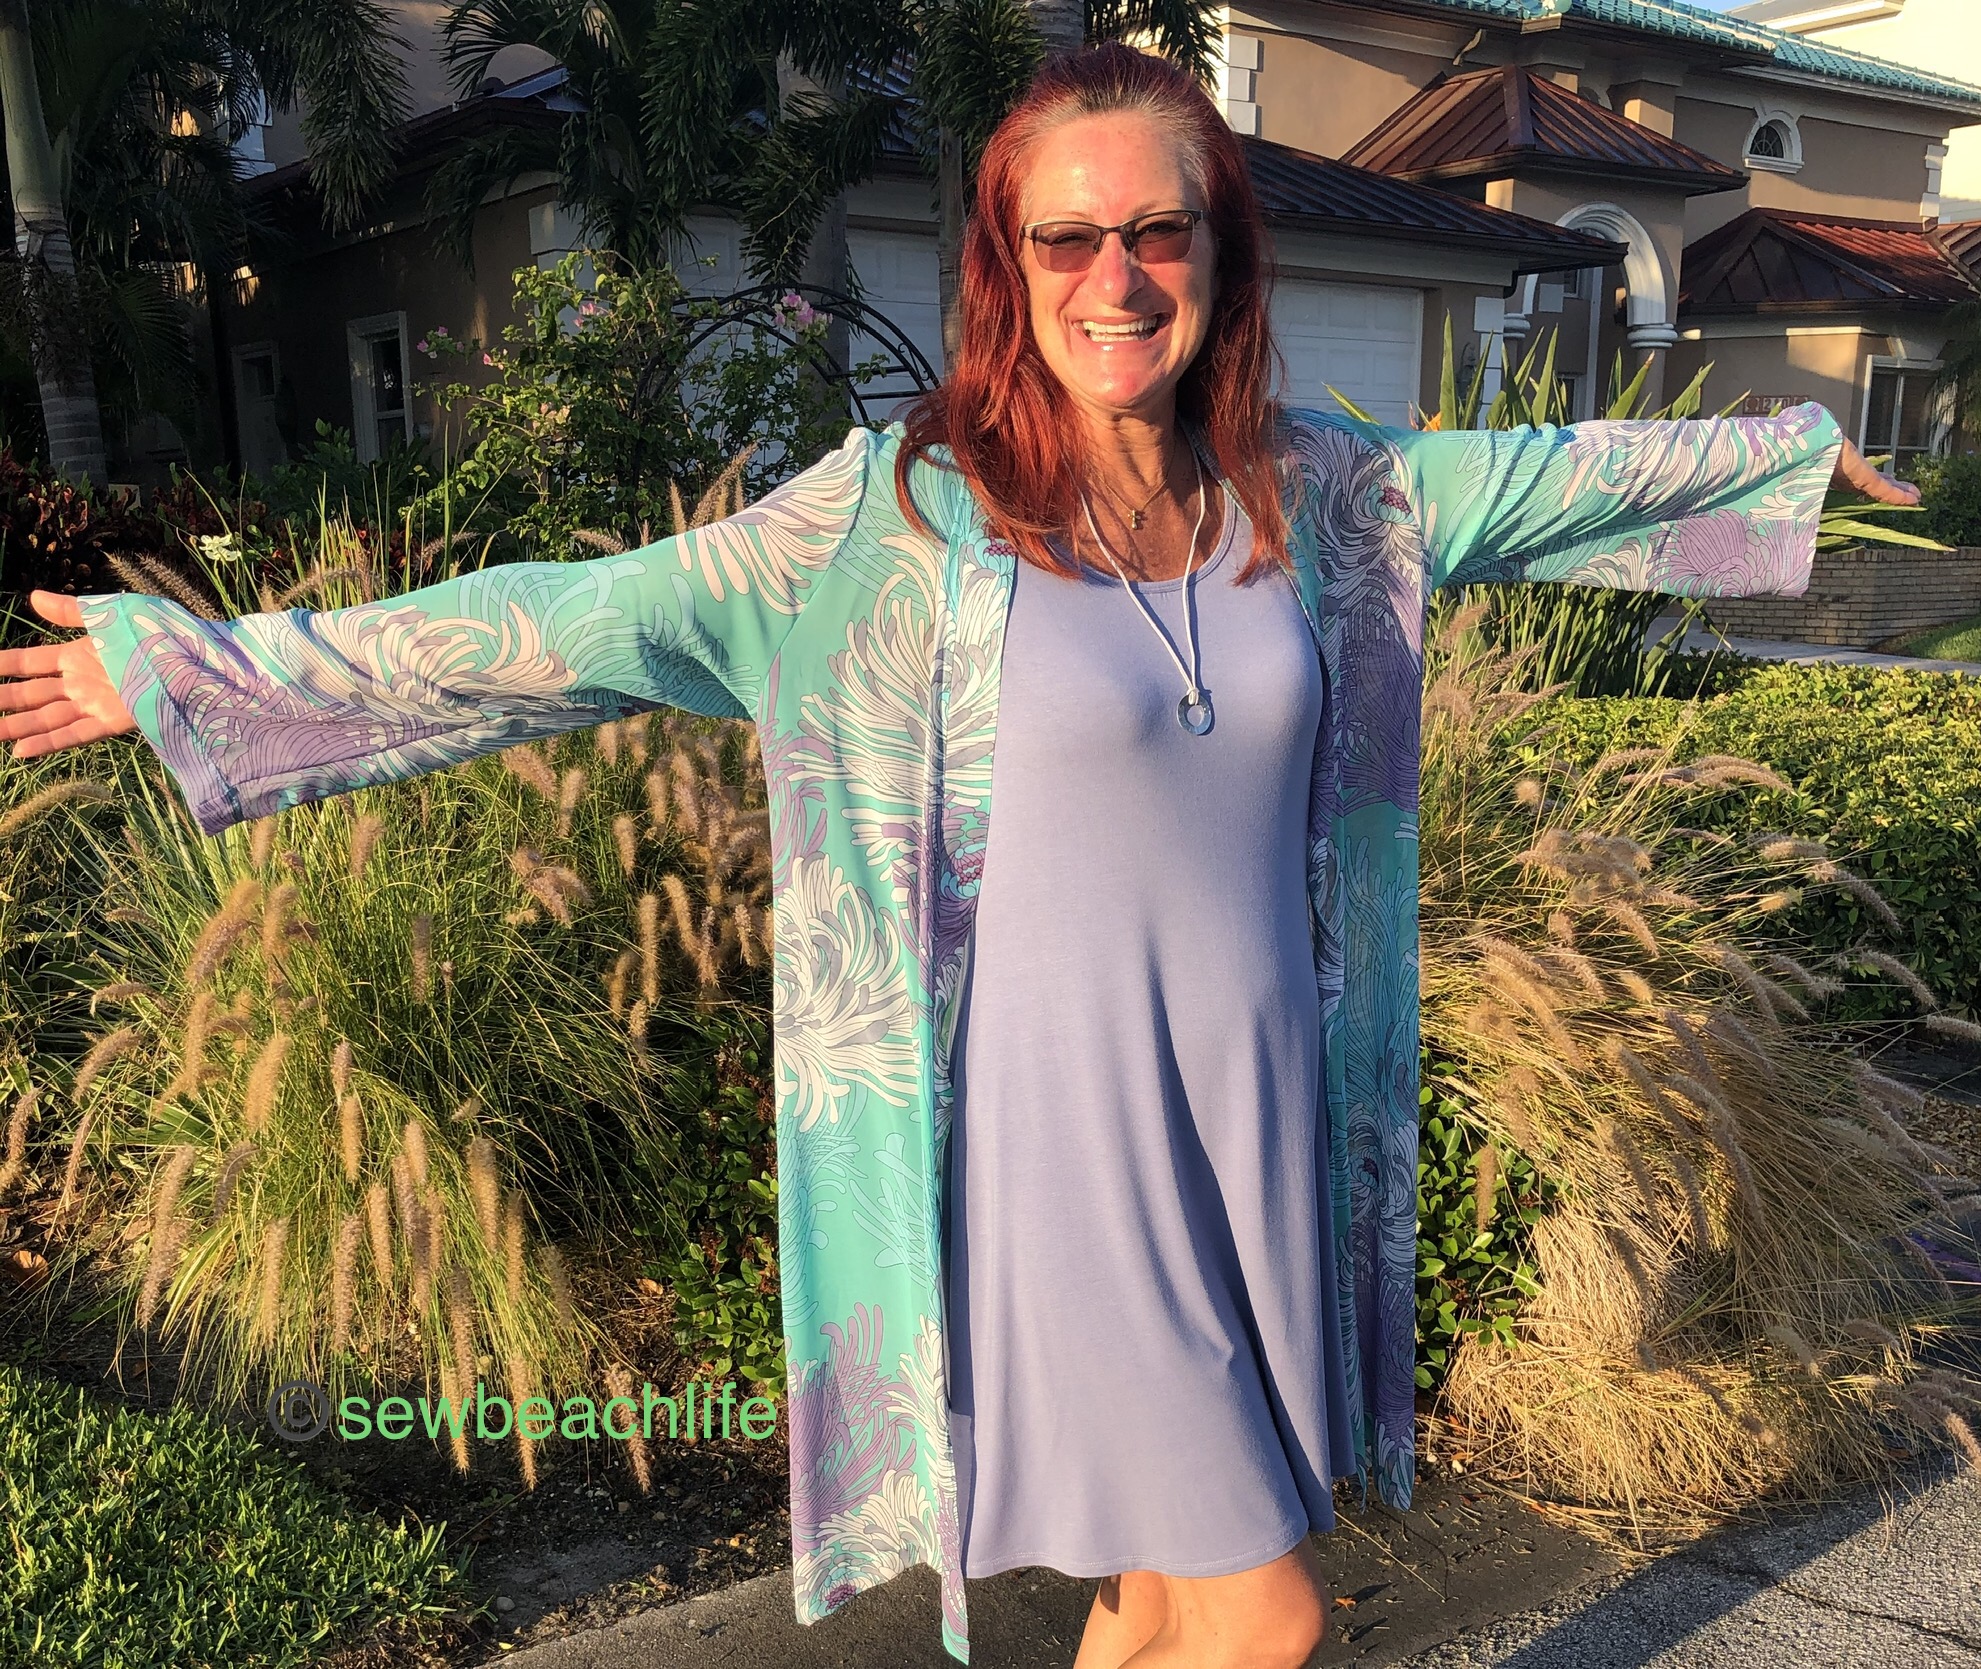
A sweater knit version would look great with jeans or pants. You could rock it with boots or flats. I wear my navy rayon spandex Sunday Cardigan with dresses, or thrown over my workout wear if it’s chilly on my way to yoga class.
Other than workout wear, dresses are a big part of my wardrobe, and I like the duster length because it looks great with any length dress. Longer dresses, short dresses, even a high-low hemline. I can rock them all with this cardigan! This foil-print fabric was a JoAnn clearance rack find last Spring. It may be a little dramatic and over-the-top, but sparkly is in, right?
I can’t control the wind, but at least I can look cute in my cardigans! Even when I use the same version of the pattern, I end up with a new look every time because I’ve used different fabrics.
My husband commented that I was looking a little slimmer (thank you yoga class and power walks!) so I cut my pattern down a size and I love the slightly more fitted look even more! I may have to change the title of this post and add another “and again” because I know I’ll be making more. What fabric should I use for my next one?
*This post may contain affiliate links. This means that at no extra cost to you, I may receive a small commission if you purchase through my links. As always, I only give my honest opinion. After all, it is my blog, which represents me! Thank you for reading and supporting my love of sewing!
When pattern companies note under fabric choices that you will need “Any knit fabric like cotton Lycra, double knit, ITY, sweater knit, French terry, etc….with at least 50% 2-way stretch”, I’m sure they must realize sewists are always going to push the boundaries of the intended fabrics! The listed fabrics for the GreenStyle Sunday Cardigan are generally pretty stable knits, which is why they are great for cardigans.
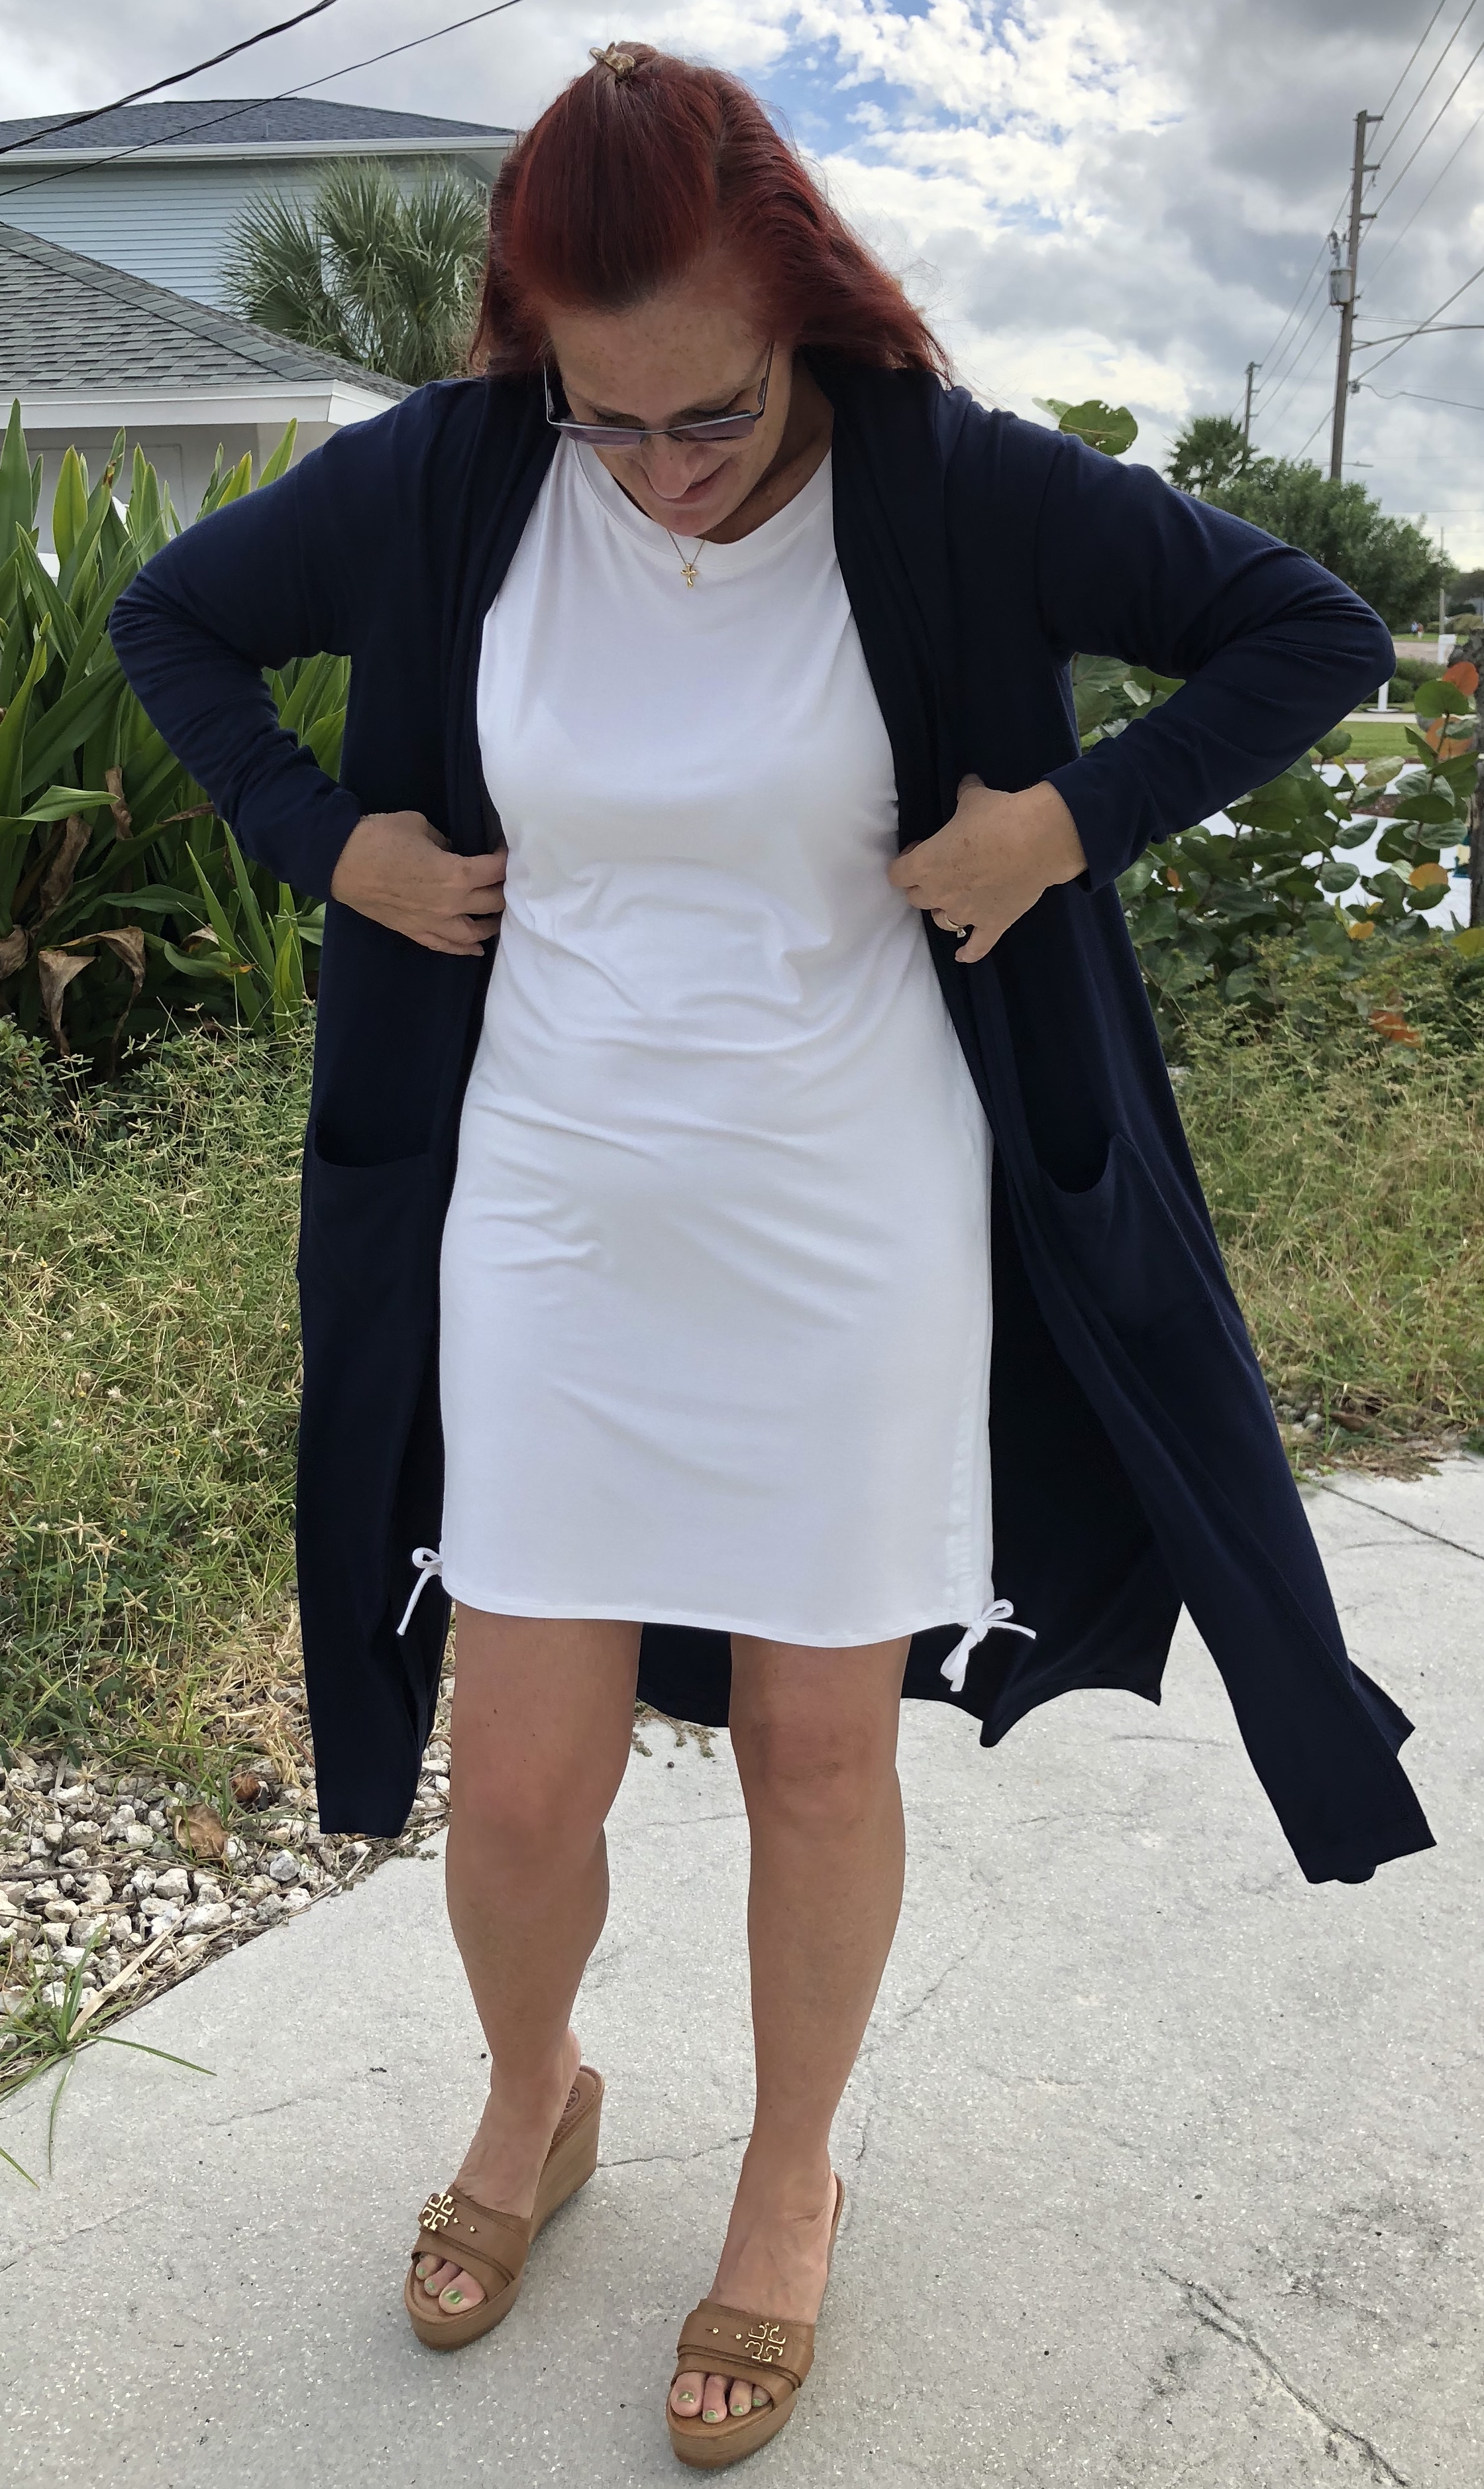
Which brings me to my fabric choice- a pretty navy blue rayon/spandex from Phee Fabrics. I live in Florida, so a thick, heavy knit cardigan isn’t likely to get much use by me. There are chilly days, and restaurants and grocery stores always seem to blast the A/C, so cardigans are a must! Rayon/spandex is light enough to keep me comfortable without being too warm. I knew I wanted the duster length cardigan because it would look nice no matter what length of dress I wear, and equally as nice with pants or leggings.
I’ve mentioned before that Phee’s rayon/spandex is much more substantial than average, so I knew it would work for this cardigan, even in duster length. The GreenStyle Sunday Cardigan doesn’t have bands, all the edges are simply pressed under and stitched. This makes it a simple sew with a clean look. I wanted to ensure crisp edges, especially since I wanted the side slits. My simple solution was interfacing. I cut 3/8″ wide strips of a light to mid-weight interfacing. It was probably Pellon Shirtailor, but since all my various weights of interfacing are just in a bag and not individually wrapped with their respective strip of directions, who knows? It wasn’t featherweight and it wasn’t a stiff heavyweight, so light to mid-weight will suffice!
I ironed the strips along the front edges and along the curve of the neckline, (which was the only place I actually traced the pattern shape). I just used my rotary cutter and ruler for cutting the long strips. I also used strips along the low slit edges. I didn’t need to use it, but it made it super easy to press over the edges without having to use a hem guide and pin all along the edges. I didn’t bother with it at the hemline, as the fabric hems beautifully.
Other than adding two inches to the sleeve length for my long arms, and ironing on the interfacing, I followed the pattern directions and ended up with a soft, cute, comfortable cardigan that will get tons of use!
My other make was the Sinclair Patterns Sienna drawstring dolman top. I have owned this pattern for months, and this is the first time I’ve made it. Why did I wait so long? Probably because every time I’ve tried on a dolman top at a store, I’ve thought they just looked baggy and sloppy on me. I have got to say that I am really growing to love the genius of Sinclair Patterns fit! I’ve previously blogged about the Sinclair Kai tee shirts I made for my husband and son. And I love that Sinclair patterns come in short, regular and tall. I think that having the pattern in tall is part of what makes this fit so well. The patterns are also drafted with a shaped hemline, and the design makes them lay well on a real body.
I made the short sleeve version for myself, and wore it with the drawstrings fully extended as a dress. The winter white rayon/spandex top looks equally as cute with the drawstrings pulled up to tunic length. In fact it’s so cute, that I texted a photo to my daughter and asked her if she wanted a top. Her answer? “I love dolman tops! I think they’re cute and give the illusion of a smaller middle.” Not that she’s implying I don’t have a small middle. It’s pretty obvious that I am not a small person! 🙂 She actually is a small, slender woman, which is why I can’t model the Sienna I made for her. She lives in a colder climate, so I made hers with the 3/4 sleeves.
Since I didn’t think I’d have quite enough fabric to make the sleeves per pattern (which has the sleeves drawn as part of the body), I cut them at the short sleeve line. Then I added the seam allowances at the top of my sleeve pieces. I think it would be easy enough to hack the sleeves to be long using this method. Since I didn’t have my daughter here to measure for that, I stuck to the 3/4 sleeves.
I sewed the sleeve pieces to the front and back pieces, then just followed the pattern directions. Her top turned out just as cute as mine and I can’t wait to see her in it!
I really like both of these patterns, and want to make them in all the colors! And I wonder how my sewing list gets so long. Hah!
May your patterns and fabric be plentiful, and your sewing time enjoyable!
*This post may contain affiliate links. This means that at no extra cost to you, I may receive a small commission if you purchase through my links. As always, I only give my honest opinion. After all, it is my blog, which represents me! Thank you for reading and supporting my love of sewing!
I mentioned in a previous post that I wasn’t chosen to be a pattern tester for 5 out of 4’s new cardigan pattern. But guess what? I got to name the pattern! How cool is that? They had a cardigan naming contest in their Facebook group, so I entered it. You never expect to actually win a contest, because face it, hundreds or thousands of other people have entered the contest too.
But lo and behold, the name I submitted was picked! I suggested The Eleanor Cardigan because cardigans are comfy and cozy, and doesn’t Eleanor make you think of a sweet Grandma or Auntie giving you a big hug? Alas, my Grandma’s are no longer around, and neither my Mom or any of my Aunties live nearby. But I can still cuddle up in a comfortable cardigan! (And I can always get a hug from my sweet husband!)
So be sure to check out The Eleanor Cardigan (women and girls versions) from 5 out of 4 Patterns https://5outof4.com/ on October 2, 2018 when it releases!