Skirt? Skort? Either Way It’s A Great Look!

Love the easy breezy comfort of a skirt? Me too, especially when it has super cool optional front pockets, along with the option of back welt pockets. The thing that makes it even better are the optional undershorts, with or without side panel pockets. The GreenStyle Paseo Skirt pattern is perfection!

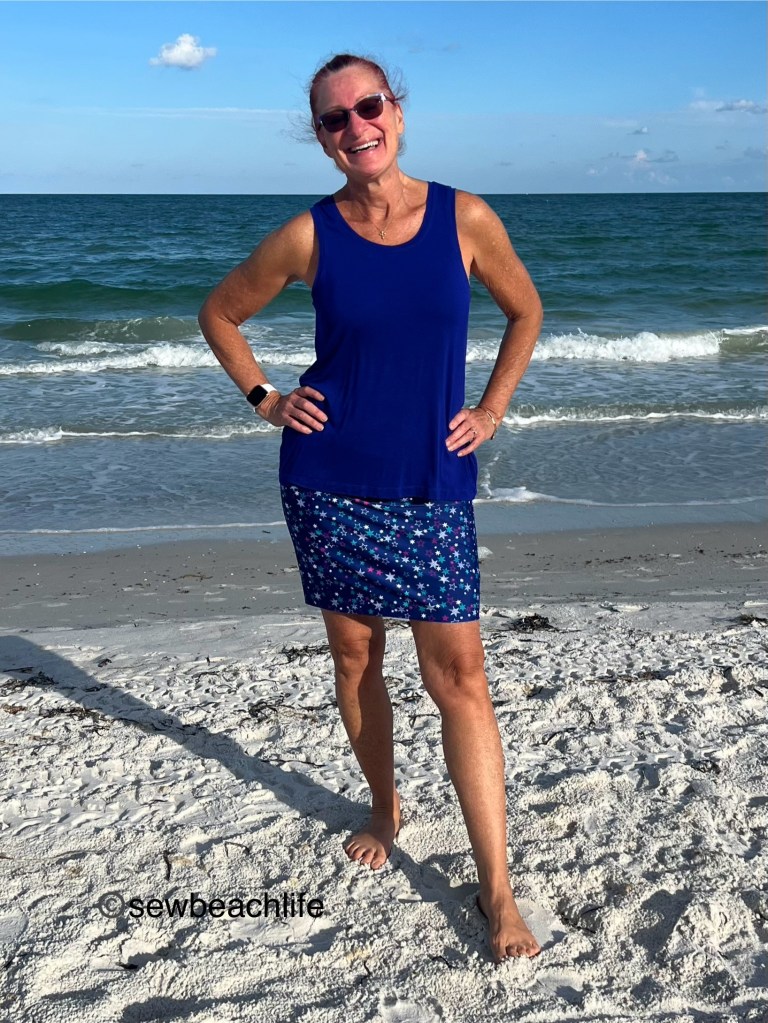
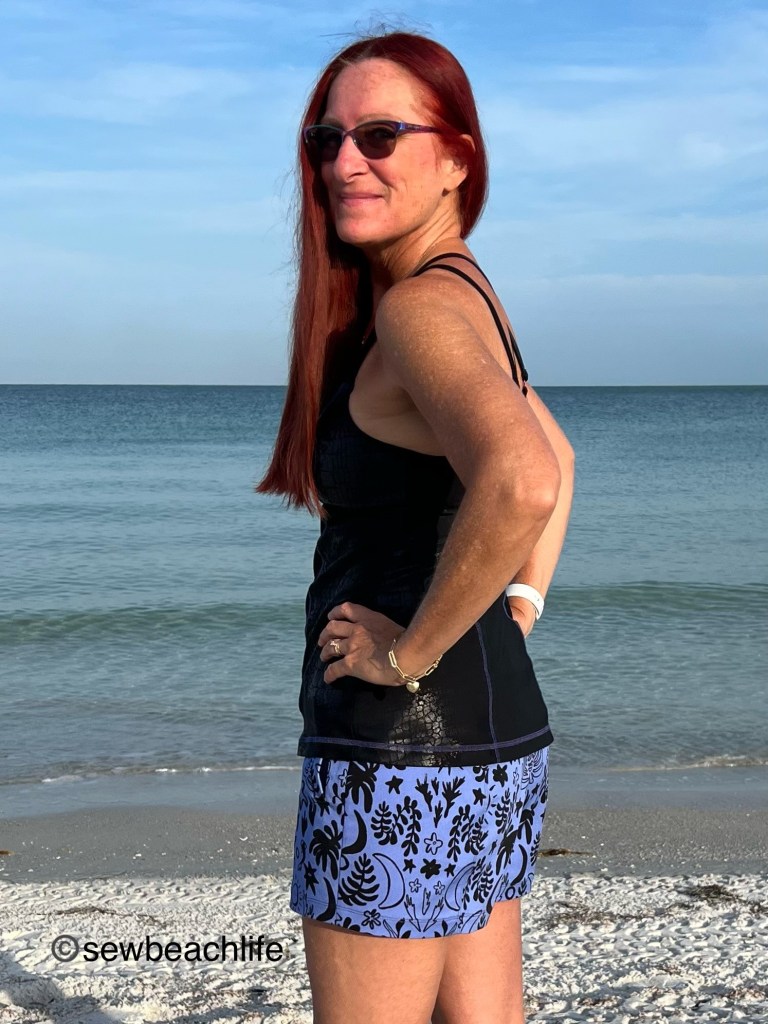
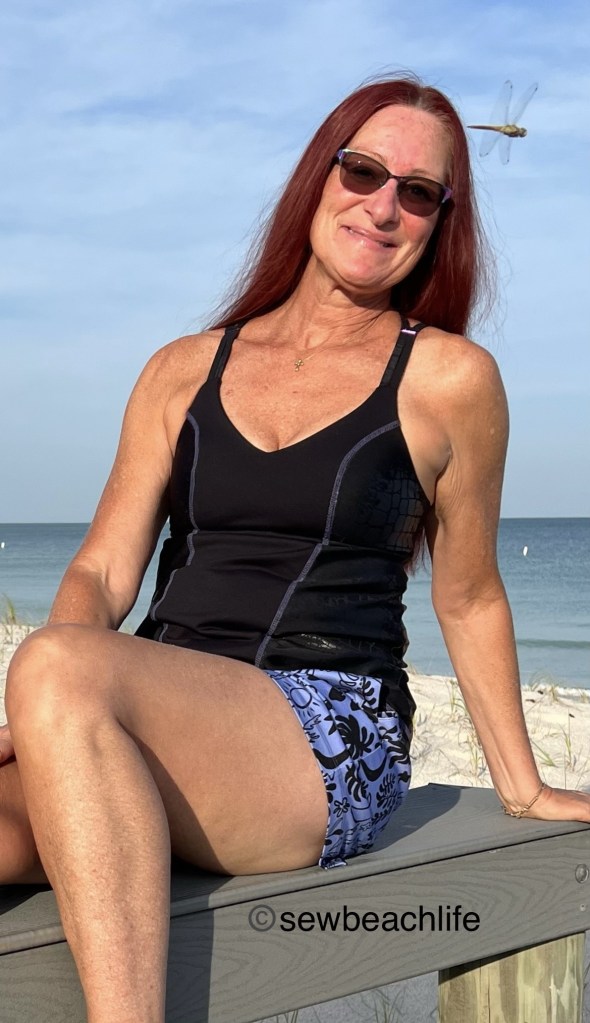
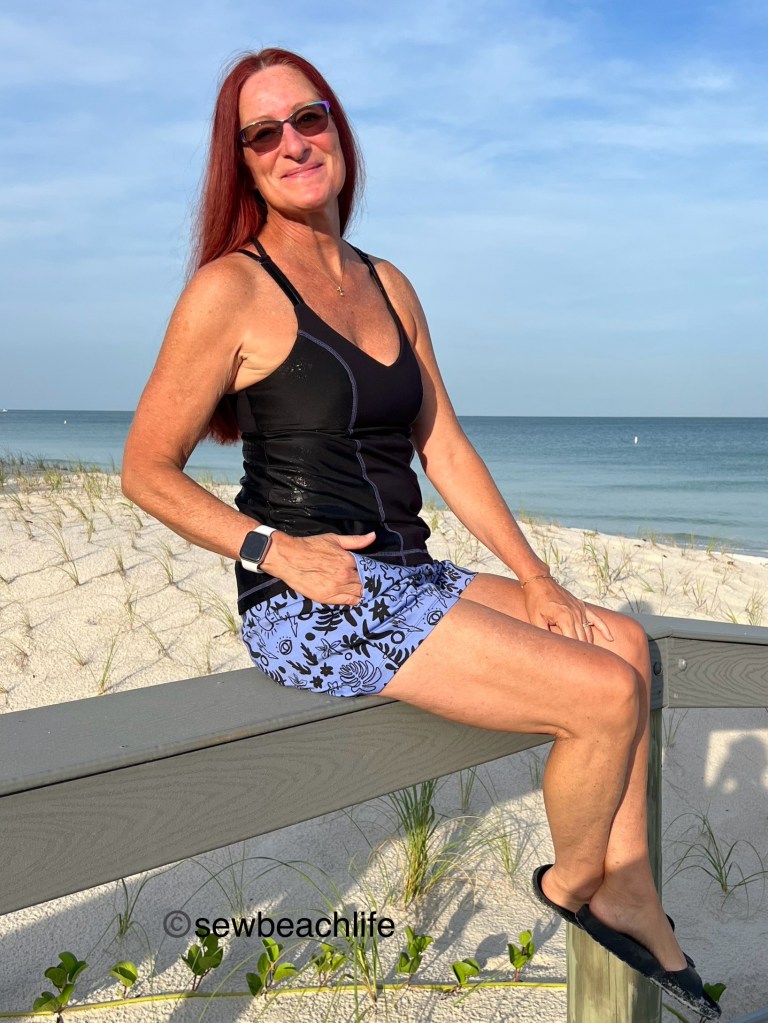
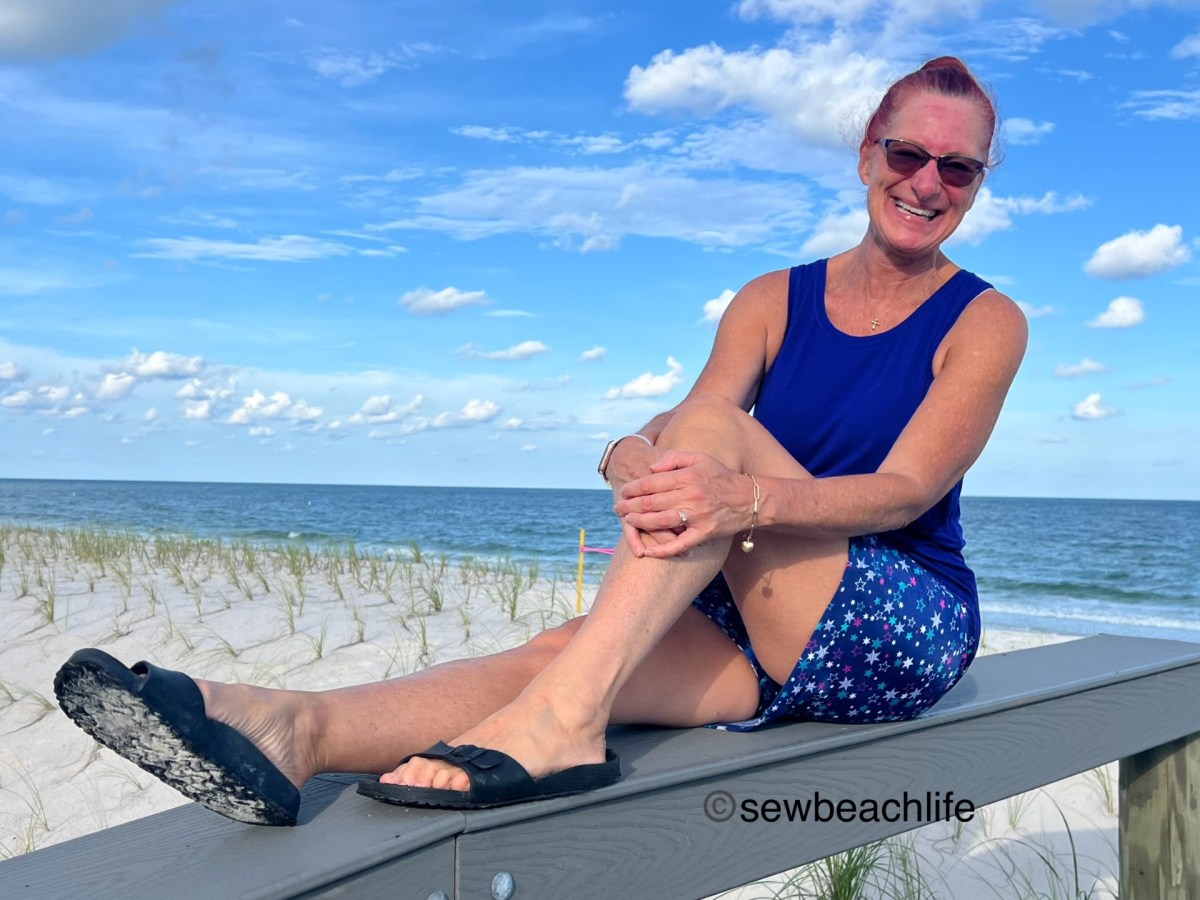
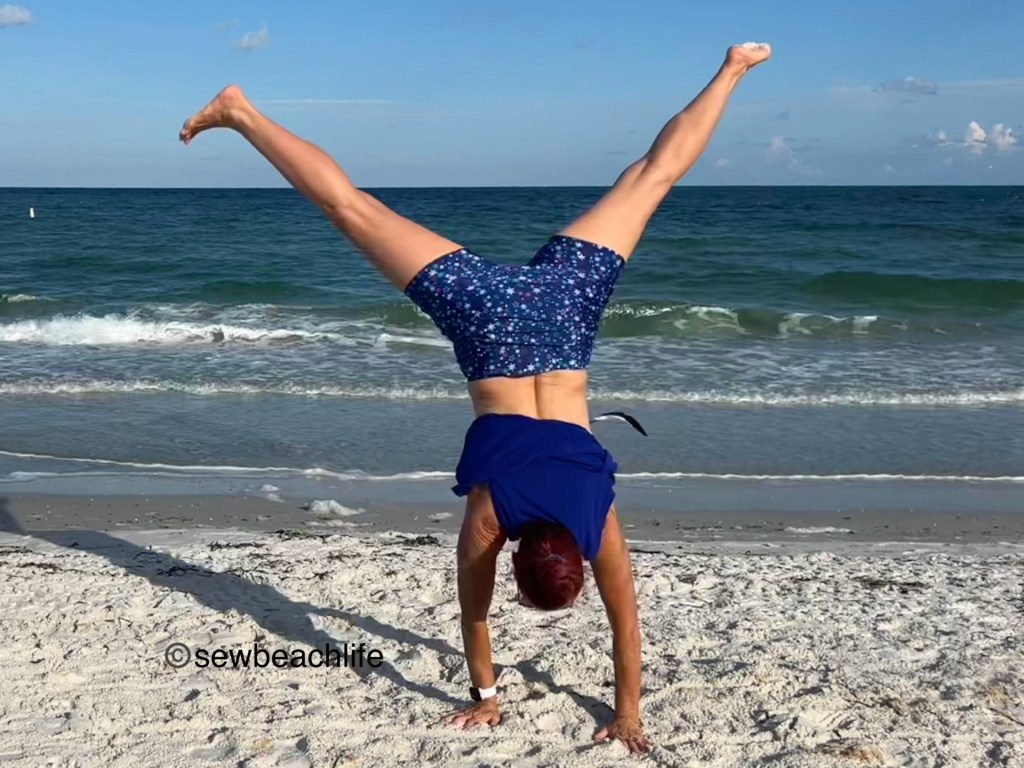
I love this pattern so much that I made three versions, all of them a bit different. (I would have made more before posting, but a home project left me with little sewing time). The blue shorter pencil skirt has the optional undershorts with side panel pockets. It’s made of a heavier weight nylon spandex swim, and I love it!

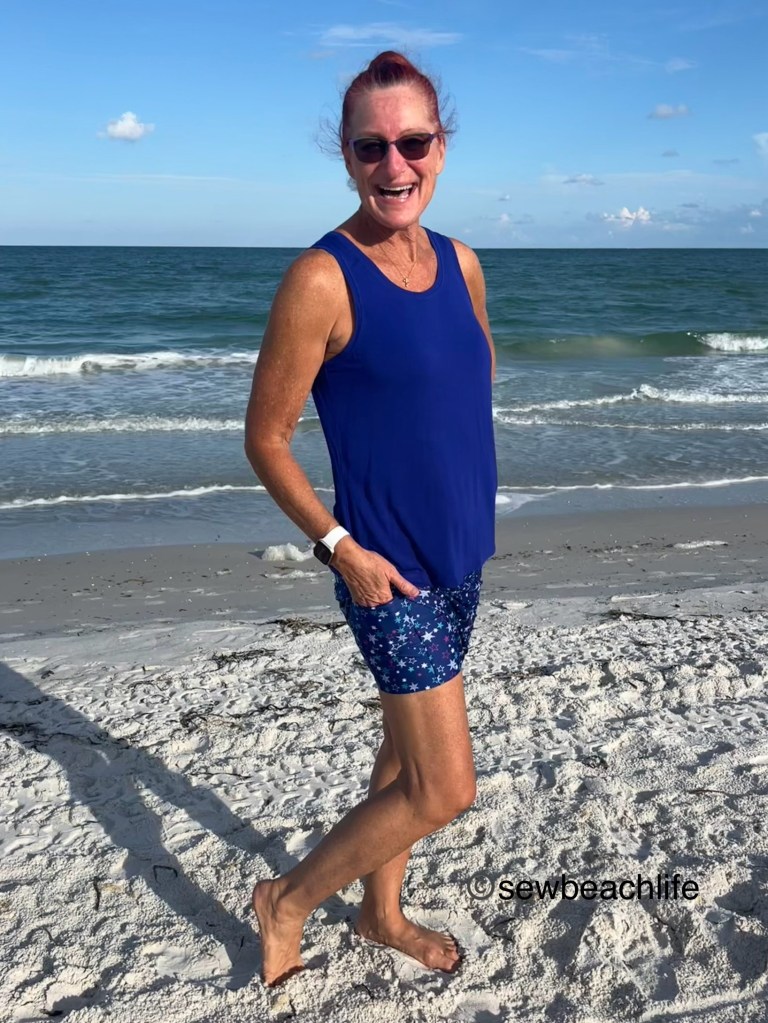
The side panel shorts pockets are a perfect size, wide and deep enough for a large iPhone. Did I mention that the undershorts have two length options? I made the shorter length. It’s super awesome to have attached shorts in case you break into spontaneous cartwheels 😉 or have children (or grandchildren) to chase after and play with.

My top slid up, the skirt slid up slightly, but the shorts stayed perfectly in place! Even the bird flying by (see the wing behind me?) was impressed. 😉

My teal long pencil skirt with no pockets or shorts was a super quick sew. It is scuba, upcycled from a no longer worn dress. Because the scuba didn’t have the greatest recovery, I used nylon spandex supplex from GreenStyle for the waistband.

The longer length pencil skirt is perfect for church or work. My only regret is not adding the front pockets. But being an upcycle, I was working with limited fabric. All future versions are going to have pockets! It really doesn’t take much longer to make the pockets.

This skirt is so comfortable and easy to wear all day, I wish I could say the same for the high heels! 🙂 Back in the day, heels were no big deal. Apparently I’ve reached the stage of life where Birkenstocks rule the day.

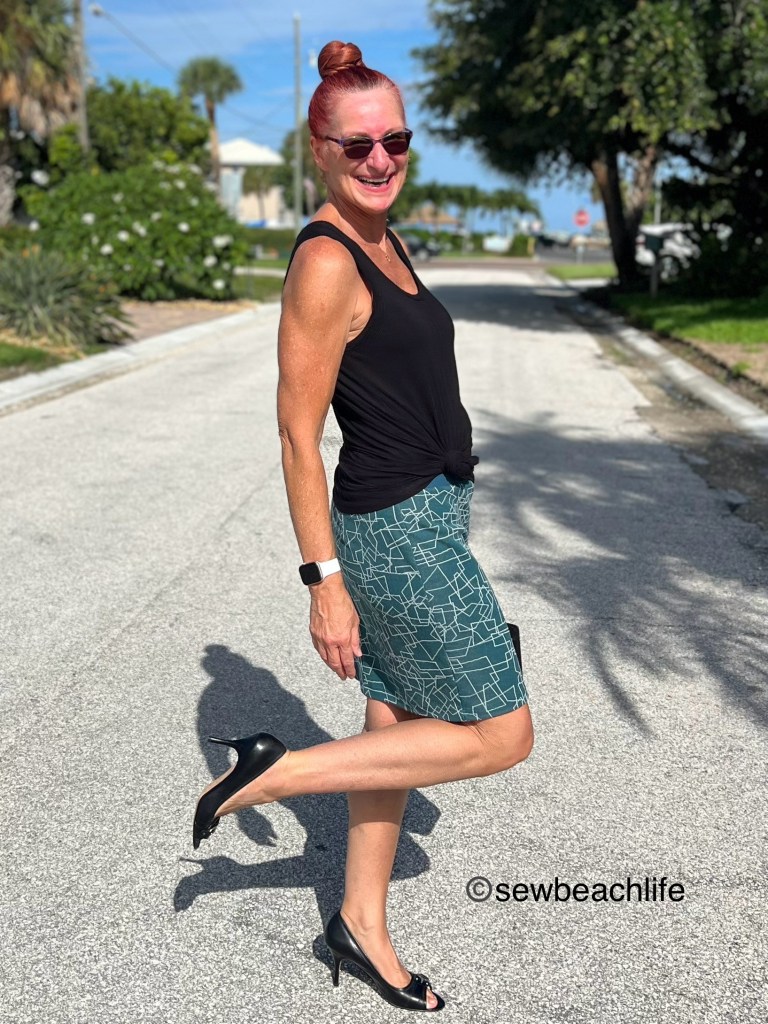
I just feel so fancy in this skirt! Obviously, I need more in my closet.

The third skirt I’m sharing is technically the first one I made. I’d made it as the longer length straight skirt with front pockets, using a stretch cotton twill panel from Mood Fabrics, taking the time to carefully match the border print at the side seams and at the front pockets. I’d chosen to make the straight skirt because I was sure that the pencil skirt would be too form fitting on me. Boy, was I wrong!

It was cute, but a bit longer and straighter than I wanted for a summer skirt. For reference, below is a photo from testing to see the longer length straight skirt. Keep in mind that it didn’t yet have a waistband on it.

Looking at the other pattern testers photos, I just loved the cut of the pencil skirt. So I unpicked the side seams and back waist darts and cut it down to the short pencil skirt. The updated version of the pattern (that’s why patterns get tested, to perfect every tiny detail!) has curved back darts, and it fits so smoothly with no bumps at the end of the dart. I’m very happy that I chose to cut it down to the shorter pencil option, as I think it’s a more flattering look on my body shape.

The skirt fits great, but since I’ve lost weight the Waimea Rashguard Top I made a few years ago is getting a bit big and baggy on me.

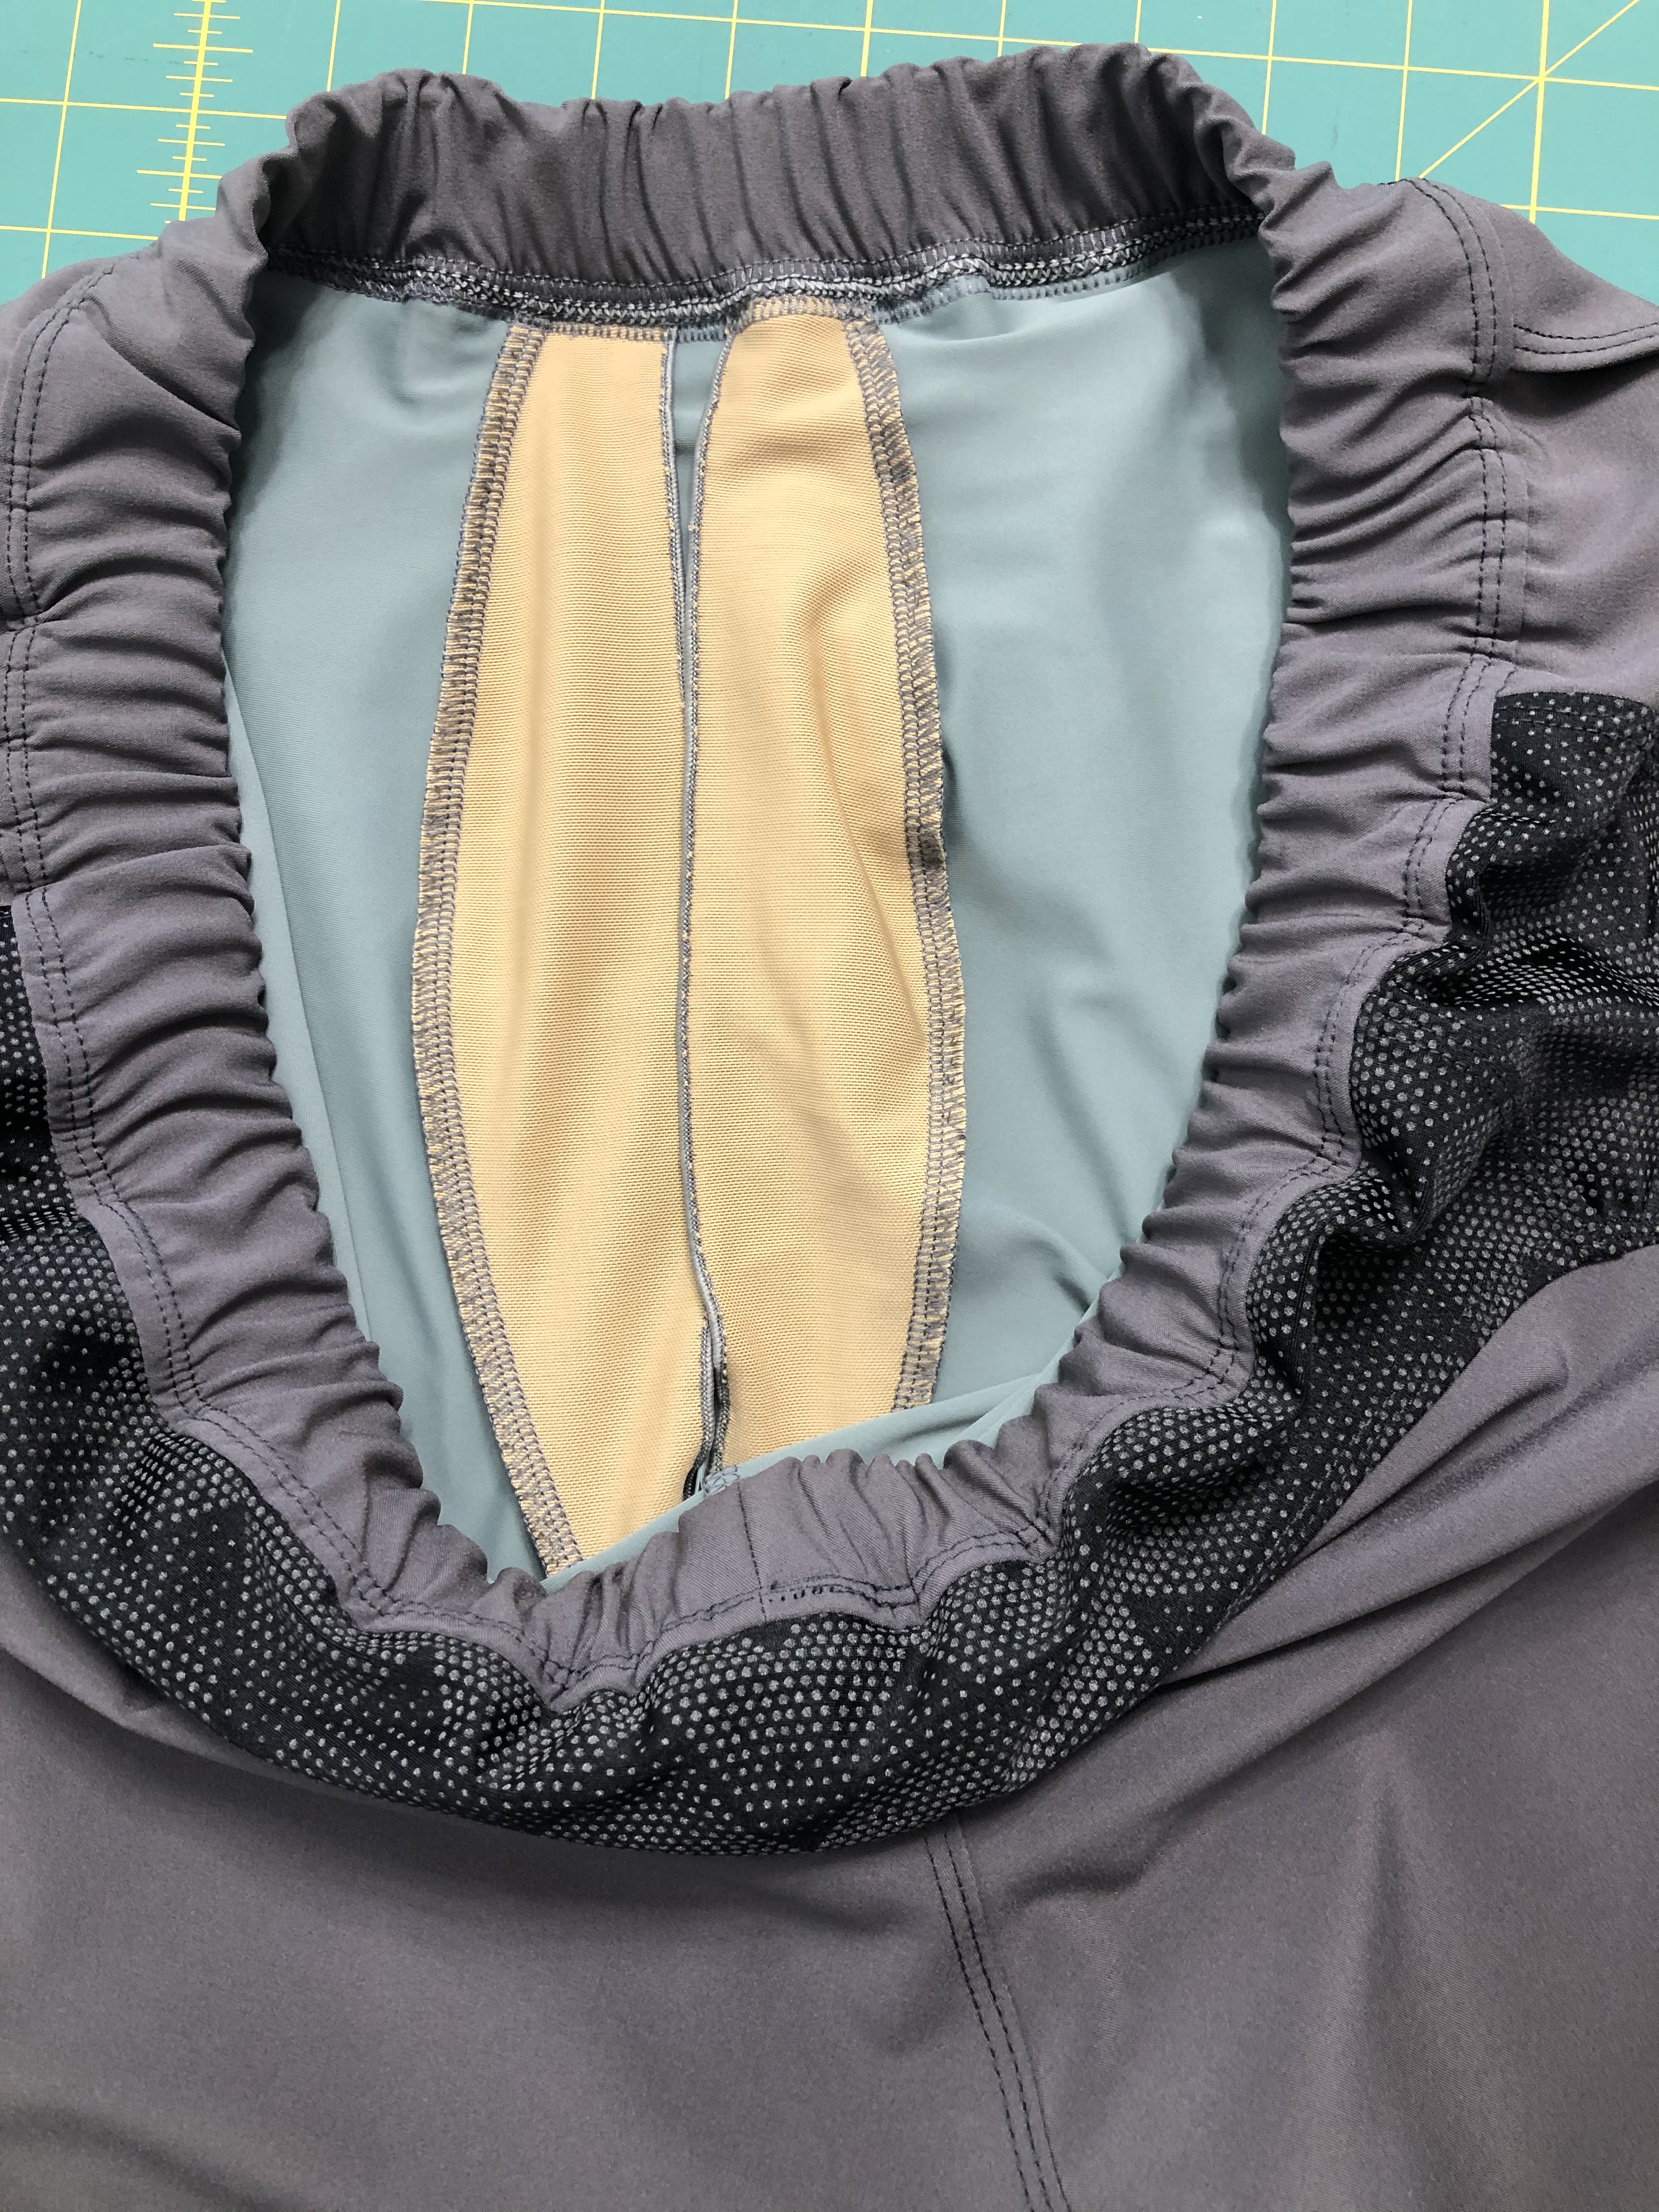
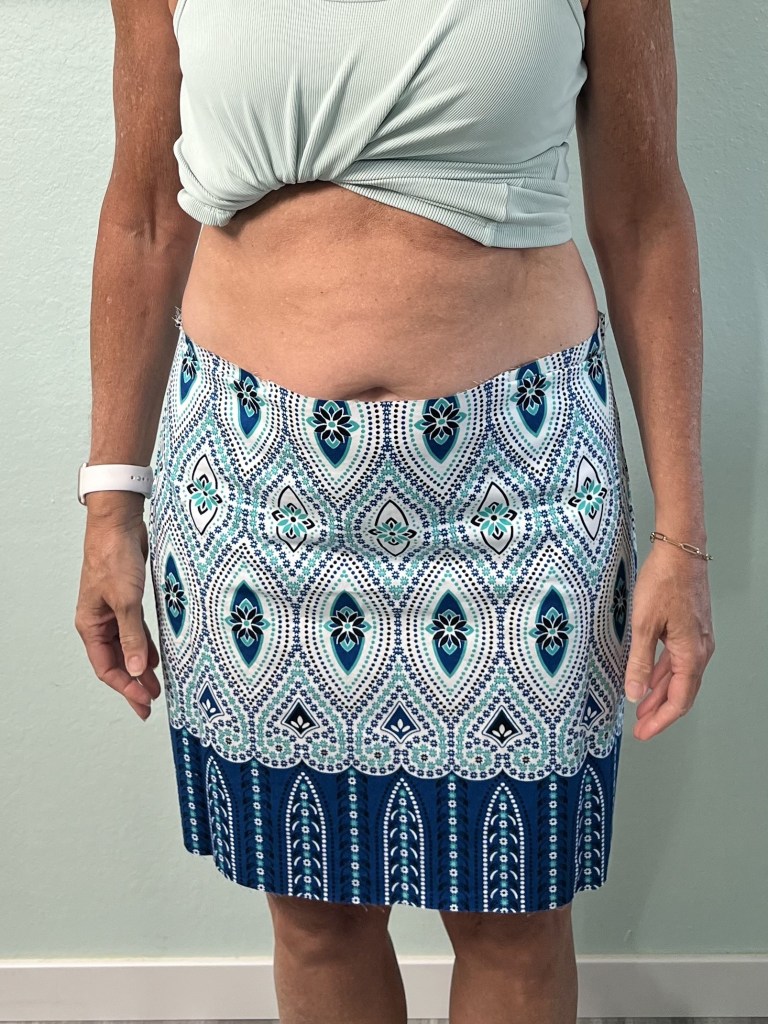
It’s important to use a knit fabric with good recovery for the waistband, since this is a pull-on skirt with no zipper. There are options for a mid or high rise waistband. The mid rise worked great for me. Since I like being able to carry my heavy phone in a pocket, I generally add 1/4″ clear elastic when serging the top seam of my waistbands together. Feed the elastic (grippy side down) through the slots on the presser foot. Your waistband pieces are right sides together. Once you’ve got everything aligned, lower the presser foot, ensuring that you can see that the elastic is back to where the needles will catch it.

Using a four thread overlock with a stitch length of 2, stitch width on M, and the differential at 1.3, serge around the top of the waistband. You don’t need to stretch or pull on the elastic. If you do, the elastic will end up a bit too tight, giving the dreaded “muffin top” look. Just gently let it feed through your fingers and let the machine do the work.

I love all three of the Paseo Skirts I made, and can’t tell you which is my favorite. Which one do you like the best?

The details:

The Paseo Skirt from GreenStyle Patterns comes in sizes B-M (hip sizes 32″-62″) with pencil or straight options, shorter or longer lengths, an optional flounce, an optional curved faced hem, optional front pockets and/or back welt pockets, a mid or high rise waistband, and optional undershorts in two lengths that can be plain or have side pocket panels. Whew, I think I listed all the options! I love patterns with a lot of versatility. They make me feel like I really get my money’s worth because I can make dozens of skirts and they can all look a little bit different.

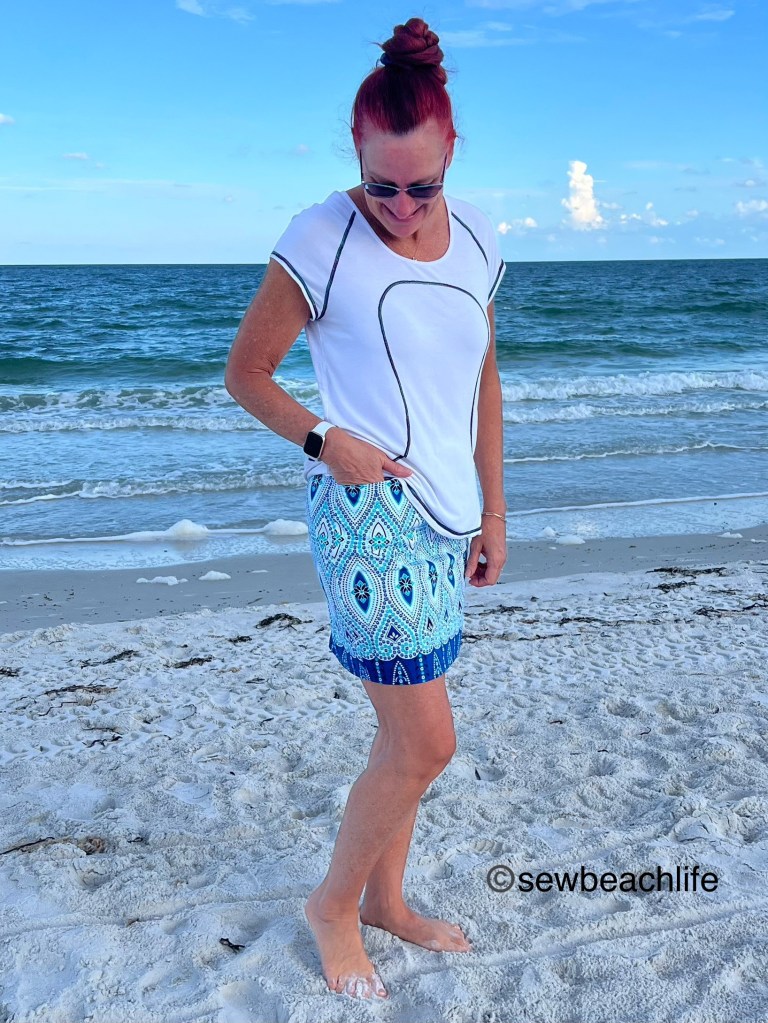
My blue skirt is nylon spandex swim purchased as a destash from Ragamuffin Fabrics. I wore it with a blue modal Leeward Tank, you can read the post here.

The teal skirt is upcycled scuba, with a mid rise waistband made of supplex from GreenStyle Fabrics. It was worn with a black rayon spandex Staple Tank (read post here) tied in a knot.

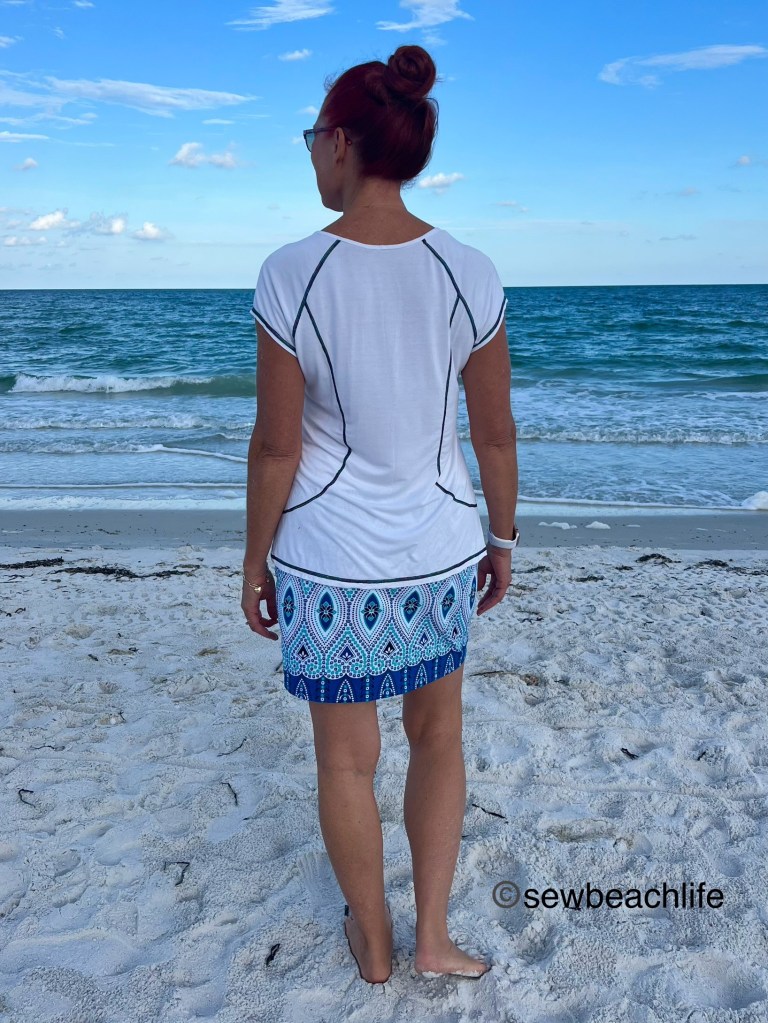
The border print skirt is a stretch twill panel (with not-quite-enough stretch) from Mood Fabrics. Fortunately, I am on the very bottom edge of my size range and it works. You’ll want to pay attention to the fabric stretch requirements, especially for the waistband. You can read more about the Waimea Rashguard top worn with it here.

This is one of my favorite patterns, and will be made again and again. It’s perfect for traveling and wearing out and about. GreenStyle has knocked it out of the park again!

The links to GreenStyle may be affiliate links (if I did them properly!) which means that I may earn a few pennies if you use my links without it costing you anything extra. Since this is my blog and represents me, I always give my honest opinion about any patterns, fabric, or supplies that I talk about. I do like knowing whether the time I spend writing posts actually interests people enough that they take a look at the patterns I review, but I write for me. It’s one more creative pursuit that I hope is helpful or interesting to others. I write to share my love of sewing and to encourage others to love it as much as I do! 🙂

Going With The Wind

The GreenStyle Windward Shorts

I’ve been waiting for these shorts for over a year! Volunteering to pre-test them last year, and loving them even back then. The pattern was put on hold until this year, when shorts season rolled around again. One of the things that makes GreenStyle patterns fit so well, is the fact that they are truly put through the test. Comments and fit photos submitted by the testers are taken into consideration, and the pattern gets tweaked again and again to perfect the fit.

With curved back seams to fit smoothly over the bum (with an optional fuller bum cut line), and welt pockets (with optional zipper) the Windward Shorts are flattering and practical. I tend to wear a lot of athletic wear style of shorts. I probably have seven pair of Moxi compression layer shorts that I wear all the time. But my dress shorts options are severely limited. As in I didn’t have any until the Windward Shorts came along!

I love being able to add another category of clothing into my life. There are occasions that require a slightly dressier look, and now I’ve got something that fits the bill.

I thought it was so cool that my husband caught this shot of the dragonfly zooming by my head!

The pattern is designed for stretch woven fabrics, so that inherently leads to a dressier look. Stretch wovens can be made of different materials (all of which contain a small percentage of spandex, which is what gives them that little bit of stretch.) The periwinkle stretch cotton twill from Mood Fabrics is a heavier, crisper fabric, which gives a different look than say a polyester blend that is thinner and a bit drapier.

I also made a pair out of stretch charmeuse from JoAnn Fabrics. The softer drape makes them look a bit more form fitting.

I love that the pattern accommodates a wide variety of stretch woven fabrics and looks great in all of them. A unique design feature is that there is no inseam, which makes the shorts very comfortable for people bothered by inner leg seams. The welt pockets are generously sized, so even my large phone fits perfectly. Since it’s anchored in the top and side seams, the pocket lays smoothly, and stays in place.

As a tall girl, I chose the high rise with the 2″ elastic waistband for both my makes. (I actually made a third pair, but didn’t photograph them.) There is a mid rise, and an options for 3″ wide elastic too. With 2″, 3″, and 4″ inseams, you’ve definitely got choices!

I love that there are no zippers or buttons to deal with (other than the optional zipper on the welt pockets) so the shorts are a quick sew and easy to wear.

I hope you’ll flip for these shorts like I did!

I love that I’m not afraid to still do a cartwheel. And I probably did 10 or 15 of them before my husband actually caught a shot with my legs up in the air and his finger not in the frame! 🙂

As a note of encouragement, don’t let the idea of welt pockets scare you. The tutorial is easy to follow and makes a fancy detail simple to accomplish. And face it, all shorts need pockets!

The waistband is comfortable, and makes the shorts easy to wear.

The details:

The GreenStyle Windward Shorts pattern includes sizes B-M, which covers hip measurements from 32″ to 62″.

The periwinkle fabric is stretch cotton twill from Mood Fabrics. I wore it with a Power Sports Bra that I hacked into a workout top made of black spandex and black snakeskin yogi fabric from GreenStyle. You can read more about the hack here.

The brushstroke print is a stretch charmeuse from JoAnn Fabrics. They were worn with one of my Tangled Swim Tops, blogged here.

Thank you for reading and sharing my love of patterns, sewing, fabric, and cute shorts with large pockets! ❤

The links to GreenStyle may be affiliate links (if I did them properly!) which means that I may earn a few pennies if you use my links without it costing you anything extra. Since this is my blog and represents me, I always give my honest opinion about any patterns, fabric, or supplies that I talk about. I do like knowing whether the time I spend writing posts actually interests people enough that they take a look at the patterns I review, but I write for me. It’s one more creative pursuit that I hope is helpful or interesting to others. I write to share my love of sewing and to encourage others to love it as much as I do! 🙂

Shorts Or Swim Trunks? How About Both!

Sewing For Men, Episode 3

My husband isn’t often interested in patterns, or in being my model for a pattern test. 🙂  He did however, really like the line drawings for the new GreenStyle Motion Athletic Shorts.  Since he basically lives in athletic shorts, he was more than happy to let me sew them for him!

The Motion Shorts are designed for stretch wovens, with an optional liner layer made in 4-way stretch fabric.  The front pockets are deep and large, so no matter how big your phone, there’s plenty of room for that, and all the other stuff guys tend to carry!  The curved back gives shaping and is quite flattering on the booty.  And the side and back panels give an opportunity for contrast fabric and pretty top-stitching.

Motion back

The liner layer can be made of mesh for a traditional swim trunk style, or Supplex or other compressive fabric for support for working out.  I chose to use nylon/spandex tricot so Dan can wear his shorts for workouts and swimming.  Moisture wicking, quick drying fabric is key when making swim or workout wear.  I use the same Phee Fabrics tricot for my swimwear and dresses, and he’s lucky I had this khaki steel color in my stash and used it for him, rather than the dress I had intended to make with it! 😉

Motion lining

After I made the first pair of shorts, he requested that I add a “hammock hack” to the liner layer, so that they would fit like ready-to-wear Saxx, and all the underwear I make for him.  No problem sweetie, I can do that! ❤  Powernet is the fabric of choice for the gusset hammock, just as it is added to bras and swimwear, because of its supportive nature.

The hammock is a partial moon shape, with the straight edges toward the center, and the curved edges sewn to the center panel of the liner layer.  After cutting out the mirror image hammock pieces, I do a tight rolled hem on the straighter side of both pieces.  If you don’t have a serger, you can also use cotton swimwear elastic tautly stretched and zig-zag stitched to the straighter edges.  Lay the hammock pieces on the lining center panel and pin along the curved edge.  Then baste along the sides and across the top with a zig zag stitch set at 2.5 or 3.0.  Then stitch the dart at the bottom of the center panel.  Snip the top of the dart up to, but not through the stitch line, and press the seam open.  Then baste it in place.  Notice how having a larger curve on the hammock piece, compared to the curve on the center panel gives the wearer space to tuck everything in?  (I’m trying hard here to be descriptive without being too descriptive if you know what I mean!)  This is a family friendly blog!

Motion gusset

At this point, the center panel can be sewn to the liner pieces as per the pattern tutorial, and the shorts can be completed.  Here’s a photo of the inside of the finished shorts.

Motion gusset complete

The pattern has options for 5″, 7″, and 9″ inseam lengths, which is great because they can be customized to fit your needs.  Dan prefers the 7″ inseam, because he doesn’t like longer shorts that get caught on his knees when he’s working out.  If I were making myself a pair, I’d choose the 5″ length.  And yes, I tried his shorts on.  I’d need a smaller size, but they were pretty cute on me too!  The pockets are so much bigger than any other shorts I’ve made, so who wouldn’t want that?

Motion pocket

They are flattering from every angle, and I am so excited that the beach has reopened so we can go for walks along the shore again.

Motion right side

And no photo session with a guy is complete without plenty of silly poses for your viewing pleasure! 😉

Motion guns Motion buff

Obviously I need to make him a few more pairs, because he is loving the look!

I used stretch twill from Phee Fabrics as the main fabric, with a scrap of (no longer available) reflective chevron as a fun accent.  It’s funny how making them out of all one fabric color gives them a dressy look, while using an accent fabric gives them a more sporty look.  And I know that I’ve found a winning pattern when he starts asking me to customize and hack it for him! 🙂

This post may contain affiliate links.  This means that at no extra cost to you, I may receive a small commission if you purchase through my link.  As always, I only give my honest opinion.  After all, it is my blog, which represents me! 🙂  Thank you for reading and sharing my love of sewing, fabric, patterns, and pattern hacking. ❤