Keep It Simple & Add Some Flair

Keeping it simple sounds like a great idea right about now, during a time of uncertainty.  And I (mostly) have been!  My days are filled with sewing, cooking, cleaning, spending time with my husband, prayer and reflection, and texting and FaceTiming family.  Like most people, I also probably spend too much time reading about the virus, watching TV, and on social media. 😦  So it’s time to get back to writing about sewing and patterns and fabric and all the other things that make me happy! 🙂

There were some chilly days here in Florida last month, so I decided to make the Pattern Emporium Keep It Simple Babe Tee shirt.  Patterns with lots of options can be overwhelming and wonderfully useful!  The Keep It Simple Babe has high and low square necks, high and low round necks, boat and crew necks, turtlenecks, and a V-neck.  And everything from cap to long sleeves, so there are definitely options.

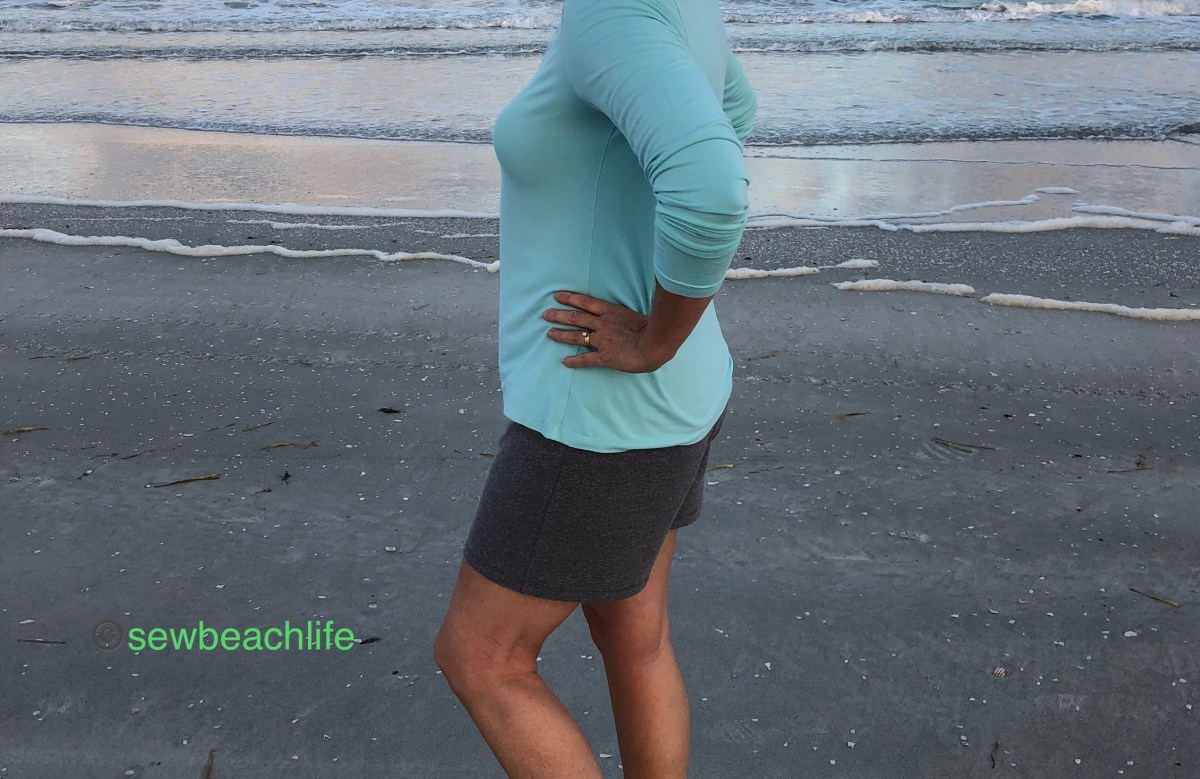
Since Florida is hot most of the year, tank tops make up a good portion of my wardrobe.  But there are chilly days, so a long sleeved tee is a practical make.  Super soft rayon spandex is my favorite fabric for tops and flowy dresses, and I had enough of this turquoise from Phee Fabrics in my stash to make the long sleeved tee.  The sleeves are slim enough to stay in place when pushed up to 3/4 length, but not feel too tight.

KISB Urban front

The V-neck is a good depth, not too high or too deep, and the neck-band came out perfectly.  The bodice skims over the body and doesn’t cling or show off the fact that I’ve probably eaten too many cookies while staying “safer at home”!  The Keep It Simple is a solid pattern choice.  Now for the Flair!

I had a small bit of Cozy French Terry left after sewing some fuzzy slipper socks for my sister, and managed to squeeze a pair of shorts on the fabric.  The Pattern Emporium Urban Flair Pants are one of my favorite pants patterns.  There are three leg width options and I chose the wide leg version to make a pair of basic black pants a couple months ago.  I love them!  They are super comfortable, the back darts smooth over the booty, and other than adding length I didn’t need to alter the pattern at all!  If you’ve ever sewn pants, that is saying something!

Urban Flair pants

So that’s why I decided to use the pattern to make a pair of shorts.  I marked the pattern to give me a 5-1/4″ inseam, and cut the legs straight across.  Since I was using scraps, I had to cut the pockets out of rayon spandex, and used Supplex and the rayon spandex for the waistband.  Supplex makes great waistbands, because it has excellent recovery.  So instead of folding the waistband pattern piece in half, I hacked it to have an inner waistband of Supplex, and an outer waistband of rayon spandex, so it would match the pockets.  I slightly contoured it, and added a seam allowance so that the finished waistband would be the same height as the pattern called for.

waistband

It’s a fun accent, and worked out great.  I will say that it’s imperative to use a substantial weight of rayon spandex.  Flimsy rayon spandex won’t hold the weight of your phone and will get stretched out of shape.  This is 13oz. rayon spandex, the same as I used for my tee.  My phone easily fits in the generously sized pockets, and the shorts are super comfortable.

KISB Urban pocket

More shorts are definitely on the agenda, along with more walks along the beach!

KISB Urban side

Both patterns were great additions to my collection, and I’m glad I bought and made (more of) them.  I hope that you are doing lots of sewing, and enjoying spending time communicating with the people you love.  So keep it simple, give yourself some grace, and don’t forget to add a bit of flair and fun to your life! ❤


How I “Prettied Up” A Play Dress

I love sewing clothes for my granddaughter!  First of all, since she’s a growing toddler, she always needs clothes.  Secondly, since children’s clothes are small, they’re generally a pretty quick sew. 😉 And thirdly, they usually don’t take too much fabric.  Sometimes I can get away with using the larger leftover scraps of fabric from previous sews, which is what I was able to do here.

I bought a yard of the Cozy French Terry from Phee Fabrics to make Lila some joggers and a cardigan.  They turned out cute, and she wore them the day we flew up to visit.  I had a bit of the French Terry left, and thought a sweatshirt dress with a woven skirt would make a cute, comfortable play dress.  It turns out that I didn’t have enough French Terry for the sleeves, so I turned to my trusty rayon spandex for the sleeves and neck band.  Remember my Made By Rae Washi Dress blogged here?  There was just enough of the Art Gallery Fabrics 100% Premium Cotton left from my dress to make the skirt.

The Stitch Upon A Time Wendybird Dress (aff link) recently jumped into my cart the last time they had a pattern sale, so I couldn’t wait to print out the pattern.  Since there was only enough of the Art Gallery cotton left to make an 11″ long by 45″ wide rectangular skirt, I lengthened the Wendybird bodice by 2″.  Although the skirt fabric is a floral, it’s not in overly girly colors, so I decided to “pretty up” the dress by adding a ruffled placket.

To make the placket, I cut a 1-3/4″w x 4″h center base out of rayon spandex.  The two inner rayon spandex ruffles are 1-3/4″w x 8″h.  The two outer AGF cotton ruffles are 2-3/4″w x 8″h.  The center French Terry ruffle is 3/4″w x 5″h.

WB placket pieces

To make the double ruffles, fold the outer cotton ruffles in half lengthwise, right sides together, and stitch along one short end.  Fold the inner rayon spandex ruffles in half lengthwise, right sides together, and stitch along one short end.  Clip the corners, being careful to not cut through the stitching line, turn the ruffles right sides out and press.  Lay an inner ruffle on top of an outer ruffle with the cut sides and finished ends aligned.  Sew a long basting stitch with a 1/4″ seam allowance, and pull the bobbin thread to gather the ruffles.  Repeat with the other double ruffle.

Fold the bottom edge of the center base under 1/4″ and baste or use Wash Away Wonder tape to keep the fold in place.  Lay a double ruffle on the center base right sides together, with the finished edge of the ruffle toward the bottom.  Stitch along the side with a 3/8″ seam allowance.  Press the ruffle to the outside and repeat with the other double ruffle.

Next we add the center ruffle.  Because the French Terry won’t fray,  the edges are left raw.  Run a basting stitch down the middle of the center ruffle, and gather it to fit the placket base.  Keeping the center ruffle 3/8″ away from the top, zig zag down the center of the ruffle to stitch it in place.

Mark the center front of the bodice with a pin.  Use tailor’s chalk, or a washable fabric marker to mark the ruffle placket placement, which should be a rectangle 1″ wide by 4″ high.

WB mark

Line the ruffle placket up at the top of the neckline and with the markings, and top-stitch around the center base to secure it to the bodice.  Baste the unfinished edges of the double ruffles in place at the neckline.  Sew on the neckband as per the pattern directions, being sure to catch the top of the double ruffles and placket in the band.

WB placket

To make the skirt, cut two 11″h x 22-1/2″w (I would have preferred 12 or 13″ high, but that was all the fabric that I had!) panels out of the AGF cotton.  Place the panels right sides together and stitch along the side seams.  Press the bottom up 1/2″, and another 1/2″ and stitch the hem.  You can run a long basting stitch around the top of the skirt to gather it, but since it’s being sewn onto a knit bodice, I like using cotton swim elastic to gather.  Measure the bottom of the bodice, and cut the elastic to that length.  Overlap the ends of the elastic 3/4″ and zigzag to form a loop.  Use a pencil to mark the quarter points of the elastic.  Mark the centers of the skirt front and back, and they and the side seams will be the quarter points of the skirt.  Line up the quarter points of the elastic along the top of the skirt, and stretch the elastic to fit as you zigzag it in place.  It should gather the skirt to fit the bodice perfectly.

WB flat

With the skirt inside out, slide the bodice down inside the skirt, right sides together, matching side seams and center points.  Sew the bodice to the skirt, then give everything a good press.  Ta dah!  A simple play dress turns into a pretty, party-worthy dress!

Since Lila only recently turned two, she doesn’t attend a lot of parties.  But she is always ready to run and play outside, picking up sticks and leaves on her way to and from the park.

WB dress sticks

And I love that she is able to play outside in nature nearly every day.  I hope that she never forgets the joy and wonder of exploring, learning new things, and playing every day.

WB dress oh

WB dress up

When you’re done sewing, don’t forget to go for a walk, and enjoy the fresh air and sunshine.  Maybe you’ll find some sticks to play with too! 🙂

Thank you for reading and sharing my love of sewing, fabric, patterns, designing, and creating. ❤