Tangled Swim Top and Bottoms by GreenStyle

And a pattern hack and sewing tips!

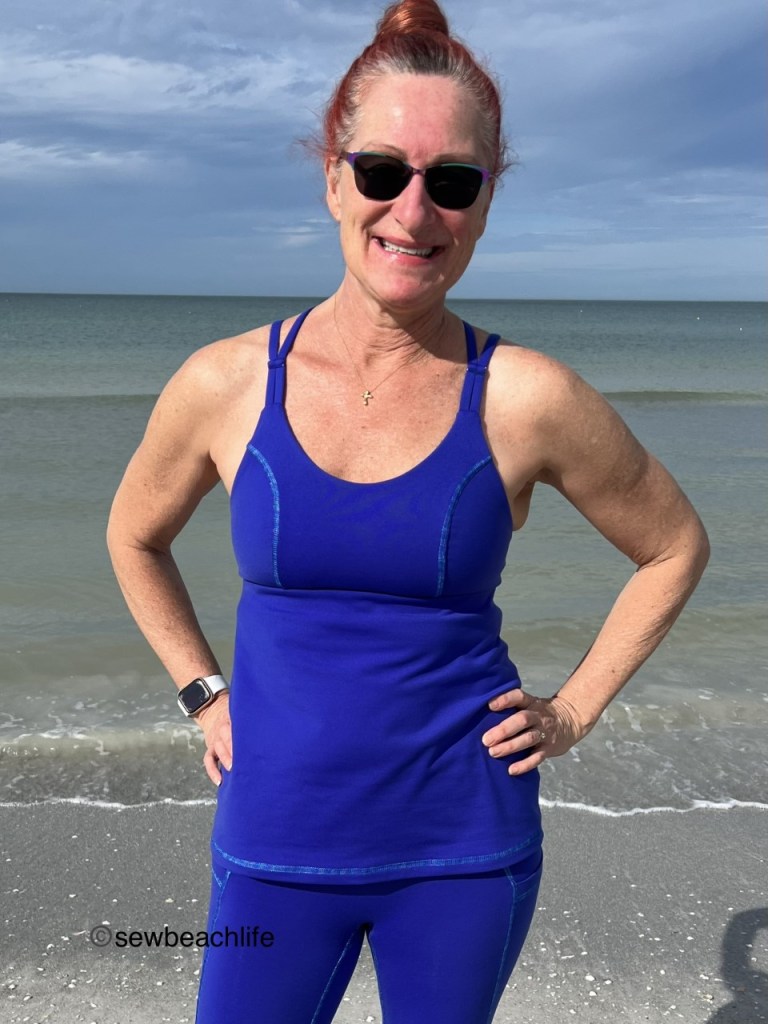
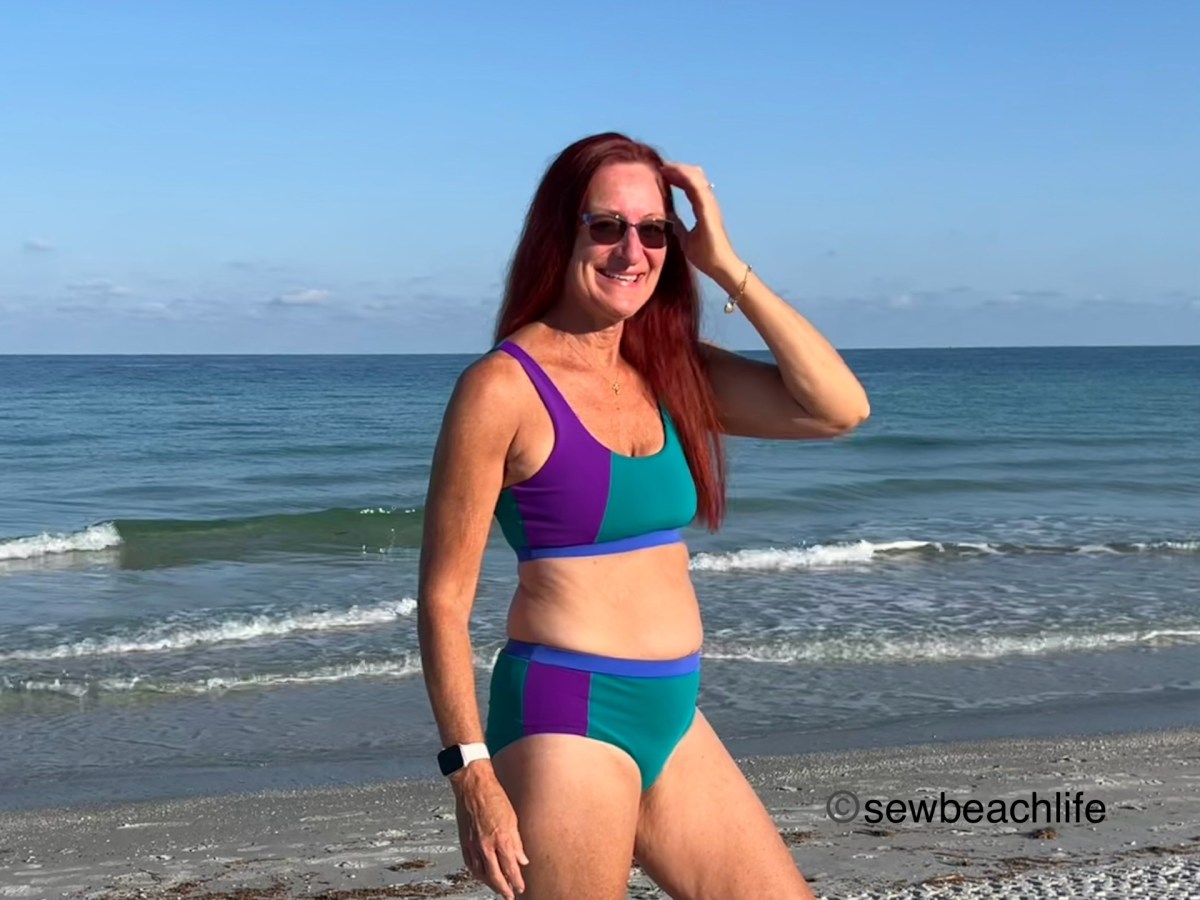
Summer time means new swimwear is in order, and the Tangled Swim Top and Tangled Swim Bottoms have some super fun color-blocking options! The hardest part will be choosing which fabrics and options to use. The top has a scoop neck front, with back options of full coverage, high scoop, and low scoop. Everything from a simple front and back to multiple color-blocked designs give you the chance to use those smaller scraps of fun swim fabrics you’ve been saving.

This shot makes me feel skinny. 🙂 That intermittent fasting is starting to pay off! Don’t get me wrong, healthy eating and exercise are part of the deal.

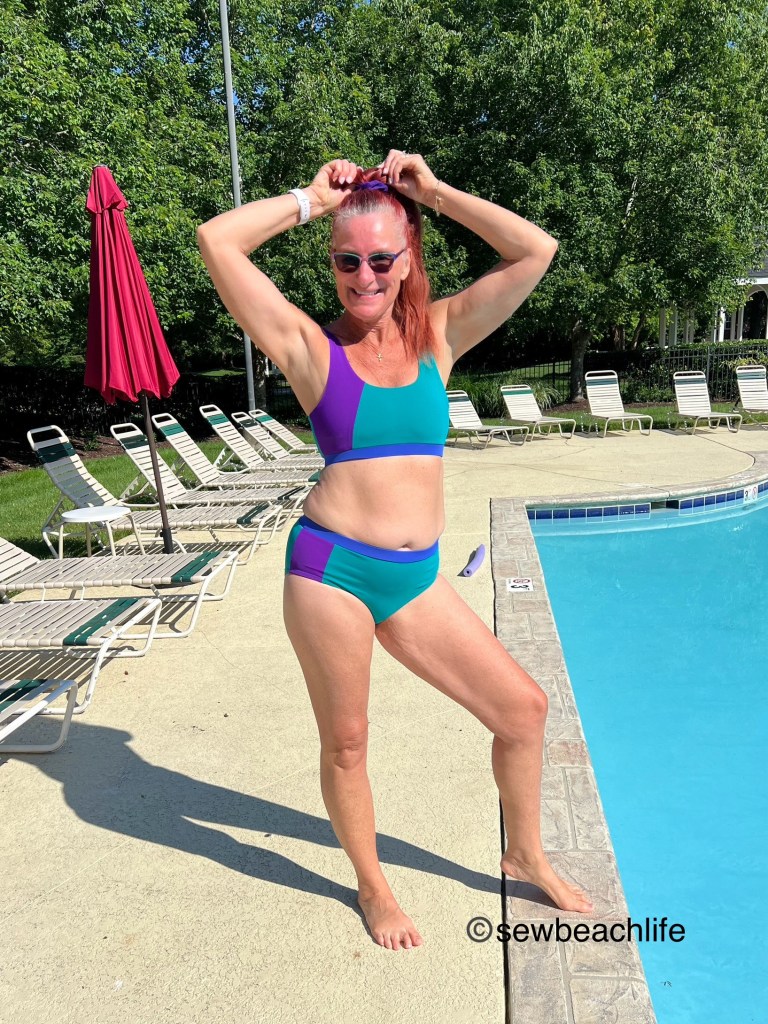
The Tangled swim bottoms have even more color-blocking options than the top! I chose the asymmetrical two-piece color block design for the front and the back, and I love being able to use three fun colors for a nice bright suit. The bottoms have a full coverage and a slightly cheeky back coverage, along with high or low rise options. I used the high rise, elastic waistband option, but there’s also a contour waistband that would make the rise even higher.

I like showing how patterns look while you’re seated too. Because you’re not just going to stand around when you’re out of the water!

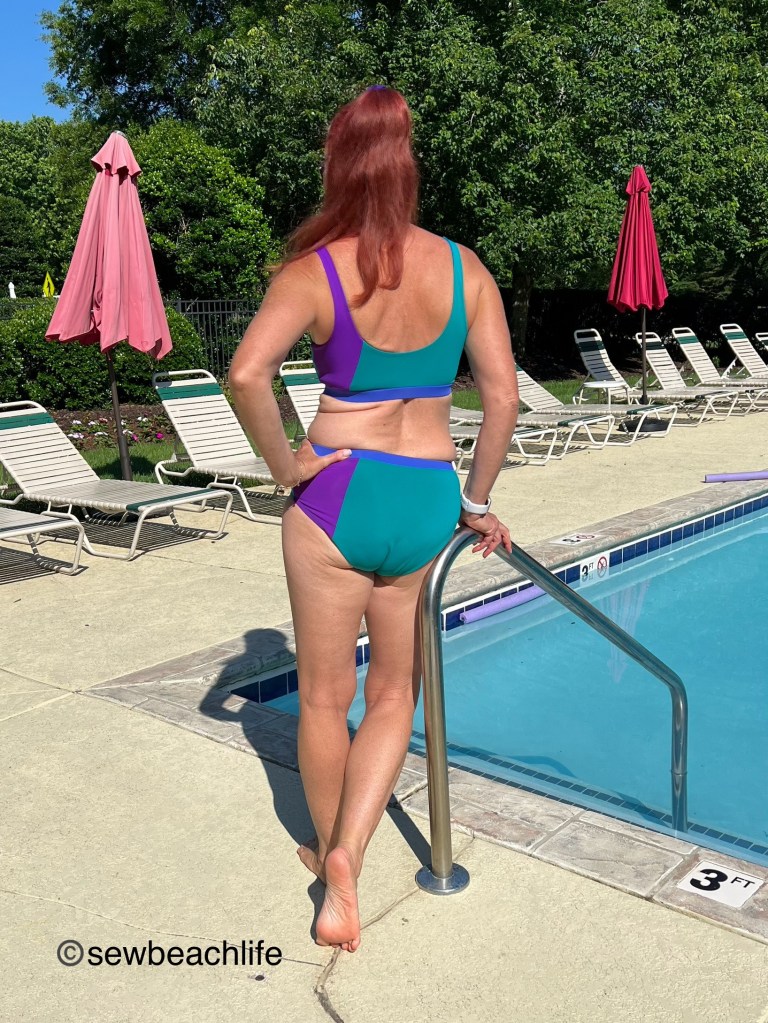
I like the lowest back option, and wanted to make the back have the same asymmetrical two piece look as the front and the bottoms. So of course I had to hack it. 😉 I can never just leave a pattern alone.

Don’t you love the way the design carries from the top down to the bottom?

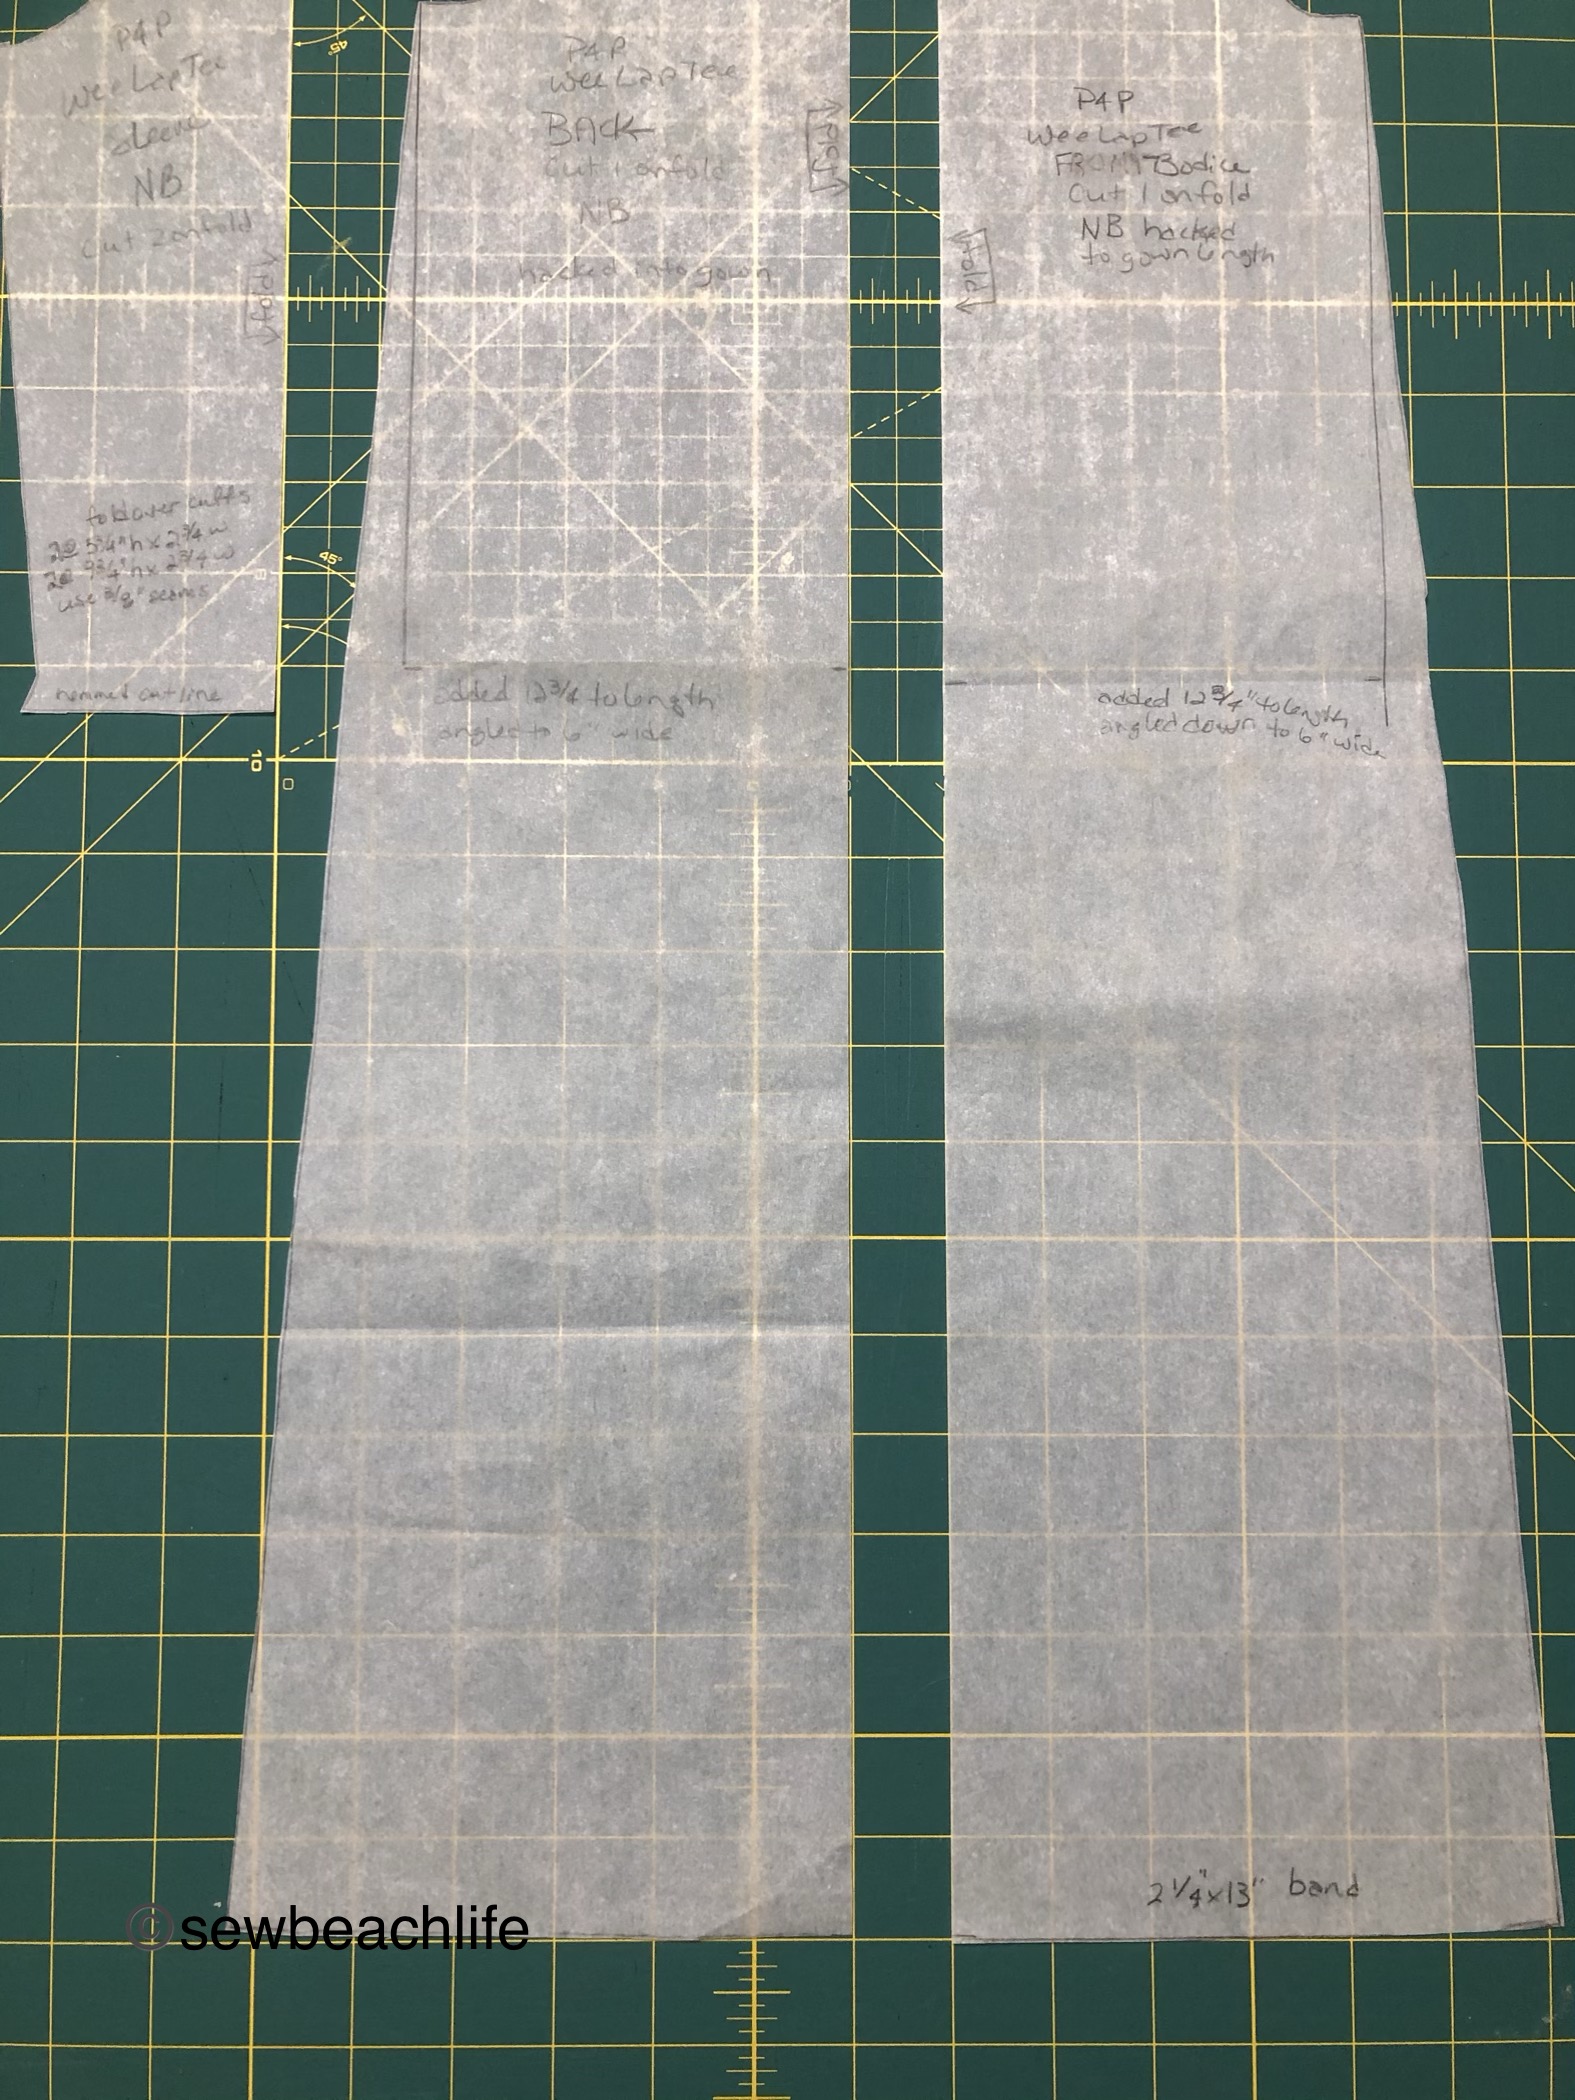
It was super easy to transfer the design from the front to the back. So, my method of tracing patterns is to consolidate the options I plan to use onto one pattern piece if feasible. I knew I was going to make the simple version of the top and bottoms which I did before moving onto the color-blocked versions.

I didn’t bother adding powernet in the front of the green top, which I kind of regret.

Once I had the simple front and back traced, it was super easy to trace the cutting lines for the asymmetrical two piece front right onto my simple front. That way I don’t have smaller pattern pieces floating around in my pattern envelope. I like to use different colored pencils to mark the left side cutting line and the right side cutting line. I also use arrows to ensure that I cut on the proper line so that I have adequate seam allowance! The marked cutting lines should end up 3/4″ apart (3/8″ seam allowance + 3/8″ seam allowance = 3/4″).

To hack the back to have the same asymmetrical two piece look, I simply laid the simple back pattern piece on top of the marked front piece, and traced the left and right cutting lines, again labeling with my colored pencils.

I always mark my pattern pieces with any changes or notes (as you can see, version 2 of the pattern testing lowered the bottom of the armscye by 1/4″) and always mark the grainlines.

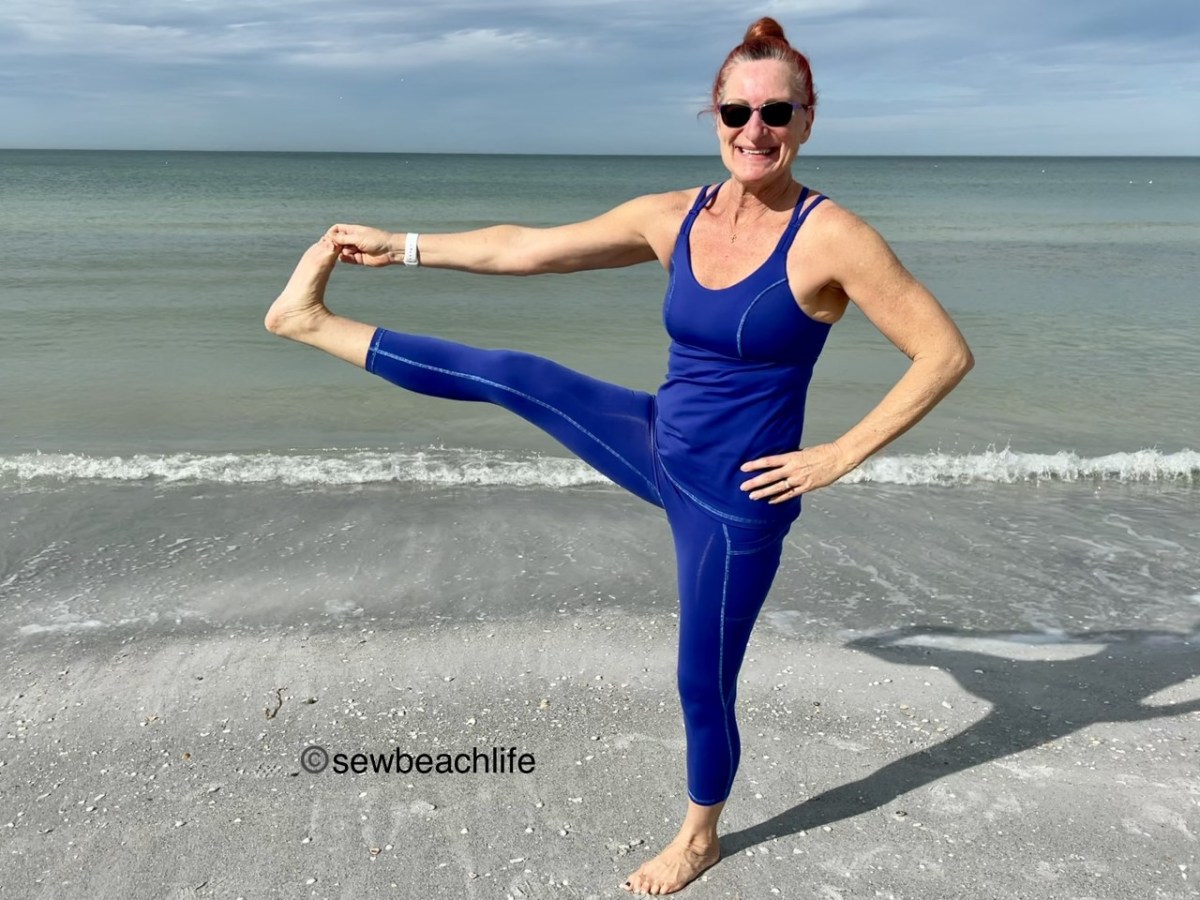
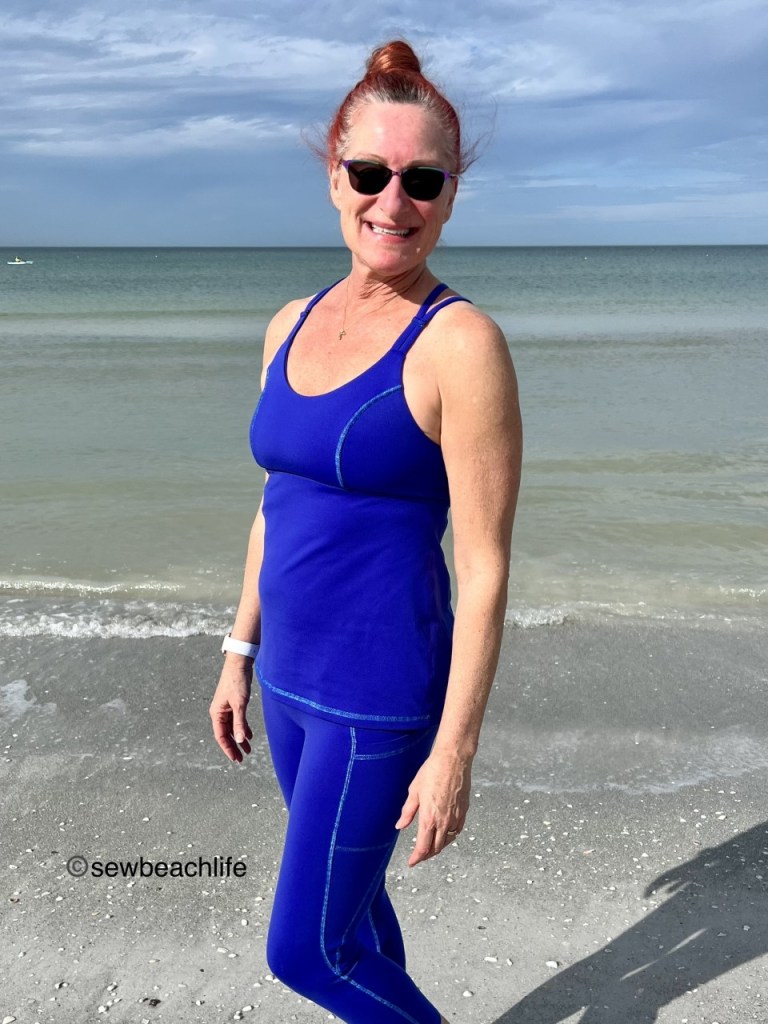
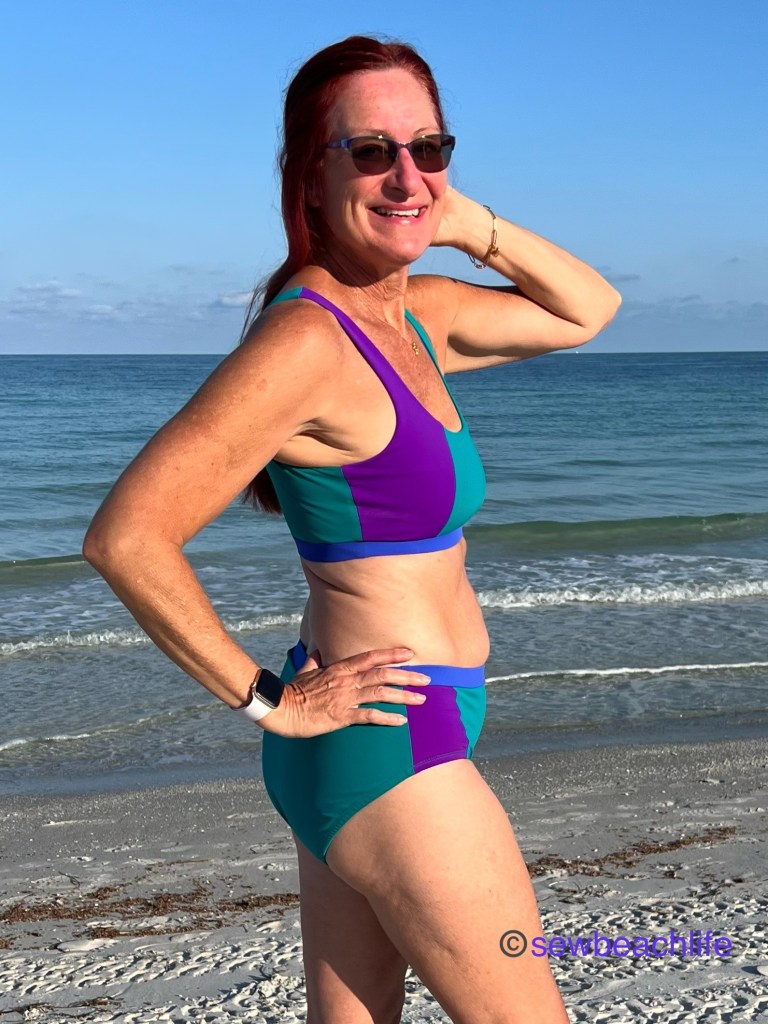
I love how the two-piece asymmetrical back hack brings that extra pop of color to the back and side. And that the angled cut of the top flows right down to the angled cut of the bottoms.

Even though this isn’t a super revealing swim suit, I love that it still looks and makes me feel sort of sexy.

GreenStyle is listing the Tangled Swim Top and Tangled Swim Bottoms patterns separately, so if you want to mix and match with any of their other swim tops or bottoms, you can choose the styles and patterns you want to use.

If you’ve never sewn swimwear before, I encourage you to try it. My best tips are to use fresh needles in your sewing machine and/or serger. Use plenty of pins to line up seams. I like to baste my swim lining to the main fabric of the swim bottoms before attaching the waistband or leg elastic. It keeps the fabric smooth and even, and ensures that you won’t have to rip out the elastic because you somehow didn’t catch a layer of fabric.

Speaking of elastic, the amount of stretch can vary from manufacturer to manufacturer. So rather than just looking at the elastic cut chart, I literally wrap the elastic around my waist and leg to choose a comfortable yet snug length. Then I mark that information right on my pattern piece for the next time I want to make it.

If you’ve ever had leg elastic “flip out” on you, then this next tip will really help you. Once you’ve sewn your leg elastic into a circle, mark the quarter points. I just use a pencil. Then I mark the quarter points of the leg opening with pins. I like to serge on the elastic using a stitch width of M, and a stitch length of 2.25, stretching the elastic so that the mark lines up with the pin. Then I turn the elastic under, and pin in place. Whether you use a coverstitch or a zigzag, be sure to sew along the serged edge, NOT along the fold. This will keep the elastic firmly in place, rather than allowing it to flip out.

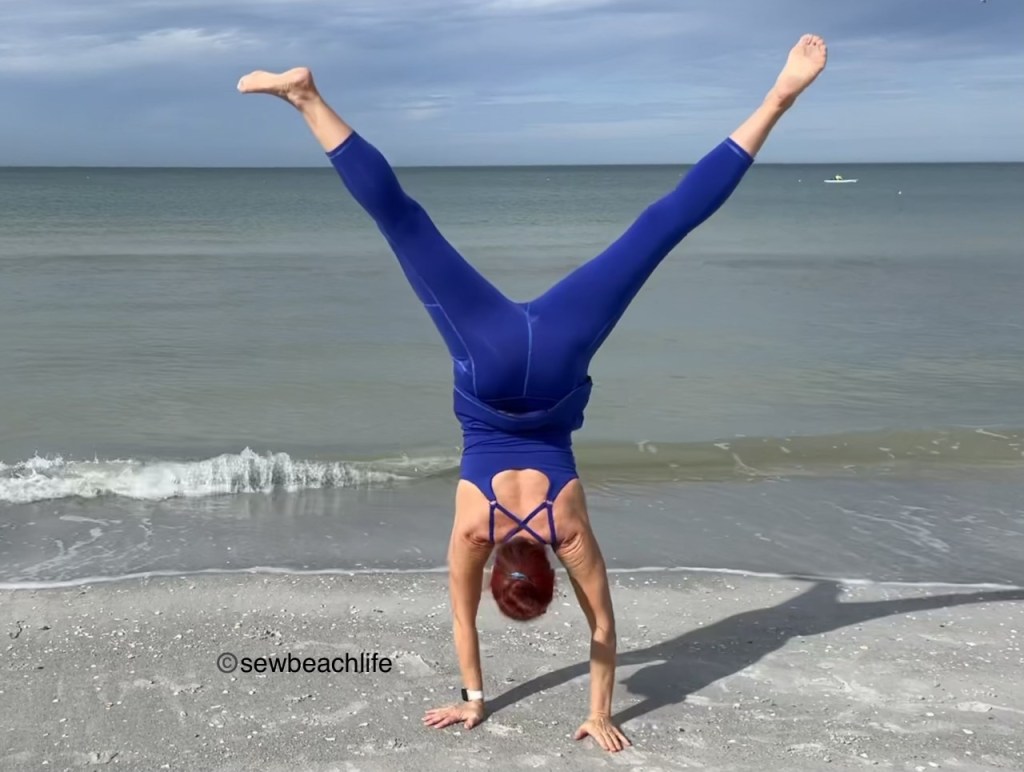
I’ve worn my suits in the pool and played in some nice waves in the ocean. Everything stayed in place, even in the big waves. So whether you hit the pool, the lake, the ocean, or a river, the GreenStyle Tangled Swim Top and Bottoms are a fun addition to the season!

The pool photos were taken at a community pool, and I sometimes wonder what other people think when they see me acting silly and posing for the camera. Probably nothing more than they think when I pose at a crowded beach. 🙂 Honestly, I don’t worry about it because A. I’m having fun, and B. There will always be people who look better, or perhaps less fit than me. And we’re all here to enjoy the sunshine, enjoy being near the water, and to have fun! And face it, most people are so caught up in their own lives to even think or worry about what you look like. So get out there in a swimsuit and enjoy life!

The details:

My GreenStyle Tangled Swim Top and Tangled Swim Bottoms were made using nylon/spandex tricot from Phee Fabrics and nylon/spandex sports bra fabric from Porcelynne.

I used 240gsm nylon/spandex powernet from Porcelynne in the front only of my swim top. If you like more compression, you can use it in the back too.

I used swim lining from JoAnn Fabrics. I also love the swim lining from Phee Fabrics, but they don’t have it in stock right now.

I used 3/8″ cotton swim elastic from Sew Sassy, and 1″ knit elastic from Wawak.

Thank you for reading and sharing my love of patterns, sewing, fabric, pattern hacking, and cute swimwear! ❤

The links to GreenStyle may be affiliate links (if I did them properly!) which means that I may earn a few pennies if you use my links without it costing you anything extra. Since this is my blog and represents me, I always give my honest opinion about any patterns, fabric, or supplies that I talk about. I do like knowing whether the time I spend writing posts actually interests people enough that they take a look at the patterns I review, but I write for me. It’s one more creative pursuit that I hope is helpful or interesting to others. I write to share my love of sewing and to encourage others to love it as much as I do! 🙂

New Year, New Workout Wear, New Supplies

It’s never a bad time to sew yourself some new workout wear, but losing some weight necessitates making new items that fit! My drawer full of workout wear is nearly all too big. Going to yoga class 4 times a week means that I need multiple outfits that fit.

Obviously making new workout wear is much more fun than seam-ripping apart your reverse triple coverstitched old outfits, cutting them down to a smaller size, and then re-sewing them! So I traced off a tried and true pattern (the GreenStyle Power Sports Bra) and tried a new pattern (the Sinclair Flex Leggings).

As a sewist, I always notice when someone in yoga class is wearing a new style. Several women had worn workout leggings with a deep V side panel with pocket, and I knew just the pattern to try. Sinclair Patterns is known for well drafted patterns that include petite, regular, and tall options in their files. There are quite a few Sinclair dresses, skorts, shorts, and tank tops in my wardrobe. They aren’t necessarily known for workout wear, but the Flex Leggings pattern is super cute, so I had to give it a try.

With no center front seam, the leggings fit smoothly across the abdomen and hips. The color-blocked V side inserts can include a pocket, which in my mind is a necessity. The pocket is deep, as in deep enough for even the largest phone to fit securely down into the pocket. I wore my leggings to Christmas dinner at my sister-in-laws house, and my phone never felt like it was going to fall out of my pocket. Of course I had my phone in and out of my pocket all day capturing moments with people that I love! (There’s one of us in every family 😉 and people sort of count on me to catch a few photos to share!)

Me, my sister-in-law, and niece.
This candid photo really highlights how much taller I am than my sisters-in-law. It also highlights the shenanigans present every time we get together! 🙂

The above photo also illustrates the only thing I disliked about the pattern. I need a contoured waistband, and always serge 1/4″ clear elastic into the top waistband seam in other patterns. The front and back waistband pieces on the Flex pattern are contoured, but fold-over. I added powernet to the front waistband piece, basting it to the wrong side of the fabric before sewing the waistband pieces together. Even with a double layer of powernet (since the piece is folded over) the waistband slid down all day long.

In all fairness, the tutorial does include optional directions to add narrow elastic threaded through buttonholes in the inner side of the waistband that could be tied to fit. I own one pair of Athleta leggings with an inner drawstring that in the past I have never bothered to tie. Since I’ve lost weight, I currently have the drawstring pulled tight and tied in a knot. But with a smooth front and smooth waistband, I didn’t really want a knot of elastic bumping out in the front. So I unpicked a small section of the waistband to leggings seam, inserted 1″ wide knit elastic, overlapped the ends by 1/2″ and zig-zagged the overlap, and serged the small section of waisband seam closed. I wore my new outfit to yoga class this week, and they stayed up perfectly! Problem solved!

Adding the 1″ wide elastic was the perfect solution! As always, I added a note to my pattern piece so I know exactly how long to cut the elastic (and remember to add it!) the next time I make these leggings!

As with every pattern, it is important to grade to fit your body. I have well developed calves (thanks to skating and yoga), so I knew I needed to grade my pattern pieces. The size chart doesn’t include calf measurements, but I’ve made enough workout wear and know my body shape well enough to estimate that my calves are about two pattern sizes larger than my hips. My knees are slender and I wanted to ensure that the leggings didn’t get baggy at the knee, so I started my grading just below the knee.

A french curve ruler is super helpful for making smooth transitions between sizes. The ruler helped me make a gradual curve on the outer seams of both the front and back pattern pieces from a size 8 out to a size 12 below the knee.

Since I couldn’t know for sure whether my grading was perfect or not, I basted the outer leg seam and tried the leggings on before serging the seam and reverse triple coverstitching. No one wants to have to seam rip that as an experiment! The grading ended up being just right, and now that I have the pattern perfected for my body, future pairs will sew up much more quickly!

These are the 7/8 length, and of course I want to make a pair with the lower leg color-blocking. So I’ll have to play around with transferring my changes to the color blocked pattern piece. What fun is sewing if you don’t challenge yourself, right? 🙂

I also like to challenge myself to see if I can still do a cartwheel. Yoga has kept my body strong and maintained my balance. Apparently it is also amusing/fascinating to watch a Grandma do numerous cartwheels while being photographed. As my husband finished our photo session a young woman lounging nearby at the beach smiled, nodded, and gave me a thumbs up. 🙂

The Power Sports Bra is a staple workout and/or swim top pattern for me. Women with smaller cup sizes can get away with flat front bras/tops, but a fuller bust is curvy and princess seams are great for fitting smoothly over your bust projection. I love playing around with it and trying new hacks. Doing double narrow straps with a criss cross was a fun, easy hack. It’s important to take your measurements and compare them to the size chart on a regular basis. I started by tracing my pattern in a smaller size. Previously I’ve used the 34 band size in cups E/F. The F is a little too high in the armpits, so I blend the E and F. My current measurements put me in a 32F. But my bust is fuller at the bottom than at the top. So I take away a bit of the upper curve on the side cup piece. Customizing the pattern pieces to fit your body is the key to a perfectly fitted garment.

Perfectly fitted princess curves fit smoothly over the bust with no puckering at the seams.

Porcelynne has some really pretty rainbow finish rings and slides that I wanted to incorporate into my top. Generally I use wide straight straps on the U-back Power Sports Bra because I don’t like straps pulling on my traps or up near my neck. I’ve found that I need the 1″ wide (final size) straps to be about 13″ long with either elastic or powernet in them, as in this post.

After cutting my four 1.5″ wide straps longer than needed, I zig-zagged 3/8″ knit elastic into the seam as shown here. It’s important to press your straps after turning, so they are as flat and smooth as possible. Also, pressing as you sew gives your garments a much more polished and professional finish.

Extending the strap connection point on the strappy U-back pattern piece by 1/2″ gave room to add the 3/4″ rings to the back by folding the fabric over the ring and stitching it in place. Then two straps were folded over each ring and stitched in place. The two outer straps were kept straight and the two inner straps were criss-crossed.

I love the fun shape the straight and criss-crossed straps form on the back. Kind of like a stylized W. I also like the muscles that I’ve developed over twenty years of doing yoga. 🙂 Not bad for a Grandma pushing 60, huh?

You control how close to the neck your crossed straps are by the placement of the 3/4″ slides. Slide them up, and the straps are pulled farther from the neck. Slide them down for maximum crossing. Once you’ve found the perfect placement for you, the straps get tucked into the bra front and stitched in place as per the pattern tutorial. My straight straps ended up 13″ long, and the crossed straps ended up 15″ long.

Using sliders not only adds a fun look, but gives you an option to slightly tighten or loosen the straps for comfort.

I’m definitely going to use rings and slides again because it’s just such a fun look! Making even a few small changes to a pattern is not only fun, it personalizes the pattern for your needs. I was also excited to try a new fabric called stretch eclon jersey from Mood Fabrics. Eclon is a brand name of nylon, and if you’ve read my blog before, you know that I am a big fan of nylon spandex. I avoid polyester, especially for workout wear because it doesn’t breathe and tends to absorb sweaty odors. Ewwww! Florida is usually hot, and my workout wear fabric needs to be moisture wicking.

I hope this inspires you to play with your patterns, and work towards a perfect fit as well as trying new looks.

I love the definition that reverse triple cover-stitching adds to accent the seam lines of well designed workout wear.

The details:

Sinclair Flex Leggings and GreenStyle Power Sports Bra, made of stretch eclon jersey from Mood Fabrics. This and several rayon spandex prints were my first purchase from Mood, so it’s a new supplier to me. I have to say that I liked all of the fabric that I ordered, except one (because it’s only a two way stretch instead of four way. Apparently I didn’t notice that in the fabric listing!)

The rings and slides were purchased from Porcelynne, along with some lovely nylon spandex fabric that I need to share. I made the cutest outfits for my granddaughters! Porcelynne isn’t new to me, I’ve purchased from her before but I don’t really think I’ve shared my makes using her findings before.

Seams were accented with a reverse triple coverstitch on my wonderful Babylock Triumph using Fantastico varigated thread #5028 Peacock Plume from Superior Threads in the looper using a stitch length of 3. Fantastico is one of my favorite threads to use for reverse coverstitching. It has such a beautiful sheen, and the short color repeat is perfect for adding a classy look to garments.

I’m very happy with my new favorite workout outfit, and will definitely be making more! Thank you for reading and sharing my love of creating, hacking, sewing, patterns, fabric, notions, thread, and making beautiful, well-fitting garments! ❤

Baby Gowns With Fold-Over Cuffs

I’ve been sewing a summer wardrobe for my granddaughter, because sewing pretty things brings me joy while we’re all under “safer at home” orders.  I texted my daughter to see if she needs any baby gowns for Lila’s soon-to-be-arriving baby sister, and if so, what size she needs.  Since she only has one newborn gown, and a couple of 3 months size gowns, newborn gowns are definitely on her need list!

It would have been easiest to buy a baby gown pattern, but where’s the fun and challenge in that? 🙂  Hacking the Patterns for Pirates Wee Lap Tee into a gown was simple enough.  Adding 12-3/4″ to the length of the tee, and angling the pattern out from the bottom of the armscye, to 6″ wide at the bottom of both the front and back pattern pieces worked perfectly.  I also curved the bottoms up slightly at the side seam.

WL pattern

To keep baby from accidentally scratching herself, (and to keep tiny fingers warm at night) fold-over mitten cuffs were needed.  So I cut the sleeves at the normal hem cut-line and hacked some cuffs to add to them.  You need two pieces of fabric 5-3/4″ high x 2-3/4″ wide, and two pieces 9-3/4 high x 2-3/4 wide.  (The direction of greatest stretch is across the width.)  Use 3/8″ seams to construct the cuffs, rather than the 1/2″ called for in the Wee Lap Tee pattern.

To assemble each cuff, fold the 9-3/4″ high piece (the pink fabric) in half, wrong sides together, lining up the 2-3/4″ ends .  Lay it on top of a 5-3/4″ high piece (the flamingo fabric) that is right side of fabric up (but with the print upside down if using a directional fabric), aligning the 2-3/4″ ends at the top, like below left.  Then carefully fold the bottom of this sandwich up, until it lines up at the top, and pin the sides, like below right.

WL cuffs step 1

Stitch along the two pinned sides.  When you turn the cuff right sides out, the seams will be completely enclosed inside the cuff, and the mitten can be folded back as a cuff, or folded over like a mitten.  It’s almost magical when you try it! 🙂

WL cuffs sewn

Follow the pattern tutorial for basic construction, except you will need to sew the side seams and then set-in the sleeves, rather than sewing the sleeves in flat.  Personally, that is how I always sew sleeves, because I think set-in sleeves are easier and cleaner.  Keep in mind that it’s easier to sew the tiny cuffs to the sleeves, by leaving the sleeve right sides together after sewing the sleeve seam.  Slide the cuff inside the end of the sleeve, carefully quartering and pinning it in place.  You may have to wrangle the sewing machine foot inside the cuff, and slowly sew it on.  But the finish is so much more professional than having an unfinished edge on a basic cuff sewn on flat!

WL gowns top

I also chose to finish the neck edges by binding rather than banding.  But that’s because I now have a cover-stitch and seem to be binding everything I sew! 😉  I played around and did a reverse triple cover stitch on the neckline of the flamingo gown, using a variegated thread in the looper.

It was fun to try different methods of finishing the bottom of the gowns.  The white and teal striped gown was finished with a band.  It’s super important to use a fabric with excellent recovery if you want to do a band.  The main fabric was some old interlock from my stash, with poor recovery, so I knew I would need to use fabric with great recovery for all the finished edges.  I chose teal nylon spandex tricot from Phee Fabrics for the cuffs, binding, and band on the gown, and it worked out perfectly.  The 2-1/4″ high, by 13″ wide strip was folded in half, and the short ends sewn together to make the band.  The band was folded wrong sides together, and carefully pinned to the bottom of the gown at the quarter and eighths points, then sewn.  The band really needs to stretch to get the bottom evenly gathered.

The flamingo gown was finished with elastic at the bottom, stitched, then turned under and top-stitched.

The pink gown was finished with an envelope flap.  Mostly out of necessity because I didn’t have enough fabric! 🙂  The front was cut out as normal.  The back was as long as I could make it.  So the rosebud print fabric was folded in half, then half the opposite way, then the balance of the gown back bottom (plus seam allowance) was cut out.  The gown front was hemmed.  One end of the rosebud extension piece was sewn to the gown back, and the seam top stitched.  The other end of the extension was slightly gathered with elastic to keep the envelope flap from being floppy.  Then the elastic was folded under and top-stitched.

To complete the envelope bottom, with the gown back right side up, fold the back extension piece up, so that it is right sides together.  Lay the gown front on the gown back, right sides together, and stitch the side seams.

envelope seam

When you turn the gown right sides out, the seam will be enclosed inside the back extension.

WL bottoms

It felt good to use up the old cotton interlock fabric in my stash that really isn’t useful for anything other than baby and children’s clothes.  The stripe, pink, and rosebud fabrics are super old, and I couldn’t begin to tell you where they were purchased.  It’s pretty likely that the stores they came from are no longer in existence!  The flamingo fabric came from JoAnn Fabrics a few years ago, so you may still be able to find it in their Doodles line.

I hope that you are finding joy while sewing through your fabric stash, and using patterns you may not have tried before.  Being able to make something beautiful for someone who truly needs it makes me happy.  I hope that sewing to help others is making you happy too!