Sew Simple Tote Tutorial

Whether you’re participating in a Secret Santa or handmade holiday gift exchange, or just want a useful tote bag to have on hand, I’ve got a simple tutorial for you.  If you’re a bag maker, you probably already have some wonderful patterns.  But if you’re like me, and only randomly make bags when the need arises, this idea should work for you.

I was originally going to use an old McCall’s Crafts pattern I had in my stash.  But once I started digging through the tissue paper pattern, trying to find all of the pieces for the view I wanted to make, (with my cat batting at and biting the tissue paper) I decided it was easier to make up my own pattern!  Since all of the pieces are rectangles, if you use a quilting ruler and rotary cutter and mat, you don’t need actual pattern pieces.

The tote bag is designed to be reversible, with a row of pockets on both the inside and outer side.  You can use all the same fabric, two (or more) coordinating fabrics, or just use an accent fabric for certain pieces like I did.  Here are the measurements for all of the pieces you will need:

  • 4@ 12″h x 15″w for the side panels (you can make two of them in coordinates if you’d like)
  • 4@ 12″h x 5″w for the end panels (again, two can be coordinating fabric)
  • 2@ 5″ x 15″ for the bottom (one can be a coordinate)
  • 1@ 12″h x 15″w for the outer pocket
  • 1@ 11″h x 15″w for the shorter inner pocket
  • 4@ 2″ x 24″ for the straps (two can be coordinates)
  • You will also cut all of the above out of interfacing, (a heavier weight is better at stiffening the bag)

tote pieces Phee

I used Art Gallery Fabrics 100% premium cotton, (the AGF canvas would also work great!), and stretch twill that I purchased from Phee Fabrics.  This print is called Botanists Essay, and it is one of my favorite prints.  The stretch twill is actually navy, though it almost looks black in my photos.  I like the simple contrast of the solid twill against the floral print.

The first step is ironing the interfacing to the wrong side of all your pieces.  Of course I ran out of iron-on interfacing and instead had to baste regular interfacing to my pieces. 😦  Let’s just say that iron-on works better. 🙂

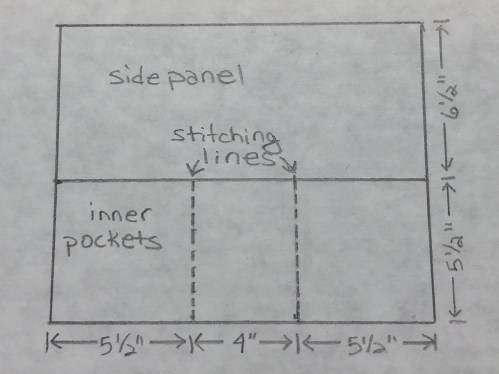
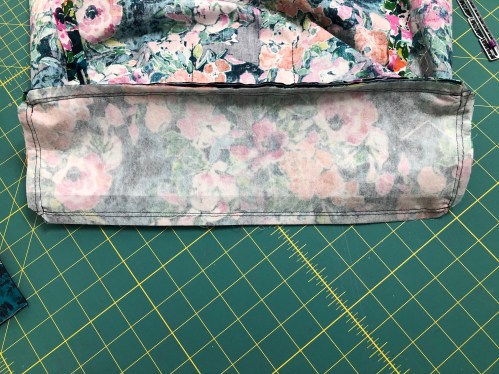
The next step is making the pockets.  Fold the pocket pieces in half, wrong sides together so that they are still 15″ wide.  Lay the outer pocket on top of one of the side panels, lining it up with the bottom and sides.  Baste the pocket to the side panel along the bottom and sides.  To form pockets, measure over 8″ from the left hand side and stitch, being sure to tack at the top of the pocket.  Measure 5-1/4″ from the right hand side and stitch, again tacking at the top of the pocket.  These pockets are sized to work great for your phone, a pen, your keys, etc.

draw out pock

The inner pockets are made in a similar way.  Lay the inner pocket on top of a side panel, lining it up with the sides and the bottom.  Baste the pocket to the side panel along the sides and bottom.  Measure 5-1/2″ from each side and stitch, tacking at the top of the pockets.  These pockets are sized to hold a notepad or tissues, and perhaps some gum or snacks!  Feel free to adjust the pocket sizes to suit your needs.

draw in pock

Now it’s time to assemble the tote bag.  Lay an end panel on the outer pocket side panel, right sides together and stitch along the side seam, using a 1/2″ seam allowance.  Then line up another side panel with the long unsewn side of the end panel, and stitch.  Then line up the other end panel on that side panel, and stitch.  Finally, line up the edges of the end panel and the pocket side panel and sew them together so that you end up with a rectangular tube.

To assist with sewing the bottom onto the tote, I like to mark the four corners 1/2″ from the edges on the wrong side of the fabric.  Line the bottom piece up with the bottom of one of the side panels ensuring that the 1/2″ markings line up with the seams, and that they are right sides together.  Stitch, being sure to back stitch at both ends.

tote bottom pins

Rotate the bottom so that one of the short sides lines up with the end panel, and stitch from one 1/2″ mark to the next.  The marks should line up with the seams.  Then rotate the bag again to line up the other long edge of the bottom with the other side panel, matching the 1/2″ marks and seams, and stitch.  Finally, rotate one last time to line up the final short side of the bottom with the final end panel, and stitch.  Clip the corners, being sure to not cut through the stitching line.

tote bottom sewn

Repeat this process of sewing the sides and ends together, then adding the bag bottom with the “lining” or inner side of the bag.  Then it’s time to make the bag straps.

tote straps

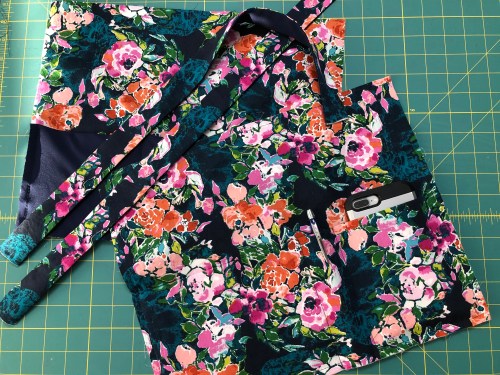
I used contrasting fabric so that one side of the straps are floral, and the other side is solid.  Place the two strap pieces right sides together, and stitch the two long sides.  Repeat with the other two strap pieces, and turn both straps right sides out.  Press and top stitch the long edges of the straps.  Measure 3″ from the seam on the side panels and pin an end of the strap in place, lining up the ends of the strap with the top of the bag.  Stitch each end of the strap in place, being sure not to twist the strap.  Repeat with the second strap on the other side panel.

tote sew layers

It’s finally time to sew the inner and outer layers together.  Turn one bag inside out.  Place the other bag inside of it, so that they are right sides are together.  Ensure that the straps are safely tucked between the two layers, and pin along the top of the bag.  Stitch along the top of the bag, leaving a 2-3″ opening so that you can turn the bag right side out.  Once the bag is right sides out, press and top-stitch along the top edge.

You’ve got a handy dandy tote with three pockets on the outside.

tote pockets full

And three pockets on the inside.  (Since it’s reversible, it can also be flipped so that the inner pockets are on the outside.)

tote reversed


To add stability to the bottom of the bag, I needed a hard thin piece of plastic to stick in the bottom of the tote.  Originally, I considered sewing a piece of plastic canvas between the two bottom layers.  Apparently my local craft store no longer carries plastic canvas, so that idea was out.  My husband came up with a solution when he mentioned that he had a couple of plastic lids in the garage that didn’t match any of the storage bins.   After moving and reorganizing the garage, he threw away the cracked and broken bins, but had kept the lids.  So I drew a 4″ x 14″ rectangle on one of the lids, and cut it out with some tin snips (my husband likes tools, and almost always has the proper tool for the job on hand!)  I sanded the cut edges to ensure that they were smooth, and slid the plastic in place at the bottom of the tote.

tote inner pockets full

The plastic insert can be removed and wiped clean, and the tote can be thrown in the washer and dryer in case of a spill.  I always wash and dry my fabric before sewing, so I never have to worry whether anything will shrink after making it.

And there you have it!  A simple tutorial and a new tote bag to use or gift.  Once you’ve sewn a tote, you can always personalize the size and shape and pocket formation of the next one to suit your needs.

Thank you for reading and sharing my love of sewing, patterns, fabric, creating, and design. ❤


The Wonderful Woven Washi Dress

High quality fabric and quality finishes truly make the garment!

When Phee Fabrics started stocking Art Gallery Fabrics in 100% premium cotton OEKO-TEX certified fabric, I knew it was time to search for a new pattern.  I have a couple of woven dress patterns that I like, (blogged here and here) but they are quite similar, and I wanted something with a little more detail to showcase the pretty fabric.

One of my sewing friends who also likes dresses, suggested a few pattern companies to me.  She forewarned me that the patterns were not inexpensive, but felt that they were worth the money.  I scrolled through a few companies, and kept coming back to the Made By Rae Washi Dress.  The simple pleats, neck detail, and of course- pockets, spoke to me.

Whenever I get a new pattern (especially for wovens), I like to compare it to a pattern that I know fits me well, to see how similar or different the fit is.  Since wovens don’t have any give, making sure that you’ve got a good fit is very important!  Right away I could tell that this pattern was drafted for a much smaller cup size, so I knew I was going to have to do some work to get a perfect fit.  I traced the bodice and taped the dart together, and held it against my body to see how far off the fit was.  The dart ended up a couple of inches above my bust apex, and the bodice didn’t cover the bottom of my bust.  Sigh!

Washi bust

Since this is kind of a common issue for me with woven patterns, it wasn’t exactly unexpected.  I needed some length between the armscye and the dart, so the simple fix was slashing the bodice front and adding in a 1.5″ wide strip of waxed paper.  I also added 1.5″ length to the pattern back.

Washi pattern adj

I cut out a bodice front and the upper back of the pattern in some cheap fabric and basted it together to check my fit.  I decided another half inch added to the front at the shoulder seam would give me that extra little bit I needed, and cut into my good fabric.  I took some time with my pattern layout, because every sewist knows that if you’re working with a floral fabric, it’s nearly impossible to avoid having flowers on your bust.  And I wanted an intentional placement versus an awkward one! 🙂

The pattern tutorial suggests using interfacing on the front around the U-notch to help keep the corners laying smoothly.  Tracing around the stitch line gave me the perfect shape to iron on to the bodice front.

Washi interfacing

It also calls for facings at the front and back neckline, and bias trim along the armscyes. But a finished bodice lining is just so much nicer, and would also make it easy to stich a couple of lines 1/2″ apart across the back to make a casing for my elastic.  To make a bodice lining, cut another bodice front, and cut a bodice back by folding the pattern back 1/2″ below the bottom shirring line marking.  Sew the front and back linings together at the shoulder seams.  Sew the bodice front and dress back pieces together at the shoulder seams.  Place the lining over the dress, right sides together, and stitch around the neckline.  Clip the curves, turn right side out and press.

Then you will need to “burrito roll” the bodice to sew the armscyes.  If you’ve never done the “burrito roll” method, it’s almost magical how it works!  Basically you are rolling the garment up from one side, then flipping the opposite sides over and around (enclosing the rolled portion in the shoulder strap area) and stitching the armscye, then pulling it through.  There are plenty of video tutorials online if you are a visual learner.  Again you will clip the curves, turn the bodice right side out and press carefully.  Stitch the side seams and press.  Turn the bottom edge of the lining under 1/4″ and press.

You’re supposed to do 5 or 6 lines of shirring along the back, to give a nice fitted look.  Since shirring didn’t really sound fun, and wasn’t the look I was going for, I opted to use elastic in a casing.  Keeping your fabric smooth, stitch the bodice back lining to the dress back along the bottom two marked shirring lines.  This will give you the casing for the back elastic. To determine the proper length of elastic, measure your body around the bottom of the bodice.  Divide the measurement in two, and use 3/8″ wide cotton swimwear elastic, marked at that length.  Thread the elastic through, stitching it in place at both ends.  Then stitch the bodice front lining in place by stitching in the ditch along the front seam line.

The interior back bodice:

Washi int backThe interior front bodice:

Washi int front

Can you see why lining the bodice is worth the effort?  There is just something so satisfying about a garment that is as nicely finished on the inside as it is on the outside!  You can always feel proud about making a quality garment that will last!

Washi frontWashi back

I love my new dress!  And it has pockets!  It’s cool and comfortable, and can be layered under a jacket or cardigan for year round use.

Washi pocketsWashi down

Using a blind hem stitch on my sewing machine was the only way to do the hem.  It’s a nice deep hem, folded under an inch, zigzagged and pressed, then folded under another two inches.  It reminds me of the type of sewing my beloved grandmother used to do. ❤  High quality fabrics, quality finishes, and a nice deep hem.

Now that I’ve got my pattern perfected, I need to decide on some more Art Gallery Fabric so that I can make another dress!


This post may contain affiliate links.  This means that at no extra cost to you, I may receive a small commission/credit if you purchase through my link.  As always, I only give my honest opinion.  After all, it is my blog, which represents me! 🙂  Thank you for reading and sharing my love of sewing, patterns, fabric, and pattern hacking. ❤


Water Faery Workout Top Version 2

Because One Hack Is Never Enough!

Don’t you love it when you feel like you really got your money’s worth out of a pattern?  Fortunately there are quite a few patterns that have enough options, that fit so well, and are a great basis for a pattern hack or mash, and the Stitch Upon A Time Water Faery is one of them.  I’ve used the Water Faery Twist & Swim Top pattern to make swim tops and hacked it into a workout top, blogged here.  I’ve also made it into a dress, linked here.

As my first workout top used the twist front bodice, I decided to keep this top simple with the plain front.  Since the Water Faery is designed as swimwear, the body is quite fitted.  So you’ll want to use a well fitting tank pattern (like the Versa Cami) for the body of your workout top.  To add a little pizazz (and because my charcoal Supplex scraps weren’t big enough to make a solid back body!) 😉 I added a triangular wedge at center back.  I simply folded the back at an angle at the center back fold line from 1″ wide at the bottom, tapering up to nothing at the top.

WF triangle

Using a folded piece of white paper, I traced the line of the angle that was folded away while cutting the two back halves.  The fold line is the center back, the pencil line is the “folded away” section, and then I drew a line 3/4″ further out to account for the 3/8″ seam allowances I used when sewing the purple triangular strip in between the two back body halves.

WF back angle

Other than narrowing the straps to end up 1-1/8″ wide, the bodice is sewn as per the pattern tutorial.  Keep in mind that it is important to use a layer of high quality powernet in the bodice front and back, along with the suggested elastic, to provide support.

Once the bodice and tank body are constructed, slide the bodice inside the body, matching up the center front, back, and quarter points, and stitch with right sides together.  While the body is still folded on top of the bodice, use a zigzag stitch to sew the recommended length of 1-1/4″ wide sport elastic onto the seam allowance.  When your top is inside out, it will look like the photo below, with the elastic hanging down below the underbust seam.

WF elastic

All you’ve got left to do now is to hem the bottom, and you can wear your new workout top to yoga class, or for whatever your favorite exercise routine is!

WF hips close

WF back

Taking the time to press your seams as you sew, and changing your thread color to match the triangular insert when hemming that section really helps to give your garment a professional finish.  I love that a few simple changes, and a little bit of extra time can turn some not-quite-big-enough scraps into a fun addition to your workout wardrobe!

I purchased all my fabric, the grape and charcoal Supplex, and the powernet from Phee Fabrics.


This post may contain affiliate links.  This means that at no extra cost to you, I may receive a small commission/credit if you purchase through my links.  As always, I only give my honest opinion.  After all, it is my blog, which represents me! 🙂  Thank you for reading and sharing my love of sewing, patterns, fabric, and pattern hacking. ❤

Love You “Two” The Moon Birthday Girl!

Can you believe that my beautiful granddaughter just turned two?  I planned to write a post about her birthday party, and thought I would include photos of the decorations and snacks and treats, along with her birthday dress like last year.  But it was a super busy day, and somehow I didn’t take many photos!  So there aren’t any close-up photos of the cute star cookies (you can barely see them on the table behind her), the astronaut ice cream, or moon cheese, chosen for her space themed birthday party.

There wasn’t much doubt that Lila would choose space as a theme, since “moon” was one of her first words, shortly after “Mama” and “Daddy”.  She likes to spot airplanes and helicopters, and “Look at stars!” and “See fireflies”.  Her vocabulary is out of this world, if I am allowed to brag a bit, about all the phrases and sentences she says these days.  She mimics and picks up new words and phrases daily.  Possibly even ones she shouldn’t, such as “OK, girlfriend”, which she learned from yours truly! 🙂  It is sort of funny though, since she inserts it appropriately into conversation!

Her birthday dress was made using the free Sew A Little Seam Birthday Dress pattern.  I muslined it using some chevron foil print purple knit I found on the clearance rack at JoAnn Fabrics a couple years ago.  It looked cute and proportionate, although I couldn’t try it on her since she lives in another state.

purp bday dress

Finding fabric that looked like galaxies was a little challenging, since I didn’t have time or the budget to order a custom fabric.  But I found some hand-printed cotton at my local fabric store (that has a ton of quilting fabric, and very little knit, which seems common in Florida) that looked pretty and sort of galaxy like.  The pattern tutorial calls for a zipper if the dress is made with woven fabric, although it’s only supposed be in the bodice.  After installing the zipper in the completely lined and finished bodice, it made no sense to me to not have it extend into the skirt.  Since there isn’t a back seam in the skirt (which would have been the easiest solution) I just snipped down the center back of the skirt about 3 inches, and folded the snipped edges under.  Attaching the skirt was a bit challenging, since I needed the edges to line up perfectly in order to continue sewing on the zipper.  It isn’t the prettiest zipper I’ve ever done, but it was installed and worked perfectly.

bday flat

To up the “space” and sparkle factor, I added some metallic trimmed satin and chiffon ribbon to the bottom edge of the tulle underskirt.  A simple zig zag stitch through the chiffon layer worked perfectly, and it took every single inch of the 3 yard spool of ribbon!  I also made the hair bow, by following a tutorial on YouTube.  Fortunately, the dress fit perfectly, and Lila wore it all day long from playing in the garden, to learning to ride her birthday scooter.

bday gardenGpa push scoot

Last year, she just leaned forward in her high chair and nibbled her cupcake.  This year, she decided it was too sticky to hold herself, and wanted Mama to hold it for her!  Can you tell that she only gets sugary treats on rare occasions?

bday cupcakebday bite

The birthday party flew by, with kids, neighbors, family, friends, noise, presents, and the general bedlam that one expects at a children’s birthday party.  And it really only ended after it grew dark, and all of the neighbor children finished playing with bikes, scooters, balls, being pulled in wagons, and the adults gathered them inside for their dinners and evening baths.

On her actual birthday, we tagged along on a trip to a local farm.  Lila got to see all the animals, go on a wagon ride, wander through a maze, and look at pumpkins, although she didn’t pick one out to take home.

Lila chickenLila turkey

Lila Gma mazeWill Gma

And she got a shoulder ride from Grandpa, just like her Mama used to when she was little!

Gpa shoulderGG farm

She also opened her present of Grandma made clothes.  She wore her Petite Stitchery Sweetie Leggings (another free pattern) made from a floral double brushed polyester scrap and her Patterns for Pirates Tiny Tulip (also a free pattern), made from pieced together scraps of rayon spandex ribbing from Phee Fabrics the next day.  The leggings are a looser fit like joggers, and the 24 months size fits well.  The dropped shoulders of the Tiny Tulip make the size 2 a little bit big on her.  I had to roll up the sleeves to keep them out of her way.

PS scooter standscooter cat

I made the skirt out of some star printed vintage cotton woven my Mom gave me when cleaning out her house.  It’s just two pieces of fabric 12″ high by 22″ wide sewn together, and gathered with swim elastic.  Swim elastic works best because it’s soft, and stretches enough to gather a wide opening small enough to fit on a simple rayon spandex waistband.

PS Sweetie P4P skirt

I hadn’t tried the free (with code in their Facebook group) Halla Leggings pattern before, but gave them a try because the rise is higher in the front than some of the other kids leggings patterns.  Toddlers have round little bellies, and I dislike low rise leggings with a baby belly and diaper sticking out of the top!  There was a big enough scrap of Polartech Powerstretch left in my stash to make the size 2/3 years.  The Patterns for Pirates Buried Treasure Tunic in size 2 was the basis for the other two tops I made.

H leggings P4P tops

The sweater knit hacci was part of a panel and I didn’t have enough scraps to make long sleeves.  So I cut them as long as I could, added seam allowances, and cut the rest of the sleeves, neckband, and gathered ruffle on the bottom out of Phee Fabrics rayon spandex.  The floral print was a scrap of rayon spandex from JoAnn Fabrics.  Since the fabric was quite thin, and didn’t have the greatest recovery, I decided to use some white rayon spandex from Phee as the neckband.

btreas puppetbtreas laugh

It makes for a cute outfit that is comfortable for her to run and play in.  She also likes adding the 5 Out Of 4 Girls’ Eleanor Cardigan I made her last year when she is preparing to go play outside.  If Phee Fabrics gets any more Polartech Powerwool in this winter, I will definitely have to make her another cardigan!

eleanor cardi

We had so much fun hanging out with the birthday girl!  The 13-1/2 hour drive each way was brutal, but worth it to be able to visit our sweet, fun, loving, adorable, hilarious granddaughter.  We can’t wait to visit again for Thanksgiving, but we’ve decided we’re going to fly next time!


This post may contain affiliate links.  This means that at no extra cost to you, I may receive a small commission/credit if you purchase through my links.  As always, I only give my honest opinion.  After all, it is my blog, which represents me! 🙂  Thank you for reading and sharing my love of sewing, patterns, fabric, and pattern hacking. ❤


Open Back Pullover

With A Simple Hack

Do you ever look at patterns and think, I really like that, except for…?  That’s how I felt about the GreenStyle Open Back Pullover.  I like the open back, I like that there’s a deeper scooped back, as well as a closed back option.  I like that it can be sleeveless, or have long or short sleeves.  I like that there is a crew neck, as well as a scoop neck, along with a hood option.  Most people love “hoodies” and banded sweatshirts.  I am not one of those people.

Banded bottom shirts are not a good look on me.  I own one banded bottom shirt, and it hangs unworn in my closet.  I’ve tried to wear it, it looked cute on the hanger when I bought it years ago, but on me, it looks like a maternity top.  If I were an expectant Mama I would wear it and look adorable.  But since I am a Grandma and long past the age of having babies, it’s just not the look I am going for!

Luckily, it is super easy to hack the Open Back Pullover to not need a band.  You are going to want to pay attention to your hip measurement.  Make sure you measure the widest/largest part of your hips and booty.  If it falls within the measurements for the size you are making, you’re good to go.  But if it’s at the upper end or bigger than the size for your bust and waist, you will want to grade your pattern out to a larger size, starting at the waist.   Then use a ruler to add 4″ of length at the bottom of the front and back pattern pieces.

Follow the pattern tutorial, (it’s a pretty easy pattern) and instead of sewing on a band at the bottom, simply pin and press the hem up 3/4″ and zigzag or coverstitch to finish the hem.

OB frontOB side

I like that I can wear a regular bra with the high scoop back, and wear it like any other top.  The low scoop back would really show off a cute Power Sports Bra and be fun for yoga class or working out.  I thought about using powernet in the scoop opening, (there is a pattern piece for that), but the open back is just the right amount of sexy.  It would also be fun to use powernet as the upper back pattern piece for an even airier feel.

I made my top out of Circular Knit, and would totally consider a long sleeved, closed back version in Rayon Spandex or Ribbing for cooler days.  If you’re looking for a more traditional hoodie feel, Cozy French Terry would be so soft and plush!  Supplex would give a more athletic feel, and would coordinate nicely with Super G’s or Stride Athletic Tights.  I’m glad I gave the Open Back Pullover a shot.  It’s a simple, slightly sexy 😉 , comfortable look.

My shorts are the Brassie Joggers, made out of Supplex.  I purchased all my fabric from Phee Fabrics.

This post may contain affiliate links.  This means that at no extra cost to you, I may receive a small commission/credit if you purchase through my links.  As always, I only give my honest opinion.  After all, it is my blog, which represents me! 🙂  Thank you for reading and sharing my love of sewing, patterns, fabric, and pattern hacking. ❤

Super Fun Super G’s

And A Simple Pocket Hack

GreenStyle Super G Tights are my “go-to” workout pants pattern.  I’ve sewn more than a half dozen pairs for myself and a pair for my daughter.  I’ve perfected the pattern to suit me, and decided to really have fun with this pair.  Since it’s hot year round in Florida, I prefer capri length (or an inch or two shorter).  It’s easy to fit capri length on one yard of fabric, with enough left over to make a workout top.  The G in Super G stands for the gusset.  It’s one long piece that stretches from calf to calf, and gives your workout tights lots of stretch and movement.

Since the gusset pattern piece is longer than 36″, simply fold up the ends on the gusset pattern, and cut the ends (adding in seam allowances) out of the same or an accent fabric.  It’s a fun way to add another little bit of accent to the inside of your leg.

Supplex is literally the best fabric for workout tights.  I’ve used Tricot as the accent fabric on the side pocket panels of my Super G’s, but my favorite accent fabric is Powernet.  It gives a little more ventilation, and adds a little bit of sexy sheerness. SG flat

On the teal and navy pairs in the photo above, I used Powernet for the upper and lower pocket pieces.  That makes the panels sheer all the way to the waistband.  This doesn’t bother me, but if you’re looking for more coverage, use Supplex or Tricot for your upper pocket piece.

Normally, the lower pocket panel of the Super G’s gets stitched to the upper pocket, and the lower panel fabric gets folded under to form a pocket, effectively hiding the seam.  Since I’ve made so many pairs of Super G’s, I thought it would be fun to give the pocket on this pair a different look.  (It also means that you can use shorter pieces of powernet, 😉  in case you only bought a half yard.)  The pocket can be moved down about an inch or so, and still be wide enough to hold a large iPhone.  You may have noticed this hack on my Super G’s in this post, where the pocket is Supplex and the upper and lower panels are powernet.

SG panels adj

The fold in the lower pocket panel piece on the left shows where the pocket seam will be.  I cut 3/8″ above that (where I am pointing) to give a seam allowance.  I added an inch to the bottom of the upper pocket panel piece, (on the right in the photo above.)  Now I just need a pocket piece which was made by tracing the folded over pocket section (the top portion of that left pattern piece.)  And then the real fun began!

SG panels white

I placed several long strips of plastic wrap on my glass dining table to protect it, and laid  the powernet pattern pieces I had cut out on it.  The little bit showing at the top left corner was used for a workout top.  The small triangular pieces are the gusset end pieces.  The pockets are on the lower left, and the lower pocket side panels are on the right.  (I used Supplex for the upper pocket panels.)

Art is often an experiment, no matter what media you choose.  It is a wonderful way to play and express yourself.  And you get to play with color, yay!  Since the grape Supplex I was using for my Super G’s was such a fun color, I knew I wanted to do something fun on the side panels.  Michaels Arts & Crafts stores often have 50% off coupons in their weekly email ads.  Which I greatly appreciate, since the Marvy Uchida Fabri-Ink kit I wanted to try was $25.

Fabri-Ink

I chose the fluorescent set since the purple, turquoise, and green fit solidly in my little wedge of the color wheel.  The set includes refillable brushes, but that didn’t sound as fun as randomly dropping splotches of diluted fabric ink with an eye dropper!  The darker splotches were diluted 50/50 with water, and the lighter ones are about 25% ink and 75% water.

SG panels dyed

Things to keep in mind: I always pre-wash my fabric before it gets folded and put in my stash for use.  Never, ever, ever skip this step.  This removes any dust, dirt, or chemicals that may have gotten on your fabric from the manufacturing process or during freight.  You do not want that on your skin, cutting mat, or machine.  It also gets any possible shrinkage out of the way.  Ink is permanent, so protect your work surface, hands, and clothes.  I let the ink dry overnight (although it dries in a matter of minutes) then pressed it with an iron to heat set it.

Mark the back edge of each side pocket panel pattern piece with a clip to avoid confusion later.  To assemble the panels, fold the top edge of the pocket under 1″, press, and topstitch with a decorative stitch.  Lay the pockets on the upper pocket panels, right sides up, aligning the bottom edges, and baste along the sides.  Then lay the lower panel on top of the pockets, right sides together, and stitch.  Press the seam up (so it won’t be visible through the lower panel), and topstitch with a decorative stitch.

sew SG panels

With the side pocket panels done, you can simply follow the pattern tutorial to finish up your super fun Super G’s.

SG pocket foilageSG Jillian back

I’ll tell you a funny story about taking these photos.  This pretty foliage is along a rather busy road.  It can be kind of awkward posing for photos with cars driving by.  While posing so my husband could take a photo of the back of my Super G’s, I asked him if my booty looked good.  Right then a truck drove by and the young man in the passenger seat leaned out the window and whistled at me.  Straight-faced, my husband answered, “I think you have your answer!” 🙂 Hahahahahahaha!

Super G pocketSG side

I love these early morning photos because the colorful sky is a pretty backdrop for my super fun and colorful Super G’s.  And who doesn’t love the sound of the ocean as background music?

Sewing is an art, so don’t be afraid to experiment with it, and with other forms of art to make your own fun projects.

All fabric was purchased from Phee Fabrics.  The white Supplex workout top is the GreenStyle Jillian I hacked to have powernet inserts and a pocket, blogged here.  The teal and grape Supplex workout top is another fun hack I’ll be posting soon.

This post may contain affiliate links.  This means that at no extra cost to you, I may receive a small commission/credit if you purchase through my links.  As always, I only give my honest opinion.  After all, it is my blog, which represents me! 🙂  Thank you for reading and sharing my love of sewing, patterns, fabric, art, and pattern hacking. ❤

Sinclair Joanne Faux Wrap Dress & Top

Twirly dresses just make me smile!  As does Sinclair Patterns newest release, the Joanne Faux Wrap Dress & Top.  This is one of those patterns that I will make again and again.  The drafting is just so good.  It was obvious during testing that the design was a winner, because after sewing it up, I had to struggle to think of anything that I would change.  The only thing I could think of was to have the wrap swoop a little lower to get under the bust easier without causing pulling at the side seams, and that I would be comfortable with the skirt being an inch or two shorter.

Joanne1 angle

Other testers struggled to find anything to critique as well.  The dress just looks so good on everyone!  It will be hard for you to see the differences in my periwinkle dress (version 1) and my blue dress (version 2).  Very subtle changes were made to deepen the pleats a little bit so that the crossover was a smidge shorter at the side seams, and the skirt was shortened an inch or so.  There is also a midi skirt cut line, so if you want a longer skirt you’re good to go.   I literally couldn’t stop myself from twirling and swishing this skirt like a little girl! 🙂

Joanne1 blurJoanne full

Both of my dresses are sleeveless, because Florida is hot.  As in temperatures are still above 90*F in late September hot.  For that one month of winter that we get, I would really like to make a Joanne with sleeves.  Because there are options galore- short, 3/4, long and my personal favorite, a flounce sleeve!

Since the test went so well, Oxana (the designer at Sinclair Patterns) added a hi low peplum option and it is gorgeous!   She also added the shaped tie belt, which I love.  It really adds to the look of the dress and top.

Joanne tie

The genius secret behind having such a nice crisp bow?  The pattern tutorial suggests using knit interfacing.  If you’ve never used knit interfacing before, it’s a little different than the interfacing you use for woven fabrics.  It’s an open weave knit, so it still has some stretch, and you just iron it on the wrong side of your fabric.  Except you absolutely have to use a pressing cloth, or you will be spending some time cleaning your iron, and could ruin your garment with glue residue.  Due to the open weave of knit interfacing, the glue will spread when heated, and if you don’t use a pressing cloth, the sticky glue will get all over your iron.  Obviously, I am speaking from previous experience here! 🙂  The first time I ever tried it, I spent some quality time cleaning my iron after realizing that yes, you should read the directions included with your interfacing!  Here’s my pro tip: If you don’t have a pressing cloth, use a paper towel.  You will have to kind of peel your paper towel up after pressing, but the residue won’t come through the paper towel and it didn’t leave any paper fibers stuck to my belt.

My other tip for sewing is the same as I mentioned for the Sinclair Yasmin Dress blogged here.  Small pieces of Wash Away Wonder Tape are great for holding your pleats in place.  I also used a strip of Scotch Tape to ensure that they stayed in place until the side seams were stitched.

wonder tape pleatsscotch tape pleats

The Joanne is a pretty quick sew, and with all of the options, it’s bound to be a staple in my closet!  I’m envisioning a black or white rayon spandex hi low peplum top because it would go with literally everything!  And of course a couple more dresses!

Joanne sideJoanne back

I know I’m gushing, and probably oversharing photos, but the fit is great whether you look at it from the back or side.

Joanne1 twirl

I am grinning in every photo, and twirling in most of them.  It’s pretty obvious that I love this pattern!  During the release sale is the perfect time to buy the Joanne Faux Wrap Dress & Top pattern, as it is on sale for $7.99 through Wednesday September 25, 2019.  I hope you’ll check it out, and share photos of your makes!

I used Rayon Spandex from Phee Fabrics for both of my dresses.  It’s a substantial 13oz. fabric and works perfectly for this (and every other tank, top, and dress) pattern I’ve ever used it for.  The drape is perfect, and it has enough recovery to make excellent bands.


This post may contain affiliate links.  This means that at no extra cost to you, I may receive a small commission/credit if you purchase through my links.  As always, I only give my honest opinion.  After all, it is my blog, which represents me! 🙂  Thank you for reading and sharing my love of sewing, patterns, and fabulous fabric. ❤


Yoga Class Fun

If you follow my blog for sewing, you’ve likely seen that I sew a lot of workout wear.  It isn’t that I run, or spend hours at the gym because obviously, I don’t!  But I do love going to yoga class.  I’ve been practicing yoga for 16 years and besides walking the beach, it’s my favorite form of exercise.  Like anything else that you practice regularly, the more  you do it, the better you get.  I’m certainly not perfect, but it’s fun when I feel like I’m able to get deeper into a pose than I used to.  I’ve had some excellent yoga instructors over the years, and am happy that I’ve found a yoga studio with classes I enjoy, along with instructors and regular attendees who make me feel like I am part of a happy little tribe.

I’ve never been able to get photos while practicing, but all of the other “regulars” at Friday morning Ashtanga were on vacation, traveling, had work commitments, etc., so I was the only student.  Ashley, my favorite Ashtanga instructor 🙂 asked if she could take some photos as we did class.  I had to laugh when she said after class that she “felt like the paparazzi, trying to get all up in there, taking photos.”  Hahahahaha!  Since I am not some Hollywood movie star or otherwise famous, the paparazzi will never be taking photos of me, so I found this hilarious!

Ashley was discreet while photographing, so you’re not subjected to photos of my sweaty face, just my sweaty back!  Just for fun, here are my yoga photos:

fold side

It was super exciting to me when I was first able to get my head down on the floor during wide legged forward folds.

twisted side angle

My elbows feel like they’re pretty centered and vertical when I’m in twisted side angle, I’m almost to the center of my chest.

forward fold

There are so many variations of forward folds.

prayer hands

I really like this photo, the lighting was pretty.  Can you see the sweat dripping up my spine?  And can you tell that I never take off my cross necklace? 🙂  I need to work on getting my palms together though.

headstand

My Grandpa taught me to stand on my head when I was a little girl, so this isn’t a big deal, since I’ve always been able to do it.

headstand pike

It’s fun to be able to pike out of a headstand too.

If you’ve thought about trying a yoga class, I hope you’ll give it a try.  It isn’t all about being able to stand on your head.  It’s more about breathing, and learning to control your breath and your responses to the stressors in life.  It helps you build focus, along with strengthening and stretching your muscles.  As I’ve heard more than once, it’s a yoga “practice”, not a yoga “perfect”.  It is also a perfect time to pray.  I manage a couple of Hail Mary’s during the opening mantra, and an Our Father during the closing mantra.  Faith is an important part of life, and there’s never a bad time to pray.  I enjoy adding prayer to my yoga practice as much as I enjoy a quiet prayer while walking the beach.

Exercise, eat healthy foods, and take care of your body and soul.

If you’re curious about my workout outfit, the tights are the GreenStyle Super G’s, although I did hack the side pocket panels in this pair a little bit.  My workout top is the hack I did on the Stitch Upon A Time Titania Top, blogged here.  The Supplex, Powernet, and plush bra strap elastic were all purchased from Phee Fabrics.


This post may contain affiliate links.  This means that at no extra cost to you, I may receive a small commission/credit if you purchase through my links.  As always, I only give my honest opinion, because after all, it is my blog, which represents me! 🙂


Chelsea Pants Make Cute Shorts!

I wouldn’t normally start off a blogpost with a photo of my booty, but when you’re talking about a pants pattern, one of the biggest questions people have is, “Will it make my booty look good?”  Um, yeah! 😉  So, let’s talk about the above photo.  My husband has the thrilling task of taking photos of me in my sewing creations.  If you think it’s awkward standing on a public beach (where a good portion of the photos get taken) and trying to model without laughing at the absurdity of it, and trying to not look like a total doofus in every photo, can you imagine having to be the photographer?

“I need close, full body shots of the front, side, and back.”  “I need the light shining on the clothes so that you can see the details.”  “Can you get a close-up of the pockets (or straps, or whatever detail is important about said garment)?”  “Are my fat rolls showing too much?”  “Make sure I don’t have any weird wrinkles.”  “Is my hem nice and straight?”  You get the picture.  He puts up with my requests and awkward silliness while posing, and hurries to snap some photos before people walk, run, or swim into the frame.

He had already taken some photos of my Chelsea shorts earlier in the morning, and I kept my comfy shorts on when we went to hang out in a nearby city.  I wanted a better detail shot of the jeans style pockets I used, and the hedge and brick fence along a shady sidewalk looked like a good spot to take photos.  Being the good sport he is, he was more than happy to crouch down on a public city sidewalk to take a few photos of my booty!  The dog walkers and random passers-by probably thought we were a little weird, but, those are the lengths we go to for good photos!

The GreenStyle Chelsea Pants are a cute, on-trend pattern.  The legs have a nice flare at the bottom, and with bell bottoms rolling back into style again, they are a good way to ease into the look.  I am old enough to recall bell bottoms being “cool” during my childhood.  And for someone who is not quite ready to embrace the full bell trend, a nice flared pant is a great look.  If it were cold here, or rather, stayed cold here for longer than two weeks in January, a few pairs of Chelsea pants in Supplex would be the perfect addition to your work and play wardrobe.  They’ve got a seam down the center front of the legs, which gives them a slimming look.

Chelsea STS front

The pattern includes a fancy two-piece pocket design, but I decided to make a simple jeans style pocket as it works better for my phone.  You’ve heard me comment on the wonders of Wash Away Wonder Tape before, and let me tell you, pockets are another great place to use it.  In the past I’ve measured, pinned, pressed, and basted the edges of my pockets under so that I could place them on my pants.  Now I measure, lightly pin, press, then put a strip of Wonder Tape in the pressed crease.  The pockets stay perfectly straight, with no possibility of getting twisted or pulled out of shape when you sew them on.  As my Dad used to say, “Having the right tools makes the job a whole lot easier.”  Wash Away Wonder Tape is a handy “tool” to have in your sewing box.

It was easy to hack the pants pattern into shorts.  I knew I wanted a 6″ inseam, which is short enough, but not too short on my long legs.  So I marked my front and back pattern pieces 7-3/8″ down from the crotch points, which gave me the 6″ inseam, an inch hem, and the 3/8″ seam allowance.  Keeping my ruler parallel with the lengthen/shorten line assured an even hem.

Chelsea shorts length

Besides using a different pocket design and shortening the length, the only other alteration I made was adding to the crotch depth.  I have a bit of a booty, so extending the crotch point a little bit gives my pants a little more space where I need it, and keeps me from having a “wedgie”, which is never a good look!

The pattern tutorial is easy to follow, and the pants are a pretty quick sew.  I used Phee Fabrics circular knit for this pair, and the moisture wicking fabric kept me cool and comfortable while walking around on a 96*F day.

Chelsea STS sideSTS Chelsea back

The Studio To Street Top blogged here is a great transition piece for cooler mornings or chilly evenings, and I love the Deep-V back option.  This one is made out of circular knit, but you’d get a similar look by using Tricot.

I have three more Studio To Street Tops with long sleeves, all made out of Rayon SpandexRayon Spandex Ribbing and Cozy French Terry would be some other great fabric choices for this cozy top.  They are so soft and comfortable, and are a go-to for throwing on before heading out to yoga class in the fall and winter.  If it’s past tank top weather were you live, the Studio to Street is a great style to wear with your Chelsea’s whether you choose to make them shorts or pants length.

These are so comfortable I’m probably going to have to make a pair in Supplex.  You know, for that two weeks of “winter” we get here in Florida! 🙂

This post may contain affiliate links.  This means that at no extra cost to you, I may receive a small commission/credit if you purchase through my links.  As always, I only give my honest opinion.  After all, it is my blog, which represents me! 🙂  Thank you for reading and sharing my love of sewing, patterns, fabric, and pattern mashing and hacking. ❤

Mashing Patterns To Suit Your Body And Style

People sometimes comment in Facebook sewing groups that they can’t find a pattern that they like, or they want a certain style for the top, but a different look for the bottom.  Do you have patterns with certain elements that you absolutely love, and wish that you could mix and match them with elements from a different pattern?  Have you ever tried mashing those patterns together to give you a new look?  I find myself mashing and hacking patterns all the time.  It’s generally a good idea to make the pattern as designed at least once, to judge how it fits and looks on you.  Once you know how it fits, it’s easier to start playing with your patterns.

A pattern mash can be something as simple as using the contour waistband you love from your favorite workout pants on a different pants or shorts pattern.  I use a modified version of the Patterns for Pirates Peg Legs contoured waistband on P4P SOS Pants and it works great, blogged here.  Mixing and mashing sports bras with workout tanks can really personalize your gym wardrobe.  Like using the GreenStyle Power Sports Bra and mashing it with the body of the GS Lille or Jillian Tank to make a workout top.  It’s always fun to turn a top into a dress, like using the Stitch Upon A Time Aushui Tank and mashing it with the skirt of the Calista Bra, Top, Tunic & Dress.

Sometimes your mash will require a little bit of adjustment in order to work.  Like tracing the armscye from a pattern onto another pattern to ensure that the sleeves you want to use will fit the jacket, top, or dress.  Sometimes it’s a matter of making your best guess as to what will work, then trying it on and adjusting from there.

That was my  experience with last week’s pattern mash.  I wanted another new dress, and loved the flared skirt from the Sinclair Yasmin Dress.  Temperatures are still in the 90’s here, so a strappy dress seemed in order.  The Stitch Upon A Time Water Faery Twist & Swim Top (blogged here) fits well, so I figured that mashing the plain front version with the Yasmin skirt would make a super cute dress.  And I think it does.  But it took a little bit of basting and trying on to perfect my fit.  I knew that the V-shaped waistband from the Yasmin wasn’t going to line up with the bodice of the Water Faery, so I cut out the crop length Water Faery body to use as a waistband.  Since it’s technically designed as a swim top, the body is quite fitted, so that it won’t float or ride up when you go in the water.  Since I don’t plan to swim in my dress, I want the waistband fitted, but not too form-fitted.  Since I’ve been known to bake (and thoroughly enjoy indulging in) apple crisp this time of year, I decided to size up one on the “waistband”. 😉

Knowing how a pattern fits, and taking note of any changes you make to the pattern really helps the next time you make it.  When I made the Water Faery into a workout top, I narrowed and lengthened the straps and liked it, so this time I knew that cutting out strips 3″ wide & 14″ long would give me the perfect finished size.  Sewing up the bodice (which is an inner and outer layer of Phee Fabrics Tricot, with a layer of powernet sandwiched between) and straps was pretty quick and easy, and the fit was spot on.  Since I hate seam ripping, I just basted the “waistband” pieces together, and tried it on.  It was too loose under the bust.  So I graded the front waistband piece from my measured size at the top, and somewhat straight down, rather than angling in which gave me more of a rectangular rather than tapered shape.  With the width figured out, I stitched the side seams together and basted the outer waistband to the bodice, right sides together.  Then I pinned the inner waistband to the inside, effectively making an enclosed waistband.  It’s easier for me to keep all of the layers perfectly lined up by basting one layer on before pinning on the other layer and stitching everything together.  Before folding the waistband pieces down into place, I zigzagged 1″ wide elastic to the seam allowance, using the length recommended for my size in the Water Faery pattern.  This ensures that the waistband and skirt will stay down under the bust.

Then it was time to determine how long the waistband needed to be.  I wanted the flared skirt to start right at the natural waist.  Starting the flare at the narrowest part of the body gives the illusion of an hourglass shape.  My natural waist is quite high, pretty much right at the bottom of my ribs, well above my belly button.  It was surprisingly easy to find the perfect spot.  Since the waistband also had powernet sandwiched between the layers, it was definitely going to find the narrowest point for me!  Literally just bending side to side, forward and back, caused the waistband to roll up to the height of my natural waist.  I used my hem gauge to take note of the fact that the waist seam needed to be 1″ up from the bottom of the waistband in the back and on the sides, tapering to 1-3/4″ up in the center front.  Since I prefer using 3/8″ seam allowances, I trimmed 5/8″ off the back waistband pattern piece.  I used a ruler to taper from 5/8″ at the sides to 1-3/8″ at center front on the front waistband pattern piece.  Then I very carefully matched up the side seams of my bodice,  lined up the bottom edges, pinned the bodice together so that the center front and center back were on the two outside edges, and used my rotary cutter to trim off the excess fabric.

Adding the skirt was super simple, sew up the two side seams, match center points and side seams, pin all around, and stitch.  The most time consuming part was pinning up the hem.  I finished the hem with a simple zigzag stitch.  And Ta Dah!  I have a brand new fun and flowy dress!  Because I used powernet in the bodice, waistband, and straps, and elastic under the bust, I didn’t need to add swim cups or wear a bra with this dress.  And I’ve already had two random strangers ask me where I found such a cute dress.


WFY side

See how the seam where the skirt is attached runs perfectly parallel across the back?

WFY back

Laughing while modelling your makes is half the fun!

WFY hair

And of course I had to twirl!  Whenever you make a twirly skirt, you can’t help but twirl!

WFY wind

This pattern mash was a complete success, and something I’m bound to make again.  After sewing it, I realize it’s probably pretty close to the Water Faery Retro One Piece dress option, and that’s ok, because it looks like a great pattern.  Since I already own the Twist & Swim Top, and would never wear a one piece, I don’t feel like I have to buy the pattern just for the dress option.  (Although if you’re not yet comfortable with pattern mashing or hacking, it is a great option).

One of the best things about sewing is being able to personalize patterns, mixing and mashing, and hacking them to suit your body, and your style.  Are you ready to try a pattern mash?

This post may contain affiliate links.  This means that at no extra cost to you, I may receive a small commission if you purchase through my links.  As always, I only give my honest opinion.  After all, it is my blog, which represents me! 😉  Thank you for reading and sharing my love of sewing, patterns, fabric, and pattern mashing and hacking. ❤